The battery is one of the important elements of the machine. Without it, it is almost impossible to start the engine. Plus, it powers all energy consumers when the engine is not running and takes over the responsibilities of the generator.
Battery failure is a common and annoying problem. Practice shows that the contacts on the battery may become loose or the terminal may be damaged.
The first problem is not difficult to solve. Usually just tightening the fasteners is enough. With a broken terminal, everything is more complicated. Here it is already necessary to replace it. The procedure is not complicated, and therefore many people take it on themselves.
Why do terminals loosen and break?
The terminals on a car battery cannot be simply replaced. This element must be damaged, worn out or deformed.
This happens mainly due to the fault of the car owner himself. The following reasons are identified:
- Removing the battery and resetting the terminals. These elements are made from soft metals. It's mostly lead. But aluminum, copper and brass are also used. If you frequently remove the battery by unscrewing the fasteners, the components will wear out. At some point, the clamp loses its strength, and the terminal may even become deformed or break;
- Strong puff. Drivers make sure that contact is not lost. And then they use all their strength to tighten it. In practice this is not necessary. Excessive force will only damage the terminals. They break off and crack;
- Overheat. If there are problems with the contacts or wiring, the terminals may overheat. Poor contact and other problems lead to an increase in the temperature of the metal terminals on the battery. As a result, they become deformed.
Trying to repair the terminals on a battery is dangerous. It is better to immediately replace them with new and high-quality ones.
Features of electrical equipment
The electrical circuit of a Lada Priora car includes several main elements - front and rear blocks, control panel blocks, as well as engine control systems. All these elements are connected to each other by special plugs located on the left under the center console, as well as above the mounting block. Only the control panel and engine control system harness is located in the heating system shaft, on the driver’s side. It should also be noted that the rear block and the device are connected to the control device via an electrical package, which is located inside the car.
The main systems that the electrical circuit includes:
- heating unit, stove;
- optics, including main headlights, dimensions, fog lights, turn signals;
- windshield and rear window cleaning system, if provided for by the vehicle design;
- car central locking;
- electric windows.
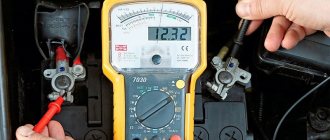
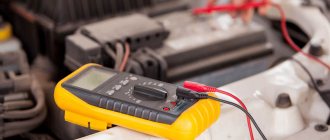
Diagnostic tester with test lamp for checking electrical circuits
Possible consequences
Not all drivers understand what damage to the terminals or loosening of their fixation can lead to.
In this scenario, the efficiency of the vehicle's entire electrical system is reduced. Some nodes may even stop working altogether.
There are several common consequences.
- Rapid battery discharge. Even if the parking was short, during this period the battery could lose all capacity. It is now impossible to start the engine;
- The starter is not working well. You may try to start the engine several times without success. But broken contact will not allow this;
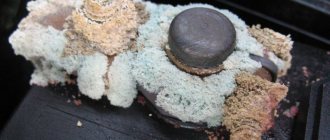
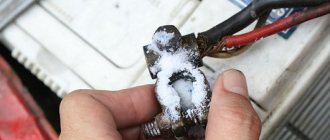
- Contacts are oxidized. A white coating appears on the terminals and electrodes. This is the result of oxidative processes. As a result, the battery may not charge properly while driving, and may also quickly discharge when stopped;
- Load on high-voltage wires. It is increasing. The result may be burnt wires and fires;
- Damage to electrical equipment. Systems operating from the on-board network may fail. Many components do not like voltage surges. Devices glitch, settings get lost, or simply stop working.
Timely maintenance and monitoring of the condition of the battery will help to avoid such consequences. If you notice that the terminals no longer hold or transmit charge correctly, they should be replaced.
Installation of additional wires on the generator and battery of the Lada Priora
Recently I began to observe a picture of voltage jumps in the on-board network and repeated discharge of the battery. Since I already have a three-level voltage regulator, I decided to do additional laying of power cables in the engine compartment. I went to the hardware store and bought a welding wire 16KG - 4.50m. So before the rework. Idling - 14.3 V
Low beam + music + heater =
13.2 V - 13.3 V
Low beam + music + heater + heated rear window =
13.0 V - 13.1 V
And if, with all these consumers, you also turn on the music much louder, then the voltage drops to
12.9 V Started work
1 .Plus from generator to battery plus.
2. Minus from the generator to the body and minus from the generator to the battery. 3. Plus from starter to battery positive. 4. Minus from the starter to the body. 5. Minus from the battery to the engine. 6. Minus from the engine to the body. 7. Minus from the battery to the body. The result of the whole alteration. Idle speed - 14.9 V
Heater on =
14.8 V
Heater + heated rear window =
14.6 V
Low beam on + heater 2 speed + music + heated rear window -
14.3 V
How to choose terminals
The market offers a large number of different terminals for batteries. Before replacing, you need to choose the appropriate option.
Differences between types of car battery terminals
The element must correspond to the dimensional characteristics of the standard terminals on the battery, otherwise they will not be installed.
Do not forget about the importance of matching the diameter of the fixing hole for connecting high-voltage wires. They should hold tight and securely.
As for materials, it is recommended to give preference to lead. The material is characterized by high conductivity. At the same time, it is soft and will not create a galvanic couple with the electrode. That is, a terminal or pin on the battery case. An alternative to lead is elements made of copper or lead.
If your car has a powerful audio system with acoustics, then you should take terminals that have additional places for fixing wires.
Kits or kits are also available for sale. This is the terminal into which the wire is pressed. It is considered a good solution, but its installation requires more dexterity and skills.
If the car did not have a casing protecting the positive terminal, then it is better to purchase and install it separately. This will prevent the negative effects of moisture, dust, and will also prevent an accidental short circuit to ground.
It is optimal to use quick-release terminals. They will eliminate the need to use keys and other tools, because in some cases the car has to be de-energized as quickly as possible.
Replacement process
It is better to carry out repairs in a heated room, since in the cold the insulation of the wires becomes tanned and destroyed. For the work you will need a set of keys or sockets, a flat-head screwdriver, and pliers. Sandpaper and a knife will not be superfluous.
Procedure:
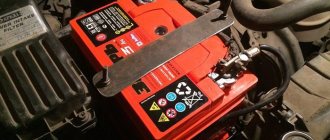
- As a rule, the positive terminal of the battery is replaced first. The car is de-energized and all energy consumers are turned off. You need to be prepared for the fact that some of the settings, for example, the clock on the dashboard, will go wrong.
- The power source is removed from the machine - the fastenings are loosened and removed from the socket.
- Remove worn terminals, which are usually secured with bolts or clamps.
- If possible, the cable is not cut so that it is enough to connect to the new contact. To remove the fastening, take a screwdriver or wrench. If it gets stuck, treat it with WD40. It is convenient to bend the clamps with the flat blade of a screwdriver.
- The exposed wire is cleaned of insulation residues with a knife.
- The veins are treated with fine-grained sandpaper to remove oxides.
- Take a new terminal, insert the stripped end of the cable into it and tighten the clamping bar.
- The contacts on the battery are carefully cleaned, the case is wiped dry, removing dust.
- Having replaced, the battery is put in place and connected to the “plus” and “minus”.
- To protect the contacts, apply a small layer of special lubricant.
Lubricating battery terminals.
If in the future, as the vehicle is used, problems become noticeable, then the negative terminal is also replaced. There are many machines where additional equipment or cables are connected to the contact group - they should also be checked for defects or damage and replaced if necessary.
Which one to shoot first?
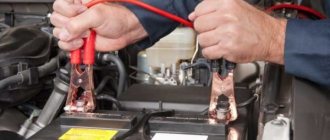
Before starting work, you need to turn off the power to the machine. To do this, turn off the ignition and disconnect the battery.
Experienced drivers can confidently say which terminal needs to be removed first. But for some reason, even they do not always follow this rule.
And failure to follow the order poses a potential threat. If you accidentally short it to ground, then all the electronics will burn out and the electrics will be damaged. The car could even catch fire. Therefore, you need to remember this once, and for the rest of your life.
The negative terminal is always removed first. After it, you can disconnect the positive one.
If everything is clear with this, then you can get to work.
Video “Do-it-yourself restoration of electrical wiring in Priora”
Visual instructions for independently restoring the functionality of the wiring in a Lada Priora car are shown in the video below (the author of the video is alecsey avtolekar).
One of the most vulnerable points in Priora is the fuel pump fuse, which often has to be changed and often done independently. Lada Priora in the minds of our motorists traditionally belongs to the category of cars that their owners repair themselves.
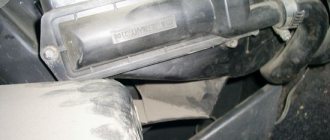
One important component is the relay and fuse box. It is also known as a mounting block. This is the most important component of the car system, which integrates all the electrical equipment of the car. This is what we will be talking about in this review.
Reasons for failure of the fuel pump fuse on Lada Priora
Let's take a closer look at the reasons why the fuel pump fuse fails. The performance of the fuel pump is associated with the following elements of the fuel system:
- on-board computer;
- the relay is designed to adapt high currents at the moment of starting the fuel pump, protecting against combustion, thus, a malfunction of the relay leads to a malfunction of the fuel supply;
- fuse located next to the relay.
The relay is easy to change. To do this, you need to unscrew its fastening in the additional compartment and replace the part with a new one.
So, on the Priora we found out where the fuel pump fuse is located - in the additional compartment near the fuel pump relay. The main function of a fuse is to protect an electrical circuit. When high currents occur, the fuse trips and the circuit opens.
Thus, the functionality of all other elements of the system is maintained. Protection can work at any time. The reason is usually current surges or overheating. In general, if the fuel pump fuse fails on a Priora, it protects the on-board computer from power surges.
Relay and fuse box Lada Priora
If we are talking about the failure of some element of the electrical equipment of the system, the inspection and repair of the car begins with diagnosing the relay and fuse box. This block in Priora is divided into three functional parts, which can be found in the following places of the car:
- The main mounting block is located on the left side near the driver's foot. The drawer opens by turning three locks 90 degrees;
- another fuse box is located near the expansion tank under the hood;
- the additional unit is located on the passenger side near his left foot.
The Priora fuel pump fuse is located in the additional mounting block on the passenger side; on the diagrams of the fuse and relay box it can be found under the designation F3 (15 A). K2 marks the location where the fuel pump relay is located. So, we figured out where the Priora fuel pump fuse is located. Now let's look at its functions.
Battery wire - overview of brands
Let's consider the most common brands of Russian-made wires used in the installation of automotive wiring.
PVA. This type of wire is intended for installation of electrical circuits of automobile vehicles. The highly flexible copper conductor is covered with polyvinyl chloride insulation, rated for voltages up to 48 volts. The wire does not propagate combustion when laid alone and is resistant to automotive fuel and oils.
The permissible temperature range when using PVA is from -40°C to +105°C. During factory testing, the wire can withstand temperatures of +135°C for 96 hours.
PGVA. Specialized automotive wire. The copper stranded core has a flexibility class of 3.
Less resistant to high temperatures, the permissible range of which is from -50°C to +70°C. Polyvinyl chloride insulation is designed for voltages up to 48 volts.
. Cable KG 1x35 mm2 can be used for making battery cables to power a car starter. Conductive copper stranded conductor of the 5th class of flexibility.
The outer sheath made of RTISHM rubber ensures the cable's operability at voltages up to 660 volts.