The VAZ-2114 and VAZ-2115 models are in stable demand. These are inexpensive, quite dynamic and comfortable cars, with affordable spare parts. From time to time they have problems with the heating system, many of which can only be solved by replacing the radiator of the VAZ-2114 or model 2115 stove. You can do this yourself, and without removing the dashboard, as required in the operation and repair manual.
Necessary diagnostic measures
It probably won’t be difficult for the driver to determine that the heating system has failed.
The following signs will indicate the need to replace the heater radiator on a VAZ 2114:
- There is a significant temperature difference between the pipes for heat supply and removal.
- The heating system works with obvious interruptions. Heat simply does not flow into the cabin.
- You can observe a leak from the heating circuit. Antifreeze will leak from the radiator.
Repairs should not be put on the back burner, especially if the onset of persistent cold weather is just around the corner. If the heat generator is faulty, the heater radiator on the VAZ 2114 needs to be replaced.
CABIN FILTER
One of the reasons why the heater in the interior of a VAZ 2114 stops heating the air normally is that the heating system is clogged with various debris and dirt. To prevent the entry of dirt and dust, a cabin filter is used; it is located between the engine compartment and the upper part of the heater housing. To replace it, you need to open the hood and find the filter protective housing; it is located just below the windshield, approximately in the center of the wiper panel. Changing an element is easy - just remove the old one with your own hands and install a new one. A cabin filter adapter has been developed especially for VAZ models (2108-2115); this design allows the installation of a modern type filter element. Replacing the element every 10 thousand kilometers will keep the heating system parts clean.
For what reasons does a malfunction occur?
It must be said that there can be quite a lot of reasons for this, but the most common of them are the following circumstances:
- There is a blockage in the radiator duct. During long-term use, this is a completely natural phenomenon in which the pipes simply become clogged with dirt.
- Factors contributing to natural wear and tear of the radiator. These include the following points:
- dynamics of temperature changes;
- the influence of atmospheric factors that lead to corrosion;
- internal pressure.
- Air ducts are not sealed.
- Heater motor malfunction.
- Resistor fault.
Naturally, metal wears out over time. A hole may simply form through which antifreeze will escape. All this dictates the need to take measures to replace the radiator heater on a VAZ 2114.
On average, a new stove radiator will serve its owner well for 5-8 years.
What to install?
Brand Pekar
Heating radiators used for the VAZ 2110 are usually divided into two types:
- Old style;
- New sample.
Until the fall of 2003, old radiators were installed on the “tenth” model, and then cars with new units began to be offered. There is practically no difference between them, but the repair differs in approach and complexity.
In addition to the standard aluminum radiator, a copper analogue is perfect for the VAZ 2110. This unit has fewer fins, but is characterized by more efficient heat transfer. This will make the stove work much better. The only drawback of a copper radiator is its cost. Ideal for installation on a VAZ 2110, a double-row copper radiator marked 2110-8101060 will cost you up to 2,000 rubles.
https://youtube.com/watch?v=7FXfxxBYNaU
If you don’t want to spend that kind of money, but want to get an effective device with high quality indicators, then choose the DAAZ model. This radiator is made of aluminum, works well, and the price does not exceed 1000 rubles.
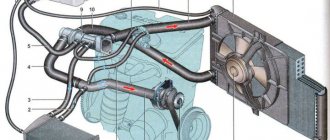
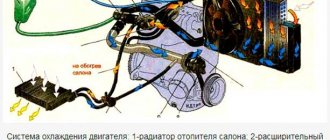
Heater design features
It must be said that the eighth and ninth family of VAZ cars have an identical heating system. In each case, the heat source is the main element of the car, which is represented by the engine. But the generated heat still needs to be conveyed, as they say, to the consumer. In this case, the coolant is antifreeze, which is supplied to the cooling system. It warms up the stove radiator. He himself is in a closed casing. It is blown by a stream of air, which is pumped by the heater turbine.
Heater design features: 1 — heater control damper lever; 2 — left heater casing; 3 — thrust of the foot heating damper; 4 — radiator gasket; 5 — heater radiator: 6 — heater seal; 7 - electric motor; 8 — fan casings: 9 — impeller; 10 — windshield heating flap; 11 — air duct for heating the windshield; 12 — side nozzle air duct; 13 - side nozzle; 14 — draft of the windshield heating flap; 15 — central nozzles; 16 — foot heating damper; 17 — right heater casing; 18 — heater control handle; 19 — crane control rod; 20 — heater control damper rod; 21 — handle for supplying air to the windshield; 22 — handle for supplying air to the feet of the driver and passengers; 23 — bracket for control levers; 24 — bracket for fastening the heater casings; 25 — internal ventilation air duct; 26 — window in the heater casing; 27 — heater control damper; 28 — lever for the foot heating flap.
There is an air duct for warm air to enter the cabin. If the heater radiator is cold, then we can definitely say that it is “sick.” This unpleasant situation can occur in all VAZ cars without exception. If the clogged radiator of stove 2114 is made of copper, then it will still last for some time. The case with an aluminum radiator requires immediate replacement.
We buy spare parts
When, having unscrewed the bracket, you discover that a crack has formed on the platform, do not rush to replace the platform, the crack can be welded. Sometimes, however, it becomes necessary to replace not only the bracket, the bolts on the crab VAZ 2109 and the platform to which it was attached also suffered ( and it happens that both platforms or both brackets, left and right):
Then in the car store we purchase a reinforced plate to which nuts are welded to attach the “crab”. When choosing, you should pay special attention to the quality of the welded nuts, since your safety when driving the car depends on this. If there is no particular choice, and the nuts were welded to the same bar welding point (well, or two), then you need to independently weld all the nuts in a circle, in order to strengthen their fastening with the plate. Definitely buy new bolts for the VAZ 2109 crabs, so that microcracks or other defects do not surface later. When choosing rod brackets, you should carefully choose not only the material from which it is made, but do not forget about the thickness. The best option for installation would be a bracket made of silumin, which has a maximum thickness of ribs. Since it is stronger than the factory one, however, will it damage the “TV” spacer in case of a strong impact? A cast iron bracket is stronger than a silumin , however, cast iron is also fragile and cracks when impacted, and besides, it can damage the spacer and the “TV”; the instructions don’t decide this issue for you. It’s worth paying special attention to the strength of the rubber cushion and its clip - the more powerful they are, the longer they will last will work out the detail We recommend choosing a crab that has a polyurethane cushion. Do not take an inexpensive one (the low price is alarming), or without packaging, we remind you of possible fakes! And don’t forget that there are right-handed and left-handed brackets and platforms; when replacing, this is of great importance
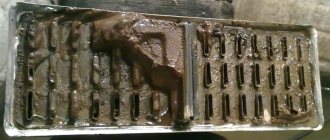
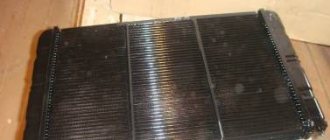
The best heating radiators for VAZ 2114
Structurally, heating radiators differ not only in the material used for their manufacture, but also in the presence or absence of turbulence. They are made from copper or aluminum.
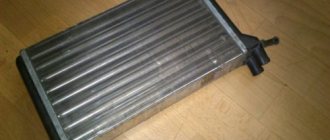
Copper radiators
Purchasing a radiator made of copper is an excellent choice. It has remarkable heat transfer properties; if the need arises, it can be repaired. The disadvantages are high cost and significant weight.
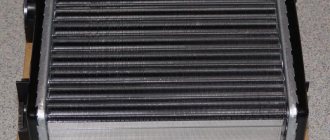
Aluminum radiators
Such radiators are much cheaper, but if they break, they cannot be replaced. Such devices heat up quickly, but also cool down so quickly. They are produced in a wide range and are relatively inexpensive.
The size of the honeycomb is of great importance. The smaller they are, the better the rapid heating of the air. But in terms of efficiency, they cannot compete with radiators with large cells, although, undoubtedly, the low price and light weight are positive aspects.
At the time of purchase, you should ask the seller about the presence of plastic swirlers or turbulators in the design. In their presence, better transfer from the liquid to the material of the swirler honeycomb is observed. If they are present, the efficiency of the radiator increases by 25-30%. From here it becomes clear that it is better to purchase a radiator with a swirler. The choice of material is at the discretion of the buyer.
What to put?
Conventionally, heating radiators for the VAZ 2110 are divided into new and old models. Until the fall of 2003, heaters for “tens” were installed of the old model, and subsequently of the new one. The differences between them are not that significant, however, repairing a radiator requires a slightly different approach, since there are minor differences.
You can also install a copper radiator on the VAZ 2110. Although it has significantly fewer fins than other types, copper has significantly higher heat transfer, and the stove heats better with it. One drawback is the relatively high price, for example, a copper double-row radiator (2110-8101060), its cost is about 1500-2000 rubles.
If both factors are important to you: real cost and normal quality, then the best choice is the DAAZ aluminum radiator, the average price is 700-1000 rubles.
Positions of radiators in the rating
A large number of radiator models offered by the manufacturer made it possible to arrange them in accordance with the rating:
DAAZ (article 21080-8101060-00)
DAAZ (article 21080-8101060-00)
The model comes with original packaging in red or blue. There are swirlers. The radiator itself has a small honeycomb size. Such a radiator can last the owner from 3 to 6 years. Aluminum is used as the manufacturing material.
Radiator with article number 1102-8101.100
Radiator with article number 1102-8101.100
The manufacturer is Orenburg Radiator LLC. Made from copper, with excellent heat transfer properties. The design is equipped with small honeycombs. Such a radiator will work no worse than the “native” device. The service life is up to 10 years.
Heater radiator luzar vaz 2114
Heater radiator luzar vaz 2114
This design is used more and more often by motorists. It is made of aluminum, but in terms of characteristics and quality it is not inferior to the “native” copper radiator. Has a large number of positive reviews.
AURORA
AURORA
This radiator costs the least of all, but also has the lowest characteristics. The radiator is made of aluminum of the poorest quality. In addition, airflow is carried out over a fairly small area. As a rule, it is used only in extreme cases.
Alaska
Alaska
There are no swirlers in the design. It has approximately the same cost as the Luzara radiator. Made from aluminum.
In any case, when purchasing, you should inquire about the availability of a certificate for the product.
Replacement of pads
If welding the platform does not make sense (the thread of the nut or the nut itself is broken, the bolt securing the VAZ 2109 crab is broken), then a grinder and welding will be needed here.
Tip: When starting to replace the site, be sure to close the radiator, and if welding is performed from the passenger seat, then also close the generator from sparks. There is no need to remove them; this is an additional and unnecessary waste of time and money (if the repair is carried out at a service station).
Let's move on to actions:
Attach the plate and mark the places for future cuts Using a grinder, remove the old pad, rusty metal and clean the areas around the cuts; when welding, it is important that the metal is clean. Before performing welding work, you need to remove both terminals from the battery. Weld the plate firmly. The quality of the seams is important here , it must be good, since the part operates under conditions of increased loads, so it makes sense to entrust this work to an experienced welder
The bracket is screwed to the overcooked platform, although the quality of the seams leaves much to be desired, and they were clearly too lazy to clean them
- To prevent your car from looking like in the photo, after completing the welding work, you should clean the seams and, to increase protection against rust, coat the surfaces with anti-rust (for example, Tamak) and cover with primer
- Attach the stretcher (if you removed it), screw the bracket into place, tightening each bolt of the VAZ 2109 crab (again, carefully, do not break the bolts) Then attach the bumper (see Removing the front bumper of the VAZ) and the lower protection
- In the future, when operating the car, it is recommended to check the brackets after each strong impact.
- It is recommended not to drive with a broken (split, cracked) “crab” unless absolutely necessary (this is dangerous for the health and life of people around you and for you too). Faulty (damaged, cracked) “crabs” discovered in time should certainly be replaced with new ones as soon as possible
- This measure will help save your money, as well as your health and life. Replacing the brackets is complete, everything is simple and completely doable on your own.
Didn't find the information you are looking for? on our forum.
We recommend reading:
Ignition switch pinout for VAZ 2109 injector. 2101-2107-2109-2110
How to check the VAZ 2114-2115 heater motor, causes of failure and solutions
Three-level voltage regulator for VAZ 2114
How to remove the gearbox on a VAZ 2107
Fastening the beam to a VAZ 2107
Repair of the underbody of a VAZ 2107
Installing hydraulic compensators on a VAZ 2107 carburetor, why compensators are needed, how they work
What is the best oil for VAZ 2114, manufacturer’s recommendations, replacement process
How to change the radiator on the stove on a VAZ 2114?
It should be noted that replacing the radiator of a VAZ 2114 stove involves two methods.
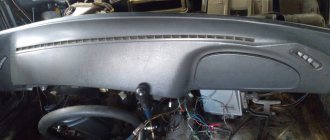
- In the first option, it is necessary to remove the torpedo.
- In the second option, the dashboard is not dismantled.
Any professional will prefer the first method without the slightest shadow of doubt. Any master mechanic at a service station will replace the VAZ 2114 heater radiator, having previously disassembled it, as they say, down to the last nut. This is quite a painstaking job, involving a lot of nuances. It is simply not possible for a beginner. This can only be done by someone who has repeatedly had to assemble and disassemble the dashboard. A car enthusiast of insufficiently professional level will prefer to remove the VAZ 2114 radiator heater in a way that does not involve the need to dismantle the dashboard.
On a note . There is a purely folk way of replacing a VAZ 2114 stove radiator. It requires cutting out the bottom. After this, the newly minted mechanic crawls under the radiator and quickly removes it.
Of course, you will need the necessary set of tools for the job. It includes screwdrivers, wrenches, pipe clamps, and some other repair tools. Naturally, a new radiator itself is needed. You can change the stove by replacing only the radiator itself.
Algorithm of actions
When replacing the radiator of a VAZ 2114 stove, you must perform the following steps:
- You need to turn off the car and open the hood. After this, the car should be de-energized by removing the wires from the battery terminals. All antifreeze present in the stove must be poured into a previously prepared container.
- The heating regulator should be set to a position where it is at maximum heating of the interior.
- Then you need to remove the plug that is located on the heating circuit. Actions should be carried out as quickly as possible, otherwise antifreeze will splash on the generator. In order for the liquid to flow out faster, you can open the cap, which is located on the antifreeze tank itself.
- It is necessary to take safety measures to ensure that the seats in the cabin do not get dirty. The rear seats should be moved back and reclined. On top they are covered with oilcloth and an old blanket.
Important! Replacing a stove radiator on a VAZ 2114 is not a quick process, so the car owner will need a lot of patience.
- Then the central pillar is unscrewed. The fasteners are unscrewed from both sides to the floor, and the self-tapping screw is unscrewed from above. In addition, the side fasteners unscrew. The caps of some fasteners are closed with plugs, and they are invisible. This is something to pay attention to.
If the radiator of a VAZ 2114 stove is being removed, the dashboard is disassembled in accordance with the technical passport. In it, the places where the fasteners are located are marked in detail. This is due to the fact that there are various modifications of the VAZ 2114. Some variants have certain nuances. For example, a VAZ 2114 with a radio is different from what comes standard.
- Then you should unscrew the dashboard mount. This must be done so that the dashboard, as they say, shakes. At the moment when the radiator is removed, this is very important. In other words, it is not thoroughly disassembled, but simply moved away.
- Then you need to get to the cables that regulate the heating tap.
- Next, you need to remove the protective casing from the radiator.
- The ducts are secured with clamps. They also need to be removed.
- Now, when replacing the radiator of a VAZ 2114 stove, you will need an assistant. Together with your partner, you need to lift the dashboard and pull it towards you. Such actions are necessary in order to remove the old radiator and install another device in its place. This is done with utmost care to avoid any damage.
It is necessary to remember that when removing the radiator, antifreeze may pour out, which may flood the electronics and for this reason they may fail. Therefore, you need to be extremely careful.
- After installing a new radiator, assembly is carried out in the reverse order.
Please note that after assembly the circuit must be refilled with service fluid. Then the heater is pumped. It is recommended to thoroughly heat the interior. Then the engine is turned off. If the need arises, antifreeze must be added to the tank.
The heating system of the VAZ 2114 may be faulty for other reasons.
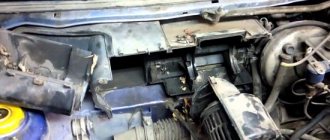
Replace without removing the panel
But no matter what method is used, you will first have to drain the coolant from the system. Therefore, you will have to stock up on antifreeze in the required quantity in advance.
First, let's look at the replacement method without removing the panel. As already mentioned, this will require making cuts in some places.
To complete the work you will need:
- Set of screwdrivers of different lengths;
- Hacksaw blade for metal;
- Flat container for draining residual coolant from the radiator;
- Rags.
Having prepared everything and drained the coolant from the cooling system, you can begin work:
- We remove the storage box (glove compartment) from the panel, for which it is necessary to unscrew 6 screws securing it;
- Remove the side trims on the center console;
- Use a metal blade to make the necessary cuts: The first cut is vertical
, we do it on the inner wall of the panel near the center console (behind the metal strip of the glove compartment). Moreover, here you will have to make two cuts.
The second cut is horizontal
, runs in the upper part along the rear wall of the opening under the glove compartment.The third one is also vertical
, but not end-to-end. It is done on the right on the rear wall of the lower storage shelf of the panel;
- After all the cuts, part of the panel together with the wall can be bent down, which will provide access to the radiator. We bend this part and fix it;
- Unscrew the near bracket for fastening the heating system flap control cable and move the cable to the side;
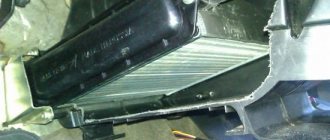
- Loosen the clamps of the coolant supply pipes to the radiator. In this case, you should place a prepared container under the connection points, since liquid will flow out of the heat exchanger. Remove the pipes;
- We unscrew the three screws securing the radiator, remove it and immediately inspect it.
Afterwards we replace the heat exchanger, fix it in the seat, connect the pipes to it and clamp it with clamps. To make the pipes fit easily, lubricate them with soap.
At this stage of work, you should fill the cooling system with liquid and run it to remove air pockets.
Next, it remains to make sure that the connections between the pipes and the radiator are not leaking, and that the damper and faucet are connected without errors.
POPULAR WITH READERS: Choosing an oil brand for Lada Vesta 1.6 l
After this, all that remains is to return the cut part of the panel to its place and fix it. To do this, you can use screws and plates.
The main thing is to fix it in several places so that in the future the cut off part does not rattle when moving. Use sealant or silicone.
This method is convenient because if you replace the radiator again (which is quite possible), all the work will be very simple - you just need to remove the storage box and unscrew a few screws.
In addition, all cuts are made in such places that after assembling the panel and installing the glove compartment they will not be noticeable.
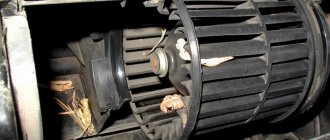
Replacing the heater motor
The following sequential steps must be performed:
- The electrical network is completely de-energized.
- The positive wire should be disconnected from the motor. It is located under the dashboard.
- It is necessary to unscrew two bolts located in the engine compartment. They serve to hold the stove casing.
- Then you need to disconnect the mass.
- Unscrew and remove two bolts that serve to secure the fan to the heater housing.
- The air duct grille is being dismantled. To do this, the element is rotated 90 degrees and removed from the casing.
- The device should be assembled using the reverse sequence. The power supply contacts must be securely fixed. Otherwise, the assembly will have to be disassembled a second time.
Order of Operations
If the car has a low seating position or the coolant drain tank is large, work should begin by lifting the car with a jack. The radiator is installed on the TV along with fog and regular headlights. Work should only begin with a cold engine. If the engine is hot, be sure to wait until it cools down.
On a note! Mandatory conditions for performing operations are strict adherence to the sequence and extreme accuracy. Because the engine cooling system is one of the main ones in a vehicle. In parallel with the replacement, it is advisable to revise it and make sure that other components are in good working order and are working properly. Regular maintenance of the cooling system is the key to long-term and efficient engine operation and a reduction in vehicle operating costs.
Now you can get started:
After removing the plug from the expansion barrel, the working fluid is drained into a container. It is necessary to drain all the antifreeze that is in the cooling system. Now you need to dismantle the filter. The radiator must be removed together with the electric fan. To do this, you need to disconnect the power supply to the cooler. Now you need to unscrew the pressure plate and remove it. Now you need to remove the inlet and outlet hoses from the pipes. To do this, loosen the fastener clamp.
The radiator with fan is tilted towards the engine and removed. Attention! Before pulling out the fan, you need to disconnect the wires. They are usually located at the bottom of the device. This is necessary in order to maintain the functionality of the wiring.
Now you need to disconnect the fan from the radiator. To do this, use a 10mm wrench to unscrew 2 nuts. The fan must be removed along with the casing. Installation of the radiator is carried out in the reverse order to that described above. It starts with switching the new node and fan
Important! Before replacing, make sure that there are 2 rubber cushions. If they are missing, install new ones in the crossmember holes.
If they are in place, then the installation of the new unit is carried out on them.
We adjust the damper of the VAZ 2114 stove
All work is performed in the following sequence:
- It is necessary to remove the bracket holding the cable sheath to the housing.
- On the left is a yellow galvanized lever. It should be taken over. This position indicates his maximum openness.
- To adjust the length, the cable should be pulled. The correct arrangement is when the long lever, when moved to the right position, is on the lever block. In this position, the device is considered to be maximally open.
- When the adjustment is completed, the cable is securely fixed.
Fuses and relays
Fuse box
One of the simplest and most unpleasant faults is a blown fuse. It is simple because anyone can replace a fuse, but it is unpleasant because it can be very difficult to determine why it blew. Typically, fuses blow due to a short circuit in the electrical wiring. On VAZ 2114 cars, the 30-amp fuse F7 is responsible for the heater, on which the cigarette lighter, glove compartment lighting, electric headlight washer motor and rear stack heating also depend. Accordingly, all this will not work together with the stove.
Replace the additional heater resistor
The operating speed of the stove on a VAZ 2114 car is regulated by an additional resistor. Its design provides for the presence of two spirals with a certain resistance. If the heating system operates in the first mode, then the current passes through two spirals. If you turn on the operation at second speed, the current will flow through one spiral. When using the third speed, the current will flow bypassing the resistor altogether. The location of the additional resistor is in the place under the gas pedal.
For the most part, repair of this part is not required, but it often fails due to the fact that the contacts burn out. In this case, they need to be cleaned. It is possible that the block may melt.
First of all, it is necessary to remove the left trim, which is located on the instrument panel. Then you need to disconnect the wires from the additional resistor and remove it, after unscrewing the screw. Visually inspect its integrity. Use a multimeter to determine the presence of a break. If it is found, the part is replaced. Assembly must be carried out in reverse order.
In conclusion, it must be said that replacing a VAZ 21114 stove radiator is quite a painstaking job and requires certain experience and knowledge. Therefore, to solve this problem, it is better for beginners to seek help from service station specialists.
On-the-go preventative cleaning
This method is recommended to be implemented in the absence of frost - in summer, early spring or late autumn. The reason is to fill the cooling system of the power unit with distilled water for several days. Due to night frosts, heat exchanger tubes may crack due to ice expansion. It is permissible to carry out flushing activities in winter if the vehicle is stored in a warm garage and does not remain outside for a long time.
How to do this cleaning:
- Completely drain the engine cooling system.
- Take the required amount of distillate corresponding to the volume of the system. Heat the water and dissolve 100–150 grams of citric acid in it.
- Pour the product into the antifreeze area and make sure there are no air pockets.
- Ride in water with citric acid for 4-5 days, then drain the solution. Fill the engine cooling jacket and pipeline network with new antifreeze of a suitable brand.
Washing “on the go” is a preventative measure. A heat exchanger heavily clogged with scale cannot be cleaned using this method; a higher concentration of acid and backwashing are required.
Problem with switches
To test the heater switch, you need a simple 12-volt light bulb with two wires. It is necessary to remove the central part of the instrument panel and do the following:
1. Turn on the ignition; 2. We connect the negative contact of the light bulb to ground with a wire; 3. We connect the positive contact alternately to outputs 1-2-3 on the additional resistor.
If the light comes on, the switch is working properly. Otherwise, the problem may be a blown fuse or an open circuit. If only the third speed does not work, you need to replace the additional resistor.