The Daewoo Nexia model is an example of a combination of a car that has outlived its age and new modern developments. Every element of the car's design, including the brake system of the Daewoo Nexia, was copied by the company's engineers from the old Opel Cadet model. These guys managed to change its appearance and make improvements in such a way that the resulting car is still relevant among car enthusiasts to this day.
The model turned out to be quite comfortable and almost fully satisfies the needs of a certain number of car owners. However, in this article we are not interested in the “heart” of the car, or even the interior, but in the design features of such a unit as the Nexia brake system, which we must understand.
General principle of the device
Each brake system of various car brands has one common operating principle - at the first press of the brake pedal, they reduce the speed of the car to the level desired by the driver. The generation of braking torque helps to cope with this responsibility, in which the force is inversely proportional to the force with which the wheels rotate and is directed at them at the place where the wheels come into contact with the road surface.
Each car model is developed in such a way that it has not just one brake system option, but several. Daewoo Nexia brake system consists of service, emergency and parking brake systems.
Replacement tool
On Lanos, pads can be replaced directly on the ground, without jacking up the car.
- Screwdrivers (flat and Phillips).
- Pliers.
- Metal brush.
- Hammer.
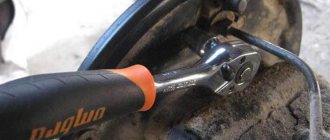
- The key is "24".
- Wrench for removing the handbrake tension nut.
- WD-40.
Rear brake pad replacement process
- Unscrew the nut that secures the parking brake cable.
- Unscrew the wheel bolts.
- Remove the wheel.
- Unscrew the hub nut.
- Remove the drum. Here it may be necessary to drill out the mounting bolts, since they are often welded during operation.
We dismantle the brake drum.
We got to the blocks.
After the initial inspection, we dismantle the pads with a screwdriver.
When inspecting the brake drum, grooves were found; it is better to replace it.
The rear pads are in place. Let's go get the drum.
We put the drum back.
At this point, the work of replacing the rear brake pads on a Chevrolet Lanos can be considered complete.
Operating principle of the parking brake system
Each of them must be considered separately. The parking brake system is responsible for keeping the car stationary during long periods of parking in one place. Among car enthusiasts, this system is called a hand or parking brake. It is the handbrake that is also an emergency option for braking the car in the event of a malfunction in the working brake system. Achieving immobility of the car using the parking brake is possible thanks to standard mechanisms that are installed on the rear axle of the model.
At the moment when the driver raises the parking lever, a special cable is tensioned, which fixes the rear wheels in a given position. The presence of a special ratchet in the design does not allow the handbrake to lower to its original position.
The working system is activated after the driver presses the pedal. Such brakes are designed to provide a systematic reduction in speed. It is impossible to use a parking system for these. But the handbrake can become an indispensable assistant when there is a need to move away while on a slope.
General rules for repairing the brake system of various car brands are described here. What is the brake system of the VAZ-2109 and what faults can most often be found in it, see here.
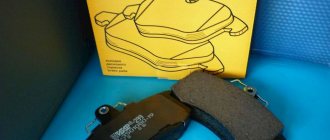
Replacing rear brake pads on a Daewoo Nexia: photos and videos
Sangsin SP - price rub.
Hankook Frixa FPD02 - price RUB. NiBK PN - price rub. Caliper C type Engine 1. GM Original pads - price RUB.
Yes Q ESD — price RUB. Fenox BP - price rub.
Engine 1. Original pads - price RUB. Sangsin SA - price rub. NiBK FN - price RUR Which brake pads are better for the Nexia When it’s time to change the pads for the Daewoo Nexia, the best choice would be the original components for the rear brake pads for the Daewoo Nexia Sangsin, which supplies spare parts to the assembly line.
But when there are none, you can also pay attention to analogues from well-known brands. Brake cylinder malfunction
Driving style and operating conditions. Resource There are cases when the rear pads last for thousands, and it happens that the linings crumble after five thousand runs. If we get lucky. That is why you should listen carefully to the operation of the rear brake mechanisms.
Brake pads for Daewoo Nexia cars in Ukraine
Just listen, because the intensity of braking and the sound made by a worn pad will indicate that you need to look for a new set and replace it. Choosing rear brake pads for the Nexia Fortunately, there are no problems with choosing pads for the Daewoo Nexia.
From the Daewoo Nexia factory, rear brake pads for the Daewoo Nexia with pads from Hi-Q, which can be purchased also. The fact is that exactly the same pads are installed on Lanos and Sensami, and on Espero and Nubira, and on budget Chevrolets, all of them are grandchildren of the Opel Kadett.
Here are the most popular brands that produce the pads we need: Catalog number SA This is practically a native company that supplies pads to Daewoo factories. And not only for Daewoo, but also for Kia and Hyundai. The quality is always excellent, the price is always reasonable.
Article We don’t know much about them, but car enthusiasts actively used them about 20 years ago. German pads of excellent quality at a high price.
Brake pads for Daewoo Nexia
Twice the price of the original. Rider Hungary catalog number A budget option if you don’t want to spend money, but still go. German Ferodos are well known among us, but they are not sold. The most expensive from this list. The quality is, of course, excellent. The price is about rubles.
Article number FSB In addition to the pads, it is advisable to buy a repair kit, which includes almost the entire brake mechanism - spacers, springs and retaining springs with washers.
The price of a complete repair kit for one side is about rubles. Catalog number - All that remains is to change it all.
Brake repair kit. Replacement algorithm Due to the fact that during the work we will need to loosen the handbrake cable, it is more convenient to carry out the work either on the inspection hole or on a lift.
Operating principle of the system and working mechanism
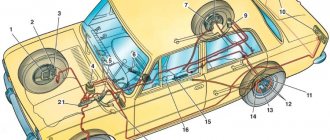
The brake system diagram of the Daewoo Nexia is very unique. For this reason, it is better to divide it into a working mechanism and a drive, while each element must be dealt with separately.
The brake system of the Nexia model is equipped with both drum and disc brakes. This was done with the aim of completely or partially blocking the rotational movements of the car’s wheels.
The front axle of the model is equipped with a disc system, and the rear axle is equipped with a drum system.
A disc brake system consists of a caliper, pads and the brake disc itself. The support in this design is fixed above the rotating disk using a bracket. The caliper has small grooves designed for working drive cylinders. In addition, the caliper contains pads that are pressed very tightly to the body using springs. Each of these pads has special friction linings, which are made of a material that can withstand high friction temperatures.
The brake disc is screwed to the hub using bolts. This is done in such a way that it can rotate simultaneously with the wheels. During braking, the disc becomes very hot. To solve this problem, special ventilated discs are installed on the machines, with holes made on the surface.
The most expensive versions of the model can be equipped with discs that are made using ceramics and are more susceptible to the friction process. They also allow you to reduce the braking distance of the car to a minimum.
The operating principle of the drum mechanism is identical to the disk mechanism. However, the design features of this design are visible to the naked eye. In this case, the working drive cylinders, together with the shoe mechanism, are located in the drum housing. The drum itself is very similar to a flat plate with large edges. This part is installed on the hub and rotates simultaneously with it.
Inside there are pads that are supported in their original position by a spring. The working cylinders are also installed in the same place. The difference between the drum system pads and the same parts of the disk system is the wider plane section of the first option.
Daewoo Nexia Lady in white › Logbook › Rear brake maintenance (extended)
It’s like in the movie, “Every year...”
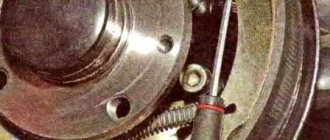
So, every summer I service the rear brakes to be sure that everything is OK with them. I already have a topic in the BZ Here, and many people have taken advantage of it, which is very nice. I decided to additionally create a topic with some clarifications on how to do it correctly and better so that everything works like a clock. And don’t believe anyone that the Nexia has no rear brakes and the handbrake doesn’t hold, if you do everything correctly, everything works as it should. True, the RTS set it to 3/40 (I didn’t drill or remove anything in the RTS, I just replaced it). The handbrake worked throughout the year and you need to use it so that the cable does not “sour”, at least from time to time. In winter, do not leave it on the handbrake for a long time, but you need to use it periodically. This is advice for you. I will try to write in more detail. We turn off the car, put it in gear, put shoes under each wheel (except for the wheel that we will remove), jack up (for example) the left rear side, place them securely MUST! something for safety (against a sudden breakdown of the jack, for example), remove the wheel. We climb under the car (from a hole, of course, it’s better), unscrew the two screen nuts with a 10mm wrench.
This is necessary in order to properly insert the key to release the handbrake. Take a 13mm wrench and unscrew the parking brake tension nut until the cables are released (the tension in the cables drops). Release the handbrake and use a Phillips screwdriver to unscrew the screw securing the brake drum. We are now trying to remove the drum itself. I easily removed it with movements in different directions. If it cannot be removed, you can take a wooden attachment, place the attachment at the end of the drum and try to tap it with a hammer, not too hard, and turn the drum from time to time. But you can’t hit it directly with a hammer; you can damage the drum itself. We removed the drum and we see the picture (of course it won’t be very clean), since waste from the brake pads will be everywhere, and the system is designed in such a way that this dust has nowhere to go, it settles on everything.
To avoid the release of the working cylinder cylinders and leakage of brake fluid, we tighten them with a tie.
In order to remove the pads with the entire mechanism, you need to press on the locking washer, turn it 90 degrees, remove the spring and pull out the rod, and do the same with the second pad. Now you can remove the mechanism itself (at the same time free it from engagement with the handbrake cable.
We clean everything with a metal brush. Checking the working cylinder. We remove the tie and the cylinders themselves should come out something like this.
Now we’ll try to press them in with our fingers; they should press inward with little effort.
Let go and the cylinders come out again, as in the picture above. We check the anthers, if everything is fine, put the tie back on. After cleaning, I coated it with a rust converter; it dries quickly in the summer.
The cylinder boots (on the inside and outside) were lubricated with grease from Toyota 08887-01206
, just designed for anthers and more.
We apply anti-squeaking lubricant containing copper to the shield where the pads will contact.
Now we look at what needs to be replaced from the mechanism: heavily rusted springs (about to break off), pads, washers. Special attention should be paid to the spacer bar with a ratchet nut. The thread must be clean, the nut can be easily rotated along the thread, and the nut slots must not be licked. Now about the main thing.
When buying repair kits, be careful (it’s better to immediately buy the original, but it costs more and only consists of a small number of components).
Here it is 96395382, 96395381.
I found a long-standing RK, not the original. The slots on the nut are made in the wrong direction, so the automatic drive will not work (you can, of course, screw the nut on the other side, but this is not our method, it’s not correct, and the tongue may not reach the slots on the nut).
Who doesn't have a castle washer? 94525222
, we will definitely set it. I didn’t have it then and installed a steel washer with vulcanized EPDM rubber that goes along with a KRS self-tapping roofing screw. Available at any hardware store. Internal 6mm. Outer 16mm. Came out as an alternative to the original one.
A year later she showed herself well.
When everything has been checked and replaced, we put the mechanism in place. It is better not to remove the lower spring (large), but to put on the pads in engagement with it, starting from the bottom, before this you need to hook the handbrake cable bracket to the lever. We fix the pads (rod - spring - washer). It's better to do it with this tool.
Shown as an example, it’s better not to use such washers, but to take original ones 93740526
, or install your original ones (previously cleaned and treated with a rust converter). Because non-original ones are made from “cabbage”, it is easy to bend, and the likelihood that the washer will not hold up and after a while will bend, the spring will fly out and the block will come out of its place, can be quite a nuisance. So it's better to warn you.
Fully tighten the spacer bar nut and place it between the pads. The protrusion of the bar should be outward, the tongue will cling to it. Indicated by the arrow, put on spring No. 1 last.
Once again we check whether everything was done correctly, put it on, and everything is engaged. We check the self-feeding manually with the drum removed, use powerful screwdrivers evenly on both sides to manually spread the pads, while the self-feeding tongue should go down, catching the ratchet nut (into engagement) and turning it, remove the screwdrivers, the pads are compressed, the tongue should go up. We put the drum on and fix it with a screw (it is better to lubricate the screw threads with anti-squeak grease), it should be easy to put on. We get into the car, turn off the gear (we have boots on, so the car won’t roll). We start the engine, begin to press the brake (press quite sharply - release, wait 3 seconds and press again), with each press the click of the auto-advance was heard, when the clicks stopped, i.e. the pads were kept under. You don't need to do anything else. We turn off the engine and check how the drum spins (it should spin easily (it may rustle a little when twisted)). If desired, paint the drum with heat-resistant paint. I renewed. Color matte black.
Do the same on the other side. Afterwards, use the tension nut to tighten the handbrake cable three clicks. In this case, when the handbrake is released, the wheel in the suspended state should spin quite easily. We check both sides. We put the heat shield in place and secure it with nuts. Don’t forget to check the tightness of the wheel bolts (I had it once, I tightened it, but didn’t tighten it properly, it was on the front wheel, then I was driving and wondering where the vibration was coming from. Luckily, everything worked out fine). It takes up to 3-3.5 hours on both sides. Not so much, but you drive more or less calmly for a year. Here is a small FAQ on servicing rear brakes.
Drive mechanism
The Nexia model is equipped with a hydraulic drive, which means that the brakes are activated due to the pressure on the fluid in the circuit. The brake actuator plays an important role in the process of controlling the braking system of a machine.
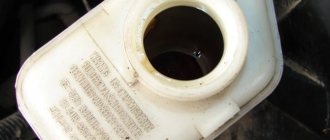
When the driver presses the brake pedal, the first pressure is created, which is transmitted via a cable to the master brake cylinder, which has a vertical location.
In the design of the upper part of the cylinder there is an expansion tank, under which there is a piston that makes translational movements and pumps up the pressure in the brake circuit. The circuits in this braking system are located strictly separately: one is located on the front axle, the second on the rear. When a person behind the wheel presses the brake pedal, this action is sensed by the brake cylinder and the valve closes. This sequence results in the liquid in the circuit being in a completely sealed state. Next, the piston begins to move down and creates pressure. When it reaches the working cylinders, the latter begin to expand and, thereby, press the pads against the drum or disk, which leads to a decrease in the speed of the car.
When the driver takes his foot off the brake pedal, the system is put into a relaxing mode, in which the piston of the master cylinder rises to the top, and the valve opens and allows excess fluid to flow into the expansion tank.
To assist the driver in controlling the application of force when pressing the pedal, the brake system is designed to include a vacuum booster, the purpose of which is to create additional force on the piston. For this reason, the brakes begin to operate even from a very light touch of the pedal.