If your headlight or turn signal bulb has burned out, you can easily replace it yourself. The fact is that lighting fixtures in modern cars are designed in such a way that replacing a light bulb is done in literally two or three movements. Of course, the replacement procedure may depend on the specific make and model of the car, but in general, this is how you should proceed.
remember this
Please note that the glass of halogen light bulbs should not be touched with your hands - otherwise they will quickly fail (this can happen almost immediately after turning on the light bulb, the reason is fingerprints left behind). If you need to take the light bulb by the glass part, use a piece of paper, polyethylene or clean cloth for this.
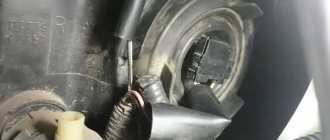
Open the hood and see how you can get to the back of the lighting fixture with your hand from the engine compartment (Fig. 7.4)
Then remove the socket with the light bulb (usually, you need to squeeze the antennae of the socket with your fingers or simply turn the socket in a certain direction). To remove the light bulb from the socket, you do not need to twist it - usually it is removed with a slight movement of your fingers. Then insert the light bulb into the socket, and the socket in its original place, and then check the operation of the lighting device.
1Replacing the turn signal bulb
Turn signals are important elements in any car (in principle, there are no unimportant parts in this mechanism, as in any other). After all, it is thanks to them that the driver shows other road users his maneuvers - in this case we are talking about turning.
Unfortunately, in modern cars it is not so rare for the turn signal bulbs to burn out, which leads to the absence of a signal sign during the next maneuver on the roadway. In this case, replacing such a part becomes mandatory, and the sooner you do this, the safer you will move on the road and become safer for other road users.
First, let's look at how to replace the light bulb in the turn signal of the front headlight unit. The diagram of this process is simple, so it won’t be difficult to handle this process yourself:
- First, the driver must turn off the ignition. Any process that the driver wants to start in the car should begin with this procedure.
- Open the hood. It is best to fix it so that further actions carried out in the repair process are completely safe for the driver or the person who will be replacing that light bulb.
- The next step is to find the turn signal bulb socket under the hood, grab it and immediately turn it counterclockwise to remove it. It should be noted that you need to remove the socket together with the light bulb, therefore, you need to take them out carefully and slowly.
- In this case, there is no need to disconnect the contacts - this is an important point in the process under consideration.
- It is clear that you will have to acquire a light bulb in advance, or first take the lamp out from under the hood, go to the store with it and buy a similar one, but a working one and a new one.
- Now it's time to insert a new light bulb in place of the burnt one. We also do this carefully, insert it into the recess for the turn signal bulb and scroll it clockwise, screwing it in a spiral.
- This is how, in a few movements, you can quickly remove a burnt paw and exchange it for a new one.
Replacing the high beam bulb on a Ford Focus
The high beam bulb in the headlight is located in the inner corner of the front optics.
-Remove the rubber cap that protects the headlight from dirt, moisture and dust.
-The rubber cover has been removed from the headlight unit.
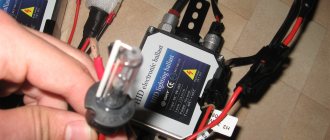
-Press the plastic button to disconnect the power connector from the high beam lamp.
By removing the rubber plug at the rear of the headlight you will have access to the high beam lamp. But you won’t be able to get it right away. To do this, you first need to disconnect the power connector from the lamp.
-Remove the connector holding the lamp.
-Do it friends as shown in the photo.
-Press the button with your finger to disconnect the connector itself.
The photos above show in more detail how the clamping mechanism works, which secures the connector itself that powers the high beam lamp.
This clamp design is based on a plug.
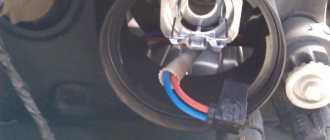
— You have free access to the high beam lamp (H1).
-This is an enlarged photograph of an old high beam lamp installed in the socket.
-Remove the old high beam bulb from the headlight.
-Take the metal contact of the high beam lamp with your fingers and pull the bulb towards you, thus removing it from the headlight housing.
-This is the socket in the headlight for the high beam bulb.
-High beam lamp Osram H1 12V 55W (you can also install a 65 W lamp).
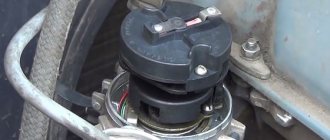
-Install a new bulb H1 into the headlight housing.
Due to the fact that the round H1 high beam lamp for the Ford Focus III has a flat edge on one side, it is impossible to install the lamp incorrectly. Align the flat edge with the empty socket in the headlight and install the lamp into place.
-New high beam lamp installed.
-Install the power connector by pressing it on top with your finger.
New high beam bulb installed and connected to power
-Carefully insert the black plastic electrical connector directly into the base of the new high beam bulb.
-Reinstall the rubber cover that blocks access to the inside of the headlight, where the high beam bulb is located.
2Side turn signal repeaters
If your side turn signal light bulb has burned out, then you will need to replace it as follows:
- First you need to remove the side repeater. To do this, you need to move it slightly, no more than 5mm.
- After that, we pull out the back part, which is located under the wing. Now you will need to get the side pointer.
- The next step is to take out the rubber cover, which is located in the hole of the front fender.
- Please note that you need to pull out both the cartridge and the cover at the same time.
- Now we just listen to the light bulb that has burned out and put a new one in its place.
- Installation of all parts is carried out in reverse order.
- Just a few steps and the light bulb in the side turn signal repeater is replaced with a new one.
- Now let's take a closer look at how to replace the turn signal lamp in the lights located at the rear of the car:
- In order to carry out this process, you will first need to pull out the circuit board on the taillight
- Only after this the driver will have to take out the bulb that has burned out and put a new one in its place.
- As you can see from the information above, replacing a turn signal lamp is a very simple process that anyone who has never even repaired their car can handle. There is nothing complicated here, the main thing is to know the sequence of actions that should be taken into account for trouble-free replacement of such light bulbs.
Our recommendations
A mechanic should check all of the vehicle's lights during every major service.
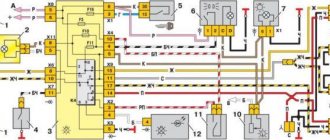
Diagram of a headlight with a turn signal lamp
Turn signal lamps
Replacing the turn signal lamp
3Rules for replacing turn signal lamps
There are a number of rules that must be followed when changing turn signal bulbs:
- First of all, the car is always completely turned off, that is, the ignition must be turned off under any circumstances.
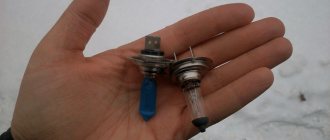
- The light bulb must be selected in accordance with the old version that needs to be replaced. If you cannot determine the type and type of light bulb visually, then first you will have to remove the light bulb and go buy a new one with it.
- The entire process of replacing a light bulb must be carried out carefully and slowly so as not to damage any other parts in the car.
- In any type of car, all turn signal bulbs can be screwed in and out very simply, without much effort. You need to understand that the light bulb goes very easily along the thread and if this process is not so easy. This means you are doing something wrong. There can be many reasons - the spiral is rusty, which means it needs to be cleaned, or the light bulb you are going to put in the turn signal does not fit.
- If you unscrew the turn signal itself and find that there is any contamination there, you must get rid of them, and immediately, do not leave everything as is, because this arrangement can negatively affect the operation of the turn signal itself.
If the light bulb in the turn signal has burned out, it’s not a problem, because replacing it with a new one is not at all difficult, especially if you have carefully read these instructions.
A guide to replacing all headlight bulbs on Ford Focus cars.
In your Ford Focus, the low or high beam lamp does not light up, or the light bulb in one of the front turn signals has failed..? It is likely that one of the bulbs in the front headlight optics has burned out, which you just need to take and replace with a new one. Remember, friends, that you must do this as quickly as possible, since non-working bulbs in the headlights of a car (especially in the turn signals) reduce your own safety while driving. After all, many light bulbs in a car play a very important role in the safety of all road users.
This manual is specifically described by us for owners of third generation
Ford Focus (MK III) cars of 2011, 2012, 2013 and 2014 release .
With the help of this guide, you can independently replace or change (as you wish) the low beam, high beam and front turn signal bulbs on your car. Also, with the help of our prescribed tips, you can replace no less important lamps on the front headlights of the car themselves - i.e. so-called marker lamps. Owners of cars such as Ford models (hatchback and sedan), as well as Fiesta, Fusion (Mondeo), Taurus and C-Max models may also find our guide useful so that you can easily replace the bulbs in the headlights of your cars.
The following lamps were used in the front lighting optics of the Ford Focus III 2011 - 2014 model year:
Low beam: # H11 lamp (55 W).
High beam: # H1 lamp (60 W).
Turn signals: # lamp 7440 (PY21W - 21 W).
Side lights: # lamp 168NA (W5W - 5 W - W2.1×9.5d.).
Necessary tools for replacing headlight bulbs:
A large screwdriver with an asterisk and with the necessary attachment to the size of the headlight bolts themselves.
Method one: remove the battery
To replace a side lighting element, no additional equipment is required; the process will not take more than 5 minutes. In order to replace the lamp, you need to open the hood and feel on the headlight unit for the side lamp socket, which is located just below the headlight lamp. Finding the lamp body by touch is not difficult.
The lamp has been removed and we are preparing to install a new lamp for the side lights. To replace the lamp, you just need to pull it. Diode lamps Some Loganovods recommend using diode lamps when replacing. It is pulled out by turning it counterclockwise.
You can press left and right on it if the base does not give in the first time. A new light bulb with H4 socket is installed.
Next, you need to return the headlight unit back, put on the bumper and reconnect the battery. How to adjust low beam lamps After installation, it is recommended to turn on the low beam and check the quality of lighting.
If necessary, adjustments should be made. To set up effectively, you need to wait until dusk, darkness, or drive the car into the garage.
How to properly adjust low beam headlights
After installation, it is recommended to turn on the low beam and check the quality of lighting. If necessary, adjustments should be made. To set up effectively, you need to wait until dusk, darkness, or drive the car into the garage.
To adjust, you will need a Phillips screwdriver to unscrew the screws. They are located on the lamp and are indicated in the figure below by numbers 1 (adjustment knob in the horizontal plane) and 4 (corresponding screw for the vertical plane).
You should use the following scheme.
- Markings are applied to the garage wall or parking fence with chalk. The car must be driven up to the wall with the low beams on. The centers of the light spots are marked first. Then the points are connected and the center is determined. Vertical lines are marked.
- Lines are drawn down from the points (75 mm). A new horizontal line is drawn.
- The car stops at 3 meters and the low beams turn on.
- By rotating the knob and screw for horizontal and vertical adjustment, you need to achieve such a position of the light so that the border of the beam is approximately level with the lower horizontal line.
The importance of proper lighting settings
For better performance of lighting fixtures on Renault Sandero, the light spot should be adjusted. This aspect makes it possible to increase the efficiency of lighting devices on Stepway. The beam adjustment procedure is simple. To do this, you only need some free time and a Phillips screwdriver.
The lamps are adjusted in a garage box or in the evening or at night. This will make it possible to accurately monitor the direction of the beam.
Adjustment is carried out with screws located on the left side of the lamp body at the end and on the right edge of its rear wall. By twisting or twisting them, you can achieve the best glow option. You should also use a special device that is designed specifically for adjusting the light beam. It is sold on the shelves of any auto store.
On a note
We replace spark plugs every 30 thousand km.
Over-tightening the spark plugs can damage the threads in the spark plug holes in the cylinder head.
The Kalina and Kalina 2 models have different headlights, so replacing the lamps in them has certain differences, and we will describe which ones in this article. Replacing the lamps yourself will not cause you any problems. Therefore, there is no point in turning to the service for help.
On Kalina 2 from 2013, to replace the lamps in the left headlight unit, you need to move the air filter to the side so that it does not interfere. There will be nothing in the right headlight block that will prevent replacement.