Before troubleshooting, you need to get acquainted with the electrical circuit of their power supply. Let's take a look at the diagram for switching on external lighting devices.
Electrical diagram of external lighting devices of VAZ 2114
We are interested in:
- 1 – lamps for front side lights;
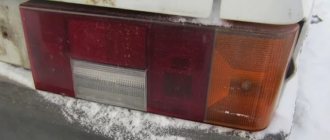
- 8 – rear parking lights/brake signal lamps;
- 3 – mounting block;
- 6 – side light switch.
How it works? When button 6 is turned on, the on-board power supply voltage is supplied to the mounting block. Having passed through fuses F10 and F11, it goes to the control relay K4. Fuses are necessary to protect the power circuits of the left (F10) and right (F11) side dimensions.
The relay controls the correct operation of the side light - if any of the lamps or its circuits malfunctions, it commands the on-board control system 12 to turn on the warning light located on the instrument panel. Having passed through the relay, the voltage is supplied to the side lamps 1 and 8.
Important! In some modifications of the VAZ 2114, instead of the K4 relay, there may be jumpers in the mounting block. Their location in the diagram above is indicated by arrows.
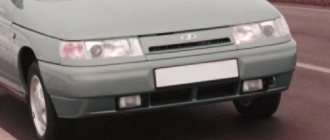
What lamps are in the dimensions of the VAZ 2114
The standard equipment of VAZ 2114 cars includes installation of the following lamps in the dimensions and front/rear headlights:
- Front dimensions – W5W;
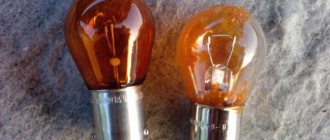
- Stop lights/side lights – P21/5W.
Recently, users are increasingly replacing standard light bulbs in the dimensions of the VAZ 2114 with LED ones, since they have a much longer resource, consume less energy and shine with a beautiful color. In order for the diodes to produce spectacular side lights with a bluish tint, weak 1-5 diode lamps are not suitable. It is better to use 12-15 diodes.
They will give a bright white glow in the daytime, and in the dark this glow will be blue-white. It is advisable to replace all side lights, or at least the front or rear lights on both sides, with such lamps at the same time. In this case, the car looks organic, and the difference in the shades of the glow of the dimensions will not mislead other road users.
How to make a diode ring
In order to make a taillight based on a diode ring, you will need the epoxy-based adhesive mentioned in this article. The basis for creating a lighting device will be the diode rings themselves or the LED strip. The headlight housing will be made from large or small reflectors, which are quite easy to find on the market if desired. You will also, of course, need paint (you can choose based on your personal aesthetic preferences). Most often, to work with VAZ 2114 cars, a coloring agent with a chrome-plated tint is used.
To make a lighting device, follow this algorithm:
- first of all, mount the diode rings in tin cylinders prepared in advance (as a rule, cans left over from drinks or food are used);
- in jars - carefully cut out the holes so that they look like wells. In this case, there should be two wells: external and internal. If, for example, a jar is suitable for an external well, then the internal one can be simply and cheaply made from a painted half-liter plastic glass;
- install one standard Soviet-made reflector in each internal well. They, among other things, must create illumination in accordance with the standard scheme: orange conductors, white reversing lights, red fog lights. After this, a large reflector may contain a certain number of elements that will look quite advantageous inside the module. The entire remaining space can be decorated with an LED ring;
- install diode ring reflectors. At the same time, in order for their adhesion to the body to be normal, you will need fixing ribs made of a substance such as epoxylin;
- glass can be equipped with additional surfaces, also secured with epoxylin.
If this algorithm is performed correctly, tuning the VAZ 2114 can be considered complete.
Reasons for failure of side light bulbs
There may be several reasons why a particular light bulb of the VAZ 2114 dimensions stopped lighting, namely:
- open circuit (no voltage at the headlights);
- the side light bulb has failed for some reason;
- the corresponding fuse has blown;
- the fuse box has failed;
- The lights button is broken.
Most often, the cause of failure is a malfunction of the light bulb itself. Fixing such a malfunction is quite simple; it is important to know exactly how to do it.
Types of light bulbs in other lighting fixtures
- Fog lights . The type of base depends on what type of fog lights are installed on the car. This can be a H3, H4 base, but most often the H base is used. Before purchasing, it is better to dismantle the lamp to determine the type of base.
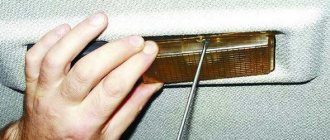
- Front side lights. Lamps with a base are used T4W. To install, you need to lower the base into the socket and turn it clockwise until it stops.
- Tail lights. The lighting element is installed P21W.
- Turn signals . The front and rear lights are equipped with P21W , the side ones - T4W .
- Brake lights , reverse . The element used is P21W .
Depending on the installation location, the type of lamp differs. The most powerful ones are installed in the headlights. This design allows you to safely operate the car in low visibility conditions. To determine which bulbs are in the headlights of a VAZ 2114, you need to remove them from the car, or use this manual.
Why don't fog lights work?
Fog lights
As I think, you have already seen that on the VAZ-2114 and other Samaras the headlights leave much to be desired. And in cloudy and rainy weather you feel like a hedgehog in the fog. Therefore, fog lights (FTL) significantly improve the situation and illuminate the roadside.
But it happens that at a certain moment the PTFs stop working, and you need to urgently look for the fault. In this article we will look at the main possible causes of fog lamp (FTL) failures and methods for eliminating them.
The most basic and common option is oxidation and corrosion, which appear during long-term operation and in the Russian climate. But still, we will touch on specific problems and start from the simplest to the most complex.
Fuse
VAZ 2114 fuses
Each fog light has a separate fuse F8 and F9 in a block rated at 7.5 A. Check its integrity and replace if necessary. If you did not find a fuse in the mounting block, most likely, in your case, the PTFs were installed by the previous owner. Then you need to look either near the fog lights themselves, or near the relay. If both headlights do not work, the cause of the malfunction lies elsewhere. Since it is not possible for both fuses to blow at the same time. Although everything happens in our lives.
Bulbs in PTF burnt out
In this case, all that remains is to check and replace. When you remove the lamp and look, the filament may visually remain intact, so it is better to check with a known working light bulb. Again, if both fog lights fail, this is most likely not your case.
Relay
The relay is either located in the mounting block or installed in another location if the PTFs were not equipped at the factory. The easiest option is to replace and test with a known working relay. You can also try knocking on it. When you turn on the PTF button, the relay should click. If it is not there, it is worth replacing the element. But it is necessary to check for access to power, which may not be supplied.
No power supply
PTF power supply
How to make a diagnosis:
- Let's see if there is power to the PTF button. If the power light is on, then everything is fine here.
- We check the relay power supply to pins 30 and 87 (see diagram). The wires go to blocks Ш7 and Ш8 of the block (they are marked).
If there is no power, you need to look for a break. Most likely, the problem in this case is trivial - the wire has fallen off or rusted.
Useful articles:
Which PTF should I choose? — choosing fog lights on the market.
How to install PTF? — we set the PTF with our own hands to the norm.
Manufacturers of lamps for VAZ 2114
Since lamps with an H4 socket are used in headlights of many models from different manufacturers, all manufacturers of car lamps produce such lamps. Among them are the following companies:
- A world-famous Dutch company, known for its low prices and good quality products;
- A German company with a long history and rich technological experience;
- Narva. This is another manufacturer from Germany, known for the quality and durability of its products;
- Bosh. Another German company that does not need any special introduction;
- Company based in Hong Kong and Germany. Produces a wide range of reliable lighting equipment.
The above list can be continued for a long time. Today, a big name of a manufacturer is not a guarantee of high quality and reliability. There are a lot of fakes on the market, which are not only cheap, but also completely inconsistent with the original. Therefore, it is better to make a choice based not on the name, but on the characteristics of the light bulbs.
How to replace low/high beam bulbs on a Lada Granta, step-by-step instructions
LED bulbs H4 6000K (VAZ 2114) - Review, test.
Causes of breakdowns
The most common reasons for node failure:
- the narrowest point in the entire structure is the elastic board;
- in second place, banal burnout or mechanical damage to light bulbs;
- the third reason is a problem with the fuse or relay;
- oxidation of contacts;
- broken wiring.
First of all, it makes sense to check those elements that do not require removing the entire headlight (for example, fuses, relays). Then check the quality of the connections, the presence of oxidation and the voltage supply level to the illuminator. The last step is to disassemble the taillight, remove and inspect the board.
Tail light repair
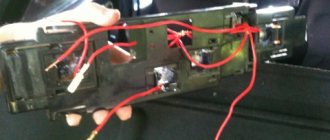
The most common reason for the failure of a VAZ 2114 rear light is the failure of a flexible printed circuit board or a connector made directly on it with conventional metallization. You can, of course, just buy a new printed circuit board and replace the faulty one with it, but, firstly, for how long?
And secondly, we are not looking for easy ways. So we will try to eliminate this malfunction on our own, at minimal cost and in such a way that it will last forever. Let's start with the connector for connecting the flashlight to the on-board network. It looks something like this:
The connector for connecting the rear light to the on-board network is part of a flexible circuit board and cannot be replaced separately
There are many reasons for this connector to fail. For example, we removed the power supply from the flashlight too often and simply partially erased the traces, which have a very small thickness of copper deposition on the plastic. Another reason is that the conductive paths next to the connector broke due to constant vibration. Well, the most banal thing is that the tracks burned out due to overload or short circuit.
Due to burnout of the conductive tracks of the flexible board, the rear fog lights do not light up
The photo shows a flashlight connector of a different modification, but the meaning of the problem is the same. All these issues can be solved with the help of a soldering iron, mounting wire and a regular six-pin (or more) connector with a mating part.
For repairs you will need this block with a mating part
We clean the connector contacts on the board using a student eraser (not sandpaper - the foil is very thin!) and service them.
You need to tin the tracks very quickly with a well-heated soldering iron. Otherwise, the tracks will simply fall off the substrate.
We solder the wires from the block onto the tracks, not forgetting to mark them, and fill the soldering area with sealant or a hot glue gun.
Mounting block soldered to the rear light board
We cut off the standard power harness block, and in its place we solder the mating part of the new one. We assemble the flashlight, connect it to the on-board network - and check it. If we haven't messed up the wiring of the pads, then everything will work right away with a bang.
What to do if the tracks are burned out or broken? You can get out of this situation as follows. Immediately after the fracture, we clean the protective varnish from the tracks, tin, and solder the block. It will look like this:
You can solder the header anywhere on the flexible board.
You can, of course, limit yourself to this (until next time), but if you spend a little more time and effort, you can make more serious repairs. Flashlights modified in this way will serve faithfully for many years. Such a repair will save you from the eternal problem of contacts of flimsy standard sockets - this is also a very common malfunction of VAZ 2114 headlights.
To implement this idea, in addition to the six-pin block with a mating part (see above), you will need five cartridges from the VAZ 2106 direction indicators and a dozen terminals for them.
You will need 5 such cartridges and 10 terminals for them
We remove the lamps, standard sockets and flexible printed circuit board from the panel. We place the purchased cartridges in the right places on the panel and mark their centers. Special precision is not required here, the main thing is that each lamp shines into its own “window”. We drill holes according to the diameter of the base parts of the cartridges.
Holes for future cartridges
We insert the cartridges into the holes, mark the mounting holes, drill them, and screw in the screws. Now the cartridges are firmly fixed in the panel.
We secure each cartridge with two self-tapping screws
Using a mounting wire with terminals pressed onto it (you can crimp it with ordinary pliers and solder it to be sure), we assemble a circuit that repeats the layout of a standard flexible printed circuit board. To be sure, the terminals can be insulated with heat-shrinkable tubing, but in principle this is not necessary - the panel on which the cartridges are mounted is plastic. We solder our block to the ends of the wires.
This block will connect the rear light to the on-board network
We solder the mating part of the block to the power supply harness of the lights, having first cut off the old one. We solder it, not twist it together. The twist will oxidize in a week, and problems will begin again - sometimes it burns, sometimes it doesn’t. We insulate the solder joint with heat shrink or cotton (black rag) tape. PVC electrical tape is an extremely bad option. It can unfold over time. This kind of isolation is no good.
Everything is ready, you can connect and check
We admire our work for a couple of minutes, insert the lamps, connect them, check them. Is everything working as expected? We assemble the lantern and connect it.
The lantern is in place, all problems are solved for a long time
LED analog P21W
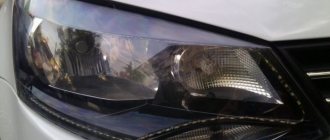
Construction and operation
Xenon and LED equipment is not installed in VAZ from the factory. The optics of the VAZ 2114 are equipped with several modules using a classic halogen lamp for the main light.
The headlight design of the VAZ 2114 is not complicated or modern. To replace the lamps, the optics do not need to be dismantled, and the beam is adjusted using built-in thumbwheels.
The disadvantages of front optics include the appearance of cracks in the glass due to stones or sudden temperature changes during operation.
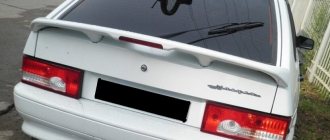
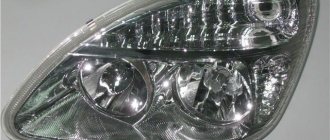
Headlights
On sale there are lensed headlights for the VAZ 2114 for halogen and xenon. Sports modifications are covered with transparent glass with no reflective lines. The internal reflector of the lens is used to form the daw. In such VAZ optics, two separate lamps are used - for the high beam and low beam.
Factory installed front light design:
- block with reflector for low and high beam;
- separate lamp for side lights;
- turn signal made of transparent orange plastic.
A distinctive feature is a glass shield with special lines that direct a beam of light onto the road surface.