The functioning of the rear lights of any car is necessary for road safety reasons. These devices at the rear of the car perform a lighting and information function (warn road users about the movement of the car).
On VAZ 21099 and other models, the lights turn on automatically when changing gears and moving the car backwards.
Structurally, the lights at the rear of the car combine the following components of the lighting system:
- reversing lighting;
- side lighting;
- brake lights;
- turn signals;
- emergency alarm.
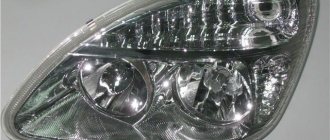
Rear view lights for VAZ 21099
The structure of the lighting devices is as follows:
- body made primarily of plastic (in some cases glass);
- lamp holder;
- latch for holding wires;
- diffuser of light rays for uniform illumination of the road surface. It is glued to the back of the product body, so if it breaks, it needs to be replaced along with the body.
The device of the rear light on VAZ 2109-2108 and 21099
The following types of rear lights can be installed at the rear of a VAZ 2108 or 2109:
- incandescent lamps. Inexpensive, but they break down relatively quickly and are not bright enough. Such lamps burn with a yellow light, which is not very visible in unfavorable weather conditions;
- halogen light bulbs . They are considered more modern and durable, since air is pumped out of their flask and inert gas is pumped in. There are models with H1 and H3 sockets on sale;
- LEDs . They burn with a cool white light and last several times longer than incandescent lamps. They are sold in strips and today often replace obsolete incandescent lamps.
LED tail lights for VAZ 2108
Causes and actions in case of breakdown
Among the reasons for the breakdown of the rear parts of the lighting system on a VAZ 21099, 2108 or 2109, the most common are:
- Bulb burnout. It happens due to wear or power surges and is almost the most popular reason for replacing rear headlights.
- Oxidation of contacts. Occurs due to poor quality of terminal contact, electrolyte leakage, or cracks in the battery case.
- Fuse failure. This cause of failure is due to voltage surges.
- The reverse sensor is broken or its wiring is broken.
- Burnt out contacts on the headlight film.
- Lack of ground on the board.
The most common and easiest fault to solve is a lamp burnout. The product must be replaced with a new one by turning off the light sources, opening the trunk and disconnecting the column of wires.
To do this, you will most likely have to remove the trunk trim of the VAZ 2108 or 21099, which is located behind the lamp. After this, squeezing the latches (they are located on the sides), you need to take out the panel and unscrew the lamp, after pressing on it. To install a new rear lamp, reverse the process.
Why don't the side lights come on?
Tail light VAZ 2110
The traffic rules state that a car should not be driven if the side and head lamps in the taillights are not lit at night and in the evening (when it is dark) or if visibility is insufficient. For this reason, replacing lamps in the rear light of a VAZ 2110 is an important matter.
Replacing the rear light bulbs of a VAZ 2110, a faulty headlight bulb in the headlamp, as well as a combined parking light and brake light bulb can be done independently without much difficulty.
Light bulb for rear light of VAZ 2110
To change the headlight bulb in the headlight, you need to perform the following steps:
- remove the battery;
- holding the lamp from behind, separate the wires in the block directly from the lamp;
- remove the rubber cover;
- remove the end of the spring retainer with the hook from engagement, move the retainer to the side;
- remove the light bulb from the headlight housing;
- install a new lamp, performing the reverse sequence of actions.
Note. If the side light bulb in the headlight turns out to be faulty, it must be replaced on site. Otherwise, you need to drive to where the repairs will be carried out with the headlight lamp turned off.
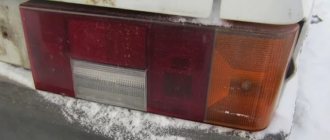
Bulbs in the taillights of the VAZ 2110
The rear light of the car consists of the following sections:
- anti-fog light (red light diffuser);
- reversing lights (white light diffuser);
- turn indicator (orange light diffuser);
- side light and brake signal (red light diffuser);
- reflector (reflector).
Bulbs for the rear lights of the VAZ 2110
There may be several reasons why the lighting does not work. Each malfunction requires an individual approach and implies its own troubleshooting methods.
Causes of the malfunction and methods for eliminating them (if some lamps of flashlights and headlights do not work):
- burnt fuses - replace them (see VAZ 2110: how to replace fuses);
- lamp filaments are burnt out - change the lamps;
- contacts on relays or switches have oxidized - clean them;
- the wires are damaged, their tips are oxidized or the connections are loose - replace the faulty wires, clean the tips;
- The contact jumpers at the location of the lamp control relay have oxidized - clean them.
Rear fog lamp bulbs for VAZ 2110
Sometimes the headlight lens fogs up a lot.
What are the reasons and what to do in this case:
- leaky adhesion of the lens to the body - immerse the headlight unit in water, if liquid penetrates, replace the headlight;
- moisture enters in the direction from the engine compartment during the process of washing the car - eliminate the liquid from the headlight unit.
Tail lamps for VAZ 2110
Replacement of the rear light occurs according to the following scheme:
- disconnect the wire from the negative terminal of the battery;
- Having opened the trunk lid, unscrew the screws that secure the rear trunk trim (2 pcs);
- having pressed the rear upholstery, bend the side upholstery, which will allow access to the rear light connection parts;
- disconnect the flashlight and the block with wires;
- loosen the nuts that hold the rear light and remove the washers;
- remove the lamp from the car;
- release the flashlight body from the holder and lamps by squeezing the claws of the clamp;
- install a new lamp, performing the steps in reverse order;
- tuck the side trim under the seal.
Note. During installation, it should be noted that the side screws are longer than the screws that secure the rear trunk trim.
Replacing parking lamps and tail lights
Rear fog lamps in VAZ 2110
When changing a vehicle's headlight bulb, you must perform the following steps:
- remove the lamp together with the socket from the optical element;
- remove the lamp from the socket.
Replacement of light bulbs in the rear lights is carried out according to the following algorithm:
- lamps need to be changed from the luggage compartment side;
- remove the contact part along with the lamps (it is held in the lamp body using latches).
Note. Do not touch the glass surface of the halogen lamp with your fingers.
When heated, the marks will cause darkening. You can wipe the lamp with a cloth or gauze soaked in alcohol.
Side turn signals
If the side turn signal lighting malfunctions, do the following:
- move the side turn signal forward, pulling its rear part;
- remove the above part;
- disconnect the lamp socket;
- replace the lamp by sliding the cover;
- If you need to replace the cartridge, you must disconnect the wires.
Car license plate light
License plate light bulb VAZ 2110
If the lights that illuminate the car number do not light, the actions should be as follows:
- Unscrew the two self-tapping screws with a Phillips screwdriver and remove the lampshade;
- replace the lamp, first removing the transparent cover from above.
Stop light and reverse
You can remove and install the brake light and reverse light according to the following scheme:
- remove the flashlight board by squeezing the protrusions;
- remove the lamp by pressing down and turning counterclockwise;
- disconnect the wiring connector;
- unscrew the nuts (two outermost and two middle) of the decorative trim using a tool of the appropriate size;
- remove the cover;
- Unscrew the two nuts that secure the lamp and remove it.
Note. Assembly occurs in reverse order.
Fog lamp
To properly replace the light source in the fog lamp, you do not need to remove it.
- disconnect the negative wire (its terminal) from the battery terminal;
- remove the rubber protective cap from the rim on the back side of the reflector;
- remove the tip of the “negative” wire from the reflector output;
- remove the lamp mounting bracket in the form of a spring, squeezing it with your fingers;
- remove the lamp from the hole located in the reflector;
- disconnect the tip of the “positive” wire from the lamp wire.
You can assemble the lamp by following the reverse procedure.
Replacing the entire fog light
If you need to replace the entire fog light, the steps are as follows:
- disconnect the block of its wires from the harness;
- unscrew the two self-tapping screws securing the cladding using a Phillips screwdriver;
- remove the lining;
- remove the headlight;
- Install the new headlight in reverse order.
The reversing lights may not light due to a faulty switch.
To troubleshoot, you need to do the following:
- disconnect the connector;
- unscrew the switch with a 21 key;
- remove the switch and replace it with a new one.
Note. The operation should be carried out quickly so that there is no large leakage of engine oil from the gearbox.
A malfunction of the car's lights may be caused by problems with the hydraulic corrector. With its help, you can change the angle at which the headlights are tilted (this is due to the different load levels of the car).
The hydraulic corrector consists of a master cylinder, which is mounted on the dashboard, actuator cylinders of the headlights and connection tubes. It cannot be disassembled and cannot be repaired.
The assembly part should be replaced.
Removal and installation of the main cylinder of the headlight hydraulic corrector occurs in stages:
- remove the handle and cylinder lining by prying it off with a screwdriver;
- unscrew the nut with a 22" head;
- remove the hydraulic corrector.
The trunk light may also need replacing.
In this case you need:
- Disconnect the cable and terminal of the negative battery;
- disconnect the rear light from the block with wires by opening the trunk lid;
- press the fastener parts and remove the holder with lamps from the flashlight body;
- unfasten the lamp by unscrewing two nuts;
- loosen the three nuts that secure the decorative trim of the luggage lid and unscrew the nut closest to the lamp;
- lift the cover and remove the lamp;
- The new lamp is installed in the opposite order to that described above.
Note. When installing the flashlight, first place the flange of its body under the decorative trim, and then tighten the nuts securing the trim.
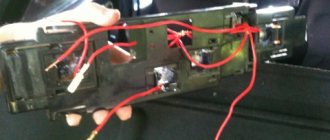
Many cars of the VAZ family, including the VAZ 2110, have a problem that affects safety and also causes a lot of trouble for drivers. The rear light board is a thin strip with conductive tracks.
You have to change this tape quite often, and with it the burnt out light bulbs. You can use the option of inserting iron cartridges from the VAZ 2101.
So, to do this, you need to:
- remove and disassemble the rear lights, removing the board and the tape from them;
- buy single cartridges for stops and dimensions;
- purchase copper wire with a cross-section of 2.5 mm, connectors, M3 bolts;
- mark the places for the cartridges and drill them, finishing the holes with a file;
- to modify the cartridges for clearance and brake lights, turn the tip terminals 180 degrees;
- completely cut out the cartridges from the turn signals;
- secure the cartridges to the plastic with bolts and nuts;
- connect all the cartridges, laying the pluses on the turn signal, stops and dimensions;
- extend the connector block and install everything on the car.
Note. Before installation, you should check everything to ensure there is no short circuit.
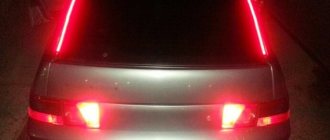
Many foreign cars these days are equipped with LED lamps instead of the usual incandescent lamps. Such lamps are installed in rear lights as brake lights, side lights, and turn indicators.
This is no coincidence. This light gives the driver behind him additional time to make decisions and make maneuvers.
Advantages of LED lamps:
- longer service life, higher light output;
- The LED lights up many times faster than a conventional lamp. This is an additional 5-6 m at a speed of 100 km/h.
- Incandescent lamps fail earlier most often due to strong vibration, especially considering the quality of Russian roads. In terms of this indicator, LEDs are much more durable and vibration is not a problem for them.
LEDs in the rear lights of the VAZ 2110
If you change incandescent lamps to LED lamps in the parking lights and brake lights with the control system turned on, it will show a break in the incandescent lamp filaments due to lower current in these circuits. In order for the system to be brought into compliance, it is necessary to modify the relay that monitors the health of the lamps.
Here is a video review that will be useful to watch. This shows the operation of the LED lights at the rear.
Thus, replacing headlights and their components will not be difficult. All you need to do is strictly follow the photo instructions.
You can save a lot on car repairs if the car owner does the work himself with his own hands.
You need to remember the rules that must be followed when resorting to doing work yourself:
- carry out a thorough diagnosis;
- follow advice and recommendations for repairs;
- use high-quality factory-produced parts;
- check the operation of the machine systems after repair.
You should not take on certain actions if the driver feels unsure of his abilities. In this case, it is better to resort to the services of a specialist, although he will charge a lot of money for services of this kind.
But there will be no problems if you do everything as the instructions advise. Today in stores the price of tail light bulbs, as well as the headlight kit itself, is not so expensive.
So it’s important to try to replace it yourself.
Materials: https://masteravaza.ru/vneshnee-osveshhenie-avtomobilya/fary-elektroprovodka-i-elektrooborudovanie/zamena-lamp-v-zadnem-fonare-vaz-2110-469
Replacement process
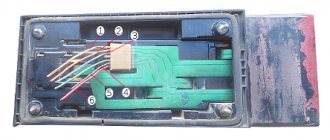
The rear lights are attached to the body of a VAZ 21099, 2108 or 2109 car using 4 nuts. To dismantle the lighting system you will need:
The operating algorithm is as follows:
- To access the nuts, remove the 21099 luggage rack at the appropriate location (if the rack is installed).
- Disconnect the power plug that is attached to the board.
- Unscrew the 4 nuts using a wrench.
- When removing the last nut, hold the taillight outside to prevent it from falling and breaking.
- After removing all 4 nuts, remove the light.
When installing a new headlight on the rear of model 21099, do not forget to connect the wiring to ground, which is attached to one of the studs.
Dimensions on VAZ 2109 do not light up? List of reasons why this happened
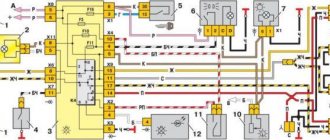
Both headlights do not work
In the case when two headlights fail at once (and both the high and low beams do not work), the switch responsible for the external lighting is first inspected. It is easy to test the circuit using a test light or a regular tester. One wire is applied to ground, and the other to the 30th terminal. If this is not the problem, then there will be 12 volts on it (even with the ignition off). After turning the key, voltage will also flow to terminal 10. Such diagnostic results allow us to say with complete confidence that the light does not come on precisely because of the switch.
If there is no voltage at the terminals mentioned above, then most likely the wires have broken or the contact has been lost.
What is especially important to control at the rear dimensions
If the control light on the key does not light up, but the dimensions work, then first look at the panel wiring. Remove the key block from the socket, then wipe the contacts with alcohol. If the dimensions on the right side do not work simultaneously with the warning lamp, then check the fuse. It is worth noting that they rarely fail, since the VAZ-2114 began to install wide options that have a reliable contact pad.
If F10 or F11 still breaks down frequently, then it is necessary to check the mounting block; it may be faulty. If this unit is in working order, then check the entire electrical circuit. Sometimes constant failure of fuses indicates a short circuit in the wiring, which can lead to a car fire for no apparent reason.
High or low beam does not turn on
The inability to turn on two high beam headlights requires a mandatory check of relay K5. It is located in the mounting block located in the cabin (to the left of the steering wheel).
How to find out if this relay is working. Pull it out and place a jumper between the 87 and 30 connectors of the block. After this, try to turn on the light. The activation of the headlights indicates a breakdown of the above-mentioned unit. It cannot be repaired in principle, so it will have to be replaced.
The reason for the failure of both low beam lamps is diagnosed in the same way, only you will have to close contacts 87 and 30 on the K4 relay block - it is the relay that is responsible for this electrical circuit.
Examination
It is easy to check the serviceability of the reverse lamps. You need to disconnect the wires suitable for the device, then connect them together (for example, with a piece of wire). If the headlights come on, then the sensor is faulty and needs to be replaced.
Frequent breakdowns are associated with deterioration in the quality of sensor manufacturing. Over time, its tightness is broken, and oil gets inside. Many inexperienced car enthusiasts associate this with different fuel supply systems - carburetor or injector. But this has nothing to do with this malfunction. You just need to monitor the condition of the sensor from time to time.
Parts prices
There is also a separate section for prices for all the parts that may be needed when repairing this part of the car, because if the side lights on a VAZ 2114 or the fuses have blown, they will still have to be replaced with new ones. In any case, all the components are quite cheap, all we might need:
- Marker lamp;
- Fuse;
- Power button;
- A whole fuse block.
Today, an ordinary white light bulb costs up to 30 rubles; of course, the price depends on the individual pricing policy of a particular seller. Individual fuses can be selected for up to 50 rubles, unless, of course, you want to install a higher quality option. Button, if you look for exactly the same one as the original one, you will have to pay up to 300 rubles. In some situations, more serious problems may arise and you will have to change the entire unit, this is quite an expensive proposition, together with all the wires it will cost up to 1000 rubles.
Sources
- autovaz-2114.ru/optics-in-the-car/ustranyaem-polomki-perednix-i-zadnix-gabaritnyx-ognej-na-vaz-2114/
- ladaautos.ru/vaz-2114/pochemu-ne-goryat-zadnie-gabarity-vaz-2114-i-chto-delat.html
- drive2.ru/l/4498777/
- lampaexpert.ru/avtomobilnye-lampy/neispravnosti/ne-gorat-zadnie-gabarity-vaz-2114
- remontvazov.com/ne-goryat-zadnie-gabarity-vaz-2114
CIRCUIT BREAKERS
To protect against voltage surges and other influences on the electrical component, a side light fuse is also included in the circuit along with the light bulbs and the button. At the moment of overvoltage, it burns out, but due to this everything else in the circuit remains intact. It is usually located in the engine compartment, where in the VAZ 2114 there is a place for a whole fuse block for all electrical networks in the car.
Since all of them have markings, we can easily find the parts that we need: F10 is responsible for the safety of the lamps on the left side of the car, and F11 for the right. Thus, in the event of a failure of one half, for example, when the rear left indicator does not light up, the right side of the car will remain operational and will do its job. And if the size fuse blows, then replacing it is, in principle, quite simple - this is considered the simplest malfunction of this kind.
Problems with headlights of VAZ 2112 cars and their simple solution
The quality of lighting reduces the risk of getting into an accident at night and during bad weather. Therefore, it is important that the headlights in a VAZ 2112 car illuminate the road surface well. It is necessary to monitor the serviceability of the optics and carry out repairs on time. This article will help you figure out what optics are installed on the VAZ 2112, how to choose, and provides instructions for replacing lamps and adjusting headlights.
A modern car has a large number of lighting fixtures.
All of them are combined into a single lighting system that performs the following functions:
- illuminates the road and side of the road;
- signals the driver's intentions;
- informs about the dimensions of the car;
- illuminates the interior, engine compartment, luggage compartment, etc.
All devices are divided into external and internal lighting. The external ones include front headlights, turn signals, side lights, rear lights, license plate lights, fog lights on the VAZ 2112. The headlights on the VAZ 2112 are a block that contains several lighting devices: low and high beam lamps, side lights, DRL.
Turning and side lights are signaling lights. The former warn about the driver’s intentions to perform a particular maneuver, the latter inform about the vehicle’s dimensions. They are built into the front headlight and rear lights. A special feature of signaling devices is that they shine yellow and synchronously.
Requirements for installing daytime running lights on cars have appeared recently. They have an intense light, their function is to improve the visibility of the car when driving in the daytime.
At first it burned, then it stopped
This is the most common type of breakdown of LED lighting, which, of course, has already been figured out how to fix it (this does not mean simply replacing a damaged light bulb with a new one similar to it).
So, having replaced ordinary light bulbs with LEDs in the backlights of your car, you begin to notice over time that these devices begin to blink for no apparent reason. Then they start to shine dimly, or even burn out completely. What is the main reason?
After all, many car enthusiasts strive to make the replacement themselves, and therefore, they probably blame themselves and their inept actions, like an auto electrician: they say, they screwed up somewhere.
Anything can happen, of course. Maybe something is connected incorrectly. But don’t rush to scold yourself for your crooked hands: if you still have the standard light bulbs (and many drivers with a garage prefer not to throw anything away and are very scrupulous about these things), insert them back into the sockets and look at the car’s reaction. If everything lights up normally without blinking, then the reason is not due to improper connection and wiring.
What needs to be done?
- Disassemble the non-working diode. The base from it will be used;
- Take an LED with a more powerful resistor (860 Ohm or 1 kOhm) and insert it into the prepared base;
- If you took a 0.25 watt and 1 kOhm resistor, then it may fit tightly into the case. It would be best to put it in heat shrink (so that it does not touch the other terminal);
- Connect the light bulb to the system. Everything should work smoothly.
As you can see, the solution to the problem turned out to be quite simple, but how much driver nerves and effort was spent (for those who did not know how to solve it).
general information
VAZ 2109 electrical faults
Let's start with general information. You should know that the VAZ 2109 has two power sources - the battery and the generator. The battery is designed to supply current when starting the power unit of a car, as well as to power the starter and other 12 V consumers when the engine is not running. When the engine starts, all the “initiative” goes to the generator. Now this element provides current to all consumers, even the ignition system and battery.
Work order
First of all, you need to check whether the alternator belt is in place. It happens that it breaks off. If the belt is in place, intact and undamaged, then it is recommended to check its tension. To do this, press with your thumb from above and notice how much the belt is bent. 10-15 mm is the norm. We arm ourselves with the appropriate wrench and unscrew the nut securing the generator to the body. Then we insert the pry bar between the generator and the engine cylinder block. Using the lever method, we move the generator and tighten the fastening nut.
Working with a generator
You need to check whether the corresponding fuse has blown. If yes, then replace it with a new one (more about fuses below).
- We start the power unit and check whether the battery charging lamp goes out. If it goes out, it means everything was done correctly.
- If it does not go out, then you need to check the cable that runs from the generator to the battery (positive). This could be where the problems lie.
- We check the integrity of this wire. Maybe it's broken or something.
- You also need to carefully check contacts that may have become oxidized over time.
- All these faults, if found, are corrected. We start the engine and see if charging appears.
- If yes, then have a nice trip!
If there is no charging again, then you need to check the generator itself (see VAZ 2109: malfunctions on the generator and how to eliminate them). To do this, it is better to contact specialists or follow the advice that can be found on our portal.
Regulator check
If the motorist is experienced, then he can be advised to check the generator voltage regulator. This component is required to maintain the generator voltage within specified limits, even if the speed and load changes. It is possible that it has “worked out” and the generator is not functioning correctly. By car:
- We arm ourselves with a voltmeter equipped with a scale of up to 15-30 V.
- We always measure the voltage after some operation of the engine at medium speed.
- We measure the voltage with the headlights on, in the place between the corresponding terminal and the generator ground. The norm is thirteen/fourteen V.
- Otherwise, if the value is lower or higher, the regulator will need to be replaced.
Resistor
Few people, unless he is a professional electrician, of course, know that LED lamps have resistors.
Take a burnt-out lighting device and disassemble it as an example. Different diodes will have different resistors (mostly 390-560 Ohms). The thing is that the declared power for lighting is not enough. And in the on-board network, as you know, some voltage surges occur, and 12 volts can hardly always be measured there either. To avoid these inconsistencies, and as a consequence - the rapid failure of LED lamps, you need to perform several fairly simple movements that make the lamps work much longer, without dimming or flickering.