➤ Trunk button Lada Granta Liftback - quick installation
Content:
The Lada Granta Liftback “Norma” and “Standard” configurations do not have a mechanical button for opening the trunk lid. Often, owners are forced to turn off the engine and then run with the key to open the luggage compartment. This is not always convenient or practical, especially in bad weather.
The equipment of the Lada Granta Liftback “Lux” has a button to open the lid. Owners of other assemblies can independently install the trunk button on the Granta Liftback by following the instructions below.
Where to buy a power trunk lock
To protect yourself as much as possible from purchasing non-original spare parts, service center technicians recommend using the services of official representative offices, service stations, dealers, and specialized auto stores.
Do not purchase goods from third-party suppliers who sell spare parts at unusually low prices. Always ask the seller to provide documents identifying the manufacturer, and check that the package includes a warranty card.
Recently, it has been popular to order parts and then install them at a service center. There are many advantages of this method, for example:
- efficiency of delivery;
- professional installation;
- quality guarantee for work performed;
- Possibility of individual ordering for tuning and local upgrades.
Review of Manufacturer Prices
| Name/article | Price, rub.) |
| electric lock 2191-5606010-10 | from 1500 |
| 2191-5606452 | |
| 2191-5605789-00 | —/— |
| 2191-5603652 | —/— |
| 2191-5604521 | —/— |
| Vartex 56526454 | from 1700 |
| Apollo 54654 | —/— |
| FX-F 82665/22 | —/— |
| Monado fd515545 | —/— |
*prices are current as of 10/09/18.
The opinions of the service station masters agreed on the choice of manufacturer - there is not much difference. When purchasing original products, the service life of the equipment exceeds 5 years.
Installation in “makeshift” conditions and poor-quality manufacturing only shorten the period of use of the equipment. Often the owner is to blame for the breakdown, violating the vehicle maintenance regulations.
Preparatory stage
Necessary tools, materials, spare parts:
- electrical cable with a cross section of 0.3 - 0.35 five meters;
- TORX to “10”;
- pliers, side cutters;
- terminals;
- corrugation for laying wiring;
- four-contact relay-regulator;
- mechanical trunk opening button.
Sequence of actions for self-installation of an electric lock
- We place the machine within the perimeter of the repair area; you can use a flat platform with unobstructed access around the perimeter. A road overpass or inspection channel in this case is not so effective, since the driver is limited in movement.
- Open the luggage compartment lid, unscrew the two mounting screws, and remove the inner part of the plastic trim.
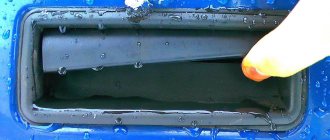
- We connect the block with two wires (“plus” and “minus”). “Mass” is black. We pack the cables in a corrugated cable, lay it along the inner cavity of the trunk lid, and lead it out into the technical hole.
- We run the wiring in the corrugation under the side decorative inserts and lower it into the lower channel. First remove the plastic covers and sound insulation.
- We go to the fuse block, namely to fuse No. 10A.
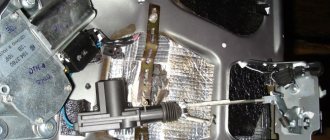
- Next, we install a four-pin relay, connect the terminals of the wires from the trunk, fuse and mechanical button. We power the minus from the radio.
- We install a mechanical button instead of a plug under the optics regulator (hydraulic corrector).
- We assemble the casing and check that the system is working properly.
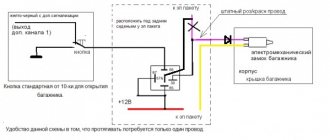
Trunk button connection diagram
- From the trunk lid lock "minus" and "plus".
- Output “+” to a four-pin relay.
- Connection “+” from fuse “10A”.
- Output “+” from a mechanical button.
- “Minus” is powered from the radio or from any other device. There is no fundamental difference.
Reviews
| № | Positive |
| 1. | Vasily: I bought a Lada Granta Liftback in the “Standard” configuration, the mechanical button is not preinstalled. Since I'm very familiar with electricians, I installed it myself in half an hour. Now everything is working properly, there are no complaints. |
| 2. | Vladislav: my garage comrades recommended connecting an activation button. I first looked at the diagram and bought the necessary spare parts. I installed it a month ago with a friend. My advice to car enthusiasts. |
| 3. | Ivan: I knew from the very beginning that there was no button in the Norma configuration. After the purchase, I immediately installed it at the service station. The guys completed it in half an hour and gave a guarantee. It works properly and has never failed. |
| 4. | Vladimir: installed a mechanical button on the trunk lid, now you don’t need to turn off the engine again or pull the core. The process is not complicated, the diagram is intuitive. |
| 5. | Ignat: last month I installed the “activator”, I didn’t go to the service station, I got by with the help of a friend. It works properly, no complaints. |
| Negative | |
| 1. | Kirill: After installation, the activator worked for two months, after which it was replaced with a new one. Despite the originality of the part, the workmanship is poor. I do not recommend domestic electric locks. |
| 2. | Victor: I regretted installing the electric drive and flew within three months. This is despite the fact that there was moderate exploitation. I can't recommend it. |
| 3. | Vladimir: after a year of use, the limiter broke down, replaced it with a new one. I don't know how long it will last. |
DIY electric trunk lock connection diagram
Many car enthusiasts who independently “pump” their cars are wondering: how to properly connect the electrics? This question arises in almost any installation. After all, simply screwing on the blocks, locks and strips is not difficult, but only properly connected electricians can make the system work.
If we take into account one of the most pressing problems - the installation of remote control locks for the fifth door, then the correct wiring diagram for the electric trunk lock will help us here.
You can find it either in the instructions that should be included with the device, or you can take it from a reliable source, but it is better to use proven options and ask friends and acquaintances what scheme they used.
Remote trunk control
Preparation for installation
We purchase a lock kit. There are a lot of manufacturers of auto parts on the market now, but there are no special differences between the sets. It is important that the device has a warranty card and instructions for use and connection. Also in the box you will find:
- Activator;
- terminal;
- Wires;
- Relay.
Additionally, you need to stock up on a set of standard tools: pliers, screwdriver, screwdrivers, multimeter, drill with carbide drill bit.
In addition to the standard accessories, immediately buy additional wires; it is quite possible that the length of those you find in the box will not be enough for you.
Black heat-resistant insulating tape, corrugated tubes, and clips for fastening the trim will also be useful, since very often the trim of car elements is attached to disposable ones.
Device set
Self-installation
First of all, it is necessary to secure the electric drive to the trunk lid and provide it with a mechanical connection to the lock itself. To do this, you will have to make two cuts on the lock, and bend the resulting free “tongue”.
Thus, we gained access directly to that part of the lock, by pulling which the trunk lid will open. Now we attach the long metal stick from the kit so that the lock can close when the system is operating.
It is quite possible that you will have to cut off extra centimeters of this pin.
Device installation process
Now our device is installed properly and all that remains is to connect the electrics. To do this, we will use the diagram below.
Important! When working with electrical equipment, remove the battery!
In most cars, electrics operate on 12V positive voltage. However, if you doubt that everything is the same for you, it is better to check with the car dealer and not use this diagram for connection. It is very important to make the correct connection of the wires, since the proper operation of your car as a whole depends on it.
At best, some options will simply not work correctly; at worst, a short circuit will occur. And it is not always possible to restore the electrics and electronics of the car after it. And this work will cost a lot of money. In addition to the above, lay wires where standard wiring is already laid.
In difficult places, for example, when you have to pull the wire from the passenger compartment to the trunk, it is necessary to use protective corrugated tubes.
Electrical connection diagram
Electrical work
To begin with, according to the diagram, we connect all the elements located in the trunk. Now you need to tighten the wires to the driver's door. It all depends on the car model.
For some it will be convenient to pull the electrics through the door sills from below, for others the option of protective strips from above is suitable. Immediately secure the wires with cable ties. If the length is not enough, take an additional wire, solder the joint with a soldering iron and rewind it with tape.
Let's continue connecting. We connect the negative wire to the electric drive, and then connect the second negative wire to the main control relay. The third, also known as the last wire, needs to be connected to the alarm.
To do this, you need to find the control unit; most likely, it is located under the dashboard. In it you will find free contacts for connection.
Electrical connection to central locking
We check, find the negative one and connect. These are the last steps we need to perform. After this, we return the battery to its place and check the functionality of the system. There are cases when the lock does not have enough traction to close.
In this option, it is enough to install an additional spring for the lock and the problem should be eliminated. There is one more point that we have not covered - the remote control button. Installation is very simple, and the connection method is described in the same diagram above.
You can use absolutely any analogue for the button, even from power windows. And the location also depends solely on your preferences.
Possible button location
Additional modernization of locks
If you dream of your car doors opening and closing as smoothly as in foreign cars, try installing silent locks.
Such a device can be installed on any model of Zhiguli. For representatives of the retro era, such modernization is also possible, but the locks themselves will have to be filed a little.
By the way, you can also put it on the trunk. In general, there is no limit to perfection.
Silent locks
And the installation is, in truth, very simple and transparent. It is enough to dismantle the old locks, try not to drop the necessary elements inside the door, or remove the trim in advance. And then install new analogues on two bolts.
There are situations when, after installation, the door does not close tightly or warps slightly, causing cracks to form. Solving the problem is also very simple by adjusting the location of the device.
In general, initially try to secure it exactly where the old one was.
Central trunk locking - installation and connection
Source: https://autolocked.ru/zamki/sxema-podklyucheniya-elektrozamka-bagazhnika
Granta and Starline - all options
I do it whenever I have free time. Therefore, I can’t install everything at once. Yesterday I connected the electric drive in the driver's door lock. I don’t remember where I got the connector from, from which we will need female terminals. The connector was purchased at auto parts for VAZ. The price is 97 rubles, some kind of cooperative.
We pull the wiring through the post-door connector. If there are no terminals for the block, then you will have to make a hole and pull the wires through it.
Price: 97 ₽ Mileage: 11,700 km
How to install an electric lock in the trunk lid of a Lada Granta
Electric trunk lock - improving the operation of the Lada Granta
The middle of 2011 is very important in the history of the domestic automotive industry. It was this period that Russian car enthusiasts remembered for the release of a new product from the Volga Automobile Plant - the Lada Granta sedan.
This car successfully fulfilled its purpose, namely replacing the classics of the Samara family.
Created on the basis of the Lada Kalina, Granta today enjoys enormous success among buyers not only in Russia, but also far beyond the borders of our state.
1 What Lada Granta owners missed
Today the car is produced in 3 main trim levels: “standard”, “norm” and “luxury”.
If with the second and third options everything is more or less clear (as they say, we will do everything for your money), then owners of cars with the first configuration were missing such an important detail as the electric drive of the trunk lid and hood lock.
At first glance, it seems that such a trifle cannot significantly spoil the mood of the happy car owner. However, given the weather conditions in our country in winter, installing an electric lock for the hood or trunk lid on this car is literally asking for it.
Judge for yourself, because in 20-degree frosts, the problem of opening the trunk lid and hood becomes the main headache of the car owner: either the key cannot be inserted into the core of the lock, or it can only be pulled out with great effort. One way or another, a lock with an electric drive is needed, and it is very difficult to argue with this fact.
Despite the fact that on Lada Granta cars with the “standard” configuration there is no electric trunk and hood lock, the manufacturer still did not leave the buyer without the opportunity to equip the car with such an important part.
This is evidenced by the presence of wiring for the electric drive, as well as a special button on the key fob.
If you press and hold this button for two seconds, you can hear a click in the electrical package control unit.
As you can see, there is absolutely everything for installing a lock with an electric drive except the mechanism itself. The lock can be purchased at any car supply store for about 800 rubles.
2 Installing an electric lock on a Lada Granta
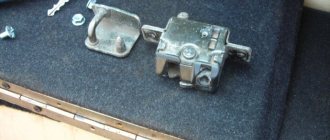
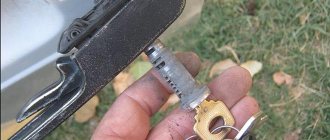
The entire process of installing an electric lock can be considered in the form of a simple algorithm. First, remove the inner trunk trim. To do this, disconnect the 7 pistons and 2 bolts holding the trunk closing handle.
Next we notice the lock mechanism. Insert the key into the lock and turn it in different directions. With this action it will be easier for us to understand the principle of operation of the lock in its various positions.
In the “closed” position, the pusher in the lock moves in vain, and in the “open” position, it presses on the rod, due to which the trunk or hood lids open.
After determining the principle of operation of the lid lock, it is easy to guess that if you connect the pusher to the activator, then the need to insert the key into the lock will disappear on its own.
Remove the lock washer and pusher. Next, we need a metal plate from which we need to machine the part. We will need the latter in order to insert the pusher and rod from the activator into it. To do this, you need to make 2 holes in the part.
The size of the first should correspond to the size of the protrusion on the pusher. We will insert the activator rod into the second hole. The first hole in the part should be in the center, the second - in the lower left edge.
In addition to the part with the holes, we will need a thin washer that can be inserted into the hole in the center.
Then we assemble the entire mechanism: our part is put on the plastic pusher. We put a new washer on top. In order to fasten this structure, you can use a retaining ring. We attach the activator to its place provided by the Lada Granta manufacturing plant. Using special rods that were included with the activator, we connect the latter with the part we turned.
Next, we check the mechanism we received. If there is a need to adjust the open-close positions, then we do it.
https://tuningkod.ru
Source: https://legkoe-delo.ru/remont-avtomobilya/automobile/91101-kak-ustanovit-zamok-s-elektroprivodom-v-kryshke-bagazhnika-lada-granta
Electrical diagram of the grant of the rear part of the VAZ 2190
Electrical diagram for the rear of the car : 1-rear wiring harness block to the instrument panel wiring harness block; 2-rear wiring harness block to the instrument panel wiring harness block; 3-side direction indicator right; 4-side direction indicator left; 5-handbrake sensor; 6-element for rear window heating; 7-interior lighting lamp; 8-switch in the driver's seat belt; 9-trunk light; 10-electric fuel pump module; 11-light right; 12-trunk lock electric motor; 13-switch for interior lighting; 14-additional brake signal; 15-left lamp; 16-rear wiring harness block to the rear left door wiring harness block; 17-rear wiring harness block to rear right door wiring harness block; 18-rear wiring harness block to the front right door wiring harness block; 19-rear wiring harness block to the front left door wiring harness block; 20-airbag control unit; 21-rear wiring harness block to license plate light wiring harness block.