Reasons for replacing the VAZ 2114 lock cylinder
The mechanism is silent, but if an extraneous sound appears when opening the door element, the device will have to be dismantled or rebuilt. Replacing the front door lock cylinder on a VAZ 2114 is required for a number of reasons:
- a sharp drop in temperature;
- failure of the locking ring;
- loss of the fixing column;
- destruction of the plastic rod cap;
- wear of internal pins and teeth.
In winter, the locking devices freeze, causing the key to turn with difficulty or not move. If a person makes an effort, then there is a risk of breaking the opening element in the core of the lock.
When individual parts wear out, they will cling to each other, blocking the rotation function. The main factor indicating a repair is turning the key.
Removing the old lock
The lock cylinder is firmly driven into the mechanism, and therefore it will not be possible to replace it without completely dismantling it.
Prepare the following tools:
- 8mm socket wrench;
- set of Phillips screwdrivers;
- marker.
First, remove the tailgate trim. It is installed on 10 plastic clips. Underneath it is the protective casing of the lock itself - unscrew the screws holding it in place and remove the element.
Next, you need to outline the locking mechanism with a marker and unscrew the nuts holding it with a wrench. Later, installing the lock along the marked contours will make it easier to adjust, or even with a successful combination of circumstances will make this procedure completely unnecessary.
To prevent wires hidden under the upholstery from interfering with your work, move them to the side and temporarily glue them with a strip of electrical tape. Remove the lock from the pins and inspect it for damage; if there is any, it will have to be replaced.
Recommendations
Reassembling and lubricating individual parts will not work if the fragments are heavily worn. It is better to remove the cylinder from the core and install a new one. Recommendations for replacing the VAZ 2114 door lock:
- Partial repairs or lubrication will only temporarily restore life to the closing mechanism. If problems arise, it is better to replace the entire cylinder.
- After installation, it is necessary to periodically lubricate the mechanism. Experienced motorists use silicone substances for this.
- The repair procedure is carried out in a well-lit room at a comfortable temperature.
- To change the element, you will need a set of screwdrivers, pliers and lubricant.
- Sometimes the springs have to be replaced along with the cylinder. They are purchased separately.
The cylinder fragment is sold as a set. The price depends on the manufacturer. If you buy a cheap Chinese version, it will cost about 150 rubles. It is better to give preference to VAZ spare parts. The cost of such a kit is 400-500 rubles.
Withdrawal procedure
Depending on the reason, a complete or partial replacement is performed. It is not recommended for the average person to engage in reassembly, since there are too many nuances in this process, but almost anyone can replace the mechanism. Step-by-step instruction:
- Three screws are unscrewed. They are located on the inside of the handle. To do this, use a Phillips screwdriver to remove the cover.
- The front trigger glass position switch is removed along with the wiring harness block. To do this, the wires are first disconnected.
- The plug on the armrest handle is removed, the element is picked up with a thin corner of a screwdriver.
- Unscrew the 2 screws on the handle that hold the inner panel.
- The plastic clips are pressed out to remove the lining.
- 6 pistons are removed to remove the door card.
- The external fastenings are removed, the nuts are unscrewed with an 8mm wrench.
The last action is to gain access to cravings.
necessary spare parts
To replace the cylinder head of VAZ 2114, 2115 , 2113, it is better to buy original parts with article numbers:
When this operation is completed, it is also necessary to change the springs of the lock drive, which bears the article number 2101-6105238.
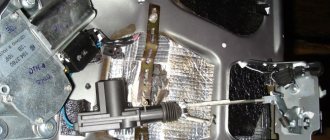
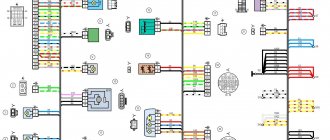
Door lock attachment
Theoretically, the lock mechanism can be divided into 3 parts: a handle with a cylinder and a button, the main mechanism, and the inner door handle. All nodes and connections between them are shown on the diagram.
Until this point, it takes 4 pulls to get to this node. Two of them are connected from the outside handle, and in order to dismantle them, the rods come out.
Since there is no electrical wiring in the middle of the door, the battery may not be disconnected before carrying out repairs.
In other cases, when electrical brakes or blockers are installed, the battery must be disconnected. For whom, as anyone knows, it is necessary to remove the “minus” terminal. This means that before repairing locks, they first open the hood, not the doors. Whoever destroys such a victory, in the shortest possible time, the victims will be burned.
READ Replacing front shock absorbers Opel Astra h
procedure
Depending on the reason, repeated or partial replacement is determined. It is not recommended for the common inhabitant to engage in this process, as there are a lot of nuances in this process, and replacing the mechanism is almost impossible. Pokrokov's instructions:
- Three screws are spun. The smells are stained on the inside of the handle. For this purpose a cross-shaped twist is used, and therefore the overlay is removed.
- The position of the front trigger plate is connected to the wiring harness block. For which the wire is connected to the head.
- The plug on the arm of the armrest is removed, and the element is secured with a thin roll of twist.
- There are 2 screws on the handle to tighten the inner panel.
- The plastic clips are pressed in to remove the lining.
- There are 6 pistons for removing the door card.
- The external fastenings are removed and the nuts are tightened with a size 8 wrench.
The rest of the day, people deny access to the body.
Replacement procedure
The replacement of itself is carried out in the following order:
- Open the tailgate and secure it with a suitable size prop.
- Use a flat-head screwdriver to pry off the attachment point of the upper hinge of the gas-filled stop, press it inside the trunk and disconnect it. Remove the upper mount of the VAZ 2114 trunk
- Use a flat screwdriver to pry off the lower fastening of the gas stop and also disconnect it. Remove the gas stop
- In a similar way, remove the second gas stop.
- Unscrew the fasteners and remove the brackets used to secure the stops. Unscrew the brackets
- Check the condition and straightness of the stops themselves - if they are bent or deformed, then you should purchase new ones and install them during reassembly.
- Using a slotted screwdriver or a special puller, pry and remove the 10 pins securing the tailgate trim.
- Remove the trim.Remove the trim
- Disconnect all terminals and wire blocks connected to the trunk door. Disconnect the terminals
- Remove the wiring harnesses from the cover. Remove the wires
- Remove the trunk lining fasteners.
- Unscrew the fastening elements of the lock and remove the lock.
- Using a puller or a flat-head screwdriver, pry and remove several pistons securing the rear edge of the interior headliner.
- Bend the detached edge of the casing so that it does not interfere with further dismantling of the cover.
- In the opened technological cavity, find the nut securing the terminal and unscrew it (it is best to use a socket wrench or a socket with an extension).
- Remove the terminal. Remove the terminal
- On each side of the upper rear part of the cabin, find and unscrew a pair of fastening nuts holding the trunk hinges. Unscrew the trunk lid hinges
- Remove the trunk lid.
After the trunk door is removed, you should carefully inspect the condition of its hinges - if they or their fastening elements are skewed or have cracks, then they should be replaced.
- Remove the gaskets from both hinges. Remove the gaskets of the hinges
- Using a socket wrench or a socket with an extension, unscrew a pair of fastening bolts holding the hinges in the door. Unscrew the fastening bolts of the hinges
- Dismantle the hinges and the gaskets installed under them. Dismantle the hinges with gaskets
- Install new gaskets and hinges, then secure them.
Reassembly and installation of the tailgate is carried out in exactly the same order as disassembly, but in reverse order.
How to remove cravings
To remove this piece, you will need an impact screwdriver and a size 8 wrench. The piece is attached to the internal locking mechanism and the lock switch. Algorithm of actions:
- The internal lock of the outer handle rod is completely disconnected.
- The handle is removed along with the rods.
- The pin is removed from the end of the rods.
- The plastic tip is removed from the core of the cylinder device.
- The return spring is removed. The old larva is being removed.
Usually the rods are fixed with plastic hinges, so they can be disconnected with a flat-head screwdriver.
Installing a new part
The removal and assembly algorithm is the same, although the instructions for installing the cylinder mechanism have its own nuances. Before inserting a new cylinder into the core, the part is lubricated with a silicone substance and only then inserted into the handle. Further algorithm of actions:
- The return spring is inserted next to the cylinder.
- The functionality of the key is checked. It should turn easily in all positions.
- A pin is installed on the tip of the rotary rod. Connection is being made.
- The inner and outer panels are screwed on, the handles are fixed, and the plug is returned to its place.
- The main three screws are tightened from the inside.
You won’t have to change the lock cylinder for a long time if you carefully use the opening mechanism.
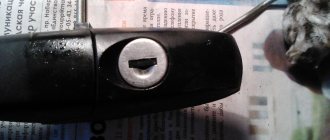
Trunk lock repair
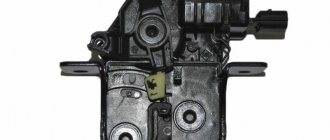
As a rule, the trunk lock on VAZ cars lasts longer than door locks, which is caused by fewer openings/closings in an equal period of time. But, due to complete wear and tear (or loss of the keys), it still has to be replaced. In most cases, the lock mechanism itself, as well as its body, remains fully operational - only the cylinder into which the keys are directly inserted wears out. It will then need to be replaced with a new one.
To do this you will need:
- crosshead screwdriver;
- slotted screwdriver;
- a set of keys.
The trunk lock cylinder of a VAZ 2114 is replaced as follows:
- Open the trunk.
- Remove the plastic rivets (“hedgehogs”) holding the plastic socket around the lock by picking them up with a slotted screwdriver or a special extractor.
- Remove the panel.
- Unscrew the fasteners holding the lock.
- Remove the lock.
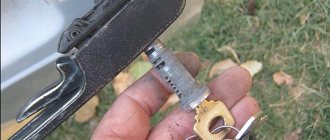
- Unscrew the fastening screws holding the cylinder in the lock and remove it.
- Install a new cylinder inside the lock.
Reassembling the lock and installing it in place is performed in exactly the same order, but in reverse order.
New lock cylinders are sold with keys inserted into the keyhole. You should not remove them before the cylinder is installed inside the lock, since this threatens its individual elements falling out, which will be extremely difficult to install in place.
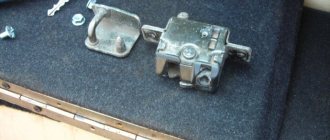
After the VAZ 2114 lock cylinder has been replaced and the lock itself has been installed in place, you should carefully inspect its counterpart, called the latch (the lock tongue goes behind it when the trunk is locked). In most cases, there is no need to replace the retainer because it has no moving parts and has a very long service life.
Replacement may only be necessary if a crack appears on the body of the clamp (it is made of silumin). The replacement process itself is simple and consists of unscrewing the old fastener and installing a new device.
The only thing you will need to pay attention to is the correct setting of the lock. To check its quality, you just need to close the trunk lid and see how it locks. If locking does not occur, it is too tight, or, on the contrary, a noticeable play is felt, then the lock is not adjusted.
To configure, you need:
- loosen a pair of fastening bolts of the clamp;
- close the trunk (at this moment the latch itself will adjust to the location of the lock tongue);
- open the trunk;
- tighten the retainer mounting bolts.
If after the adjustment procedure the trunk begins to lock even worse, then most likely the mating part of the locking element is skewed. It is enough to unscrew the fasteners, place it straight without moving the lock itself, tighten the bolts - and the trunk will be easy to lock.
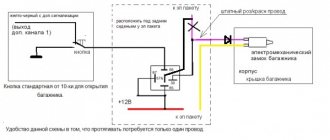
Installing an electric trunk drive
In the latch it is necessary to drill several technological holes with threads intended for fastening screws under points 3 and 4. With such screws you can secure the end of the cable. One question remains unresolved: how to get rid of the lock latch from the trunk lid? This can be realized by making a hole in the trunk lid, the diameter of which will be 1.15 cm. To knock out the axle in it, you need to insert a dense drift into it and remove the rod. It is necessary to ensure that the roller recess and the two screws are located symmetrically to each other. When removing the axle, the plate moves and the inside is removed along with the pusher. To make it impossible to open the lock with a key, it is enough to reduce the size of the end of the pusher by approximately 10 millimeters.
After the work has been done, having assembled a new lock system, you can put it in its original place. Then fix the relay in the lower part of the door, at a distance of 150-200 mm from the lock. It is also necessary to maintain a symmetrical arrangement on the axis of the entire device made. Due to the fact that the roller can be purchased separately, the electromechanical part can be connected to the window lift mechanism. To facilitate installation of the cable, the bushing located at the end of the relay core is replaced with a screw. You can attach the cable to the screw in different ways, for example, press the body of the cable to the lock with screws, but first place adjusting washers under them. In the same way, we attach the other end of the cable to the main part of the relay. After the electrical part has been checked, the entire mechanism needs to be adjusted. It is necessary to adjust the cable travel for normal opening of the trunk latch.
If the electrical part of the trunk opening still fails, you can open the lock latch from inside the vehicle by manually pulling the cable.
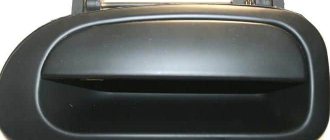
Replacing door locks
If your car doors become difficult to lock or unlock, you may need to replace the door locks. In order to do this, you will need new locks, as well as the same set of tools as to replace the trunk lock.
Before changing the locks on a VAZ 2114, you should disconnect the “mass” terminal from the battery so as not to provoke a short circuit and even a car fire.
The replacement itself is carried out in the following order:
- Remove the door trim.
- Disconnect the rods connecting the outer door handle to the lock.
- Remove the pair of screws securing the inner handle of the lock.
- Using a slotted screwdriver, disconnect the rod from the inner handle of the lock.
- Remove the handle from the door along with the rod.
- Remove the outer part of the lock.
- Disconnect the central locking wires.
- Remove the lock from the technological cavity of the door.
- Using a Phillips screwdriver, unscrew the pair of screws securing the switch.
- Rotate the switch until the slots on its lever align with the protrusions on the rod.
- Remove the switch.
- Squeeze the antennae of the plastic rod with slight force, and then dismantle it.
- Mark with a felt-tip pen the correct position of the latch on the door pillar.
- Remove the 3 screws holding the retainer in place (this is best done with an impact screwdriver).
- Remove the retainer and the shims underneath it.
Removing locks from other interior doors is done in exactly the same way. Reinstallation of locks and latches is carried out in the same order, but in reverse order.
That being said, there are a few important points to keep in mind.
- First, before installation, all metal parts of the lock should be lubricated with thick lubricant.
- Secondly, if necessary, you should adjust the length of the pull of the external handle - in this case, you need to ensure that the lock can be locked with a key without any difficulty.
- Thirdly, you should adjust the new latch in the same way as when replacing the trunk lock.
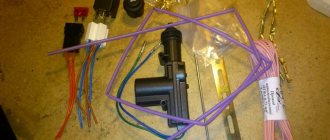
Instructions for dismantling and replacing the mechanism
Buy a suitable device. You can choose the appropriate part for your Lada Granta car. This is a good option because it has an electric drive and a limit switch. Unfortunately, when installing a part of this option, you will have to install your own fastening; you can make it from a small steel angle, for example, 40 * 40 * 4 mm. The corner can be cut with a suitable tool, for example, a grinder
Similar articles
What to do if the central locking does not work when opening and closing the car doors?
It is important to consider the size of the purchased device, as well as the location where it will be installed. The manufactured metal part must be coated with a suitable color. Then plug the hole from the previously installed lock. To do this, you can use the plug from the manual window lifter.
It also needs to be painted the same color. If during installation of the product it was necessary to get rid of the wiper, you can use the wires coming from it and connect one to the drive of the part, and the second to the connector of the mounting block. Return the bracket and tighten the finished fixation device.
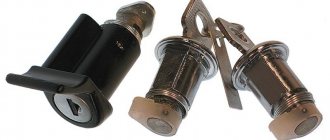
Reasons for replacing the lock cylinder on a VAZ
Most often, the lock cylinder in the doors of VAZ-2113, 2114 and 2115 has to be changed in the following cases:
- In case of defects or breakages of the locking ring or fixing post. Both of these parts are located in a plastic rod cap and are easily destroyed under the influence of an aggressive external environment - during large temperature changes, in the cold season, etc. The problem is often discovered when a car owner tries to open the car in cold weather. The key starts to turn, but the mechanism does not work. If the cylinder is additionally loaded at this moment (for example, by pressing the door, knocking on it, pushing or pulling), the part will come out of the handle socket.
- When worn. During the operation of the car, the internal pins of the device wear out and when you try to turn the key in the cylinder, the parts begin to cling to each other, which ultimately leads to their destruction.
- If the car owner decides to upgrade the door handles or install European locks.
Old castle larva