The problem with the VAZ-2109 is that over time the door becomes loose and the operation of the locks is disrupted. In most cases, adjustment and adjustment of the lock is necessary. The situation is more complicated when the lock simply jams. This often happens on the driver's side. In this case, it is worth replacing the lock, but do not knock it out with a wheel wrench. As a temporary measure, the door lock cylinder on a VAZ-2109 car can be replaced.
Repair of interior door locks
Losing keys or jamming a lock is an unpleasant situation for any car enthusiast. Do not break the door or locking mechanism. Carefully open the door so as not to damage the rods and the body of the locking mechanism. After this, proceed to the rest of the work. Instructions for removing and replacing the Euro handle cylinder are as follows:
- Remove the door trim. This job won't take much effort, but be careful not to damage the material.
- Disconnecting the rods is one of the most difficult parts of the job. Pick up the bottom one with pliers and remove it from the handle. Then it is easy to insert it back. To remove the top one, press the screwdriver against the handle, thread the unnecessary wire through the rod and pull sharply. Without a screwdriver, the rod will bend.
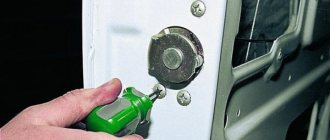
- Using a 8 key, unscrew the handle.
- Before further work, remember the position of the lock. Pull out the pin from the side and remove the rod.
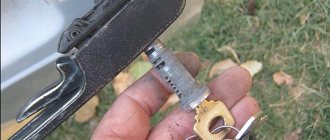
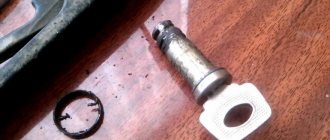
- Remove the spring and pull out the cylinder.
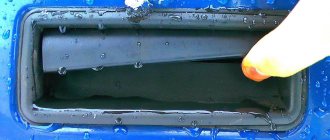
- Lubricate the groove where the cylinder was located with WD-40.
- The new cylinder is supplied with the key. Do not remove it until the lock is installed. Sometimes a new part needs to be carefully finished with a file. This happens if it is made in China or is simply of poor quality.
- If the pin does not fit into the hole freely, then you need to lightly file the place for it.
Assembly occurs in reverse order. Don't forget to connect the rods and check the lock's functionality before you lock the car for the first time. This work will take you no more than an hour. The trim is always installed last, after adjusting the locking mechanism.
Replacing the tailgate locking device cylinder
Buying a new car trunk lock and cylinder is quite simple at any auto supply store that sells locking devices for car doors. There is no need to immediately remove the key from the hole in the cylinder, since after this it is almost impossible to put the mechanism back together. You can easily remove the trim and gain access to the trunk locking device by removing a few rivets. After this manipulation, you need to unscrew the two nuts without touching the terminals located on their bolts. The next step is to actually replace the old mechanism and the cylinder itself with new parts. The cylinder and lock should be screwed with factory bolts and the area covered with sheathing.
You can forget about the poorly functioning lock of the “nine” for a long time by trying to change it to the automatic electric lock of the “Kalina”. You need to pay attention to the fact that you should use a lock from a Lada with a sedan body type, and not a hatchback - they differ in their design from each other. The next element of the new design, which will need to be installed in place of the old lock, is the counterpart, which can also be taken from the Lada Kalina lock. It can be easily installed on the trunk of a VAZ 2109 car and does not require significant changes.
Installing a Kalina lock means that it will be opened using an electric drive or mechanically using a lever from inside the car. Therefore, it is worth purchasing a special kit for the central locking. Electrical wiring will require the installation of a button, relay and fuse (8 or 16 A). In addition to these structural elements, you will need two more plastic or rubber plugs, as well as a bracket - a small corner with side dimensions of 30 mm and a thickness of 1-2 mm.
The tools that will help replace the device are:
- angle grinder;
- keys for 8 and 10;
- drill.
The cost of a new device will definitely pay off in a year, so there is no need to worry about your investment. In addition, all the materials required for the new mechanism are quite cheap. Replacing a lock is a very important thing that you can do either yourself or trust the repair specialists.
Features of door adjustment
The adjustment work involves changing the height of the rods. The rods are attached using plastic tips that have a ball joint inside. Correct adjustment of the door lock is carried out by pulling out the groove. Next, you will need to twist slightly counterclockwise or clockwise. The lock is adjustable by selecting the ideal length. So please be patient.
Reasons for replacing the VAZ 2109 lock cylinder
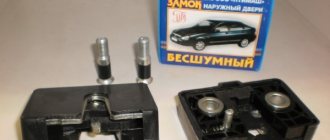
The VAZ 21099 lock should operate silently. The appearance of extraneous sounds or problems when opening/closing the device occurs for the following reasons:
- jamming due to low temperatures;
- failure of the locking ring;
- broken pins;
- destruction of the thrust cap;
- failure of the retaining post.
Sometimes it is enough to lubricate the device to start working again. If the problem is in the teeth, then they will cling to each other, blocking the rotation function, then the core will need to be replaced.
Replacing and adjusting the trunk lock
The work is carried out in the following order:
- The casing is removed.
- Replace the support mechanism. If the lock's supporting tooth breaks. Replace not only the cylinder, but also the new body. In general, this work is no different from what needs to be done to repair a door lock.
- Adjustment is carried out using the lower clamp. Unscrew the nuts and remove the washers. Assembling and disassembling the lock will help you adjust the lock. In this case, you need to act using the selection method. The desired result is the moment when the door closes effortlessly and does not vibrate when slamming and driving the car.
More extensive work is required if the retainer bushing is broken. If you are changing the lock assembly, then before its fasteners are fully tightened, you need to adjust the latch. Only after the lock closes perfectly can you tighten the fastening nuts to the maximum.
"Nine" and the door lock device
Theoretically, the lock mechanism can be divided into 3 parts: a handle with a cylinder and a button, the main mechanism, and the inner door handle. All nodes and connections between them are shown in the diagram.
Door lock mechanism VAZ-2109
The node labeled “2” looks like this.
Internal mechanism (not collapsible)
4 rods fit to it, that is, to this node. Two of them are connected to the external handle, and in order to dismantle it, the rods are disconnected.
If there is no electrical wiring inside the door, you do not need to disconnect the battery before performing repairs.
In other cases, that is, when power windows or locks are installed, the battery must be disconnected. To do this, as many people know, it is enough to remove the “negative” terminal. This means that before repairing locks, the hood is opened first, not the doors. Anyone who violates such a requirement will, at best, have to change burnt fuses.
Volkswagen Passat ignition switch replacement
The first signs that the ignition switch is worn out as much as possible, and you need to replace its components or replace the ignition switch assembly as soon as possible:
- Key jammed.
- No reaction when turning the key (the car does not react to the movement of the key, only after two or three attempts everything becomes normal).
Required Tools
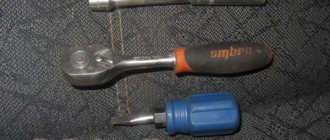
For this procedure you will need the following tools:
- Set of hexagons.
- Screwdriver Set.
- Socket wrench.
- Ratchet.
- Hammer.
- Drill.
- Rags.
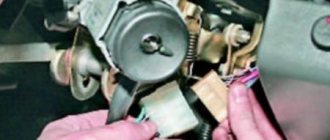
Replacing the ignition switch
The procedure for replacing the ignition switch takes from one to several hours, depending on the level of training, the availability of the necessary tools and the conditions of the repair procedure.
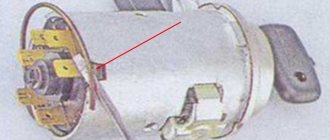
Using a screwdriver, remove the signal cover (tear it off carefully). Turn off the power to the car by removing the negative terminal from the battery. Disconnect the two conductors from the signal terminals
Be careful not to rip them off. Unscrew the steering wheel nut with a socket and then remove it. Remove the plastic casing. To do this, you need to unscrew the three mounting screws. Disconnect all connectors from the switch block. Disconnect the connectors from the contact group. Remove the ignition switch connector from the vehicle. Now you need to disconnect the switch group. Remove the bushing together with the puller. Knock off the bushing. Remove the spring after successfully removing the bushing. Remove the bolt that secures the ignition switch housing. Remove the plastic sleeve. Insert the key into the lock and only then completely dismantle the lock body. Remove all lock parts from the steering rack. Remove the contact group from the housing
To do this, you need to unscrew one mounting screw. Assess the condition of the ignition switch contact group socket. As a rule, a certain “cylinder” is replaced on the ignition switches. To do this, you need to press on the stopper of the larvae. Drill a hole in the required location. Use a nail or other sharp object to remove the larva from the body. Assess its condition in more detail Replace with a new one. Assembly is carried out in the reverse order of removal.
Egnition lock
On modern cars, it is almost impossible to completely wear out the ignition switch, but on older Passat models, a similar nuisance happens from time to time. As a rule, ignition switches die by 150 thousand km. operation of the vehicle.
Replacing the ignition switch with a new one is always problematic, since the lock may break during a crossroads between two cities. In this case, you only have to call a tow truck, and loading the car is a problem, since, usually, along with a worn ignition switch, the steering wheel is blocked.
They also often replace ignition switches after their car has been stolen or robbed (there are many examples when robbers, having watched enough movies, inserted screwdrivers into the locks with the hope that the car would start and drive). After the above points, replacing the ignition switch is a necessity.
Replacing the front door lock
If the mechanism malfunctions, partial repair of fragments or full replacement of the device is practiced. Algorithm of actions:
- The plug and the inner handle are removed.
- The casing is dismantled - the clips snap off.
- The front trigger glass position switch is removed along with the wiring harness block. The nuts are unscrewed with a wrench.
- Traction is turned off. To do this, remove the pin from the tip and the return spring.
- The screws holding the lock box are unscrewed.
- Internal elements are lubricated.
- A new device is inserted.
- The rod, retainer, and spring are returned to their place.
- The bolts are tightened.
- The functionality of the device is checked.
Only after this is the door structure reassembled: the electronics are connected, the facing part is fastened, and the internal handle is screwed on.
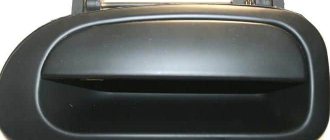
How to install euro handles on a VAZ 2109, 2114.
To install the Euro handle on a VAZ 2109, 2114, we squeeze it out and try to insert it into the socket. The fit is a little tight. After installing the handle in the technological hole, you need to push it a little in the direction of travel of the car and the handle completely sits in place. Now you can screw it on
Door opening rods are included with the Euro handles. Two short ones go to the rear doors, two long ones to the front ones. We put on the required rod and adjust it by unscrewing or screwing the plastic attachment onto the rod. We try to open and close the door. If the door does not open, then unscrew the plastic cap a few turns; if the door does not close, then tighten it.
All! Euro pen installed! Now all that remains is to assemble the door card. It is assembled in the reverse order of disassembly.
How to install Euro handles on a VAZ 2109, 2114 is no longer a secret for you!
Replacement of all door locks on VAZ 2108, VAZ 2109, VAZ 21099
Note! First, before starting work, from the car door on which you are going to replace any lock, first remove the trim; you will find information on how to remove the trim from a car door “in this article”!
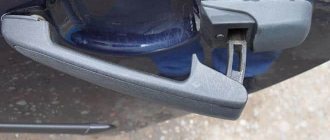
Replacing the outside door handle:
1) First, disconnect both rods from the inner lock of the outer handle, to do this:
1. First, use a screwdriver to pry up the “door handle trigger rod” and then disconnect it.
2. Then, in the same way, disconnect the second rod “door lock switch rod” from the internal lock.
Note! For more details on where both rods of the internal lock are located, see the photo below!
2) Next, unscrew one inner retaining nut that secures the outer handle to the car door.
3) And after unscrewing the inner nut, completely unscrew the last nut, which is located on the edge of the door and also holds the outer handle.
4) And then remove the outer door opening handle, together with the rods, from the car door.
Replacing the lock cylinder:
1) First, remove the outside handle from the car door, if you still have it removed. (see "Removing the outer handle")
2) After removing the handle, using an awl or a thin screwdriver, push out the locking pin of the lock.
3) And then, on the back side of the handle, remove the lock leash.
4) Next, use a screwdriver to pry the spring of the outer handle cylinder.
5) And then remove it.
6) To complete the operation, insert the door opening key into the cylinder, and then remove the cylinder from the handle.
Replacement of external and internal door lock:
Replacing an external door lock: 1) In order to remove the external lock from a car door, read a separate article on this matter, published earlier on our website, the article is called: “Replacing an external lock”
Replacing the inner door lock: 1) First, use a screwdriver to remove both screws that secure the outer lock to the car door.
Note! It is best to unscrew these two screws with an impact screwdriver, but if you don’t have one, then use a regular screwdriver! (If you do not know about such a screwdriver or do not know how to use it, then look at the article entitled: “What is an impact screwdriver and how should it be used?”)
2) After unscrewing the screws, remove the outside lock from the car door.
3) And after that, remove the inner lock from the inside of the car door.
4) After removing the internal lock, remove from it using a screwdriver the lock washer that locks the “internal drive rod”.
5) And after disconnecting the lock washer, remove the “internal drive rod” from the lock.
6) Next, disconnect the plastic clamp that secures it from the “lock release button drive rod”, and then remove the rod from the lock.
Replacing the inner door handle:
1) First, use a screwdriver to unscrew both screws that secure the door handle to the car door itself.
2) Then put your hand into the inside of the door, and then remove the door handle from there.
3) After removing the handle from the inside of the door, disconnect the traction cable from it, and then remove it from the car.
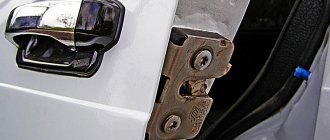
Replacing the lock retainer:
1) First, use a hammer and an impact screwdriver to unscrew the central screw securing the lock retainer.
Note! If you do not have an impact screwdriver, then unscrew the central screw securing the lock retainer using a regular screwdriver!
2) After unscrewing the screw, remove it from the retainer.
3) Next, unscrew in exactly the same way as the central screw, two more screws that secure the clamp, and then remove the clamp from the car body.
Note! Before removing the latch, we recommend that you circle the place where the latch was installed with a felt-tip pen, so that when you reinstall the latch, the adjustment of the door lock is not disturbed!
Important! 1) Reinstallation of the latch, cylinder, as well as locks and all handles occurs in the reverse order of removal!
Device, principle of operation
Most often the front door lock on the VAZ 2109 breaks down. The operating principle is contained in a mechanism that is located not only inside the structure, but also outside. The device is a cylinder, inside of which the teeth fall into grooves during movement. When they close, a closing occurs; when they open, an opening occurs. On the vases there are standard products with a larva. If you periodically carry out lubrication, they will last a long time. To replace or repair the device, it is necessary to remove the interior trim, disassemble the steel block, and remove the core.
The larva's device is not sophisticated, but reliable. The teeth are located on both sides. They start moving with the help of a key on which there are notches. Manufacturers lubricate the internal elements well during assembly of the device, so the mechanism works properly for a long time. Inside the larva there is a latch that controls the operation of the pins and a rod that connects the chain of elements. If a tooth breaks, the case is damaged, or the groove is blocked, the mechanism will cease to perform its functions.
Changing the contact group
Exploded view of the lock
From a cost point of view, replacing one contact group is the least expensive:
- All our actions are repeated in principle, as in the case described above with removing the lock, you will have to remove the casing, and so on
- To avoid the common nuisance associated with mixing up contacts, it is recommended to number them (or otherwise mark them) before disconnecting them.
- This measure will save your nerves and time
- Some models of locks have a locking ring in their contact group, and here we need an awl to remove it
- It’s important not to forget to put it back in place later.
- Then everything is assembled back and screwed to the steering column
That's all, all that remains is to finish watching the video and calmly change any part of the lock.