Damage to doors, especially their locks, not only causes discomfort to the driver, but also calls into question the safety of personal belongings, so replacing a VAZ 2114 door lock is not a procedure that should be postponed. Since the quality of workmanship and metal consumption of domestic door locks do not allow for great success, their breakdowns and malfunctions are quite common.
Trouble can await the driver at any moment when the driver’s door “suddenly” does not open and you have to exit through the passenger door. The situation is much worse when the door is left open and the car is left “unsecured” if the lock is broken.
Reasons for replacing the lock cylinder on a VAZ
Most often, the lock cylinder in the doors of VAZ-2113, 2114 and 2115 has to be changed in the following cases:
- In case of defects or breakages of the locking ring or fixing post. Both of these parts are located in a plastic rod cap and are easily destroyed under the influence of an aggressive external environment - during large temperature changes, in the cold season, etc. The problem is often discovered when a car owner tries to open the car in cold weather. The key starts to turn, but the mechanism does not work. If the cylinder is additionally loaded at this moment (for example, by pressing the door, knocking on it, pushing or pulling), the part will come out of the handle socket.
- When worn. During the operation of the car, the internal pins of the device wear out and when you try to turn the key in the cylinder, the parts begin to cling to each other, which ultimately leads to their destruction.
- If the car owner decides to upgrade the door handles or install European locks.
Old castle larva
Why doesn't the door open from the inside or outside?
The reasons why the car door does not open from the inside and outside (VAZ-2114, 15,12,11) can be different:
- wear of some parts responsible for traction inside the latch;
- Wetting of the lock or icing of parts of the lock due to frost;
- presence of a foreign object inside;
- The battery is completely discharged when the baby shutter is on.
Individual parts on VAZ 2108-2115 cars wear out most often. This is especially true for the plastic tip responsible for traction. Over time, the material undergoes deformation and becomes more fragile. This is due to the fact that the locking device has to be closed and opened daily.
First, the unlocking mechanism begins to jam when pressed too sharply or too smoothly. And one day the day comes when the door in your VAZ-2115 or 2112 car will stop opening both from the inside and from the outside.
How to open
If you are inside the car and the door is jammed, you can get out of the car and then try to open the lock yourself from the outside.
When this cannot be done from the outside (for example, in a situation where the owner has forgotten the keys in the car), then you can use different methods: from adequate, gentle to aggressive, radical - even knocking out the rear window.
If the car window is open a few centimeters, then it is easy to pry up the handle, which is fixed in a certain position, then pull it back using a regular rope or strong fishing line.
Another option is what to do if the car door does not open from the outside VAZ-2114, 2115,2112, 2111
How to open a jammed door from the inside
If you are inside the car, but are unable to exit through another door, you can use one of the alternative opening options:
- If the door does not slam completely shut, try to get to the locking mechanism using a metal ruler or a strong, long wire.
- If it closes all the way, press the inside and outside handles simultaneously or alternately, trying to push the door out from the inside.
- The last option involves outside help. Try opening the door from both sides by pushing down on it, pressing on the door lock, using a metal ruler.
At some point, the locking lever may operate and the mechanism will open. But it is important to understand that this situation will repeat itself in the future. Therefore, it would be safer to take the car to a car service center for professional door lock repair.
Installation of a new larva
To install a new lock cylinder, you will need to follow a few simple steps:
- Unpack the new kit, prepared for replacement, and lubricate the internal moving parts.
- Install a new return spring. Usually it is not included in the standard replacement kit and is purchased separately. When installed correctly, the key should rotate freely back when in the hole.
Installing a new return spring
- Install the pin in the end of the swivel rod.
- Reassemble the door in the reverse order as described in the previous section.
How does a car door lock 2108-2115 work?
The door lock for VAZ models from 2108 to 2015 is a completely non-separable structure, which consists of several parts:
- metal base;
- constipation;
- retainer;
- spring;
- plastic case.
The lock has 3 positions:
- open;
- safety;
- closed.
The lock is controlled by the shifter. This part, which is included in the internal lock mechanism, unlocks the lock when lowered.
The door won't open
The design type of internal or external locks of VAZ cars coincides with similar mechanisms from Porsche cars of brand 924,944. This interesting fact is often mentioned by auto mechanics when they repair door structures on domestic cars.
Work order
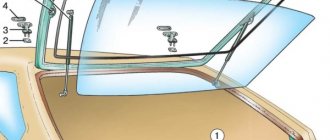
Before replacing the trunk cylinder of VAZ 2115, 2113, 2114, the following is first dismantled:
- Unscrew the 3 screws at the bottom of the door trim.
Remove the cover, from under which the glass switch and block are also removed. These two components must be disconnected.
- Remove the lining by unscrewing the 2 screws in the handle fastening.
- Carefully remove the six pistons located in the door panel (it is impossible to continue without this step).
- Unscrew the two nuts that secure the handle externally.
- Disconnect the locking mechanism, which is connected to the outer handle lock switch, and at the same time connected to the inner rod lock.
- Remove the outer handle and the pin located in the rod end.
- Remove the plastic tip located in the cylinder.
Get the larva. It only needs to be removed together with the key.Now you can begin installing the new cylinder into the locking device.
- Make preparations - unpack and lubricate moving parts.
Insert a new spring (purchased separately). If the spring is installed correctly, the key in the hole easily turns back.
- Further installation is carried out in the opposite order to that described above. Here the master will find the photographs taken during disassembly very useful.
Install the pin in the steering rod end.
To illustrate the replacement of the VAZ 2114 lock cylinder and other modifications, you can watch the video:
Correct adjustment of locks
To make the adjustment correctly, you need to know the action plan step by step:
- Lighten the tension of the bolts that secure the door lock.
- It will be good if you use a pencil to mark the contours of the retainer on the body pillar.
- The direction of shift of the latch is based on the situation: if the door closes too tightly, then it is moved outward, inward - if the door closes weakly.
- Vertical regulation occurs according to a simple relationship: if the door goes down, then the latch needs to be moved up, if the door goes up, then the latch needs to be released.
How to connect
Installation of the VAZ-2114 alarm system begins with disconnecting the battery and determining the location of the elements. The control unit is placed under the instrument panel or behind the glove box, the siren is placed in the engine compartment. Guided by the instructions and diagram, all elements are connected.
The control unit is connected through connectors to system elements, components and vehicle parts. Installation and installation begin from the farthest point of installation of the security system element, using 9 connectors (X) for connection.
Sensors (limit switches) are installed in the engine compartment, under the hood and in the trunk, which react to opening. The door trims are dismantled to install activators. The Valet service button is installed in a place hidden from prying eyes, but easily accessible to the car owner.
A transmit-receive antenna is installed on the windshield in the upper corner. It is recommended to install the shock sensor inside the passenger compartment, securing it to a metal surface. The emergency siren is installed in the engine compartment with the bell facing down.
When all the elements are located in their places, you can begin to connect them into a single system.
Scheme
The characteristics of the Starline A 91 car alarm and the connection diagram of the main elements are given in the manufacturer's instructions. When connecting a 6-pin connector X 2, you may need an additional door opener activator.
When connecting door opening sensors, use the blue/red wire of connector X 3. All alarm connection points, i.e. connectors (X) look like this:
- X 9 - connect a two-level shock sensor installed on a metal surface.
- X 8 and X 7 - connectors are not used.
- X 6 - Valet service button, installed in a hidden and easily accessible place.
- X 5 - LED indicator, installed on the instrument panel.
- X 4 - transmitting sensor receiving module; it is recommended to install it in one of the upper corners of the windshield.
- X 3 - connector with many wires.
They are connected to the systems with wires of the following colors:
- Red - with the “plus” of the ignition switch.
- Green/yellow and green/black - sidelights and side turns.
- Black—vehicle mass.
- Yellow - ignition switch (connection to blue/black).
- Gray is the “plus” of the emergency siren.
- Blue/red - “plus” of the door entrance.
- Black/red - additional blocking relay.
- Orange/gray - hood lift sensor.
- Orange/white - trunk opening sensor.
- Orange/purple - to the brakes (according to the diagram in the instructions).
- X 2 - connect door opening activators;
- X 1 - ignition switch (closed with red wire).
Connecting the central lock
In basic configurations, the control unit (CU) of the central locking (CL) performs the function of locking the door lock. The electrical circuit connection diagram is the same for all central locks, the only difference may be in the control unit, activators and the number of pins for connecting an additional device.
The main elements of the central lock include the control unit, door sensor switches (limit switches) and microswitches that fix the position of the key. All these elements are connected to the alarm and interior lighting of the car.
To connect to the central locking, it is necessary to connect the central locking control unit (CU) to the car alarm using the door opening and closing relay, to the car ignition switch and to the door opening sensors. When installing the central locking, you will need additional parts, such as:
- diode 1A - 3 pcs.;
- 3A diode - 1 pc.;
- diode 5A - 2 pcs.
Tapping into wires
In order to insert into the wires, you first need to free them from under the threshold trim. To do this, unscrew the fastening screws and remove the upholstery. Underneath there are 2 wire harnesses running to the instrument panel. One of the harnesses contains the parking brake wire. 2 wires are connected to the sidelights and side indicators.
When inserting into the parking brake wire, 1 diode is installed, and 2 diodes are installed in the wire that powers the side headlights and side turn indicators. The terminals of the insertion wires are connected to connector X 3 of the alarm control unit.
Autostart
One of the functions of the Starlin car alarm system is auto engine start. In order to install with autostart yourself, you need to use the ignition switch wires. The lilac wire is connected to the battery. Blue (ignition switch) is connected to the alarm control unit via connector X 1.
To connect the tachometer sensor, it is connected to a gray/black wire coming from connector X 3. Connect ground from the main unit using the black wire of connector X 3.
Types of door handles
The handle squeaks when pressed
The most common problem and easily solved. Eliminate as follows:
- unscrew the mounting plate using a screwdriver
- disassemble the mechanism
- lubricate all metal parts, such as WD-40
- reinstall the handle.
The handle is loose
The handle on your door has become loose and there is a gap. Backlash is the gap between the contacting elements of the front door. How to fix it?
Most likely the locking screw is loose and needs to be tightened from the outside and inside.
If this does not help, then we disassemble the handle further. Remove the decorative ring and tighten all the screws or screws with a screwdriver. We do this on the inside and outside of the door.
Watch detailed video instructions on how to adjust the input handle if play appears.
The lock latch does not work
This happens when the latch tab stops working or the pin that operates the latch is not long enough.
How to check? You need to unscrew the fastening bar and check whether the lock tongue works. To do this, insert a screwdriver into the lock slot and turn it.
If the tongue works properly, the problem lies in the insufficient length of the pin. There are two solutions:
- buy a new pin at any hardware store and cut the required length
- Place wood chips or pieces of thick cardboard into this socket (on the end side of the handle) to “extend” the existing pin.
The pressure part of the handle fell off, but the mount remained in place
This happens when the retaining ring flies off the groove on the end part:
- or because the ring burst
- or because it has unclenched.
You need to check what exactly happened in the following way - unscrew the fastening bar and look at the condition of the ring. If it is whole, then bend it further. Then return the handle to its place and put the ring on top.
If the ring has burst, then you can only buy a new door handle.
Door handle square broke
If the door handle falls off or does not stay in the grooves, this may be due to a broken square inside the structure. The square is the base of the door handle. The main advantage is that the square can be purchased and replaced.
Choose a new square made of steel, preferably from the manufacturer of your door handle, so that it fits in size. If you can’t find it, you’ll have to cut it with a grinder to the size of the old square.
The handle does not return to its original position after pressing
This happens when a spring falls off or bursts. This part is located behind the retaining ring and connects all structural elements together.
To repair the spring, remove the retaining bar, remove the retaining ring, and secure the spring. If the spring has burst, you can replace it. But often finding a similar part becomes problematic. In this case, you need to buy a new handle entirely.
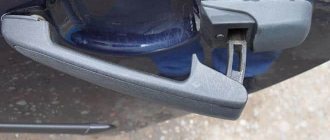
Lada 2114 › Logbook › Euro handles: Installation
twist the plastic tip,
to adjust the gap in the handle
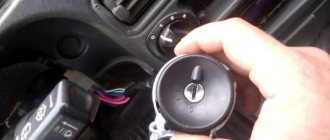
and put it on for traction. DMMC has just such a problem, we will fix it as soon as possible. The handles have such a principle of operation that when you pull on it, the rod goes down, pressing on the lever that opens the lock; when you release the handle, the lock lever rises along with the rod and the higher the rod rises, the smaller the gap will be or not It will be possible if you configure everything correctly. The back door was dismantled together, and I was the one who installed the handle. I found on the Internet how to remove the window handle, I’m posting it here in case it comes in handy for someone.
It's pretty clear what's what.
The process is the same, remove the old handle and install a new one. We adjust the rods and see that they, by the mother of their feet, are 2.5 cm longer than they should be! And even if you tighten the tip, the situation cannot be corrected. The desire to do something was completely repulsed. I put the old pen back and went home. I couldn’t sit quietly - I started reading the drive, maybe someone had already encountered this - no, no one had. I decided to bend the urge,
It doesn’t look strong, but I couldn’t bend it, I asked my father, he bent it, then they adjusted it several times by bending it in place and installed this handle at night.
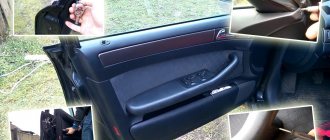
Three days passed, I was again able to get to the car in the literal sense of these words. Already with another friend I began to remove the trim from the driver's door.
I began to tear off the vibration with a screwdriver, the paintwork was not damaged much, but I managed to tear off the vibration without casualties.
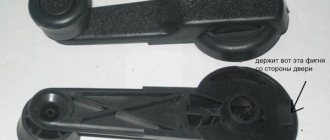
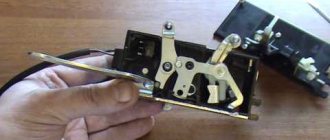
There are two rods in the driver's door, one from the lock cylinder, the other from the handle.
We disconnect them with a knife.
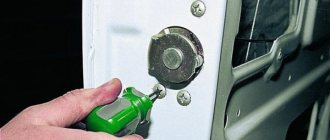
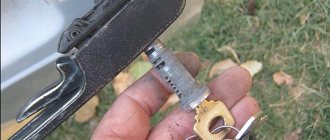
Now you need to rearrange the cylinder, if you did “One key for the whole car”, then you know how to do this, if not, then read and watch. First, we knock out the pin that holds the round piece of plastic, then we disconnect the spring with pliers, insert the key into the cylinder and pull it out.
READ How to install a motorcycle suspension yourself
We insert the larva into the new handle, and perform all the actions in reverse order. Then we insert the handle and hook the rods to the lock levers.
Well, before that I bought vibration sheets and stuck them on the front passenger door,
where I tore it off on Sunday. And then I put on the trim, otherwise it’s not cool to drive without one column. Ready.
And now about the effect. I'm happy. It doesn’t look familiar, holding the handles and opening the door is also unusual, but it’s convenient. Finally, my friend opens the door with ease; before she didn’t have the strength to press the hook of the handle. Everything works perfectly!
Source
Recommendations
Reassembling and lubricating individual parts will not work if the fragments are heavily worn. It is better to remove the cylinder from the core and install a new one. Recommendations for replacing the VAZ 2114 door lock:
- Partial repairs or lubrication will only temporarily restore life to the closing mechanism. If problems arise, it is better to replace the entire cylinder.
- After installation, it is necessary to periodically lubricate the mechanism. Experienced motorists use silicone substances for this.
- The repair procedure is carried out in a well-lit room at a comfortable temperature.
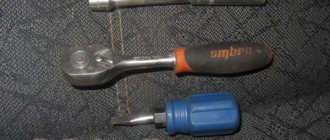
- To change the element, you will need a set of screwdrivers, pliers and lubricant.
- Sometimes the springs have to be replaced along with the cylinder. They are purchased separately.
The cylinder fragment is sold as a set. The price depends on the manufacturer. If you buy a cheap Chinese version, it will cost about 150 rubles. It is better to give preference to VAZ spare parts. The cost of such a kit is 400-500 rubles.
Causes of problems opening the door
If incorrect operation of the VAZ 2115 design is noticed and the rear door does not open from the outside, then the reason lies in the locking mechanism or poor adjustment of the door fragment. The following factors indicate the need for repairs:
- the door slams loudly when closing;
- an unpleasant creak appeared;
- there is a rebound from the car rim;
- the door leaf has shifted;
- an increased gap appeared between the body and the door rim;
- subsidence, sagging, movement of the door pillar to the side;
- when closing there is a sharp kickback because the backlash is set incorrectly;
- the door closes only after a strong push;
- the lock is broken or blocked, the handle (external, internal) does not work;
- There was a crackling noise in the door panel while the vehicle was moving.
Special attention is required to the gaps, hinges, internal filling of the door, lock and handle. The exterior of the vehicle is inspected in a closed and open state. It is also determined whether there is any distortion or other changes in the body shape. The doors should be at the same level, the diameter of the gaps should be no more than 1–2 cm. Having examined the condition of the hinges, a search for mechanical damage is carried out, the functionality of the opening mechanism and the operation of the lock cylinder are checked.
Fixing problems
If the key or silumin rod breaks, do not immediately buy a new block with a handle. On sale you can find special repair kits for door handles VAZ 2108-099, where these parts are in 2 copies.
This way, you can save money and change the key yourself without any hassle by removing the handle using this sequence of steps:
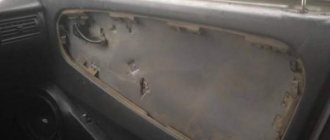
- Remove the trim panel.
- Disconnect the handle rod connecting it to the locking device from the mechanism.
- When the glass is fully raised, unscrew the 2 knobs of the handle to the gate card.
- Remove the handle, replace the parts and return them.
If the rod is disabled, the inner pad must be removed and secured in place as described above. The moment the trim panel is removed, make sure it causes that link to come loose so history doesn't repeat itself when the door is closed.
Malfunctions of the locking mechanism can only be eliminated by removing it. In a situation where the device has a lot of wear, as happens on the driver and front passenger doors, it is recommended to replace the lock with a new one.
Once it is in place, adjustments are required to ensure that the locking parts are perfectly aligned. To adjust the locking, you need to lock it in different positions, reaching the optimal value.
Owners of domestically produced cars often need to carry out one or another repair of car parts. One of the common and inconvenient problems is a broken door lock. It forces quick action, as it calls into question the driver’s comfort and the safety of personal belongings.