The car should always respond clearly to rotations of the steering wheel. If this does not happen, then there can be no talk of any security. This applies to all cars, including the VAZ 2107. The main steering unit is the gearbox, which has its own faults, which can be identified and eliminated without visiting a service center.
- Steering column
VAZ 2107 steering column deviceSteering wheel
- Steering shaft
- Gearbox
- Lubricant leak
- How to remove a column
Video: how to replace the steering gear on a “classic”
- Video: repairing the steering column of classic Zhiguli cars
- Video: how to change the oil in the steering column
- Video: how to reduce play in the classic steering gear
INSTALLATION OF PARTS AND ADJUSTMENT
Installation of steering rods on a car of the classic VAZ 2107 model is not particularly difficult and is performed as follows:
- We measure the length of the old assembly using a steel ruler as accurately as possible.
- We adjust the new unit using a threaded connection to the desired size and lock it with locknuts.
- Installing the part in place is carried out by inserting a finger into the seat and screwing the nut with a certain torque.
Timely replacement of faulty components of the VAZ 2107 steering mechanism will allow you to avoid serious troubles and emergency situations on the road.
How does steering work?
DIY steering rack repair
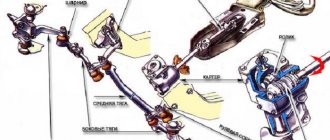
In fact, the VAZ-2107 steering column is a complex mechanism that includes several elements. Firstly, this is the steering wheel itself, which you rotate with your hands. Secondly, the cardan transmission running from the steering wheel to the gearbox. Thirdly, it is the gearbox itself, which converts rotational motion into translational motion. In this case, the output of the gearbox affects the lever, which shifts the rods to the left or right, depending on which way you turn.
But the gearbox has one more function - it allows you to increase the force applied to the steering wheel several times. As a result, turning is much more efficient. The gearbox consists of several elements - a worm gear, which is driven by a gear wheel connected by a cardan transmission to the steering wheel. Transmission oil is filled inside the mechanism.
everything useful is here
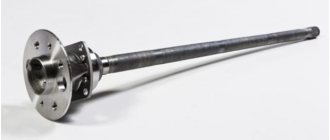
Replacing the steering shaft
Remove the negative terminal from the battery. Remove the steering wheel, steering shaft mounting bracket covers, steering column switches, disconnect the ignition switch connector
Using a 13mm wrench, unscrew the nuts from the coupling bolts of the intermediate shaft universal joint forks and remove the bolts.
Using a 10mm wrench, unscrew the two shear screws securing the steering shaft bracket.
If the bolts have their heads cut off, use a chisel to loosen the remaining round heads and finally unscrew them with pliers. Locking washers are installed under the screws. Using a 13mm wrench, unscrew the two nuts securing the steering wheel bracket... ...and remove the bracket. We remove the upper shaft from the splined connection with the intermediate shaft. Remove the intermediate shaft from the splines of the gearbox worm shaft. Flare the curved edges of the bracket pipe on the steering wheel side, insert the key into the ignition switch and turn off the lock. With light blows we knock the shaft together with the bearing out of the pipe.
The second bearing can be knocked out using a suitable piece of pipe. The needle bearings are installed in shock-absorbing plastic cages. If the shaft or its bearings are worn or damaged, replace them.
Malfunctions of the steering column of VAZ 2107
Given the simple design of the column, there are few options for malfunction. It is important to monitor its condition and promptly eliminate problems when they arise.
There are several main types of faults:
- Column creaking. The cause of the squeak may be wear of the column parts, deformation of the trim panels, or malfunction of the steering switch unit.
- Steering wheel play. There are probably two reasons for this. The first is that the steering wheel fastening nut has been loosened. Fixing this problem is easy. But if this is not done in time, the splines on the shaft will break and the steering wheel may turn, leaving the car uncontrollable. Another reason is wear of the steering gear worm gear. Then it is necessary to adjust the gearbox or repair it.
- Play in the plane of the steering wheel or column axis. This is a dangerous malfunction that appears when the elements of the mounting bracket or spline connections are worn (loose).
Loosening the nuts and bolts of the spline fasteners over time leads to the abrasion of the splines, causing the car to lose control. Therefore, the column play must be eliminated immediately.
DEVICE OF RODS AND TIPS
The middle solid element of the trapezoid has the simplest design - an iron rod with two hinges at the ends.
The rod fingers are inserted into the second holes of the bipod (counting from the end of the lever), screwed with 22 mm castle nuts and secured with cotter pins. The middle lever is slightly bent forward so that when the trapezoid moves, the rod does not touch the gearbox
Not all service station mechanics know about the correct installation of the middle trapezoid rod. My friend, who came to the service to change a set of steering rods on a VAZ 2107, was convinced of this. The inexperienced master placed the middle section in a backward bend, so it was not possible to go far - exactly until the first turn.
Side rods consist of the following parts:
- short (outer) tip with ball pin;
- long (inner) tip with hinge;
- connecting clamp with 2 bolts and nuts M8 for a 13 mm spanner.
The element is made detachable to adjust the toe angle of the front wheels. The length of the lever can be changed by rotating the threaded clamp and thus adjusting the position of the wheel for straight-line movement. The threads of the tips and inside the clamp are different - right and left, so when rotated, the rod lengthens or shortens.
The hinge pins of the Zhiguli side rods are attached to the outer holes of the bipod
The design of all hinge ends is the same and includes the following parts (the numbering coincides with the diagram):
- Ball pin with M14 x 1.5 thread for a 22 mm castle nut. The radius of the sphere is 11 mm; a hole is made in the threaded part for a cotter pin.
- A rubber (or silicone) dirt-proof cover, also known as a boot;
- Metal body welded to a rod with M16 x 1 thread.
- The support liner is made of a composite material, otherwise - a cracker.
- Spring.
- A cover pressed into the body.
The short outer ends of the side rods are the same, but the long ones are different. You can tell which part belongs to it by its bend—a lever curved to the right is installed on the right side. The ball pins of the side rods are attached to the first holes of the bipod of the pendulum and gearbox.
The identity of long tips is determined by the bend of the rod
A car mechanic I know suggests distinguishing between long tips like this: take the part in your right hand by the hinge, pointing the ball pin downward, as if you were holding a gun. If the “barrel” is curved to the left, you have a left-hand rod tip in front of you.
Signs of wear in tie rod ends
The most vulnerable element of the tie rod is the tip. The average operating time is considered to be about 40 thousand kilometers. The average figure was chosen because several factors influence tip wear: driving style and road conditions. Another reason could be a low-quality boot installed together with a counterfeit tip; it can easily burst or tear.
Once a tip malfunction has reached a critical point, it becomes immediately clear - you will immediately begin to feel play. You will not be able to repair the tips; they are replaced as an assembly.
Tactics for inspecting and checking the steering of a car
Exhaust system for VAZ 2107: design and repair
General check of steering functionality
The condition of the steering must be checked regularly - the life of the car driver may depend on it. When inspecting the steering, you should pay special attention to the condition of the threaded connections, protective covers and caps, and the degree of their wear. If it is high and these units are torn, cracked or have lost elasticity, they must be replaced
The fact is that water, dirt or dust getting on them can quickly damage these elements.
Also, during the check, it makes sense to turn the steering wheel all the way in each direction, while visually and also audibly checking: – whether the steering wheel and steering mechanism are securely fastened; – whether there are any gaps in the tie rod joints; – whether the pin nuts on the ball joints are securely tightened; – whether there is any binding or interference that could make it difficult to rotate the steering wheel.
1. Check the condition of the caps that protect the ball joints of the steering rods. If they are torn, cracked or have lost their elasticity, these caps must be replaced.
2. The assistant involved in the inspection must sharply turn the steering wheel in both one and the other direction, and more than once. At this time, the inspector visually and aurally determines the reliability of the steering mechanism (there should be no knocks, and the mechanism should not move on the fastening studs).
5. ...And also whether the nuts of the adjusting couplings are tightened securely.
6. To check the condition of the pendulum arm on the bottom of the car, you should swing it sharply and strongly in different directions. If gaps are detected, it is worth taking action.
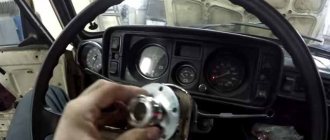
How to check the play (aka free play) of the steering wheel?
If the free play of the steering wheel exceeds the permissible parameters, it becomes more difficult to drive the car. The fact is that the vehicle begins to respond to any driver’s actions with some delay
It is important to remember that if, when adjusting the steering mechanism, the increased travel cannot be eliminated, this means that the steering is faulty (the fastening of the steering mechanism, pendulum arm or steering rods may be loose, as well as wear of their constituent elements)
5° is the maximum permissible amount of play. In order to calculate it, the car must be placed on a flat and non-slip surface. When calculating, the inspector will need a ruler, as well as wire or chalk used to make marks. In order to recalculate the existing play in millimeters, the following formula is used: L = (5°/360°)pD, for the purpose of which L is the play of the steering wheel itself, mm; p - 3, 14; D is the outer diameter of this steering wheel, mm. The maximum possible play for a steering wheel whose outer diameter is 400 mm should not exceed 17 mm.
You will need: a ruler, chalk (or wire) for making marks.1. The front wheels must be set in a position that corresponds to straight-line movement
After the front wheels are installed in this way, you should pay attention to the spokes of the steering wheel. If they are not located horizontally, this means that the adjustment of the angles at which the wheels are installed is broken
Or there are defects in the suspension or steering.
2. The ruler must be installed so that its end rests on the dashboard, and its edge touches the outer surface of the car steering wheel. Then the steering wheel should be turned in any direction until the front wheels begin to spin. After this, a mark is made on the rim of the steering wheel or a wire is secured.
3. The ruler should remain in the same place, and the steering wheel should be turned in the other direction, also before the front wheels turn. A second mark is made on the steering wheel rim.
4. The distance between the marks made must be measured.
Replacing the steering column of a VAZ 2107
Replacing a steering column is a rather difficult task, but it can be done independently if you have some experience in car repair. You will need the following tools:
- Wrenches 17 (socket and open-end).
- Socket heads for 17 and 30.
- Handle with ratchet.
- Mount.
- Hammer.
- Collar.
The column is removed in the following order:
- Disconnect the battery.
- Remove the steering wheel.
- Remove the steering shaft housing.
- Remove the wire block from the ignition switch.
- Remove the ignition switch.
- Remove the steering column switches.
- Remove the steering shaft clamped in the column.
- Using a 30mm socket and a powerful wrench, unscrew the steering column mounting nut. The tightening force here is significant, so the knob must be a fairly long lever. If you can’t unscrew it, you can lengthen the knob by putting a piece of pipe on it.
- Unscrew the 3 bolts securing the column to the body. The procedure is not easy - the distance between the parts and the body is too small, the bolts are difficult to keep from turning. A handle with a ratchet will come in handy here, which will speed up the process.
- Remove the column from the shaft. To do this, you need to knock the column off the tie rod splines using a pry bar. This must be done in jerks, resting your feet on the body.
- Unscrew and remove the shaft seal installed at the bottom of the column.
After dismantling the old column, it is necessary to clean the seat from dirt. Before installing a new column, you should check the condition of its hinge joints and needle bearings. If everything is in order, you can begin installation, which is done in the reverse order of removal.
When installing a new VAZ 2107 steering column, you must pay special attention to ensure that all fastening bolts and nuts are well tightened. Considering how important this unit is for driving a car, play, and even more so, slippage of the steering column splines can lead to tragic consequences.
When installing the steering wheel, pay attention to the position of its spokes.
After completing the installation of parts and connecting the wire block to the ignition switch, you can connect the battery. Column replacement is complete.
What types of steering wheel torque amplifiers are there (simply - steering wheel)?
Statistics show that almost no one buys a new VAZ 2107 to immediately install power steering. If you have money, they take a foreign car. So the amplifier is often installed on a used car. And it’s unlikely that anyone will want to invest about half the cost (about 31-32 thousand rubles in 2014 prices) into a VAZ 2107 worth 50-60 thousand rubles. Therefore, we will tell you in more detail about the more popular option - the electromechanical amplifier (EMA). It is a little cheaper, its cost is about 20 thousand rubles.
Electromechanical power steering (electric power steering) copes well with the load, its installation is much easier and faster. It works on the VAZ 2107 almost as efficiently as oil power steering. And most importantly, it fulfills the motorist’s eternal dream of regular maintenance, as it works on the “set it and forget it” principle. As the name suggests, the electric power steering is connected to the on-board 12 V power system (with a maximum current of 50A) and the steering.
Let's consider a domestic EUR for the VAZ 2107 produced in Makhachkala.
Electric power steering is provided for the VAZ 21214, but it is quite suitable for the entire range of classics, including the VAZ 2107. It is attached instead of a regular steering column.
The principle of operation is the creation of additional torque by the electric motor, acting synergistically and synchronously with the driver’s hands. The steering wheel gain is 5.7. This means that the turning effort, in which the driver “put in” 20 kg of his own force, now requires 3.5 kg.
What is included?
- the amplifier itself;
- bracket for mounting on the steering column of a VAZ 2107;
- intermediate cardan;
- auxiliary parts such as wires, fasteners and decorative casing.
How does electric power steering work?
The operating principle is complex, using feedback:
- The torque sensor “catch” the direction and force applied to the steering wheel by the driver and transforms the impulses into an electrical signal; In addition to the torque sensor, there are sensors for crankshaft speed, vehicle speed, ignition key position, etc., each of them also generates a signal and sends them to the control unit.
- The block, according to a special processing program, produces a summing signal, which is sent to the stator of the electric motor.
- The electric motor performs “reverse work”, turning the electrical impulse into steering movement.
The presence of a speed sensor leads to the fact that the faster the car moves, the “weaker” the force, that is, the steering wheel becomes “heavier”. At the same time, the electric motor turns on only when needed, and then you can hear it hum slightly.
The EUR starts working on the VAZ 2107 4-6 seconds after the ignition is turned on.
If any problems occur in the power circuit, the electronics will simply turn off the power steering, the warning light will come on, and the car will return to manual control.
Installation of EUR. For this:
- First, as with any work, we disconnect the ground from the battery.
- replacing the cardan in the steering column;
- drill mounting mounting holes according to the attached diagram;
- We run the power supply wire, install the fuse and the crankshaft and speed sensor wires.
- We install a protective casing on the outside.
The whole work takes about 2-3 hours. In order to install the device, almost all work is carried out in the salon.
The product warranty is 1 year from the date of purchase.
In general, if you are selflessly devoted to the VAZ 2107, then you can install electric power steering.
Another option: EUR from Priora. To install on a classic series, a special adapter plate and a special cardan are required.
Attention! Since during any maintenance the play of the steering wheel is measured, there is a 100% risk of “running into” a question and there is a high possibility that you will be refused an inspection with a “tuned” steering system. If you want to pass MOT honestly, then you need to:
If you want to pass MOT honestly, then you need to:
- Find an official letter from the manufacturer of the VAZ car (with stamps) stating that this particular model is approved for the VAZ 2107 and take it with you for maintenance; As far as we know, there is a letter for the 2110 family, and for the 21214. As for the VAZ 2107, is there one at all? Download for printing
- Also take a document that the electric booster was installed at a service station or service station, which is officially a representative of VAZ, and not by you personally in the garage. If in this case the authorities interfere, demand a written refusal of admission to maintenance, indicating a detailed reason, and threaten with legal punishment.
Replacing the outer short tip
Since the outer part of the trapezoid can be approached from the wheel side, disassembly can be performed without an inspection ditch. What tools and materials will be needed:
- ring wrenches size 13 and 22 mm;
- pliers;
- hammer;
- puller - a “glass” type extruder;
- a ruler at least 20 cm long or a tape measure;
- devices for removing the wheel - jack, wheel wrench, wheel chock;
- rags, fabric gloves.
The correct cup-shaped puller will never tear the rubber boot when pressing out a finger.
Also, prepare a new cotter pin, WD-40 spray lubricant, and a wire brush in advance to remove any stubborn dirt from the rod before starting work.
Why is it customary to replace tips rather than repair them:
- High-quality factory parts are made non-separable; in a garage it is impossible to remove a worn-out cracker - the hinge cover is tightly pressed into the body.
- Collapsible rods made at home using a lathe are considered unreliable. The reason is the “licked” thread profile inside the housing; under load, the ball pin is able to squeeze out the lid and jump out.
In a collapsible tip, the bottom cap is held on a thread cut by a lathe
Preparatory stage
Before removing the tip, perform a number of preparatory operations:
- Secure the car on the platform and unscrew the desired wheel. To provide maximum access to the tip, turn the steering wheel to the right or left as far as it will go.
- Clean the threaded connections of the clamp and ball pin from dirt with a brush, and treat with WD-40 aerosol.
- Use a ruler to measure the distance between the centers of both rod ends. The goal is to ensure the original length of the lever during the replacement process, otherwise the toe angle of the front wheels will have to be adjusted.
- Unbend and remove the cotter pin from the castle nut.
Disassembly instructions
Dismantling the old part and installing a new tip is carried out in the following order:
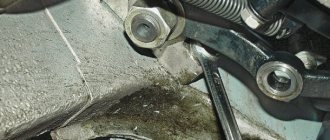
- Using a 13 mm wrench, loosen one nut of the tie rod, located closer to the wheel. Do not touch the second nut.
- Using a 22 mm wrench, unscrew the nut securing the ball pin to the trunnion.
- Put on the puller (tapping with a hammer is allowed) and turn the central bolt with a wrench until it rests on the ball pin and pushes it out of the eye.
- Unscrew the tip from the clamp by hand, turning it counterclockwise.
- After checking the presence of lubricant inside the new part, screw it in place of the old tip. By turning the hinge and using a ruler, adjust the length of the rod.
- Tighten the clamp, insert the pin into the pin and tighten with the nut. Place and straighten the cotter pin.
Some car enthusiasts, instead of measuring the length, count the revolutions when unscrewing the tip. This method is not suitable - the length of the threaded part on parts from different manufacturers may differ by 2-3 mm. I had to face this problem personally - after the replacement, the car began to pull to the right and “eat up” the edge of the tire. The issue was resolved at a car service - the master adjusted the toe angle of the wheels.
If you are unable to find the puller, try knocking the pin out of the eye by hitting the pin with a hammer. Method two: lower the wheel hub onto the block, screw a nut onto the thread of the pin and hit it with a hammer through a wooden spacer.
To press out a finger, you need to hit it exactly on the pin so as not to rivet the thread.
Knocking out is not the best way to disassemble a connection. You can accidentally rivet the threads, in addition, shocks are transmitted to the hub bearing. It’s better to buy an inexpensive puller - it will be useful for replacing other hinges.
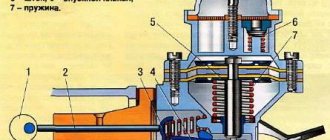
↑ Section of the steering gear housing
1 — plate of the adjusting screw of the bipod shaft; 2 — bipod shaft adjusting screw; 3 — adjusting screw nut; 4 — oil filler plug; 5 — steering gear housing cover; 6 - worm; 7 — steering gear housing; 8 — bipod; 9 — nut securing the bipod to the shaft; 10 — spring washer; 11 — bipod shaft seal; 12 — bipod shaft sleeve; 13 — bipod shaft; 14 — bipod shaft roller; 15 - worm shaft; 16 — upper ball bearing; 17 — lower ball bearing; 18 — adjusting shims; 19 — lower worm bearing cover; 20 — roller axis; 21 — roller ball bearing; 22 — worm shaft seal; B, C - marks.
- Set the bipod of the steering mechanism to the middle position, for which align the marks on the crankcase and on the worm shaft (see figure).
- Temporarily install the wheel on the shaft so that the spokes are horizontal and in this position connect the universal joint fork of the intermediate steering shaft with the worm shaft, then attach the steering shaft bracket to the body.
- Remove the steering wheel and install the turn signal, headlight and windshield wiper switch onto the steering shaft.
- Place the steering wheel on the shaft in its original position and, pressing the steering wheel, as shown by the arrows in Fig. check that there is no radial movement of the shaft. If there is radial movement, replace the upper steering shaft or bearings.
- Check that the steering wheel rotates smoothly and easily in both directions, then tighten the steering wheel nut and tighten it at three points.
- Slide the housing of the turn signal, headlight and windshield wiper switch towards the steering wheel until it stops and tighten the switch mounting clamp.
- Connect the wires to the ignition switch terminals and secure the switch with screws to the steering shaft bracket.
- Connect the turn signal, headlight and windshield wiper switch connectors to the car wiring harness connectors.
- Place the two halves of the facing casing on the shaft and fasten them with screws. Install the horn switch on the steering wheel.
- Install the middle and side left link ball pins on the bipod and secure them with nuts.
- Adjust the toe-in of the front wheels and check the force on the steering wheel, which when turning the wheels on a smooth plate should not exceed 196 N (20 kgf) (when measured at the wheel rim).
To secure the assembly, position the steering wheel spokes horizontally and connect the worm shaft to the lower end of the steering intermediate shaft.
Afterword
You will not have any difficulties when removing and installing the steering gearbox or cardan transmission. But it is worth noting that after all work on the steering, it is necessary to adjust the camber and toe of the wheels. This will save the tires and body. And don’t forget to fill the gearbox with transmission oil. This will allow the mechanism to operate as easily as possible. This is how the VAZ-2107 steering column changes. The price of a used part is 500-1000 rubles, depending on the condition.
What does your nose shape say about your personality? Many experts believe that you can tell a lot about a person's personality by looking at their nose.
Therefore, when you first meet, pay attention to the stranger’s nose
15 Cancer Symptoms Women Most Often Ignore Many signs of cancer are similar to symptoms of other diseases or conditions, which is why they are often ignored.
Pay attention to your body. If you notice
What is it like to be a virgin at 30? I wonder what it’s like for women who didn’t have sex until almost middle age.
How to look younger: the best haircuts for those over 30, 40, 50, 60 Girls in their 20s don’t worry about the shape and length of their hair. It seems that youth is created for experiments with appearance and daring curls. However, already last.
Our ancestors slept differently than we do. What are we doing wrong? It’s hard to believe, but scientists and many historians are inclined to believe that modern man sleeps completely differently than his ancient ancestors. Initially.
Never do this in church! If you are not sure whether you are behaving correctly in church or not, then you are probably not acting as you should. Here's a list of terrible ones.
Repair and maintenance
Over the years of operation it has been proven that the steering on VAZ 2107 vehicles has impressive reliability. However, this does not take away the fact that the machine requires periodic inspection and repair.
When performing maintenance, it is important to check for increased play as well as increased wear on the ball joints. To do this, you need to turn the steering wheel from one side to the other.
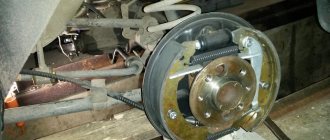
If the wheels do not respond when the steering wheel is turned 5 degrees from its original position, this indicates severe wear. Here you will need to repair the steering column on the VAZ 2107. To avoid the need for urgent and rather expensive repair of the steering gear on the VAZ 2107, it is necessary to change the oil in the worm gear housing. This is done at intervals of 60 thousand kilometers. Leaks may occur through the seals, so they are carefully checked 2-3 times a year. This is one of the weak points of the system. The swing arm should be inspected by slowly rotating the steering wheel from side to side. If the parts move in a vertical plane, then surgical intervention is required.
To do this, the drive and steering mechanism are dismantled completely or partially. Everything depends directly on the nature of the breakdown.
Check which parts have defects and what has failed. Inspection is required for each component of the mechanism. If parts are worn out, there is no point in trying to repair them. There is only one way out - a complete replacement of worn-out components of the steering system on a car from a Volga company.
If problems arise with the steering, it is advisable to contact a professional service station.
Photo of the VAZ 2107 steering gearbox
You can replace the gearbox yourself, but the process is complicated and requires at least minimal experience and skills.
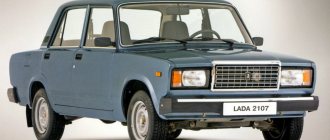
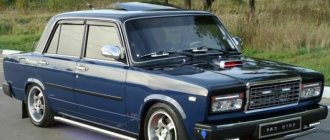
The VAZ "Seven" is a true classic of the domestic automotive industry. Unlike modern LADAs, they are more reliable and durable, which is proven by the huge presence of these cars on our roads.
Of course, the VAZ 2107 has long been outdated, it does not have a hydraulic booster, and you have to apply sufficient force to turn and maneuver. But for connoisseurs this is not a problem.
Hello). If you got an old Zhiguli car from your Father or Grandfather; or maybe you yourself already bought a Zhiguli; then perhaps you are familiar with this problem, which is actually widespread among old VAZ cars.
As you understand, from the title of the page that I visited, I’m talking about an unadjusted steering gearbox. How does this problem manifest itself?
Main syndromes - 2; - this is a very tightly clamped steering wheel (so tightly that some people turn it not only with two hands, but also help themselves in this with the weight of their own body).
Agree, the situation is very unpleasant, especially in the summer, somewhere in a traffic jam). And in winter it’s probably not good either. And if, when the driver turns such a tight steering wheel, he becomes muscular and strong, then a tight steering wheel definitely has a negative effect on the health of the car; — the resource of such a gearbox will be several times less than what is normally adjusted.
Do you think nothing could be worse with the steering gear)? Now imagine that you are turning the steering wheel (and by the way, it rotates very, and even very easily), but the wheels do not turn at all). By the way, I heard stories where the steering gear was so worn out that even when the steering wheel was turned 180 degrees, the wheels did not even think of moving.
Of course, the last case is completely neglected, and here the usual adjustment will certainly not help. But imagine; - you are driving along the highway 80 - 100 km per hour, the steering wheel is at the zero point, you turn it by 10 degrees, and - the car goes straight. Agree, this is also not at all pleasant.