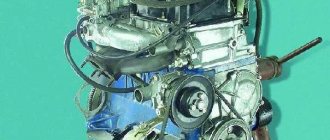
A manual gearbox (MT) is designed to convert and transmit torque from the engine to the vehicle's transmission with a stepwise change in gear ratio.
Models of the Volzhsky Automobile Plant were equipped with four and five-speed gearboxes. The VAZ 2107 began to be equipped with a five-speed gearbox in 1982. This box is one of the successful design solutions of “classical” mechanics.
Like all mechanisms that have rotating and rubbing parts, the gearbox is also subject to intense wear. The structure of the unit is complex, so maintenance and repairs are best done in specialized workshops with the assistance of trained personnel.
Although every car enthusiast who knows how to hold a tool in his hands, having studied the device and the procedure for performing work, can carry out maintenance and repairs in his garage.
Five-speed manual transmission
The seventh model Zhiguli has a five-speed gearbox with five forward speeds and one reverse.
It is made of duralumin and has similar covers on the front and back. The clutch cover is attached to the front of the box using studs. A steel cover is installed on the bottom of the device. There are sealing gaskets between the box body and each lid.
The front cover is connected to the clutch housing using a press fit. There is a hole in it for the input shaft to exit and install the cuff.
Inside the box, shafts with gears, synchronizers and gear shifting devices are installed in a certain order. There is an oil filler hole on the right, and a drain hole with a magnetic plug on the bottom.
At the bottom left of the cover comes the speedometer cable, which is driven by the secondary shaft using a gear.
The gear shift lever is on top. Consists of a gear selection device, rods and a locking mechanism. A handle is attached to the lever on top. This entire structure is attached to the lid using three studs.
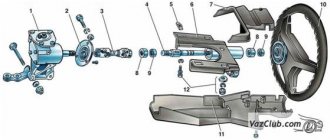
Type of gearbox:
- Clutch cover.
- Breather.
- Box body.
- Rear cover.
- Gear shift lever.
- Lever housing.
- Coupling flange.
- Screw.
- Speedometer drive.
- Tray cover.
- Hole for filling.
Exploded parts:
- Fork for engaging 3rd and 4th gears.
- Fork for engaging 1st and 2nd gears.
- Fork fastener.
- Engraving washer.
- Fork rod for engaging 1st and 2nd gears.
- Rusk.
- Fork rod for engaging 3rd and 4th gears.
- Gear shift lever.
- Fork rod for engaging 5th gear and reverse.
- Rusk.
- Rusk.
- 5th gear and reverse detent spring.
- Retainer cover with gasket.
- Retainer springs.
- Ball retainers.
- Fork for engaging 5th gear and reverse.
- Sleeve.
Moving parts of the gearbox:
- Intermediate shaft.
- Front intermediate shaft bearing.
- Rear main shaft bearing.
- Input shaft with 4th gear gear.
- Synchronizer clutch for 3rd and 4th gears.
- Synchronizer clutch hub.
- Synchronizer clutch for 1st and 2nd gears.
- Synchronizer clutch hub.
- Front secondary shaft bearing.
- Secondary shaft.
- Intermediate bearing of the secondary shaft.
- Rear secondary shaft bearing.
- 5th gear synchronizer clutch.
- Synchronizer clutch hub.
- Reverse gear.
- Gear with 5th gear synchronizer.
- Speedometer drive gear.
- Gear block for 5th gear and reverse gear.
- Gear block bearing.
- Reverse intermediate gear.
- Reverse idler gear axis.
- Rear intermediate shaft bearing.
- Gear with 1st gear synchronizer.
- Gear with 2nd gear synchronizer.
- Gear with 3rd gear synchronizer.
Repair of a new VAZ 2107 gearbox (5 speed, t
I bring to your attention an article on repairing a 5-speed gearbox of a new type (the so-called “torn package”) Some of the photos of the process will be repeated, please do not kick too much, the photos were mainly taken during assembly, since the gearbox and parts were washed, and the camera remained clean: ). What additional tool will be required? A retainer for the input shaft (I made it from an old clutch disc hub), a high 30" socket for loosening the output shaft nut, a pair of powerful screwdrivers, a circlip remover, an impact screwdriver with a hammer and, ideally, a torque wrench.
It’s unlikely that anyone will have a special stand at hand for repairing a gearbox; in principle, you can sort it out on a table, or you can also carefully clamp it in a vice. So, we drain the oil from the gearbox, remove the gearbox from the car, remove the elastic coupling, the rear gearbox mount along with the yoke and remove the clutch fork with boot and release plate. We thoroughly clean the gearbox from dirt using a metal brush, a suitable tool such as a screwdriver, and ideally blow it out with a compressor.
Even though the oil has been drained, there is still some oil left in the gearbox, so we take this fact into account when disassembling. Remove the lower gearbox cover.
We remove the rubber boot of the coupling from the secondary shaft, the stopper from the secondary shaft, using a suitable drift we knock out the centering sleeve of the coupling. If you cannot “pick up” the sleeve, then unscrew the secondary shaft nut as much as possible and screw it back. At the same time, the bushing will almost come off its place. We engage any gear, fix the input shaft, and unscrew the secondary shaft nut to “30”. Remove the conical spring washer.
If you don’t have a primary shaft lock at hand, you can use an aluminum spoon by inserting its handle between the gears of the primary and intermediate shafts. Don't be afraid for the gears, the luminaire won't harm them. Remove the flexible coupling flange.
Turn off the reverse light switch. Be careful not to lose the copper sealing washer.
Unscrew the nut and remove the speedometer drive
We engage second gear and remove the gear shift lever housing by unscrewing the three nuts along the outer radius.
Unscrew the two nuts securing the trouser bracket to the gearbox
We remove the bracket and take out the mounting bolt with a square head located under it.
Unscrew the five nuts securing the rear cover on the outside and one on the inside.
We remove the back cover, sometimes you have to tap it lightly with a hammer. The bearings may become separated, part of the bearing remains on the shaft, part in the back cover, no problem.
Remove the inner bearing race (hereinafter referred to as P) from the secondary shaft, then remove the speedometer drive gear. AHTUNG! There is a small ball under the drive gear, don't lose it!
We remove the oil deflector washer. We inspect it; there was a case when the washer came off the bushing.
Using a screwdriver, set the 1-2 gear shift rod to the neutral position. We fix the input shaft and use the “17” head to remove the bolt securing the gear block. Then it will move by hand, but do not unscrew it yet.
Now you need to remove the clutch cover (aka bell). We unscrew one nut to “13” and six nuts to “17”.
We remove it and put it aside. A spring cone washer remains on the input shaft or in the bell. We inspect it for wear and cracks. Sometimes, instead of a cone washer, there may be a thick ring.
Holding the input shaft with the clamp, unscrew the front bolt of the intermediate shaft (hereinafter referred to as the washout) with the head set to “19”.
We unscrew the two bolts of the plate that holds the springs of the gear shift rod clamps.
Under the plate there are three springs, two of the same length (for the 1-2 and 3-4 gear rods) and one longer (for the 5th gear and reverse rod). We take out the springs.
There are three balls under the springs; they are in oil and do not fall out on their own, but still keep an eye on them during further disassembly.
Now unscrew the gear block bolt and remove it. Now we take out the gear block. Move backwards and sideways. The 5th gear gears move back a little.
A spacer ring is installed between the gear block and the rear shaft shaft. It sometimes sticks to the gear block and falls off at the most inopportune moment.
We remove the 5th gear assembly from the secondary shaft with the 5th gear shift rod, the Z.H. gear, and the clutch.
Remove the spacer ring.
Using a suitable thin object, push the retainer ball out of the socket. I use a tube from VD 40, it is flexible.
Now, using pliers, we open the retaining ring of the 5th gear synchronizer clutch hub and remove it.
Remove the hub from the secondary shaft of the gearbox.
Remove the spring washer. It faces the Z.H. gear.
Removing the reverse gear
Now you need to remove the wash shaft. To do this, you need to remove the front bearing. Sometimes it is enough to catch the locking ring with screwdrivers and the P. will come out.
Sometimes it doesn’t want to come off, then you have to screw the bolt a few turns into the groove and, creating a stop with a screwdriver, lightly tap the bolt with a hammer and move the bearing out of place. Sometimes the bearing is disassembled, no big deal, it can be reassembled.
Now we remove the rear P. shaft by pushing it out of the housing with a screwdriver.
We unscrew the bolt securing the 3-4 gear fork to the 3-4 gear shift rod with the head set to “10”.
We take out the rod and at the same time pull out the plug.
AHTUNG! There is a small locking block located in the shift rod. When the rod is pulled out, it may fall out.
Then remove the locking block from the gearbox housing.
We take out the locking ball.
We unscrew the bolt securing the 1-2 gear fork to the 1-2 gear shift rod with the head set to “10”.
We take out the rod and at the same time pull out the plug.
Then remove the locking block from the gearbox housing.
We take out the locking ball.
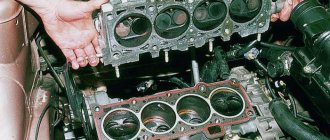
We remove the needle bearing. We inspect the friction surfaces of the needle bearing inside the input shaft and on the secondary shaft. If there are traces of chipping, the shaft will have to be replaced.
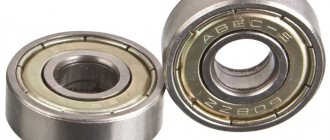
We wash the bearing and carefully inspect it; the treadmill and balls should not have any signs of chipping or pitting. The oil-lubricated bearing should rotate quietly, without jamming or noise. This is what a worn out treadmill looks like - the cause of the noise
If there is a need to replace the bearing, then: Remove the retaining ring from the outer race of the bearing
Using a puller, remove the retaining ring; if it does not come off, then knock it down with a drift and remove the spring washer.
We press out the bearing and press on a new one. We press the retaining ring into place using a punch along the shaft
Using an impact screwdriver and a hammer, pry it out of place and unscrew the three screws of the locking plate.
If there is no damage, the screws can be reused, but we always install new castle washers during assembly. Remove the locking plate.
We remove the bearing from the gearbox housing complete with a lock washer.
Holding the gears on the shaft, pull out the secondary shaft assembly from the gearbox housing.
This is what the removed secondary shaft assembly looks like.
We remove the 3-4th gear clutch from the shaft and inspect the clutch. There should be no nicks on the teeth. Now we disassemble the secondary shaft to inspect 1st and 2nd gears. All parts are simply removed from the shaft. Sometimes the hub of 1-2 gears can fit quite tightly, a couple of light blows to the 2nd gear gear and the hub will come off. This is what the 1st and 2nd gear parts removed from the secondary shaft look like.
If you need to gain access to the 3rd gear gear and the blocking ring, then disassemble the shaft in the following order: Clamp the shaft in a vice through a rag.
It is not possible to release the stopper; we knock it out of place with a drift and the ring will pop out on its own.
Remove the 3rd gear gear assembly.
We put the gear, hub, and spring ring in place.
Using a circlip remover, place the circlip as close as possible to its location on the shaft.
Using a punch, strike from above and along the perimeter of the ring to push the retaining ring into place.
We inspect the gears, the teeth should not have nicks, the edges should be sharp
We inspect the gears; chipped teeth are not allowed. When purchasing a new gear, pay attention to the teeth of the gear itself - there should be no nicks or other defects. There were new gears with nicks, which caused noise. We inspect the synchronizer blocking ring; there should be no marks on it from the coupling (notches along the ring or an annular groove) In the photo on the left there is a worn ring, on the right there is a new one
To replace the locking ring, press the ring against the gear (compressing the spring) and use a puller to release the locking ring.
Remove the stopper and locking ring
We put a new ring, put it back together, check the ease of movement, it shouldn’t stick.
We inspect the coupling-nicks on the teeth; there should be no signs of wear in the groove under the fork. Worn coupling
We inspect the shift forks. Wear on the working surface of the fork is not allowed. For comparison - new and worn fork
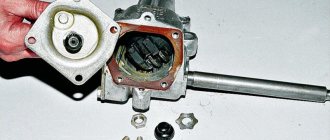
We change the input shaft oil seal. From the clutch side, through the hole in the guide sleeve of the release bearing, use a drift of a suitable diameter to knock out the oil seal.
We thoroughly clean, degrease, lubricate with a thin layer of sealant, and put the oil seal in place using a 32 socket.
We examine the supporting “soldier” of the clutch fork for wear. We inspect the spring thrust washer (wear of the supporting surfaces, cracks are not allowed).
We apply a little lithol to the seat of the washer and put it in place. With the help of lithol, the washer is “glued” and will not fall out during assembly.
Let's now work on the back cover. As a rule, the race of one or two bearings remains in it. And the oil seal also needs to be changed. We knock out the plug using an extension cord.
We knock out the oil seal using a screwdriver.
Using a screwdriver and a hammer, knock out the bearings from the rear cover housing.P. They sit without tension, so they come out easily.
We wash the body, degrease the oil seal seats and plugs. We apply sealant to the seats of the oil seal and plug. Press in the oil seal and plug.
Gear ratios at the gearbox
The seventh model of the Zhiguli received a good version of a five-speed gearbox. The designers of the Volzhsky Automobile Plant took a box from a VAZ 2105 as a prototype, replaced the gear ratio of the main gearbox pair from 4.3 to 4.1, then to 3.9 and obtained the following gear ratios.
| home | 1st gear | 2nd gear | 3rd gear | 4th gear | 5th gear | Reverse |
| 4,1/3,9 | 3,667 | 2,100 | 1,361 | 1,000 | 0,820 | 3,530 |
The gear ratio is the ratio of the number of teeth on the driven gear to the number of teeth on the drive gear.
Primary shaft
The input shaft transmits torque from the engine crankshaft through the clutch disc to the gearbox. The disc is located on the splines of the front part of the shaft. A constant mesh gear is rigidly mounted on the shaft.
For free rotation, it is placed in two bearings. One bearing is located at the end of the crankshaft, the other is in the front cover of the gearbox.
Secondary shaft
In a complex gearbox mechanism, the secondary shaft is the final stage in converting torque and transmitting it to the cardan. The gears of the first three speeds move freely on this shaft. At a certain gear, they engage with the intermediate shaft gears and provide the required torque.
The shaft is placed in bearings, there are three of them. One is pressed into the end of the input shaft, the other into the box body, and the third into the rear cover.
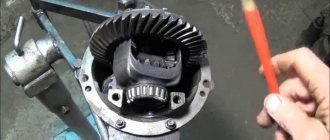
Intermediate shaft
The intermediate shaft transmits rotation from the primary shaft to the secondary shaft.
He plays the role of a satellite. The gears and shaft are made from a single piece. It is installed on three bearings. The gears for fifth and reverse speed are located on it.
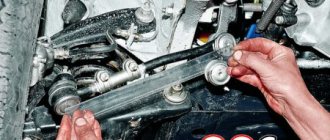
Forks
In the process of switching speeds, forks are involved, which move gears along the shaft to a certain place.
The gear shift lever moves the forks.
Technical characteristics of manual transmission
In the operating instructions, the technical characteristics of the box are indicated together with the characteristics of the transmission. This is given in tabular form:
| Clutch | Single-disk, dry with hydraulic drive and central diaphragm spring |
| Transmission | Mechanical, five-speed, three-way, three-shaft, with synchronizers on all forward gears |
| Gear ratios | |
| First | 3.667 |
| Second | 2.100 |
| Third | 1.361 |
| Fourth | 1.000 |
| Fifth | 0.820 |
| Reverse | 3.530 |
| Cardan transmission | Twin-shaft with intermediate support and elastic coupling |
| main gear | Hypoid |
| Final drive ratio | 3.9 or 4.1 |
| Differential | Conical, two-satellite |
Main technical characteristics of the VAZ 2107 box
The “seven” gearbox works in conjunction with the clutch. The VAZ 2107 is equipped with a single-plate dry clutch, which has only one (central) pressure spring. This is quite enough for convenient control of vehicle speeds.
The gearbox is only mechanical, three-code, five-speed. The VAZ 2107 has synchronizers for each forward gear.
The device weighs quite a lot - 26.9 kg without oil.
Video: operating principle of a VAZ manual transmission
What kind of gearbox can be put on the “seven”
The VAZ 2107 will willingly work with both a four-speed and a five-speed gearbox, so only the driver decides which model to choose.
If we talk about domestic “VAZ” gearboxes, then initially the “seven” was equipped with a four-speed unit, so you can always buy and install this particular unit. The main advantage of such a box is its increased performance - the driver drives 200 - 300 thousand kilometers without ever investing in repairing the device. In addition, the four-speed gearbox is more suitable for low-power 1.3-liter engines or for drivers who often transport heavy loads by car, since the gearbox is initially designed for high traction.
Five-speed gearboxes allow you to reach higher speeds. Younger drivers like this, since at the start and when overtaking you can squeeze maximum power out of the car. However, over time, such boxes began to be made from low-quality materials, so switching is not always clear.
Foreign gearboxes can also be installed on the VAZ 2107. Boxes from Fiat are most suitable, since it was this car that became the prototype of domestic models. Some car enthusiasts install boxes from older versions of BMW, but the installation procedure can take a lot of time, since the car’s original design does not provide for non-standard units.
When changing the factory gearbox, you should keep in mind that the new gearbox may not fit the dimensions and mounts to the VAZ
What kind of gearbox can be installed on a VAZ 2107
Initially, the “Seven” was produced with a “four-speed”, so you can install any VAZ gearbox from rear-wheel drive “Zhiguli” on it. You should know what functions the car will perform. If you use it as a workhorse, carry loads, pull a trailer, then a four-speed gearbox will do. It is more durable and resistant to variable loads. If high-speed driving on highways is necessary, then a five-speed gearbox is suitable.
It is possible to install boxes from foreign cars.
The best option is a box from an Italian Fiat model, since this is a prototype of our VAZ.
You can also install it from an early model BMW, but for installation you will have to redo the fastenings.
Transmission malfunctions
The box on the seventh model Zhiguli is considered a reliable unit. If you maintain it regularly and treat it with care during operation, then repairs will not be needed for a long time. However, all components and parts are subject to wear. There are many reasons for this. In any case, if a malfunction is detected in the gearbox, it is necessary to carry out diagnostics and repairs.
Most malfunctions occur of the following types.
One of the gears does not engage
Without opening the box, we can assume that:
- the hinges and springs are worn out and need to be replaced, or better yet, a complete repair;
- on synchronizers, the rings have become unusable and need to be replaced;
- synchronizer spring burst, replace;
- The teeth on the transmission gears are worn, replace the gear.
Knocks out gear when driving
It happens that when you turn on a gear, it does not turn off randomly. Possible reasons:
- the lever hinge is jammed, inspect and clean;
- the clutch is faulty, it may not engage completely, adjust it, if the disc is worn, replace it;
- The shift lever is broken, replace it with a new one;
- Forks, shift gears are bent, replace with new ones.
Crunching and grinding in the box while driving
This problem appears for the following reasons:
- the bearings are worn out, they should be replaced, and at the same time check the seals;
- the teeth of the gears are worn out, in this case it is better to make a major repair;
- There is not enough or no lubricating fluid in the gearbox, find the leak and fix it, add oil.
Grease leaking from box
The gearbox is designed so that lubricant cannot leak out spontaneously. But if an oil stain has formed under the car, an inspection should be made and the leak eliminated.
The reason may be:
- wear of oil seals and sealing gaskets due to natural aging of rubber must be replaced with new ones;
- the fastenings of the covers on the box have become loose, tighten all the nuts and bolts completely;
- mechanical damage to the body or lids of the box; if the steel lid is damaged, it can be welded. If the crankcase is damaged, it is better to replace it, since it is cast from an aluminum alloy.
Gearbox seals and their replacement
Oil seals in any mechanism where they exist act as gaskets. In this case, they are designed to seal the holes from which the primary and secondary shafts come out. Previously, oil seals were cast from rubber.
Currently made from modern composite materials, more resistant to temperature changes and aggressive environments.
Input shaft oil seal
The oil seal, which is installed on the input shaft, has the following dimensions:
- • outer diameter – 47 mm;
- • internal diameter – 28 mm;
- • width – 8 mm;
- • weight – 20 grams.
It is installed in the shaft output hole in the clutch housing and serves to prevent lubricant from flowing through the shaft.
There is no difficulty in replacing the oil seal, but the gearbox will have to be removed.
The order of work to change the oil seal is as follows:
- Remove the clutch cover from the gearbox.
- Remove the release bearing and clutch fork.
- Remove the used oil seal by picking it up with a screwdriver or knife.
- Clean the place where the oil seal was located and wipe it dry.
- Install the new oil seal in its original place.
- Replace all the parts that were removed from the box in reverse order.
Secondary shaft oil seal
The oil seal, which is installed on the secondary shaft, is larger and has dimensions:
- outer diameter – 56 mm;
- internal diameter – 32 mm;
- width – 10 mm;
- weight – 10 grams.
It is installed at the output of the secondary shaft at the rear of the box.
The order of work to change the oil seal is as follows.
- Unscrew the nut securing the flange, having previously secured it.
- Remove the centering metal ring from the shaft.
- Remove the flange and washer using a puller.
- Pull out the old oil seal using a tool.
- Clean and wash the seal area.
- Install a new oil seal.
Replacing gears and synchronizers
The work of replacing gears and synchronizers is one of the most difficult when repairing a gearbox. There is a standard repair kit containing all the necessary parts to help cope with the task. It is advisable to prepare a special tool.
Gears and synchronizers on the primary and secondary shafts are changed in almost the same way.
The process goes like this:
- remove the shaft from the box;
- clamp the shaft in a vice, wrapping it in something soft;
- Remove the retaining ring from the shaft using a special tool or a screwdriver:
- press the bearings off the shaft;
- remove the shaft from the vice, place it vertically, resting the first gear on two supports;
- carefully press the gear off the shaft;
- Carry out similar operations with the remaining gears and synchronizers.
Removing and replacing the fifth gear gear occurs differently.
The video clearly shows and explains how to do this:
How to replace gears and synchronizers
As mentioned above, independent work with gearboxes, and even more so with shafts and their elements, is fraught with many errors. Therefore, it is better to entrust the replacement of gears and synchronizers to specialists at auto repair shops.
In this condition, the gear will not be able to perform the full amount of work.
Experienced VAZ 2107 owners can watch a special video that explains all the nuances of changing these parts.
Video: a unique video on removing gear from fifth gear
Transmission oil for gearboxes
To select gear oil for the Lada gearbox, you need to take into account the region where the car will be operated.
Two types of oils are offered. The first - with a temperature range from +35 to -26, this is SAE 80W85 and the second - with a temperature range from +45 to -40, this is SAE 75W90.
The best oil is synthetic, but semi-synthetic and mineral oils will not harm the Seven’s transmission. The amount of oil in the VAZ 2107 gearbox is about 1.6 liters. The oil change time is carried out according to the instructions in the technical instructions supplied with the car.
Manual transmission oil level
The oil level in the box is checked as follows:
- drive the car onto an overpass or pit;
- clean the filler plug;
- unscrew the plug;
- measure through the hole with a probe or other object resembling a probe. The oil should be level with the end of the filler hole; top up if necessary.
Oil change
It is better to change the oil on an overpass or pit with a warm engine, so the oil will drain faster. Prepare the tool in advance, a container for working out at least two liters, oil for changing.
The order is as follows:
- clean the fill and drain plugs from dirt;
- Place the prepared container for used oil under the drain hole;
- open the drain hole and wait until the oil completely drains into the container;
- clean the plug of old oil and close the drain hole;
- pour 1.5 liters of new oil into the box through the filler hole (it’s better to fill it with a supercharger);
- let it sit for ten minutes, then check the level and top up if necessary.
Removing the VAZ 2107 gearbox
To dismantle the VAZ 2107 manual transmission, you must perform the following steps:
- Place the machine on an overpass, pit, or lift it onto a lift.
- Disconnect ground from the battery. When using a lift, the battery should be disconnected before lifting the machine. Work inside the car also takes place with the lift lowered.
- Remove the beard (radio panel).
- Press the gearshift lever and use a screwdriver to remove the locking sleeve down from the cavity of the rod (handle).
- Remove the gearbox rod (handle) and use tweezers to remove the rubber damper bushing from it.
- Use screwdrivers to spread the petals of the damper spacer bushing and remove it, as well as the lower rubber and locking bushings from the lever.
- Unscrew the screws securing the cover that covers the hole in the floor of the car in the area where the gearshift lever exits.
- Remove the cover and foam seal.
- Go into a hole (under an overpass) or lift the car with a lift.
- Remove the exhaust pipe.
- Unscrew the starter from the clutch housing and move it forward.
- Unplug the reverse switch wire.
- Disconnect the speedometer drive.
- Unscrew the driveshaft from the gearbox and remove it.
- Unscrew and remove the clutch slave cylinder from the gearbox housing.
- Unscrew the clutch housing mounting bolts.
- Place a support under the checkpoint or invite helpers to support it.
- Unscrew the 4 gearbox mounting bolts.
- Remove the gearbox from the vehicle by moving it to the rear.
After this, you can begin checking and repairing the VAZ 2107 (“5-mortar”) gearbox.
Installation of the box after repair is carried out in the reverse order.