Hello everyone, I'm tired of this auxiliary business wasting money, in a month I already bought 4 temperature sensors for the damn radiator, the parts are now a complete mess, so I went around. I found this diagram on the drive
In general, I did everything according to it, it works (I’m shocked, I’m an electrician like a VAZ car designer). In general, I’m thinking of adapting another light bulb (controller), although it’s an extra miracle, well, I still want it. Like, I turned it on, it lights up, apparently that the fan is working and it won’t be superfluous, they say turn it off otherwise the system has already cooled down :)
PS So, gentlemen, electricians, how to attach this miracle to my circuit, here’s what kind of on/off button I used on the interior heater button of a VAZ 2107 (2 positions)
VAZ 2107 is equipped with an electric radiator cooling fan. It automatically turns on when the coolant heats up to 90 degrees and under normal conditions ensures a stable engine temperature regardless of air temperature and driving mode.
But there is one problem. Sometimes the fan switching relay (sensor) breaks and the VAZ 2107 radiator fan does not start. As a result, the engine overheats and the matter, at best, is limited to boiling and leakage of coolant, and at worst, a major engine overhaul. To avoid problems, you can improve the design by organizing forced cooling of the radiator. There are two ways to do this: mechanical and electrical.
Communities › VAZ: Repair and Modification › Blog › A hackneyed topic: Fan and mounting block VAZ 2107
I’m returning to the already well-worn problem with the new type of mounting blocks.
The essence of the problem is that when installing a new type of mounting block on a classic carburetor, the cooling fan stops working. This problem is not new and the Internet is full of articles on how to fix it, but it’s still very difficult to find complete information (as they say for dummies) on the Internet, so I decided to post a clear article about solving this problem. Solution to the problem:
4 relays in the mounting block are responsible for turning on the cooling fan
Usually, when you buy a block, there is a jumper between 30 and 87 contacts instead of a full-fledged relay.
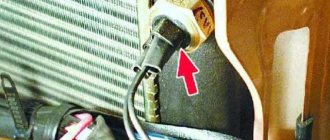
First, you need to unsolder the missing pin, it is marked 7Ш,7 (green) and goes to pin 86 of the relay.
Everything is simple here, we take a pin either from an old block, or simply grind a metal plate to size and solder it in place:
We sorted out contact 86. Now you need to apply + to pin 85 of the relay. There are many ways, the most competent one, in my opinion, is to do everything according to the diagram and instead of the missing track in the block, just throw a wire:
We insert a regular 4-pin relay instead of the jumper and you're done!
With this arrangement, voltage is supplied to the fan through 4 relays and 10 fuse, as required according to the diagram.
I hope this article helps someone
Thank you for your attention
Mechanical forced cooling of the VAZ 2107 radiator
On older VAZ models, the radiator was cooled using an impeller mounted on the water pump rotor. This solution ensured constant airflow to the radiator when the engine was running. Considering that the design of the VAZ 2107 differs little from its “predecessors”, installing such an impeller will not be difficult.
The advantage of this solution is reliability. Forced mechanical airflow of the radiator ensures that the car does not boil while sitting in a traffic jam on a hot day. But at the same time, the efficiency of blowing at low speeds is reduced in comparison with electric blowing. In winter, another disadvantage of forced cooling appears - a cold engine is additionally blown by a fan, which slightly slows down its warming up. The fact that the fan blows on the radiator on a cold engine does not in any way affect the warm-up speed provided the thermostat is working. The fact is that before the engine warms up, the coolant circulates through a small circuit, bypassing the radiator.
The mechanical drive of the VAZ 2107 cooling fan can be improved:
- Install a diffuser that directs the air flow through the radiator honeycombs. This will improve cooling efficiency.
- Move the radiator a little back, closer to the impeller. To do this, you can tilt its upper part, using rigid steel strips for fastening. The slats must be calculated so that the distance between the radiator and the impeller is approximately 2040 mm.
This way you can protect your car from overheating.
Checking and replacing the electric motor
A more complex option is to check and replace the electric motor. It is performed according to the instructions:
- Disconnect the fan power plug. Connect two wires to the fan connector, of such length that they can be brought to the battery terminals. After connecting to the plug, connect the wires to the battery and watch the fan react. No response means it needs to be replaced.
- If it works, then you need to check whether voltage is supplied. To do this, you need to place the voltmeter probes on the contacts of the second half of the plug. After this, start the engine. If you have a carburetor engine, then you need to additionally close the contacts of the temperature sensor using a screwdriver. Look at the voltmeter readings, the voltage should be from 11.7 to 14.5 V. If you have an injector, then you need to wait until the temperature reaches +85...+95 °C. After this, the on-board computer will send a signal to the relay to turn on the fan. As soon as this happens, look at the readings on the device, they should be within the same limits. Insufficient voltage or its absence indicates problems in the power circuit.
- After checking, when you realize that the fan does not start due to the motor, it is necessary to replace it. To do this, use socket wrenches to remove the two fasteners of the fan casing to the generator.
- Pull the casing towards you and release the wires from the retainer. To do this, use pliers to squeeze the fastening petals and then push them out.
- Remove the fan. While holding the impeller, unscrew the central nut securing it with a 13mm wrench.
- Remove the impeller from the shaft. Unscrew the electric motor mountings with a 10mm wrench.
- Remove the electric motor and replace it with a new one. After this, you need to reassemble the structure.
Temperature sensors rarely fail, so we will not dwell in detail on checking and replacing them. Most often the problem lies in the electric motor or power circuit.
Today we’ll talk about the reasons why the VAZ 2107 fan (injector and carburetor) does not turn on. A little earlier, we figured out how to improve the engine cooling system. The whole procedure is simple and does not require much knowledge. But an equally pressing problem is that the fan refuses to turn on in a timely manner. Let's try to find out why this happens.
For injection system
Forced fuel supply in the "seven" for the Russian market began to be used in 2006. In these car models, the fan operation and other functions are performed by the ECU. On the VAZ 2107 injector, the signal about the antifreeze temperature comes from the coolant temperature sensor, which is located on the right side of the engine cylinder block.
The data is processed by the ECU, which outputs a signal to the control relay to turn on the cooling - circuit diagram. The fan switching sensor is not needed on VAZ 2107 injection systems; it is replaced by a thermistor sensor, and control functions are assigned to the controller.
In any “seven”, to protect the fan from short circuit, there is a fuse F7 located in the mounting block.
Operation of the coolant temperature sensor for the injection system
Usually, turning on the fan on a VAZ 2107 is accompanied by a noise that the driver hears while sitting behind the wheel. A prolonged absence of sound from the device when driving around the city in the summer may indicate a malfunction in the cooling system, which can lead to antifreeze boiling and damage to engine components. The driver must react quickly to such defects so as not to spoil the “heart” of his car.
One of the possible malfunctions in the engine cooling cycle may be a breakdown of the coolant temperature sensor. In addition to the cooling system, it is responsible for the correct supply of the air-fuel mixture to the engine and its inclusion in idle mode.
The sensor that affects the operation of the VAZ 2107 injector fan consists of a semiconductor thermistor with two terminals, soldered into a housing with a thread that is screwed into the wall of the cylinder block. A constant voltage of 5 V is supplied to the device. As the temperature of the antifreeze increases, the resistance of the thermistor decreases and vice versa. At the input to the computer, passing through a resistor, the voltage drops as the coolant temperature increases to a certain level, after which the controller gives a signal to turn on the cooling.
How to check and install a new one
Checking the sensor responsible for turning on the fan does not require much effort. The following signs may serve as grounds for verification:
- The “Check Engine” light on the instrument panel is on.
- The fan operates continuously or is turned off.
- Low idle torque.
- Coolant overheating.
The cause of the malfunction may be outdated wiring. To find out for sure, you need to check it, and then move on to the sensor.
- The negative cable of the battery is disconnected.
- On a cold engine, the antifreeze drains to a level below the temperature sensor socket.
- The protective layer is shifted and the wiring from the temperature sensor is disconnected.
- Use a key to unscrew the sensor from its socket.
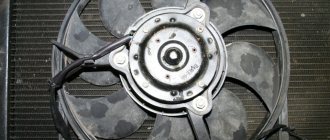
Fan motor
The electric motor is the main component of the device. The VAZ 2107 used two types of engines: ME-271 and ME-272. In terms of characteristics, they are almost identical, but as for the design, it is somewhat different. The ME-271 engine has a stamped housing, i.e., non-separable. It does not require periodic maintenance, but in case of malfunction, it can only be replaced.
Not every fan motor can be disassembled
Design and characteristics of the fan motor
Structurally, the motor consists of:
- housings;
- four permanent magnets glued around the circumference inside the case;
- armatures with winding and collector;
- brush holder with brushes;
- ball bearing;
- support sleeve;
- back cover.
The ME-272 electric motor also does not require maintenance, but unlike the previous model, if necessary, it can be partially disassembled and attempted to be restored. Disassembly is carried out by unscrewing the tightening bolts and removing the back cover.
ME-272 has a collapsible design
In practice, repairing an electric fan is impractical. Firstly, you can only buy used spare parts for it, and secondly, a new device complete with impeller costs no more than 1,500 rubles.
Table: main technical characteristics of the ME-272 electric motor
| Characteristics | Indicators |
| Rated voltage, V | 12 |
| Rated rotation speed, rpm | 2500 |
| Maximum current, A | 14 |
Forced fan activation
If the VAZ 2107 fan sensor is broken, it is quite possible to drive on a good road without noticing it. But as soon as you drive onto a country road or get into city traffic jams, the engine will start to overheat. Replacing the fan sensor is not very difficult, but requires draining the coolant. Even if you have a spare sensor at hand, replacing it on the road is problematic. There is an easier way out of the situation.
The following operations must be performed:
- disconnect “mass”;
- remove two wires from the sensor terminals and connect (“short-circuit”) them;
- insulate the exposed contacts of the connected wires;
- connect ground.
In this case, the fan will run continuously. To turn it off, you will have to disconnect the ground and disconnect the contacts.
If you have already experienced problems with the fan sensor on the road, you can install a forced fan circuit on the car that operates in parallel with the sensor. To do this, just connect a couple of wires to the terminals going to the sensor contacts and stretch them into the engine compartment. Install a separate button (toggle switch) on the dashboard and connect the wires to it so that you can close them if necessary.
In this case, if the sensor malfunctions, there will be no need to crawl under the hood to force the fan to start.
VAZ 2107 fan sensor malfunctions and performance check
It is easy to find out whether the VAZ 2107 fan switch sensor is working properly. The fan motor is quite noisy; you can hear it turning on even from inside the cabin. If the temperature gauge shows more than 90 degrees, but the fan does not turn on, you should check the sensor.
First you need to localize the source of the problem. If the antifreeze is hotter than 90 degrees, but the bottom of the radiator remains cold, the problem is the thermostat, not the fan. It is not possible to replace the thermostat on the road. To get out of the situation, you can increase the cooling by fully opening the heater damper and turning on its fan. Of course, such a solution will be extremely uncomfortable in the warm season, but, if you’re lucky, it will make it possible to get to the repair site without stopping. If this is not enough, you will have to make stops along the way to allow the engine to cool.
Another reason for overheating is low coolant level. In this case, it is necessary to quickly find and eliminate the leak and add antifreeze to the system. If it is not there, you can add water to the system. But then, as soon as possible, it is necessary to drain the liquid from the cooling system and add antifreeze.
If the radiator is hot and the fan does not start, you need to try to start the fan by short-circuiting the two wires going to the sensor contacts. If the cause of the breakdown is the latter, the fan should start working.
If the sensor is not installed on the car, you can check it using a thermometer and ohmmeter. You need to place the part of the sensor that is inserted into the radiator into water and heat it to about 90 degrees. The sensor should turn on when the water heats up to no more than 92 degrees. The switching on (closure of the sensor contacts) is indicated by the absence of resistance between the sensor terminals.
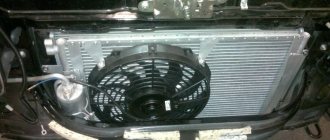
Improving the cooling system with an electric fan
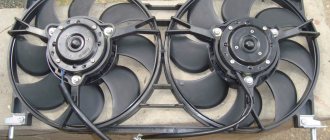
To improve cooling, you can replace the standard VAZ 2107 cooling fan with a more powerful and advanced one. Fans from Viburnum or Priora are suitable for this purpose. The eight-blade fan is especially effective, providing particularly strong air flow.
It is worth considering that the cooling system of the VAZ 2107 was initially designed for efficient operation. If it fails, the reason lies not in an ineffective standard battery, but in clogged radiator cells or a lack of coolant in the system. Therefore, if the engine overheats while the fan is running, it is worth checking the coolant level and cleaning the radiator honeycombs (or replacing it).
Does not work
Therefore, the search for reasons for the fan not turning on begins by removing the connector from the sensor with the ignition on. If the fan itself is working properly, then it should work. By inserting a load in the form of a light bulb into the connector terminals, the fan should stop. Thus, you check the electrical circuit of the fan motor. In this case, it will be fine, but the fan sensor will have to be replaced. However, it should be noted that there are also substandard sensors on sale, which, when installed on the engine, will also not work.
If, after removing the connector from the sensor, the fan does not work, then its functionality must be checked by connecting it directly to the battery. There are only two options for the experiment. If the fan is working, then you will have to check the functionality of the fuse that protects this circuit, the fan relay and the ECU. And if the fan does not work, then you will have to check the condition of its brushes for wear.
On carburetor engines of the VAZ-2107 car, there will be no ECU in the electrical circuit for turning on the fan, and some “sevens” do not even have a fan turn-on relay. Therefore, it is much easier to find the reason why the fan does not turn on, and many drivers of VAZ-2107 cars can cope with this.
Instructions: replacing the radiator grille.
Which thermostat is better to install https://vz07-up.ru/ssh/termostat.html#t2.
Scheme
We present to you a diagram for switching on the electric radiator cooling fan for the VAZ-2107, VAZ-2105 and VAZ-2104. In this circuit, there is a relay in the fuse block; therefore, a low-current sensor can be installed.
Electric cooling fan operation
The design of the “classic” cooling system does not provide for constant fan operation. It should turn on only after reaching a certain coolant temperature, we discussed this in more detail in this article. The fan switching sensor for the VAZ 2107 injector is installed in the radiator. Therefore, the fan turns on after the radiator itself can no longer cope with the cooling task. This is implemented as follows:
- After heating the antifreeze in the “small circle” of cooling, the thermostat opens.
- The coolant circulates in a “large circle” through the radiator, which ensures effective heat exchange with the environment.
- If the radiator does not “cope” with cooling, the contacts of the fan sensor close and it begins to intensively drive air flow through the radiator, increasing heat transfer.
If the sensor fails, the fan turns on when it overheats and the coolant may boil.
Troubleshooting algorithm
If the electric cooling fan does not work on your VAZ 2107 (carburetor), you need to do the following:
Turn off the engine and turn on the ignition. Use a flat-head screwdriver to short-circuit the terminals of the fan switch sensor.
Please note that all control is based on mass. If the fan turns on, the sensor is faulty
If it doesn’t work, then the reason lies deeper. Disconnect the block from the electric fan and supply power from the battery directly. A rotating rotor indicates that the engine is running. If the electric fan does not work even this way, you will have to think about replacing it. If the fan and sensor are working properly, you need to check the electromagnetic relay (if present in the circuit). The wires are checked last. Oxidation very often occurs at the joints with the car body. And sometimes a banal break even happens.
The same algorithm can partly be applied to cars on which an injector is installed.
But in order to compare and appreciate the difference, it is worth considering such machines.
Designs and principles of operation of sensors
Over the years, various models of fan switching sensors were installed on VAZ 2107 cars. At first these were electromechanical sensors, then they were replaced by electronics. Let's take a closer look at each device.
Electromechanical sensor VAZ 2107
Inside the electromechanical sensor there is a small container with ceresite mixed with copper powder. Above this substance there is a flexible membrane with a pusher attached to it. And the pusher, in turn, is connected to the moving contact. This entire structure is housed in a steel case with thick walls (which are necessary to ensure more uniform heating of the sensor). On the outside of the housing there are threads and a pair of electrical contacts.
The sensor operates on a simple principle: the volume of ceresite changes with increasing temperature. Ceresite, heating up under the influence of almost boiling antifreeze, expands and raises the membrane, which sets the pusher in motion. It reaches the moving contact and closes it, which causes the fan to turn on. When the temperature of the antifreeze drops due to additional airflow, the ceresite cools down, the membrane goes down, the contact opens and the fan turns off.
Electronic sensor VAZ 2107
The basis of the electronic sensor is a thermal resistor inserted into a massive steel housing. As in the previous case, the body has a thread that allows you to screw the sensor into the radiator, and a pair of contacts.
The operation of the electronic sensor is based on a change in the resistance of a resistor under the influence of high temperature. Changes in electrical resistance are monitored by a special circuit. And when the resistance reaches certain values, the circuit sends a signal to the contact system, they close and turn on the fan.
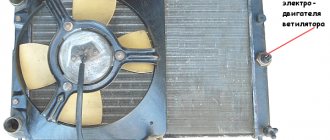
Sensor location
On almost all classic VAZ models, fan switching sensors are screwed directly into the cooling radiators. This is necessary so that most of the working surface of the sensor comes into contact with hot antifreeze. A special sealing gasket made of material resistant to high temperatures must be installed between the sensor and the radiator.
Since the VAZ 2107 fan sensor is screwed into the lower part of the main radiator, it is most convenient to change it from the inspection hole on which the car must be installed.
Diagnostics and repair
It is recommended to check the fan and elements of its electrical circuit in the following order:
- Fuse.
- Relay.
- Electric motor.
- Temperature sensor.
Checking the functionality of the fuse
The fuse is usually checked first, as this process is the simplest and does not take much time. To carry it out, you only need an autotester or a test lamp. The essence of the diagnosis is to determine whether it passes electric current.
The fan circuit fuse is installed in the vehicle's mounting block, which is located in the engine compartment. In the diagram it is designated as F-7 with a rating of 16 A. To check and replace it, you must perform the following work:
- Disconnect the negative terminal from the battery.
- Remove the mounting block cover.
- Find the F-7 fuse and remove it from the seat.
Relay diagnostics
As we have already said, in the injection “sevens” a relay is provided to unload the electrical circuit of the radiator fan. It is installed in an additional mounting block located under the glove box in the car interior, and is designated R-3.
Checking the relay yourself is quite problematic. It is much easier to take a new device and install it in place of the one being diagnosed. If the electric fan turns on when the refrigerant is heated to the desired temperature, then that was the problem.
Checking and replacing the electric motor
- voltmeter or multifunction autotester;
- two pieces of wire;
- socket wrenches “8”, “10” and “13”;
- pliers.
The work order is as follows:
- Disconnect the fan power connector.
- To the contacts of the half of the connector that comes from the electric motor, we connect two wires, the length of which should be enough to connect them to the battery terminals.
Diagnostics and replacement of temperature sensor
Temperature sensors for carburetor and injection "sevens" differ not only in design, but also in their operating principle. For the former, the sensor simply closes and opens the contacts, while for the latter, it changes the value of its electrical resistance. Let's consider both options.
Carburetor engine
Tools and tools you will need:
- open-end wrench at “30”;
- socket wrench or socket to “13”;
- ohmmeter or autotester;
- liquid thermometer with a measuring range of up to 100 °C;
- a clean container for collecting refrigerant;
- container with water;
- gas (electric) stove or household boiler;
- dry clean rag.
The check and replacement algorithm is as follows:
- We place the container under the plug on the cylinder block of the power plant.
Injection engine
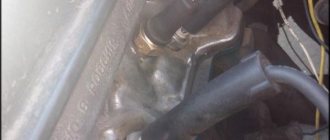
The injection “seven” has two temperature sensors. One of them works in tandem with a device that shows the coolant temperature to the driver, the other with the ECU. We need exactly the second sensor. As already mentioned, it is installed on the pipe next to the thermostat. To check and replace it we will need:
- autotester or multimeter with the ability to measure voltage and resistance;
- open-end or ring wrench set to “19”;
- liquid thermometer with temperature measurement amplitude up to 100 °C;
- heat-resistant container with water;
- boiler or stove (for heating a container of water);
- clean dry cloth.
The order of work is as follows:
- We find the sensor. Disconnect the connector from its contacts.
Checking the functionality of the VAZ 2107 fan sensor
To check the serviceability of the fan switch sensor on a VAZ 2107, you will need the following things:
- container for boiling water;
- thermometer;
- household boiler;
- fan switch removed from the machine;
- household multimeter.
Sensor test sequence
The sequence for checking the sensor is as follows:
- Water is poured into the prepared container.
- The threaded part of the sensor is immersed in water, and its contacts are connected to the contacts of a multimeter configured to test electrical resistance.
- Now the thermometer and boiler are immersed in water.
- The boiler is turned on and the water begins to heat up. The heating temperature is monitored by a thermometer.
Video: checking the serviceability of the VAZ 2107 fan sensor
VAZ 2107 fan does not work
Over the years of their production, VAZ-2107 cars were equipped with both carburetor and, subsequently, injection engines. Therefore, the electrical circuits for supplying voltage to the electric motor of the engine cooling system fan differ from each other.
On VAZ-2107 injection engines, a two-contact fan sensor, which is located in the upper pipe, when the coolant temperature rises above that for which it is designed, it must send a signal to the ECU. The electronic control unit, having analyzed the signal, turns on the fan through a relay.
Therefore, the search for reasons for the fan not turning on begins by removing the connector from the sensor with the ignition on. If the fan itself is working properly, then it should work. By inserting a load in the form of a light bulb into the connector terminals, the fan should stop. Thus, you check the electrical circuit of the fan motor. In this case, it will be fine, but the fan sensor will have to be replaced. However, it should be noted that there are also substandard sensors on sale, which, when installed on the engine, will also not work.
If, after removing the connector from the sensor, the fan does not work, then its functionality must be checked by connecting it directly to the battery. There are only two options for the experiment. If the fan is working, then you will have to check the functionality of the fuse that protects this circuit, the fan relay and the ECU. And if the fan does not work, then you will have to check the condition of its brushes for wear.
On carburetor engines of the VAZ-2107 car, there will be no ECU in the electrical circuit for turning on the fan, and some “sevens” do not even have a fan turn-on relay. Therefore, it is much easier to find the reason why the fan does not turn on, and many drivers of VAZ-2107 cars can cope with this.
2 comments
Thank you, you helped. Accessible and understandable.
Eng. I remove the chip from the sensor - it doesn’t turn. The fan is working (connected directly), I replaced the mother folders, the fuse is intact (the signal works), I changed the P3 relay under the glove compartment - no changes. The relay clicks when the ignition is turned on. The only thing I didn’t look at was the power supply unit for the burnt track. Tell me what the problem is.
- VAZ 2107
- 2109
- 2110
- 2112
- 2114
- 2115
- Vesta
- Kalina
- Lada Priora
- Lada Granta
- Lada Largus
- Chevrolet Niva
GAS
- Gazelle
Volga Renault
- Logan
Megane Sandero Scenic Symbol Laguna Fluence Hyundai
- Accent
Getz Solaris Skoda
- Octavia II
Fabia II Volkswagen
- Jetta V
Tiguan Passat UAZ
- Patriot
3151 Daewoo
- Nexia
Matiz Chevrolet
- Aveo
Lanos Lacetti Cruze Ford
- Focus 2
Fusion Mondeo 4 KIA
- Rio 2
Spectra Ceed Audi
- 80
A4 Nissan
- Qashqai
Chery
- Tiggo
Amulet Opel
- Astra
Corsa Zafira Mitsubishi
- Lancer
The last notes:
- Audi will take charge of Volkswagen Group's research and development efforts
- Restyling Hyundai i30 2022 model year
- Volvo is redefining the concept of autonomous driving
- Details about the new Kia Sorento 2022 before its debut presentation in Geneva
About Us:
Each of us faces problems while operating a car. It's always unpleasant. However, sometimes these problems can be solved on your own. The main goal of this site is to help motorists avoid unnecessary costs when repairing cars by suggesting the causes of the malfunction and options for eliminating it. We are focused on live communication, so we look forward to your comments and mutual assistance to other motorists. Thank you for being with us and good luck on the roads!
Contacts:
All rights to materials published on this site belong to the editors of the site, with the exception of cases of reprinting of other people's materials, and are protected in accordance with the legislation of the Russian Federation. If you found your photo or text on our resource, tell us about it. We will indicate your authorship or remove the material.
Sensor for turning on the fan of a VAZ 2107 car
The engine of the Russian VAZ 2107 car is equipped with a cooling system in the form of a radiator and other components that prevent overheating of the engine cylinders during the combustion of the air-fuel mixture. The key point in the cooling cycle is an electric fan that blows across the radiator to lower the temperature of the antifreeze or antifreeze circulating in its tubes. The operation of the fan is regulated by a switch on sensor, which gives a signal directly, or by an electronic control unit (ECU), depending on the type of air-fuel mixture supplied to the machine.
The process of replacing a sensor on a carburetor engine
This is where the process may seem more complicated. After all, given that the sensor is located at the bottom, you will have to drain the coolant. And to do this you need to look for an inspection hole, remove the engine protection, etc. But you don’t have to do this. You just need to quickly screw the new sensor in place of the old one. Naturally, some coolant will spill out, but its amount will be limited to 20-30 ml. In addition, you can always place a properly cut plastic bottle under the connection point.
So, prepare a new sensor and a “30” wrench. Disconnect the wires from the device. Carefully unscrew the sensor using the key. Continue unscrewing it by hand, pressing it against the radiator body. When the sensor comes off the thread, you can pinch the hole with your finger and start screwing in the new element with your other hand. Do not manage to lose the O-ring that is placed on the threaded part of the device. That, in fact, is the whole process. All that remains is to connect the wires to it, start the power unit and check if everything works.
Carburetor sevens
In these cars, the control system for turning on the electric fan is very simple. It can even be called analog. The entire circuit consists of the simplest form of the following elements:
- Electric fan motor.
- Power sensor.
- Wiring.
That's it, there is nothing else, you need to look for breakdowns only in these parts of the structure. In 70% of cases the sensor fails, in 5% the electric fan fails, in 20% the electrical wiring is to blame.
To diagnose a car, I recommend using a fairly cheap solution: install it once and use it always.
But some cars use a slightly more advanced circuit, which includes an electromagnetic relay. With its help, it is possible to remove high currents from the sensor. This increases the resource of the device.
Some drivers who are not used to trusting automation install a regular button parallel to the sensor (and sometimes instead of it). Such a scheme has a right to exist, but the driver himself must be extremely careful in order to notice the temperature rise in time and turn on the electric fan.
Method two - electric
If you have a new car, an injector and an electric fan are installed, is it worth spoiling it with a forced impeller? It would be somewhat more reasonable to leave the electric fan, but make a backup way to turn it on using a button. Purchase several items and materials from the store:
- New sensor (if the old one has become unusable).
- Electromagnetic relay with normally open contacts.
- Red wire with a cross section of 0.75 square meters. mm.
- A button for installation in the dashboard of a VAZ 2107 (preferably backlit).
- Heat shrink insulation.
- Female connectors and relay socket.
The connection diagram is shown in the photo. First of all, turn off the fan and change the sensor for turning it on. Then you assemble the circuit.
Please note that newer vehicles use sensors that can handle very high currents. But despite this, they still burn
Sudden loads still quickly damage it. What to do? There is only one way out - to reduce the current at the sensor terminals. To do this, introduce an electromagnetic relay into the circuit. Now the chance of sensor failure is reduced. But the chance of relay failure becomes higher. True, it will be easier to change it.
Install a button to force the fan on in the dashboard and stretch two wires from it - one can be connected directly to ground, and the second to the sensor output. It turns out that your button and sensor contacts are connected in parallel. Therefore, if the sensor fails, you can turn on the electromagnetic relay with a button.
Electric radiator cooling fan (forced)
To prevent a breakdown of the VAZ 2107 fan sensor from causing problems, you can organize forced cooling without replacing the standard electric fan with an impeller mounted on the pump pulley. To do this, it is enough to ensure that the fan is turned on with a button. You will need the following parts and materials:
- electromagnetic relay;
- relay block;
- button for installation on the dashboard (can be backlit);
- wire with a cross section of at least 0.75 mm;
- male-female connectors;
- insulation.
You will also need a new fan sensor if the old one is faulty. Serviceability can be checked with an ohmmeter or continuity tester. If the fan does not turn on when the lower part of the radiator heats up, it must be replaced.
First you need to reduce the current passing through the contacts of the thermal relay that controls the fan. To do this, the VAZ 2107 fan switching circuit must be changed so that it is powered not directly from the sensor, but through an additional relay. In this case, the contacts of the fan sensor (thermal relay) will not burn out, and if the additional relay fails, it will be much easier to replace the latter.