Owners of popular Lada Kalina models often encounter situations when the cooling fan does not turn on. This situation forces the driver to periodically stop to allow the engine to cool down. If a malfunction occurs in frosty weather, then it has almost no effect on the functionality of the system, but in warm periods it significantly prevents the LADA Kalina from moving smoothly.
Most Lada Kalina owners are not able to independently diagnose the reasons why the cooling fan does not turn on, much less eliminate them. Tow trucks and services, as well as a switching diagram, are happy to come to their aid.
Why the cooling fan does not work on the Lada Kalina
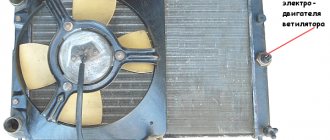
The cooling fan is an integral part of the cooling system. It serves to create a flow of air blowing across the radiator with coolant circulating in it.
Engine cooling system fan switching diagram.
The fan turns on when the preset coolant temperature threshold is exceeded. On Kalina, the factory setting is 101 °C . Antifreeze begins to boil at 110 °C .
Tips for motorists
The activation of the electric motor of the cooling system fan on the Lada Kalina passenger car (VAZ-2118) is controlled by the electronic control unit (ECU). The moment of switching on depends on the time the signal is sent to the ECU by the temperature sensor, and the voltage from the current source to the terminals of the fan motor is supplied through a relay. On some Lada Kalina cars, the fan can be turned on in two modes, with low and high rotation speeds. Reducing the rotation speed of the fan motor armature is achieved by applying voltage to its terminals through an additional resistance.
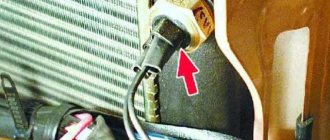
The fan should turn on when the antifreeze temperature reaches 103 degrees in the upper pipe of the engine cooling system, but there are times when it continues to work without turning off regardless of what the antifreeze temperature is at the moment. This happens due to sticking contacts of the fan relay. In most cases, stuck contacts cannot open on their own without outside help, which makes it impossible to turn off the power to the fan motor terminals.
One of the reasons for contact sticking is overheating of the relay for its activation, since it is located in the area of the deflector through which hot air is supplied to the front passenger’s feet in the case when the driver sets such a distribution of air flows from the heater radiator. The second reason is that the standard relay installed during assembly of the Lada Kalina car is designed for a current of 30 amperes. But, as is known, the passage of current through the relay contacts causes them to heat up, and since a running fan motor consumes a current close to thirty amperes, the contacts will heat up very much. This is what can lead to them sticking.
This malfunction can be eliminated by installing a fan switch relay designed for a current of 40 or 50 amperes, which will heat up less and then contact sticking will not occur. The only problem will be finding a place where you can purchase it. True, you can take a starter relay from the “ten”, designed for 50 amperes, but with the help of a file you will have to reduce the width of the legs to 6 millimeters so that they become exactly the same as those of the standard relay.
The radiator fan is constantly on - when the ignition is turned on, it turns on and turns off approximately 20 seconds after the ignition is turned off. At the same time, the temperature indicator arrow on the instrument panel does not move at all. When checking, self-diagnosis, all devices move, including the temperature indicator.
When measuring with a voltmeter, there is voltage at the temperature sensor connector, the sensor resistance is about 5 Kom, at 18°C. During diagnostics it shows Er 4, apparently error -4. What kind of malfunction is this?
Main reasons
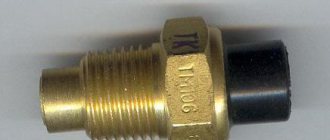
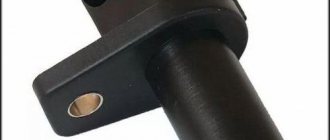
- Coolant temperature sensor malfunction There are two of them on the Lada Kalina. One provides data to the instrument panel, the second to the car's ECU.
Temperature sensor diagram for Lada Kalina.
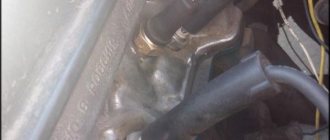
We have a Kalina with a Priora engine (98 horsepower). It's quite cramped under the hood. The photo shows the location of the cooling fan under the hood.
Burnt contacts on the connector that connects to the fan. It is temporarily eliminated by bending the contact plate, then the block is replaced with a new one.
The most common breakdown is the malfunction of the temperature sensor due to its relatively low reliability. Finding the reason is easy on your own.
Verification algorithm
- Disconnect the connector from the temperature sensor, which is located near the thermostat. When the sensor is disconnected and the ignition is on, the cooling fan should run constantly . If the fan does not turn on, it may be the fan fuse or the fan itself.
We remove the block from the sensor and turn on the ignition.
Cooling fan fuse diagram.
Sensor check
For a complete check, the sensor will have to be removed, which involves draining a small amount of coolant.
You can check the sensor with a tester in resistance . The probes of the device are connected to the connector terminals and the tip of the sensor is immersed in hot water. Table of indications.
| Temperature ( °C ) | Resistance ( Ohm ) |
| 100 | 177 |
| 90 | 241 |
| 80 | 332 |
| 70 | 467 |
| 60 | 667 |
| 50 | 973 |
| 45 | 1188 |
| 40 | 1459 |
| 35 | 1802 |
When checking, you need to check the condition of the connector contacts. If the contact is poor, they will overheat and the contact will weaken even more, until it completely disappears. Connectors must be dry, clean and free from overheating.
Source
Air lock: features
"Kalina", like hundreds of other cars, is in no way protected from the appearance of an air lock. It cuts off the coolant supply. Solving this problem often involves some difficulties.
For a novice motorist who owns a Lada Kalina, an air lock is always a problem. To deal with it, you first need to remove the cap from the expansion tank. Then heat the engine to a temperature at which the gauge needle begins to reach the red zone. When the fan turns on, you need to press the accelerator pedal several times and turn off the ignition. Sometimes this is enough. The air lock completely disappears.
However, if the plug remains, more specific measures must be taken:
- The plastic screen is being dismantled;
- the clamp is released;
- the tube is removed from the fitting located on the throttle assembly;
- the expansion tank opens, its neck must be closed with a rag;
- Air is supplied to the open expansion tank until liquid begins to pour out of the tube. If it was not possible to break through the air plug in this way, you need to close the lid and return the removed tube to its place.
- then you need to warm up the engine again and turn off the ignition;
- remove the heating tube, but do not remove the cover. You need to wait a little until the liquid begins to pour out of the tube.
Since coolant is a toxic substance, this operation must be performed very carefully. Safety precautions require gloves.
During operation, you need to check the temperature of the tubes. The engine must be completely cool.
After draining the liquid, the tube is put on the fitting and tightened with clamps. Thus, the air from Kalina will be completely removed. This work can be done by any motorist; the help of a specialist is not needed. In order for Kalina to be free from such problems, it is necessary to constantly check the tightness of all connections and tighten the clamps.
How to check the Kalina fan switch sensor
The radiator fan is used to force cool the engine radiator when it overheats.
When the car is in motion, the radiator is cooled by oncoming air flow. At low speeds, or when the car is just standing still, the radiator is not able to cool the liquid on its own, so when it reaches a certain temperature (101-105 degrees), the sensor is triggered, thereby transmitting the corresponding signal to the controller.
The latter analyzes the received information and turns on the fan.
The fan itself is a structure consisting of a casing (housing) with a built-in electric motor with an impeller. The fan is attached to the inside of the cooling radiator.
Problems when paying with bank cards
Sometimes difficulties may arise when paying with Visa/MasterCard bank cards. The most common of them:
- There is a restriction on the card for paying for online purchases
- A plastic card is not intended for making payments online.
- The plastic card is not activated for making payments online.
- There are not enough funds on the plastic card.
In order to solve these problems, you need to call or write to the technical support of the bank where you are served. Bank specialists will help you resolve them and make payments.
That's basically it. The entire process of paying for a book in PDF format on car repair on our website takes 1-2 minutes.
If you still have any questions, you can ask them using the feedback form, or write us an email at
The price of a cooling fan and the cost of replacing it
Prices for a cooling fan for the Lada Kalina (electric motor with impeller) vary between 1500-2500 rubles. Replacing this unit at a service station will cost 300-400 rubles.
When buying a new fan, pay attention to its manufacturer and catalog number. This part may have the following numbers:
- 1118-1308008;
- 1118-1300025;
- 21230-1300025-00;
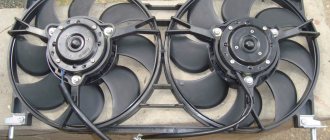
- 2123-1300025 (with two engines for Kalina 2123);
- MOD285 (BM brand);
- BMMOD285 (Pilenga brand).
Vehicle maintenance
A catalog of consumable spare parts required for maintenance is given in Chapter 3b of this manual.
Periodic Maintenance
Timely and regular maintenance of the car in accordance with the technological map (see the service book attached to the car upon sale) can significantly extend the life of the car.
A message appears in the notification center indicating the mileage remaining until the next service. This message appears and remains for 4 seconds each time the ignition switch is turned to position 2.
The display begins to show mileage - 10,000 km. This distance gradually decreases (every 50 km) until zero remains (in this case, service must be performed). After each service the display is reset again to 10,000 km.
Note
Service intervals are based on 50 km intervals, so short journeys may not be shown on the display.
The vehicle must be serviced every 10,000 km or every 6 months (whichever comes first).
Note
If service has not been performed (or the display has not been reset), the distance indicator will remain at that value after reaching zero until reset.
The service center employee must make the appropriate notes, stamp and sign the vehicle’s service book for each maintenance service.
Replacing brake fluid
Brake fluid requires replacement every two years, regardless of the vehicle's mileage.
Note
Replacing brake fluid is included in scheduled maintenance and is paid for.
Coolant replacement
Engine coolant must be replaced every three years, regardless of the vehicle's mileage.
Note
Coolant replacement is included in scheduled maintenance and is paid for.
Monitoring the content of harmful emissions in exhaust gases
This vehicle is equipped with a system to control harmful emissions and fuel vapors. Incorrect engine settings can affect exhaust emissions, engine performance and fuel consumption, and can cause elevated temperatures that damage the catalytic converters and engine.
Attention Please be aware that replacement, modification or counterfeiting of these devices is punishable by law. In addition, outside interference in engine settings is strictly PROHIBITED!
Replacing the cooling fan Lada Kalina
To replace the cooling fan, it is not necessary to go to a service station. You can do this without much difficulty on your own.
- head with ratchet or socket wrench 10;
- spanner or open-end wrench 8;
- screwdriver with Phillips bit;
- pliers.
Work order
- Place the car on a level surface.
- Raise the hood, disconnect the ground wire from the battery.
- Using a 10mm wrench, unscrew the two air filter mounting bolts.
- Disconnect the mass air flow sensor connector by pressing the latch.
- Disconnect the purge valve connector located on the air filter housing.
- Using a screwdriver, unscrew the bolt of the air duct fixation clamp and remove the corrugation.
- Unscrew the 4 screws securing the air filter cover.
- Remove the cover and remove the filter element.
- Using a size 8 wrench, unscrew the nut securing the air intake and remove it.
- Using a size 10 wrench, unscrew the two nuts securing the fan casing on the right in the direction of travel of the car, and then with a size 8 wrench, unscrew the two nuts on the left.
- Disconnect the fan power connector.
- Carefully, so as not to damage the radiator fins, remove the fan along with the housing.
- Using a 10mm wrench, unscrew the 3 bolts securing the electric motor and remove it from the housing.
- Install a new electric motor with impeller in its place.
- Screw the casing assembly with the fan to the radiator.
- Connect its connector.
- Carry out the rest of the installation work in reverse order.
Replacing relays and fuses
These protective and fan control components are fairly easy to replace. We remove the burnt element from the mounting socket and install a new analogue. It is convenient to use suitable tweezers here.
Steering rack Kalina
How to drain antifreeze from Kalina
Adjusting the Kalina generator belt
Description
As you know, any Priora and Kalina have a cooling system that ensures normal engine operation and helps prevent overheating. One of the devices that allows you to cool the power unit is a fan sensor, upon the signal of which the ventilation device should turn on. On Kalina, this controller is designed to activate the fan when the engine temperature reaches a certain point. Thanks to the fan, which must turn on based on a signal from the controller, the engine temperature will always be normal and will not exceed the permissible threshold. If the device does not work, the fan will not turn on, and the engine may overheat.
Sensor connection diagram in the cooling system
System diagnostics
If Kalina's fan does not turn on, first of all, you should start looking for the problem in the electric motor. To do this, disconnect the wiring, and then connect the device directly to the battery. This way you will know whether there is a problem with the fan, or whether you need to look for another reason for the faulty cooling system.
Next we check the contacts, relay and fuse. They should be found on the additional mounting block, which is located just to the right of the instrument panel. To check the fuse we use a tester. If this does not help solve the problem, look at the temperature sensor. Just warm up the engine, turn off the engine, and then turn off the sensor.
You can find it on the thermostat housing. After disconnecting the sensor, the fan will start in automatic mode. We start the engine. If it warms up and the Kalina cooling fan does not work, we begin to look for broken wiring.
The main reasons for sensor malfunctions
So, for what reasons on Kalinas and Prioras, and on all VAZs in principle, the controller may not work:
- The first reason is the thermostat not working. This problem is one of the most difficult; when it occurs, the fan will not work correctly. To make sure that the thermostat is working, you will need to touch the lower hose - if it is cold, then the device has really failed. In general, for Kalina, thermostat failure is a fairly common occurrence.
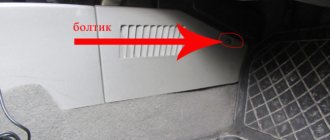
- If the thermostat is working, then it is necessary to diagnose the safety elements. You should also check the condition of the circuits themselves; use a multimeter to do this. The fuse diagram should be indicated on the back of the unit cover. In the case of Kalina, the unit is located under the dashboard, you are interested in fuse element 3, its capacity is 50 amperes. If the fuse is working, then you need to diagnose the fan relay, it is marked with the number 1. If these elements are working, you will have to remove the fan control unit - to do this, move the air duct and, using a 10-mm wrench, unscrew its fastening. There should be two relays on the block, they should be checked.
- It would also be a good idea to climb into the engine compartment and ring the contacts of the fan itself. The problem may be a break, broken wiring, oxidation of contacts, or a burnt-out winding inside the device. Problems with wires and contacts are solved without problems - bad wiring is replaced, and contacts are cleaned. But if the problem lies in the winding, then the device will have to be completely changed.
- The problem may also lie directly in the sensor itself. To start the ventilating unit, you will need to reset the terminals from the device. Diagnosis of the controller is carried out by dismantling the thermostat and placing it in a container with hot water - the thermostat should open at this moment.
- Another reason, which happens quite rarely, is a break in the circuit. This problem can be diagnosed using a multimeter - broken wires must be replaced (the author of the video about diagnosing the regulator with your own hands is Dmitry Maznitsyn).
Album of electrical circuits of VAZ 1118
The VAZ 1118 operation and repair manual contains an album of all electrical circuits of the car. The general electrical equipment diagram of the Lada includes 59 elements: sources, consumers, protective elements, ECU (electronic control unit), sensors. Consumers of electricity in Lada are lamps (headlights, interior lighting, license plate, instrument panel, glove compartment), electric drive of the main vehicle options, switches and a sound signal.
A separate electrical diagram of the engine control system connections is shown with the designation of the main elements (spark plugs, injectors, ignition coil). The manual describes the front and rear wiring harness diagram, instrument panel wiring harness connection, door wiring harness connection, and air intake box wiring harness connection.
To ensure reliable contact of the wires, they are combined into terminal blocks. Each block has colored wires. The color in the diagram corresponds to the color of the wire on the car.
When reading an electrical diagram, you can determine by the number next to the wire which connector it is connected to. The designation 9/14 indicates that two wires are connected together and connected to the 9th block through the 14th connector.
DIY fault repair
We will not talk about solving problems such as failure of fuses or the sensor itself. Everything is so simple here - failed elements are removed from their installation locations and replaced with new ones.
Separately, it is necessary to highlight the replacement of the ventilation unit - read about this below:
- So that during the repair process you do not have to dismantle the radiator, do everything carefully, since there is a possibility of damage to other elements.
- Open the hood and disconnect the battery. Remove the air filter.
- Having done this, you can dismantle the radiator grille.
- Next, you will need to unscrew the top mountings of the optics - the right and left lights.
- Using a 10mm wrench (it will be more convenient to take a socket wrench), you will need to remove the upper front panel.
- After these steps are completed, you will need to disconnect the plugs that are connected to the ventilation unit. Having done this, the wires can be twisted a little.
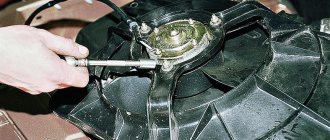
- Next, using a wrench, you will need to unscrew the four screws that secure the device to be replaced. The arrows in the photo indicate the screws that secure the assembly; they will need to be unscrewed.
- Only after the unit is freed will it be necessary to dismantle it and replace it with a new one. After removal, just in case, clean the connectors themselves so that in the future you will not be bothered by the problem of poor contact. Further assembly of the system and installation of all elements is carried out in the reverse order.
Air conditioners
Climatronic - repair of electric air recirculation control drive (rus.)
Photo report. Reason for repair: the gear of the electric drive for controlling air recirculation is turning. A cracking noise is heard when the recirculation button is pressed. During self-diagnosis, the climatronic displays the 4FA error; when the recirculation mode is turned on and off, a buzzing and clicking sound is heard under the dashboard; in the rain, everything fogs up.
Heater and air conditioning system (rus.)
Skoda technical manual. Training of service station specialists. The climate control systems used on cars Felicia (unregulated compressor), Fabia (compressor with external regulation), Octavia I (compressor with internal regulation), Octavia II (compressor with external regulation), SUPERB (compressor with internal regulation) are considered in detail.
Electric motors controlling climatronic dampers, A5 platform (rus.)
Photo report
Diagnostics: Group 08. Climatronic, platform A4, 3B1-907-044-A (year of manufacture 1998) (rus.)
Photo report
Air conditioning compressor repair Sanden SD-709 (rus.)
Photo report
Electric motors that control climatronic dampers, platform A5 (rus.)
Photo report
Air conditioning compressor sleeve, how to revive the compressor (rus.)
Photo report
Restoring the air conditioner compressor clutch (electromagnetic clutch coil) (rus.)
Photo report
Partial disassembly of the Sanden SD7V16 air conditioning compressor.
Golf 3 VR6 (357820803R) (rus.) Photo report
Sanden SD7 Service Manual (eng.)
Repair manual for Sanden air conditioning compressors, which are installed on most VW vehicles.
Basic climate control (rus.)
Mazda Training Manual.
He talks very well about the operating principles of diagnosing and repairing air conditioning systems. The manual is divided into the following main chapters: Basic Concepts, Air Conditioning System, Heating System, Diagnostics and Repair. The data, tables and procedures presented in this manual are for illustrative purposes only. They are taken from service literature and are subject to major or minor changes over time. To prevent any misdiagnosis, always refer to current service literature when working on climate control systems. Household and automobile air conditioners (rus.)
How can I find the information I need here?
Decoding the factory equipment of the car (English) Decoding the factory equipment of VAG in Russian! Diagnostics of
Volkswagen, Audi, Skoda, Seat, error codes.
If you have not found information on your car, look at the cars built on the platform of your car. Most likely, the information on repair and maintenance will be suitable for your car.