Front suspension device
The front suspension
is independent, with telescopic swivel struts, wishbones, trailing arms and a stabilizer bar.
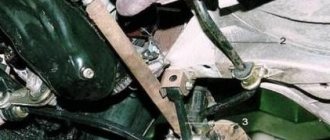
Front suspension:
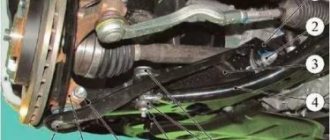
1 - cross member; 2 — cross member bracket; 3 — adjusting washers of the front end of the extension; 4 — longitudinal stretch; 5 — telescopic stand; 6 — steering knuckle; 7 — adjusting washers of the rear end of the extension; 8 — ball joint; 9 — wishbone; 10 — stabilizer strut; 11 — rubber-metal hinge; 12 — car body bracket; 13 — stabilizer bar; 14 — rod cushion bracket
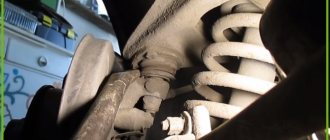
The suspension strut consists of a housing in which a hydraulic telescopic shock absorber is installed, a coil spring and an upper strut support. A bracket for attaching the steering knuckle, a swing arm and a lower spring support cup are welded to the outside of the strut body.
The coil spring rests with its lower coil on the lower support cup, and with its upper coil on the upper support cup mounted on the shock absorber rod. Also installed on the shock absorber rod is the upper support of the strut, consisting of a housing, a rubber cushion and a bearing. The support body is attached to the car body with three studs and nuts. The bearing allows the shock absorber rod to rotate in the support when the strut is turned, and the rubber buffer prevents the transfer of vibrations to the car body.
The shock absorber rod is protected from dirt and dust by a corrugated casing. In the event of a suspension breakdown, the stroke of the rod is limited by the compression stroke buffer.
The strut pivot arm is connected to the steering rod through a ball pin. Changing the length of the rod using its threaded insert allows you to adjust the toe-in of the front wheels.
1 — tie rod end 2 — threaded insert; 3 — steering rod; 4 — telescopic stand; 5 - rotary lever
The steering knuckle is attached to the strut bracket with two bolts and nuts. The upper hole of the bracket is made oval, and the bolt installed in it has an eccentric collar and an eccentric washer. When the top bolt is turned, the steering knuckle moves along the radius the required distance, using the bottom bolt as the axis of rotation. Thanks to this, the angle between the strut and the fist changes, which in turn allows you to adjust the camber of the front wheel.
1 — bracket for fastening the steering knuckle; 2 — rack body; 3 - upper (eccentric) steering knuckle mounting bolt; 4 - lower steering knuckle mounting bolt; 5 - steering knuckle
A double-row ball bearing is pressed into the hole of the steering knuckle and secured with two retaining rings. The wheel hub is pressed into the inner ring of the bearing.
At the bottom, the steering knuckle is connected to the wishbone of the suspension using a ball joint. The transverse lever is kept from moving by a stretcher, which is attached at its rear end through a rubber-metal hinge to the lever, and at the front end through a cushion to the cross member. By changing the number of washers in the front and rear brace mounts, you can change the position of the lever, thereby adjusting the longitudinal inclination of the steering axis.
1 — rear end of the longitudinal extension; 2 — adjusting washers; 3 - thrust washer; 4 — rubber-metal hinge; 5 - transverse suspension arm
The ends of the anti-roll bar are connected by struts to the wishbones of the vehicle's front suspension. The central part of the stabilizer is secured through rubber pads to the body. The movement of one of the levers is transmitted through the stabilizer to the second. This allows you to partially synchronize the operation of both sides of the suspension and thereby reduce the sway of the car on uneven roads and roll in corners.
Source
Rear suspension of VAZ 2107
The rear suspension of “classic” VAZ cars is directly connected to the rest of the chassis. The rear suspension of the VAZ-2107 includes a driving rear axle, which is connected to the car’s engine through a cardan drive and the rest of the transmission. The wheels are oriented strictly in the direction of travel of the car. These conditions determined the features of the rear suspension of the VAZ-2107. Like the front suspension, the rear suspension is a modernized version of the first VAZ model.
The figure below shows the rear suspension structure of the VAZ-2107. Number 1 shows the thrust spring between the axle (4) and the car body. Number 2, telescopic shock absorber dampening sudden vibrations. Transverse reaction rod 3 prevents the bridge from moving to the sides from the vehicle axis. Longitudinal rods 5 and 6 fix the position in the direction of travel. This arrangement of nodes allows you to compensate for road unevenness.
Review of the front suspension of the VAZ-2112 and what parts it includes: structure and diagram
Passenger cars of the “Tenth Family” were produced by the VAZ plant in the early 2000s. These include the Lada-112 hatchbacks, the design of which is considered the most successful. On the VAZ-2112 the front suspension is designed in the same way as on station wagons or sedans. And it is more complex than on all Logan family cars. The reason is the absence of triangular levers. But in the VAZ-2110 (2112) suspension you can adjust literally everything, while in Logan we only adjust the toe.
Sometimes the suspension unit is tuned. But what is shown in the video should not be repeated. Let's see...
Spherical bearing
The VAZ 2110 front suspension arm is attached to the hub using a ball joint. If you have consulted the reference literature, you may know that this node is practically invulnerable. It is difficult to break it and put it in bad shape. Unfortunately, the support still breaks. And its resource largely depends on the following factors:
Very often, it is because of a ball failure that a knocking sound appears from the front suspension of the VAZ 2110. Moreover, it can be observed both when the car is moving and when passengers are boarding and disembarking. And it doesn’t matter how fast you move or which direction you turn. But knocking in the suspension is not uncommon. And if it appeared due to a ball joint, then repairs will not be very expensive.
Front suspension - complete assembly
The photo shows what the right disc suspension looks like. It is easy to recognize the telescopic post 6, as well as the lever 3. Both of these parts form the basis of the assembly.
We list the main parts in ascending order of number: 1 – anti-roll bar; 2 – stabilizer rod; 3 – suspension arm; 4 – ball joint; 5 – steering knuckle; 6 – suspension strut; 7 – stretch (saber); 8 – extension bracket.
Parts 7 and 3 could constitute a "monolith". But even then they would be mounted on hinges, and in the suspension design of the VAZ-2112 (and 2110) we will find these hinges plus one more - it connects parts 3 and 7.
The photo does not show the swing arm, but here it is attached to the shock absorber, that is, it is part of it.
The main part is a strut with a shock absorber
Everything that is indicated above by the number 6 consists of several parts. Let's list them.
The numbers indicate the elements:
- 2108-2901056 – metric nut M14;
- 2110-2902760 - cup;
- 10519601 - washer;
- 16105021 – self-locking nut M12;
- 2110-2902816 – bump stop;
- 2110-2905003 and 2110-2905002 – shock absorber left and right;
- 2110-2902826 - frame;
- 2108-2901052 – washer for screw;
- 15540931 – M12 screw (until 07.2001);
- 2108-2901051 – lower screw (after 07.2001);
- 2110-2901054 – cap;
- 2110-2902842 - washer;
- 2110-2902830 – screw;
- 2110-2901032 - washer;
- 2110-2902820 – upper support (pillow);
- 2112-2902712 – suspension spring;
- 2112-2901031 and 2112-2901030 – left and right rack;
- 2110-2905681 – anther;
- 2108-2901050 – screw with eccentric;
- 16104111 – self-locking nut M8;
- 2108-2902840 (-01, -02) or 2110-2902840 (-01) – support bearing.
Some station wagons and sedans have racks 2110-2901030 and 2110-2901031. But then springs 2108-2902712 are used. But the parts marked with the number 21 are interchangeable.
Rounded fist
Let's consider one important unit, consisting of a minimum number of parts.
Steering knuckle with hub bearing
From the appearance of the unit it is clear what and how it is attached to. Let's list the articles:
- 2108-3103020-01 (-02) – wheel bearing;
- 2108-3103068 – sealing ring;
- 2108-3001060 – dirt protection lining (internal);
- 2108-3103012 – hub;
- 2108-3103079 – bearing element (washer);
- 2108-3103032 – a retaining ring that secures the bearing;
- 2108-3001061 – dirt protection pad (external);
- 2110-3103065 – decorative cap (after 01.2003);
- 2108-3103065 – decorative cap (until 01.2003);
- 2108-3001015 and 2108-3001014 – left and right fist;
- 2108-3103061 – hub mudguard;
- 14044271 – self-locking nut M20.
Front suspension struts SS20 for VAZ 2110, 2111, 2112 RACING “SPORT” series (set of 2 pcs)
Lowered front struts SS20 Racing SPORT for VAZ 2110-2111-2112
Since August 2022, front shock absorber struts SS20 with lowering “-30”, “-50” and “-70” mm for VAZ 2108 and VAZ 2110 have been combined into a single position VAZ 2108-10 and can be used on both automobile. Lowered (sports) shock absorbers “SS20 Racing” are a series of SS20 products for drivers who prefer a fast and active driving style, for whom not only the appearance of the car is important, but also the correct and stable operation of the suspension when the ground clearance is lowered.
Benefits of SS20 Racing Lowered Shocks
- lowering the car suspension by 30, 50, 70 or 90 mm at your choice;
- increasing vehicle stability and reducing roll when cornering;
- increased resistance of rebound and compression valves, which provides increased energy consumption for lowered suspension;
- the reduced rod output ensures reliable fixation of the spring when the wheel is fully suspended;
- the geometry of the shock absorbers is designed in such a way as to ensure the balanced operation of all suspension elements for the required lowering of the suspension;
- improving the aerodynamics and speed characteristics of the car;
- equipped in pairs with the same characteristics, which guarantees uniform running of the car;
- improving handling and preventing the car body from swaying at high speeds;
- increased strength and rigidity of the body of the SS20 Racing struts (due to the reinforcement gussets) allows them to be used as sports shock absorbers for competitions;
- new impressive sports characteristics and sporty appearance of the car.
The lowered SS20 Racing struts , produced in the “Sport” modification, have high rebound and compression forces, which allow them to be used in amateur competitions. These shock absorbers are less suitable for everyday use, as the suspension becomes much stiffer.
Shock absorbers of the SS20 Racing series have the following design features:
- reduced rod output for working with shortened springs -30, -50 and -70 mm (with the number of turns no more than 6 for the front struts and no more than 9.5 for the rear ones);
- a shortened upper part of the body for proper distribution of forces between the bump stop and the spring as part of the lowered suspension;
- a spring cup shifted 20 mm downwards in modifications of the SS20 Racing shock absorbers -70mm;
- a downward-shifted swing arm to ensure the design geometry of the steering linkage;
- a gusset-reinforced body that can withstand increased loads compared to standard shock absorbers.
The kit includes:
- Left shock absorber strut
- Right shock absorber strut
- Warranty card
Warranty - 1 year Price is per set
| Applicability | |
| Model | 2110, 2111, 2112 |
| Packaging dimensions | |
| Height | 20 cm |
| Width | 30 cm |
| Length | 50 cm |
| Guarantee | |
| Guarantee | 1 year |
| Product line | |
| Series | SS20 Racing SPORT |
Ready-made solutions for lowering a car:
Selection table for lowered suspension kit SS20 for VAZ 2110-2112 cars:
| Lowering amount (mm) | Shock absorbers | Springs |
| -30 | SS20 Racing [–30] | SS20 Racing [–30] |
| -50 | SS20 Racing [–50] | SS20 Racing [–50] |
| -70 | SS20 Racing [–70] | SS20 Racing [–50] |
| -70 | SS20 Racing [–50] | SS20 Racing [–70] |
| -90 | SS20 Racing [–70] | SS20 Racing [–70] |
As you know, the steering of front-wheel drive VAZ cars is designed in such a way that when the car is on its wheels, the steering rods are in a position close to horizontal. Thus, when the suspension moves and when the car rolls, there is a minimal change in the toe-in of the front wheels.
When lowering a car using springs without replacing the standard shock absorbers, the body is lowered by the amount of lowering, and the steering mechanism is lowered along with it. The ends of the steering rods remain at the same height relative to the ground, therefore, the rods stand at an angle. When such a suspension moves and when cornering with a roll, the steering rods deflect even more. In this case, the toe-in changes more than on the standard suspension, and it becomes necessary to increase the steering movement in the direction of the turn.
Let's consider the case when one wheel hits a bump. The rack goes up, and the steering rod deflects, while the rack turns away from the straight path. And such a deviation must be countered by turning the steering wheel. The car becomes overly sensitive to road irregularities. The SS20 Racing shock absorbers have the swing arms shifted downwards. This made it possible to maintain the neutral position of the steering rods. And ensure minimal changes in toe-in on turns and road unevenness. Thus, when lowering a car with SS20 Racing shock absorbers, the necessary steering precision is maintained, and there is no need to constantly steer when driving over uneven roads and when banking in a corner.
Like all SS20 struts, the lowered front and rear shock absorbers of the SS20 Racing series undergo mandatory 100% quality control. They are equipped in pairs with the same characteristics, which guarantees uniform running of the car.
You can get the best results when lowering your suspension by combining these shock absorbers with SS20 Racing lowering springs
Note!
- “SS20 Racing” shock absorbers allow you to install wheels up to 195-50/R15 in size. If the wheel size is larger, it is recommended to install SS20 wheel spacers. When installing larger wheels, make sure that there is at least a 10mm gap between the edge of the wheel and the edge of the rear shock absorber spring cup.
- The use of modified products on public roads is strictly prohibited.
- Products with a modified design are intended for cars prepared for competitions in areas specially equipped for this purpose.
- The seller is not responsible for changes made to the design of the vehicle by the buyer. The buyer bears all responsibility for these changes.
Diagram of the anti-roll bar on the VAZ-2112
The stabilizer is an important part, but you can drive without it. The absence of a stabilizer is not a reason to remove the car from service.
Stabilizer and traction rod
The unit consists of a rod and two rods. Articles:
- 2110-2906050 – thrust or stand;
- 2110-2906010 – assembly assembly;
- 10516870 – spring washer;
- 2110-2906040 - pillow;
- 10519601 - washer;
- 2108-2906042 - bracket;
- 2110-2906016 – rod;
- 2110-2906078 – upper rod bushing;
- 15971321 – M10 screw;
- 12164711 – nut M10;
- 16104111 – self-locking nut M8;
- 2108-2906079 – lower rod bushing.
To get rid of the stabilizer, remove the parts shown in the list.
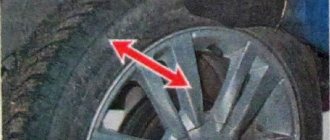
Suspension check
Knowing the meaning and design of the suspension, you will be able to check its condition every time you inspect the machine on a pit (overpass) and perform maintenance. Pay special attention to the condition of the protective covers on the ball joints. Check to see if any deformations, cracks or dents have appeared on the suspension due to shaking and bumps.
Be sure to check the condition of all rubber and rubber-to-metal parts, as well as the ball joint of each wheel. Remember: a malfunction noticed and corrected in time is much less evil than repairs when everything is already falling apart.
Main front suspension components
The main element of the front suspension is considered to be a hydraulic telescopic strut , which is simply irreplaceable in the matter of shock absorption and ensuring a comfortable ride on the car. The car won’t shake much, and going through every hole won’t turn your trip into a nightmare.
To change the wheel camber, there is a strut in the front suspension. To be more precise, the steering knuckle and the upper bolt, which has an eccentric washer and a belt, are responsible for this process.
- Special springs;
- Buffer to limit the compression stroke. On the VAZ 2110 this element is made of polyurethane;
- Upper support. It is attached to the rack, to which, in turn, the mudguard is attached. Please note that only self-locking nuts are used for fixing. Therefore, ordinary nuts will not work for repairs;
- Bearing to ensure rotation of the stand together with the wheels;
- Shock absorbers with spring and plunger.
The ball joint serves to combine the steering knuckle and the lever, that is, the lower part of the suspension. Rubber-metal hinges combine the lower arms, longitudinal braces, and cross member supports.
By the way, the cross member of the front suspension of the VAZ 2110 is a bar to which the lower arms are connected. In the center it is attached to the body using a rubber cushion.
This is a brief diagram of the front suspension of the VAZ 2110, your instruction manual will help you get to know it better. Many motorists underestimate the importance of this literature, which the manufacturer attaches to each of its cars. But in fact, the necessary, useful and important information about each component, unit and system of the machine is presented in detail and in all colors. Including the front suspension, of course.
Do-it-yourself repair of the VAZ 2110 front suspension Detailed instructions
During the operation of a car, its suspension takes on the greatest load. Not only safety, but also driving comfort depends on the technical condition in which it is located. Today we will try to figure out how to repair the front suspension of a VAZ 2110 at home.
DIY suspension repair
It is worth noting that most of the repair work can be done on your own, without involving expensive specialists and using the services of service centers or service stations.
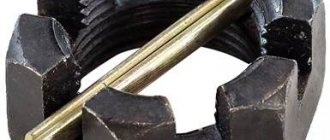
So, first of all, you need to put the car on the handbrake and secure the wheels with wheel chocks. The entire repair process can be divided into several stages. Let's look at each of them in detail: Repair of ball joints - remove the wheel and clean the suspension elements from accumulated dirt. Using a jack, slightly raise the front of the car. Unscrew the upper ball joint pin nut and press the pin out of the steering knuckle. After it comes out, remove the fastening of the ball joint and remove it from the upper arm along with the protective casing. Install a new device and assemble it in reverse order. The lower support changes in a similar way; Front suspension arms - work begins by removing the upper element, for which the steering knuckle pin is pressed out of the ball joint. Remove the bracket bolt from the bumper and unscrew the fastening nuts from the axle, then remove it, and remove the lever itself from the car. Using a special puller, damaged silent blocks are removed and new ones are installed in their place. Assembly is carried out in reverse order. It is not necessary to remove the lower element, just unscrew the nuts on its axis and, using a puller, remove the rubber-metal hinges, put new ones in their place and tighten the nuts. Removal is carried out only if the part is damaged, which, however, is quite rare;
Shock absorber - to replace this component, unscrew the fastening nut located on its rod. Remove all installed washers and the upper rubber cushion from it. Unscrew the lower shock absorber bracket, which connects it to the lower arm. Remove the broken part through the technological hole. Remove the mounting bracket and install a new shock absorber. Assembly is performed in reverse order.
It is important to remember that even if one shock absorber is broken, both must be replaced;
Spring - first of all, remove the shock absorber and disconnect the stabilizer bar from the lever. Loosen the fastening nuts on the lower axle, lightly jack the lower arm and use a lift to remove the ball joint pin from it. Lower the jack, slightly weakening the spring, and use a spatula to remove it from the support cup located below. Compress the new spring using special ties and put it in place. Using a jack, slightly press the lower arm up and insert the ball joint into the steering knuckle. Fix it and then remove the clamps from the spring. The remaining parts of the suspension are assembled in the reverse order in which they were dismantled.
Knocks
If you start to hear knocking noises coming from the front suspension, this could be caused by several reasons:
- The rack has certain faults;
- The ties on the cross member, the cushions are worn out or the bolts are loose;
- The attachment to the body was not strong enough;
- The springs have failed;
- The hinges are worn out;
- The rubber part of the suspension has broken its integrity. The knock should be clear, like the impact of metal on metal;
- Wheel alignment is out of balance.
If you do not hear a knock, but a noise, then the causes of front suspension problems may be as follows:
- The bolts that secure the stabilizer bar to the body have become loose;
- The rubber components in the strut support have collapsed;
- The rubber pads of the coupler or rod are worn out;
- The suspension spring has broken or violated its geometry;
- The wheels are unbalanced;
- The compression stroke buffer has collapsed.
Spherical bearing
If there is a knocking sound from the front suspension of the VAZ-2110, there is a high probability that there is a malfunction in the ball joint. It consists of the following elements:
- Threaded ball pin.
- Metal clip.
- Bolts attaching to the suspension arm.
- Nut fastening to the hub.
- Rubber boot.
Two failures can be distinguished - destruction of the metal ball pin and boot. The latter happens quite often. Water, dust, and dirt penetrate into the mechanism through cuts and cracks. These particles act as an abrasive, gradually destroying the rubbing parts.
Having special equipment for restoring balls, you can repair them. But there is little point in this - the cost of a set of new elements (2 pieces) is approximately 500-700 rubles, depending on the manufacturer. And recovery will not give good results for a long time.
Why does the car pull to the side?
Sometimes drivers notice how, when driving in a straight line, the car begins to pull to the side. There are several reasons for this phenomenon:
- Each spring has its own specific compression ratio. If it loses elasticity, the element must be replaced;
- Tires may have different pressures. Check this first;
- A rubber component on one of the strut supports has collapsed. In such a situation, a characteristic knock may appear. The situation can be corrected by simply replacing the element;
- The wheels are set at the wrong angle. A common cause of tire wear. It is better to trust such a problem to a specialist, since it is difficult to repair the front suspension on a VAZ 2110 with your own hands in case of such a malfunction.
Engine
There are many modifications to the VAZ 2110 engine to improve its performance. A list of engine changes that tuning enthusiasts can do with their own hands:
- A zero resistance filter is installed in the engine.
- Changes are being made to the fuel supply system to the engine. For example, jets are installed - dispensers that control the amount of incoming fuel.
- A larger diameter throttle valve is installed in the intake system to increase the volume of air supplied.
- The receiver is being modified.
- Direct-flow exhaust is installed. This procedure is considered one of the most common modifications performed by car tuning enthusiasts.
- Various manipulations are performed with the cylinder block. For example, new camshafts are installed.
- The engine cooling system is tuned to obtain a cold intake effect.
Some of these modifications are difficult to do yourself. If you do not have the necessary experience and qualifications, it is advisable to contact a car service center for any changes to the car’s power unit.
Examination
To prevent you from having problems while driving on the road, it is strongly recommended to check the front suspension for preventive purposes, and also to respond immediately when the first signs of trouble appear.
- Experts recommend paying special attention to the protective covers of the joints, monitoring their condition, and also checking the front suspension for mechanical damage.
- Make sure that neither the front suspension arm of the VAZ 2110 nor any other element has cracks or other visible damage. Pay attention to checking the connection points of the elements.
- If the components are deformed, the angle of the wheels will most likely be disrupted and they will no longer be able to be adjusted.
- Check ball joints, hinges, upper stack mounts, cushions. If there are breaks in the rubber elements, they must be replaced.
- Measure the distance between the lower arm and the brake disc. This way you can check the condition of the suspension joint. If the distance is more than 0.8 millimeters, the hinge must be replaced with a new one.
- If the buffer shows signs of destruction, it should be replaced immediately.
- The spring is replaced if it has failed or sagged.
- Ball joints are replaced when they are worn or deformed. Other hinges must be replaced if they or the stabilizer bar struts are worn out.
- All rubber elements change under conditions of deformation or failure.
- If the fastening of the upper strut mount to the body is loose, simply try to tighten the fastening. Most likely, no major intervention will be required.
Understanding the structure of the front suspension, as well as audibly or visually identifying its malfunctions is quite simple, despite the apparent complexity of the assembly. But you should approach the issue carefully and periodically check the condition of the suspension, even if its malfunction is not indicated by any noise, knocking or behavior of the car on the road.
For any car, it is better to organize preventive maintenance than to later pay exorbitant prices for a full repair. Like a disease, it is better to prevent problems with the front suspension of the VAZ 2110 from occurring. It is cheaper, simpler and more correct on the part of the car owner.
Encyclopedia of tuning and modifications for VAZ 2110, VAZ 2112
| Helical suspension (coilovers) allows you to easily adjust the car’s suspension to different operating conditions. But such adjustable shock absorbers have one big drawback - their high price (a set from 50,000 rubles). Want to save money? Try making homemade coilovers. |
| One of the popular ways of tuning a car is to lower it. To do this, the suspension is modified using different methods, for example, cutting off the springs (which is not recommended), installing a lowered suspension kit, installing air suspension, or using suspensions with adjustable clearance. I will dwell on the last method in more detail. |
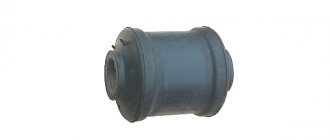
| On the VAZ 2110 (and some other front-wheel drive cars), rubber silent blocks are used in the cross member of the front suspension. To change the characteristics of the suspension and handling, they can be replaced with rubber-metal hinges (popularly “daisies”). Let's look at this improvement in detail. |
| Car silent blocks are hinged elements that serve to connect parts of the front or rear suspension and dampen vibrations transmitted from one unit to another. Most often they are made of rubber, but for tuning enthusiasts they offer polyurethane silent blocks. Do you know what is better to choose polyurethane or rubber? |
| Buffers are interturn spacers made of durable and elastic material designed to increase the stiffness of suspension springs. According to the manufacturers, these accessories can not only make the ride more comfortable, but also extend the life of the suspension and increase ground clearance. They claim that the installation of an auto-buffer is comparable in its characteristics to the installation of an additional shock absorber and gives the effect of an air suspension. Is this really so? |
| If the car falls into a deep hole, cracks in the paintwork may appear on the strut support. Most often, Kalina owners encounter this defect, but older VAZ models (2108-21099, 2110-15) are also no exception. To extend the life of the body, there are special protective spacers that can protect weak points from damage, as well as prevent the further spread of existing cracks. |
| For the first time at AvtoVAZ, negative camber of the rear wheels was used on the sports Kalina. Later, minus camber of -1 degree was used on Grant and the new Kalina. Do you know how to make negative camber on a VAZ with your own hands? |
| AvtoVAZ recommends installing wheels with a camber angle of 0 degrees. When the wheels are parallel to each other, good traction and stable driving are ensured. Do you know why they do negative camber and how it affects the behavior of the car? |
| Many car owners complain about insufficient handling due to weak body rigidity and suspension mounting points. This problem can be solved using an integrated approach to improving the driving performance of the car - installing a subframe. |
| On front-wheel drive VAZ cars, the rear suspension is semi-independent (torsion bar), which has its advantages and disadvantages. To change the characteristics of the car, the rear suspension is changed to independent. Do you know how complicated this process is and what impressions you get after such tuning? |
| At the front of the car, as a rule, an independent MacPherson-type suspension, double-wishbone or multi-link suspension is installed. But the rear suspension may have significant differences. Depending on the car and its operating conditions, the rear suspension is dependent, semi-independent or independent with a different number of levers. Each design has its own characteristics, advantages and disadvantages, and which one is better? |
| Do you hear extraneous noise in your car when driving? You should not delay in finding the cause of the malfunction, but repair the failed part as quickly as possible. The table describes the main causes of noise when driving a car, as well as ways to eliminate the problem. |
| During the operation of the car, we involuntarily have to deal with the appearance of extraneous noise, no exception knocking or squeaking when turning the steering wheel. In this article, we will look at the possible causes of this problem and how to fix it. |
| The front struts of the VAZ 2110 are designed to absorb shocks and impacts on the car body. Their approximate service life is 60-100 thousand km. mileage, and it largely depends on operating conditions. If you notice that the car has become less stable on the road, replacing the shock absorbers will most likely solve the problem. |
Loading, Please Wait!
This may take a second or two.
Before you start repairing anything, you need to know how it works. Therefore, the first article in this section is the design of the front suspension. What is front suspension and what does it consist of?
The suspension is the parts, components and mechanisms that connect the car body to the wheels. The purpose of the suspension is to reduce dynamic loads on the supporting elements. The VAZ 2110 has an independent, telescopic front suspension.
It is based on hydraulic shock absorbers, coil springs, levers with extensions, and a stability stabilizer. Let's look at the picture of everything that is included in it:
1 – ball joint 2 – hub 3 – brake disc 4 – protective cover 5 – swing arm 6 – lower support cup 7 – suspension spring 8 – telescopic strut protective cover 9 – compression buffer 10 – upper support cup 11 – upper support bearing 12 – upper strut support 13 – rod nut 14 – rod 15 – compression buffer support 16 – telescopic strut 17 – nut 18 – eccentric bolt 19 – steering knuckle 20 – front wheel drive shaft 21 – hinge protective cover 22 – outer shaft joint 23 – lower arm Let’s Let's see what the front suspension looks like when you look at it from under the car:
1 – suspension arm extension 2 – anti-roll bar 3 – suspension arm The upper support is attached to the car body, namely to the mudguard strut, with 3 nuts. Due to the fact that the support is quite elastic, the stand can swing during the suspension stroke. This is good because body vibrations are damped. And the bearing installed in it makes it possible to rotate the rack in the same way as turning the wheels.
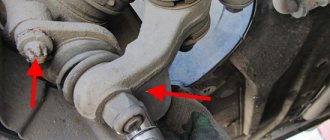
There is a hydraulic shock absorber installed inside the strut housing; if it fails, it can be replaced. The steering knuckle 19 is connected to the lever 23 by means of a ball joint 1. The support is secured with 2 bolts; when unscrewing them, it is worth tapping them and spraying them with WD-40, since they often break when pressed hard.
Traction and braking forces are received by longitudinal braces, which are connected with silent blocks to the beam and lower arms.
In the middle part of the anti-roll bar there is a bend for the exhaust pipe. The lower arms are connected to the ends of the stabilizer by rubber-metal hinges. In turn, the stabilizer bar is secured with fasteners, inside of which rubber cushions are inserted.
(votes: 3, average: 5.00 out of 5).
Hi all!
Today I’ll tell you
about the front suspension
, there will be a little theory and the final result that I have.
So, the front suspension.
Our tens have single wishbone suspension at the front. Not the best option, but we are content with what we have. With a strong understatement (I mean -110 and below), the suspension geometry changes very much. Namely, in the stock state, the lever is raised very high (and if there is also a stabilizer, but it is generally compressed as much as possible), the steering rod, if not moved on the rack, also lifts up into the sky.
A little theory.
Before perceiving the information, I recommend reading
this book
, not necessarily all of it, but specifically the sections
“Chapter 2. Suspension Height”
,
“Chapter 3. Suspension Geometry”
and
“Chapter 6. Angles and Shock Control”,
it is advisable to study, maybe I’ll do something I didn’t understand it correctly, but I’ll try to briefly tell you how I understood it now.
When lowering the car, you must always remember the position of the lower arm and steering rod. Attention! All positions are considered from hinge to hinge, and not according to the geometry of the lever and rod itself.
Our task is to ensure that in the driving position the lower arm is as parallel to the ground as possible, and the steering rod is also parallel to the horizon, and at the same time, they must be parallel to each other. The permissible deviations in both cases are about 1.5 mm in each direction. In this case, we have the most correct front suspension geometry (in theory), with no “shock control”. When hanging, such a car will have a strongly negative toe-in, which also indicates that the geometry has been properly prepared. In theory everything is fine, but how it turns out in practice will be known later.
Repair of VAZ 2110 Lada Chassis
4.0 Chassis
Telescopic stand 1 – compression valve body; 2 – compression valve discs; 3 – throttle disk of the compression valve; 4 – compression valve plate; 5 – compression valve spring; 6 – compression valve cage; 7 – recoil valve nut; 8 – recoil valve spring; 9 – valve plate from...
4.1. Checking the technical condition of suspension parts on a car (Category). See the list of materials inside...
4.2. Rear suspension (Category). See the list of materials inside...
↓ Comments ↓
1. General data 1.0 General data 1.1. Vehicle Specifications
2. Engine 2.0 Engine 2.1 Possible engine malfunctions. 2.2 Replacing the coolant 2.3 Replacing the engine oil and oil filter 2.4. Installing the piston of the first cylinder to the TDC position of the compression stroke 2.5 Replacing the camshaft drive belt and tension roller 2.6 Adjusting the camshaft drive belt tension 2.7 Removing, troubleshooting and installing the flywheel 2.8. Replacing engine seal parts 2.9 Cylinder head 2.10 Grinding in valves 2.11 Adjusting clearances in valve drive 2.12 Removing and installing engine 2.13. Engine repair 2.14. Lubrication system 2.15. Cooling system 2.16. Exhaust gas system 2.18. Features of VAZ-2112 engine repair
3. Transmission 3.0 Transmission 3.1. Clutch 3.2. Gearbox 3.3. Front wheel drives
4. Chassis 4.0 Chassis 4.1. Checking the technical condition of suspension parts on the car 4.2. Rear suspension
5. Steering 5.0 Steering 5.1 Inspection and check of the steering on the car 5.2. Steering column 5.4. Steering mechanism 5.5 Possible steering malfunctions.
6. Brake system 6.0 Brake system 6.1. Vacuum booster 6.2. Main brake cylinder 6.3. Pressure regulator 6.4. Brake hoses and tubes 6.5 Bleeding the brake system 6.6 Replacing brake fluid 6.7. Front wheel brakes 6.8. Braking mechanisms of the rear wheels 6.9. Parking brake 6.10 Possible malfunctions of the brake system.
7. Electrical equipment 7.0 Electrical equipment 7.1. Mounting block 7.2. Generator 7.3. Starter 7.4. Ignition switch (lock) 7.5. Checking and replacing spark plugs 7.6. Integrated engine management system (fuel injection system) 7.7. Contactless ignition system 7.8. Lighting, light and sound signaling 7.9. Windshield wiper 7.10 Replacing the electric motor of the radiator fan of the cooling system 7.11. Heater electric motor 7.12. Cigarette lighter 7.13. Instrument cluster 7.14 Checking the carburetor solenoid valve control unit 7.15 Possible malfunctions of the EPHH control unit. 7.16 Electrical diagram of a VAZ-21102 car 7.17 Electrical diagram of a car with a carburetor engine 2110 7.18 Engine control diagram 2111 (pin M1.5.4) 7.19 Engine control diagram 2111 (pin MP7.0) 7.20 Control diagram for engines 2111 and 2112 (pin M1) .5.4N, "January-5.1")
8. Body 8.0 Body 8.1 Possible body malfunctions. 8.2. Replacing the buffers 8.3 Removing and installing the radiator trim 8.4 Removing and installing the locker 8.5 Removing and installing the wing 8.6. Hood 8.7 Removing and installing upholstery, trim and windshield frame lining 8.8. Trunk lid 8.9. Side doors 8.10 Removing and installing the front seat 8.11 Removing and installing the upper and lower lining of the floor tunnel 8.12. Seat belts 8.13. Rear view mirrors 8.14. Instrument panel 8.15. Heater 8.16 Anti-corrosion compounds for body treatment 8.17. Features of body repair of models 2111 and 2112 8.18. Body care
9. Appendices 9.0 Appendices 9.1 Fuels, lubricants and operating fluids 9.2 Basic data for adjustments and control 9.3 Filling volumes 9.4 Lamps used in the car