The car's electronic system is equipped with a function for recognizing errors in the operation of many components and mechanisms, so if you have technical problems, you should definitely pay attention to the instrument panel. In addition to the Check Engine light coming on, information about problems can be transmitted in encrypted form. The code usually consists of letters and symbols, therefore, without knowing the exact meaning of such a “message”, it is impossible to take any action to improve the situation. If the car’s engine begins to operate unstably, the car’s technical condition monitoring system displays error p0300, but analogues of such a message can also be codes like p03xx in which “x” can be replaced with a number.
What does P0030 mean?
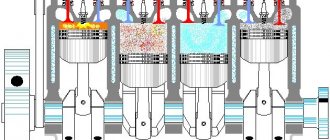
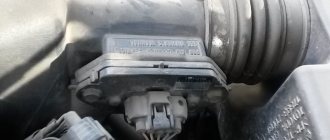
Trouble code P0030 is a general trouble code that indicates that the engine control module (ECM) has detected a malfunction in the oxygen sensor 1 (bank 1) heater circuit. The vehicle's ECM uses an oxygen sensor to monitor the oxygen content of the vehicle's exhaust gases. The ECM uses the signal received from the oxygen sensor to regulate the fuel/air mixture ratio of the engine. The most optimal ratio of air and fuel in the mixture supplied to the engine cylinders is 14.7:1. It is this ratio that is necessary to achieve maximum engine power and optimal fuel consumption.
The oxygen sensor heater is used to heat the internal components of the oxygen sensor to provide faster feedback to the vehicle's ECM. This is necessary to reduce emissions of harmful substances from the vehicle's exhaust gases when starting the engine, especially if the engine is started in a cold state.
Signs of trouble
Basically, code P0030 is accompanied by the following deviations in normal engine operation:
- The Check lamp is constantly on;
- fuel consumption increases significantly;
- engine power decreases;
- when accelerating, the engine begins to slow down and transmits thrust jerkily;
- The control unit puts the car into emergency mode - the crankshaft speed is limited to 3000 rpm, and in some cases the speed may be limited to 30-60 km/h.
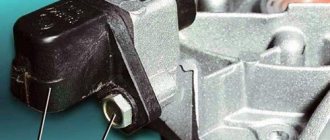
In addition, the error often appears in conjunction with other codes that either simply duplicate it or indicate the presence of related faults. Error code P0032 in place of P0030 may be displayed more often than others, as it indicates a malfunction of the heater itself. As a result of heater failure, the system registers a reference voltage of 0.9 V that is too high, as if the mixture is too rich (the norm is 0.45 V).
Display of auxiliary error P0032
Displays two errors simultaneously: P0030 and P0134
The table below shows the most common codes that can be displayed simultaneously with the obd error P0030 on different vehicles:
| Error code | Decoding |
| P0031 | Oxygen sensor to the neutralizer, checking the short circuit of the heater circuit “to ground” |
| P0032 | Oxygen sensor 1 heating circuit voltage too high |
| P0036 | Malfunction in the oxygen sensor 2 heater circuit (bank 1) |
| P0037 | Oxygen sensor after the converter, checking the short circuit of the heater circuit “to ground” |
| P0038 | Oxygen sensor after the converter, short circuit |
| P0050 | Oxygen Sensor Heater 1 Bank 2 - Circuit Malfunction |
| P0053 | Heating resistor of the first lambda probe, incorrect resistance |
| P0054 | Heating resistor of the second lambda probe, incorrect resistance |
| P0057 | Heated Oxygen Sensor 2 Bank 2 Heater Control - Heater Circuit Low Voltage |
| P0134 | Low level of oxygen sensor signal, UDC circuit is not active |
| P0141 | O2 Sensor Heater 2 Bank 1 - Circuit Malfunction |
| P0172 | Too rich mixture (rarely displayed, mainly on Subaru) |
| P2251 | Lambda probe 1, bank 1, ground cable open circuit |
| P2626 | Heated Oxygen Sensor 1 Bank 1 Pump Current - Open Circuit |
How does a mechanic diagnose a P0030 code?
First, the mechanic reads all the stored data and error codes using an OBD-II scanner. He will then clear the error codes from the computer's memory and test drive the vehicle to see if P0030 appears again. If the error code appears again, the mechanic will visually inspect the heated oxygen sensor for damage, as well as check the ground and measure the voltage at the sensor.
The mechanic will then carefully check any associated electrical wires that may have been damaged due to excessive heat due to high exhaust temperatures.
Diagnosis and problem solving
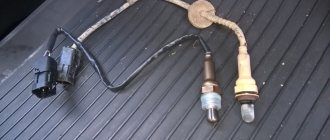
Trouble P0030 can only be caused by the oxygen sensor heater circuit or the oxygen sensor itself. Diagnostics usually begins with checking the sensor wiring. Typically the heated oxygen sensor comes with four wires.
Two wires go directly to the heater circuit, and the other two are for powering and grounding the sensor. You may need a wiring diagram for your car. To be sure you are testing the correct set of wires.
Wiring check
Test the heater circuit using a digital multimeter or volt-ohmmeter. Consult your vehicle's wiring diagram to determine the exact pinout of the ground connector.
The reading should be close to the battery voltage. If this is not the case, then there is most likely a problem with the sensor's power supply.
It is also necessary to check the grounding. To do this, you need to connect the positive terminal of the battery to the red wire of the multimeter. And the black wire to ground to check the grounding of the circuit. The result should be 12V, if not then this indicates a grounding problem at the sensor.
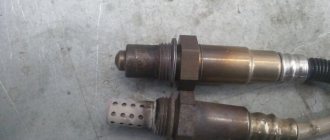
Sensor check
If the power and ground are ok, then the next option is to check the sensor heating element. To determine if it has an open circuit or high resistance.
Set the volt-ohm meter to Ohm scale, check the resistance of the heater circuit using the electrical diagram as a reference.
Make sure you have disconnected the O₂ sensor. The heater circuit inside the sensor should have little resistance. Exceeding the limit value indicates a break in the heating part. Therefore, the oxygen sensor will have to be replaced.
How serious is P0030?
When a P0030 error occurs, the Check Engine light on your vehicle's dashboard will illuminate, indicating a problem. Failure of the heated oxygen sensor may cause the vehicle's ECM to not be able to properly regulate the fuel/air mixture in the engine. The vehicle's engine may run erratically. It may also increase fuel consumption and damage other vehicle components. If this code is detected, it is recommended that you contact a qualified technician as soon as possible to diagnose and resolve the error.
Often, if the Check Engine Light comes on immediately after starting the engine, the OBD-II system can be reset and the vehicle will continue to operate normally.
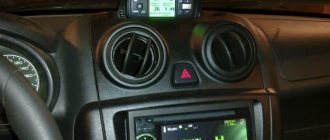
Spark plugs, BB wires, coil
If a VAZ-2114 car stalls, the “check” is on, or the engine “troubles” at idle, you need to pay attention to the ignition system. The main elements are spark plugs and high-voltage wires. Often on domestic cars there is a breakdown of spark plugs or wires. It is necessary to check these elements for serviceability and replace if necessary. The best way to check is to install a pre-made set of spark plugs or wires.
This way we can narrow down our search. If even one spark plug is faulty, it is better to replace the entire set. Otherwise, there is a high probability that the breakdown will happen again, only on a different cylinder. It is also recommended to check the spark plug gap between the central and side electrodes. Over time, this gap increases. The normal value should not exceed 1.3 millimeters. If the gap is larger, it can be corrected by bending the side electrode closer to the central one. If the distance between the electrodes is too large, a spark is difficult to form. Part of the fuel mixture will simply go into the air. Typically, the service life of spark plugs is 20 thousand kilometers. Some people install iridium ones because they last longer. But as motorists say, there is no point in overpaying. The characteristics of the internal combustion engine will remain the same, and the cost of such spark plugs is equivalent to three or four sets of regular ones, which are no worse.
Less often on a VAZ, the ignition coil itself fails. At the same time, the “check engine” lamp lights up on the instrument panel. The engine may stall, start poorly, or stall. The coil cannot be repaired and must be replaced completely with a new one. As for the wires, you can check them by measuring the resistance.
What repairs can fix the P0030 code?
To resolve the P0030 error you may need to:
- Clearing error codes from the ECM and test driving the vehicle to see if the P0030 code appears again
- Heated Oxygen Sensor 1 (Bank 1) Replacement
- Repair or replace electrical wires or connector for heated oxygen sensor 1 (bank 1)
- Replacing the fuse in the oxygen sensor 1 heater circuit (bank 1)
- In rare cases, replacing the engine control module (ECM)
How to dismantle and install the Priora dashboard
To dismantle the module, you will need to prepare two screwdrivers – a Phillips and a flathead one. A complete replacement of the Priora tidy looks like this.
- Disconnect the wires from the battery.
- Pull the steering column all the way down and remove the steering wheel from the pin.
- You will also need to remove the cover covering the fuse box.
- Unscrew the 4 bolts holding the instrument panel and remove it.
- Loosen the two mounting bolts of the trim panel and remove it.
- Disconnect the wiring harnesses from the contact groups and completely remove the board from the machine.
Installation is performed in reverse order.
Specialization : Graduated from the State Automobile University, worked for 20 years at GAZ-56, now I drive a Zhiguli.
Source
Additional comments for troubleshooting P0030
Many high mileage vehicles (usually over 150,000 kilometers) have short-term problems with sensors, which usually occur when the engine is started or the transmission is subjected to prolonged stress. Often, if the Check Engine Light comes on but the vehicle continues to operate normally, the OBD-II system can be reset and the problem will be resolved. This is why it is important to check for an error code using a scanner and clear the code from the computer's memory before performing any repair work.
System high voltage
Description of the scheme
The ECM monitors the ignition voltage through the ignition circuit to terminal K18 on the ECM. Any signal value above the calibrated value will set a system voltage diagnostic trouble code.
Conditions for Setting the DTC
- The system voltage is less than 16 V.
- Engine running
Action Taken When the DTC Sets
- The malfunction indicator lamp does not light up.
- The controller records the operating conditions at the time the fault is detected. This information is stored in fault logs.
- An archive of diagnostic trouble codes is saved.
Conditions for Clearing DTC/Malfunction Indication
- The DTC history is cleared after 40 consecutive heating cycles without faults.
- The DTC can be cleared by a scan tool.
- The ECM power supply is turned off for more than 10 seconds.
Diagnostic information
If the DTC sets while the accessory drive is operating, check for loose connections or high current. Any circuit that may be causing an intermittent fault should be carefully checked for the following:
- Removed terminals
- Terminal connection
- Lock malfunction
- Deformity
- Terminal damage
- Poor contact between terminals and wiring connectors.
- Physical damage to wiring harnesses
Description of the test
The numbers below indicate the operation numbers in the diagnostic table.
- The On-Board Diagnostic (EOBD) system prompts the technician to perform basic checks and store status and fault data in the scan tool. This creates an electronic copy of the data recorded when a fault occurs. The information is stored in the scanning device for further processing.
- This test is carried out if the generator fails under load.
- The replacement ECM must be programmed. Reprogramming the ECM is described in the latest Techline.
- If no faults have been detected at this stage and no additional fault codes have been set, then see this Diagnostic Information section for additional test information.
DTC P0563 - System Voltage High
| Step | Operation | Values | Yes | No |
| 1 | Perform an On-Board Diagnostic (EOBD) system check. Has the check been completed? | — | Go to Step 2 | Go to “On-Board Diagnostic System Check“. |
| 2 |
Is the voltage below the specified value? | 16 V | Go to Step 3 | Go to Step 5 |
| 3 |
Is the battery voltage less than the specified value? | 16 V | Go to Step 4 | Go to "Diagnostic Information" |
| 4 |
Is the renovation completed? | — | Go to Step 5 | — |
| 5 |
Does the scan tool identify this test as passed and successful? | — | Go to Step 6 | Go to Step 2 |
| 6 | Check to see if additional diagnostic trouble codes have been set. Are diagnostic trouble codes displayed that have not been diagnosed? | — | Go to appropriate DTC table | System OK |