Cars admin26.02.2020
There is no voltage of 12.0 volts at the heating contacts of the sensor. But there is 9.0 volts. Battery -12.75 volts. Error P0134 constantly appears - the oxygen sensor circuit to the converter is inactive. What to do, where to look?
- Error: P0102 low oxygen sensor level, on Kalina - 2 answers
- Errors 0134 and 1135 in Kalina - 1 answer
- BC reports that the mixture is lean - 4 answers
- Error p0171 in Lada Kalina? – 4 answers
- The check light came on, which scanner should I buy for Kalina? – 4 answers
90 percent that the sensor is covered. The remaining 10 are due to wiring faults. And the heating voltage has nothing to do with it, we are talking about signal wires.
How did you measure it? Yes, the oxygen sensor should receive the same voltage as the battery. But this is with correct measurements - multimeter probes on the positive wire and on the negative wire (and not on two positive ones - sometimes some people try to measure this way). And if there is no proper voltage, this means there is a leak in the wiring, look for problems there. And one more point: the device must be in good working order, and its errors (if any) must be taken into account.
By mistake: there is no response from the oxygen sensor, its circuit is inactive, this means the sensor is faulty or the signal wire is broken.
P0134 – the first sensor (lambda probe) does not give a signal at all.
If you want to know how to check the operation of the oxygen sensor, then see Here.
The production technology of oxygen sensors has long reached a level where the percentage of hidden defects is minimal, and the service life can be measured in hundreds of thousands of kilometers. However, this does not mean that the average motorist is immune from problems. Among the ECM errors, which are not uncommon even during the car’s warranty period, the leading one is code P0135 – an open circuit for the lambda probe heating.
What does code P0130 mean?
This Diagnostic Trouble Code (DTC) is a generic transmission code. This means that it applies to all OBD-II equipped vehicles. Although the general and specific repair steps may vary depending on the make/model.
Bank 1 is always the block that contains cylinder #1. Sensor 1 is always the upper DC, located in front of the catalyst.
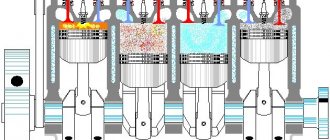
The oxygen sensor (OS) produces a voltage based on the oxygen content in the exhaust. The voltage varies between 0.1 and 0.9 volts. 0.1 means a lean mixture, 0.9 means a rich mixture.
The engine control unit (ECU) constantly monitors this voltage in a closed circuit. This is necessary to determine how much fuel to inject. If the ECU determines that the DC voltage has been too low (less than 0.4 volts) for too long (more than 20 seconds - time varies by model), code P0130 is set.
Causes of P0130
Usually the cause of P0130 is a bad DC, however this is not always the case. If your oxygen sensors haven't been replaced and they're old, there's a good chance the sensor is the problem. But it can be caused by any of the following factors:
- Water or corrosion in the connector.
- Loose terminals in the connector.
- Burnt wiring on exhaust parts.
- Open or short circuit in the wiring.
- Holes in the exhaust that allow unaccounted oxygen to enter the exhaust system.
- Air leak.
- Faulty oxygen sensor.
- ECU malfunction (rare).
Troubleshooting
Using a scan tool or adapter, determine whether sensor 1 in cylinder block 1 is switching properly. It should switch between lean and rich conditions quickly, evenly.
Step 1
If so, the fault is probably intermittent. You should check the wiring for visible damage. Then wiggle the connector and wiring while observing the oxygen sensor voltage. If the signal changes, secure the appropriate part of the wiring harness to the location where the problem occurs.
Step 2
If the DC is not shifting properly, try to determine whether the sensor is showing the exhaust correctly or not. This can be done by briefly removing the vacuum supply from the fuel pressure regulator. The oxygen sensor should show a rich mixture in response to the addition of additional fuel.
Restore the fuel regulator to its previous condition. Then create a lean condition by disconnecting the vacuum line from the intake manifold. The oxygen sensor should show a lean mixture in response to the increase in air.
If the sensor is working properly, there may be nothing wrong with it, but the problem could be holes in the exhaust or an unaccounted for vacuum leak in the engine.
Unmeasured engine air leaks are almost always accompanied by lean error codes.
If there are holes in the exhaust, it is possible that the O2 sensor is misreading the exhaust due to excess oxygen flowing through them.
Step 3
Perhaps the DC simply does not switch or works slowly and sluggishly. Disconnect the sensor connector. Using a multimeter, make sure it is receiving 5 volts of reference voltage.
Next, check for 12 volts in the oxygen sensor heater circuit. Also check the continuity of the grounding circuit.
If any of these are missing or are not the correct voltage, repair the open or short in the appropriate wire. The lambda probe will not work properly without the proper voltage. If the voltages are OK, replace the oxygen sensor.
Source
Analysis of external inspection of lambda probe malfunction
When starting your analysis, first check the wiring and make sure that it is not damaged. Even minor damage negatively affects the output signal from the measuring element. Then inspect the probe body for signs of damage that could indicate dents or cracks caused by mechanical stress.
It is important that the body of the probe measuring element remains unchanged, only then can it ensure normal operation
Just as an experienced driver can determine the technical condition of an engine by looking at the carbon deposits on the spark plugs, examining the appearance of the lambda probe can provide a lot of necessary and useful information.
Normal condition of the lambda probe
Appearance: The protective tube of the measuring element is free from any contamination and has a matte color.
Cause: Clean combustion in the engine, resulting from timely inspections of technical condition and maintenance.
Antifreeze contamination
Appearance: Granular gray-white, with a strong coating in places with greenish deposits. Apparently this antifreeze somehow gets into the combustion chamber.
The cause may be damage to the cylinder block. You should also check the condition of the cylinder head gasket and intake manifold. Solution: Check the tightness of the engine cooling system, especially the head gasket and replace if necessary. Replace probe.
Oil contamination
Appearance: Coarse deposits on color protection tube; grey-black, black and greasy deposits indicate excessive oil consumption.
Cause: Contamination caused by excessive oil consumption. In this case, you should check in particular the valve guides, oil seals and piston rings, which may be worn. Solution: Check the engine for oil leaks or wear, repair if necessary. Replace probe.
Air/fuel mixture too rich
Appearance: Excessive dark brown or black soot deposits. The cause may be a faulty sensor heater or a faulty fuel system. Solution: Check the fuel system, check the fuel pressure, the efficiency of the injection system, measure the composition of the exhaust gases. Fix the problem. Replace probe.
The use of various types of fuel additives
A whitish coating on the measuring part of the probe indicates contamination due to the use of harmful additives or excessive amounts of additives.
Some fuel additive components may contaminate the probe's measuring element. Solution: Clean the fuel system to remove any remaining fuel additives. Replace probe.
Lead contamination
Appearance: Shiny, gray or reddish deposits on the probe protection tube.
Reason: Use of fuel containing lead impurities.
Solution: Clean the fuel tank.
Replace probe.
THIS IS IMPORTANT: In any case, a dirty lambda probe must be replaced. After replacement, check the operation of the catalyst
Final part
A small note. An efficient lambda probe and correct sensor readings do not guarantee that the engine is in excellent condition.
The lambda probe measures the average value for all four cylinders. That is, the sensor does not measure (fuel-air ratio) for each cylinder separately.
Thus, we can imagine a situation in which, for example, our injectors do not work well. Two of them supply too much fuel to the combustion chamber, while the others supply too little. Although none of the cylinders reach the permissible excess air ratio (14.7:1), the average value may be correct!
What are Bank 1 and Bank 2, Sensor 1 and Sensor 2 (Bank 1, Bank 2, Sensor 1, Sensor 2)
Are you trying to figure out which oxygen sensor (OS) really needs to be replaced? We get a lot of questions about how to determine which DC is Bank 1 and which DC is Bank 2.
That's why we decided to write this article to clear things up once and for all. It sounds very confusing with all this "Bank 1 Sensor 2 etc." But if you figure it out once, it won't be that difficult.
There are often people who have replaced the wrong sensor because they didn't know which one they needed to replace. After you read this article, you won't make the same mistake!
What is bank 1 and bank 2?
Engine cylinders are often divided into two parts. If you have a V-twin engine, there is one block on each side of the engine. There is a lot of misinformation about which side is bank 1 and bank 2.
The truth is that you can't simplify it and say bank 1 is on the driver's side or vice versa, because different engines may have 1 cylinder on different sides.
Bank 1 is the side with cylinder #1 (cylinders 1 − 3 − 5 − 7, etc.)
Bank 2 is the side with cylinder #2 (cylinders 2 − 4 − 6 − 8, etc.)
To learn how to determine which side is Bank 1 and Bank 2, keep reading below and we'll explain how you can easily find it. You may ask: but I have a straight six, what can you tell me about bank 2?
That's why we don't want to tell you about the side that is bank 1 and 2. You can have bank 2 on both inline and transverse engines (engines mounted in the other direction).
If you know which cylinder is first, then it makes no difference what kind of engine you have. Bank 1 is always on cylinder 1 − 3 − 5 − 7 − 9 − 11, and bank 2 is always on cylinder 2 − 4 − 6 − 8 − 10 − 12.
What is sensor 1 and 2?
The sensor number tells us where the oxygen sensor or exhaust gas temperature sensor is installed on the exhaust system. The first sensor is located closer to the engine, and the second is located at the rear of the exhaust system.
In general, if we are talking about recreation center:
Sensor 1 = front before the catalytic converter (upstream DC).
Sensor 2 = rear after the catalyst (DC downstream).
Some diesel engines have many exhaust gas temperature sensors and may use sensors 1 − 2 − 3 − 4, etc. In these cases, sensor 1 is located closest to the engine and the last sensor is located at the end of the exhaust system.
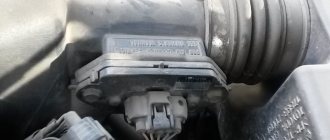
Replacing the oxygen sensor VAZ 2114
- To replace a part, you first need to find its location. On old VAZs with 8-valve engines, the sensor location was very inconvenient. Then it was in the exhaust system pipe.
- Access to it was not convenient, since it was only possible from under the car. In this arrangement, replacing the sensor is extremely inconvenient and difficult.
- In newer editions of the VAZ 2114, the sensor location has become more convenient. Access to it appeared through the top of the engine compartment.
- To change the sensor yourself, you need to prepare some tools. Required items: 22mm wrench, screwdriver, socket wrench and penetrating lubricant. The replacement should be done strictly according to the algorithm, because if it works incorrectly, additional malfunctions may appear.
- First you need to place the car over the inspection hole. Then open the hood, disconnect the battery and remove the crankcase protection. After these steps, you need to unscrew the oxygen sensor, remove it, and if necessary, clean the area from dirt. Only after this can a new oxygen sensor be installed. Everything is assembled in reverse order. After collection, you need to check whether the motor is working correctly.
- If some symptoms of a probe malfunction appear, but it is not possible to go to a service center and carry out diagnostics, then you can make a trick that will help temporarily solve the problem. You can make such a deception yourself. Installing the decoy is very simple; just remove the oxygen sensor from the car and screw in the decoy in its place. Often this necessitates the installation of additional sealing rings.
This method should be used only in extreme cases. And if any problem or suspicion of a malfunction occurs, you should contact the service for diagnostics.
Article Rating
How to find cylinder numbers?
There are several ways to find the cylinder number. On some vehicles, the cylinder number is stamped on the crankcase cover.
If you have high voltage ignition wires, there are often numbers on them as well. But this is not a recommended method, since previously they could be changed or transferred between cylinders.
The safest way is to look at the crankcase cover or find the cylinder numbers in the car's repair/service manual. You can call the car dealer and ask them. You can try to find information online by searching your engine code.
Why error P0130 is dangerous and how to fix it
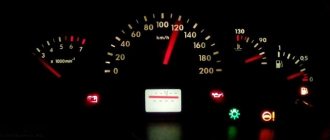
No motorist will be happy to see an error when scanning the control unit. This is especially true for errors that are accompanied by the Check Engine light on the instrument panel.
It is the burning check that most often becomes the reason to inquire about what errors were recorded and stored in the memory of the control unit. Some codes contain rather warnings, recommending that consumables be replaced in the near future. Others point to the pre-accident condition of the vehicle and its individual systems.
What does error P0130 mean?
This is a question of paramount importance that should be of interest to the car owner. By connecting to the control unit of a scanner or smartphone, when reading errors, you can detect code P0130.
Decoding the code P0130 means that there is low voltage in the oxygen sensor circuit.
We are talking about an oxygen sensor or lambda probe, which is located in front of the catalyst, that is, before the catalytic converter.
But understanding the meaning of error code P0130 is not enough. You also need to find out the reason for its occurrence, the reasons that provoked its occurrence, as well as current methods for troubleshooting.
Whether to do it yourself or seek qualified help - each motorist decides individually. Practice shows that in many situations it is possible to cope without outside help. Act according to the situation.
How serious is p0134?
If error P0134 appears, it is unlikely that serious problems will arise with the vehicle's handling, but the error should not be ignored.
If the problem is left unaddressed for a long time, it can cause damage to the catalytic converter. Also, when this error appears, fuel consumption may increase and engine power may drop. If a P0134 code is detected, it is recommended that you contact a qualified technician as soon as possible to diagnose and repair the error.
Formation conditions
In order for error P0130 to be recorded and stored in the memory of the control unit, while simultaneously producing accompanying symptoms, a certain scenario must be executed.
These are the conditions under which an error is generated, and it is recorded by the vehicle's ECU. We are talking about executing such a scenario.
The oxygen sensor, also known as a lambda probe, must be faulty for 1 minute or more, which is detected by the control unit.
When no information is received from the oxygen controller, that is, the values change too slowly, the data is erroneous, and this continues for 60 seconds or longer, then the error is recorded in the memory of the control unit.
Approximately 10 seconds after the error code P0130 is recorded in the memory of the electronic unit, everyone’s unloved check indicator appears on the dashboard. That is, Check Engine, which recommends that the motorist check the condition of the engine as soon as possible. After all, there are some malfunctions in it.
If the oxygen sensor has completely failed, that is, no signals are received from the controller, in addition to error P0130, code P0134 is often recorded in the ECU memory.
Fulfilling the appropriate conditions allows the corresponding problem to be detected when scanning the memory of the electronic control unit.
Correct probe replacement
Replacing a lambda probe on a VAZ 2112 requires the following actions:
- First, disconnect the probe wire from the electrical wiring. The procedure is carried out with the engine completely cooled and the ignition off. To replace an old device, you should purchase a sensor with the same markings as the previous one
- Then, using the key we need, we unscrew the old sensor. From a dead point, it is best to rip the device off with the ignition on, and, of course, the hot sensor and exhaust pipe, otherwise there is a risk of damaging, pulling or stripping the threads; in a cold state, any metal shrinks, and you will have to unscrew it with considerable effort. When you've pulled it off, you can turn off the engine. It will be much easier to unscrew further
Attention: when the engine is hot there is a danger of getting burned, so you should use thick cloth gloves and be careful
- The new probe is screwed in until it stops in order to create a tight seal.
- Connecting the electrical wiring
- We check the performance of the new oxygen sensor using an oscilloscope, and a voltmeter, as well as an ohmmeter, the engine temperature is not lower than 350 degrees, at this point the replacement of the VAZ 2112 lambda probe is completed
That's all, good luck in replacing and checking your sensor, and in addition we recommend video material on replacing it.
Symptoms that appear
The P0130 error itself does not have characteristic symptoms that would allow us to immediately say that the problem in the engine is observed from the lambda probe. These are rather indirect signs by which you can guess to check the ECU, read the error and then understand the essence of the problem from it.
If there is a voltage problem in the oxygen sensor circuit, this will affect engine performance. Therefore, error P0130 almost never goes unnoticed.
If there is such a malfunction, you can notice it by the following signs:
- fuel consumption increases without changing the load and operating conditions, that is, fuel consumption is higher than before the error under similar conditions;
- the engine is unstable at high speeds;
- the car noticeably loses in dynamics;
- acceleration takes more time;
- actively pressing the gas pedal to the floor still does not give the expected jerk;
- The Check Engine light comes on on the dashboard.
To deal with such a problem, you need to know why it may arise.
Reasons for error P0130
Error P0130 just doesn’t appear. There must be some kind of malfunction. Experts identify several reasons that could lead to a decrease in voltage in the oxygen sensor circuit in front of the catalytic converter (catalyst).
We are talking about the following malfunctions:
- damage and breakage of wiring;
- cracks on the exhaust manifold side;
- failure of the oxygen sensor.
At the same time, during diagnostics and repairs, it is worth checking the condition of the mass air flow sensor and the possible presence of suction on the intake manifold behind the flow meter. Pressure in the fuel system and cracks in the exhaust manifold in front of the lambda probe can affect the operation of the oxygen sensor.
But if we talk specifically about error P0130, most often it occurs precisely for the reasons listed above.
Repair or replace the lambda probe?
Just like replacing a fuel pump on a VAZ-2110, repairing a lambda sensor should be carried out at a car service center. However, in most cases, this spare part is completely replaced, since it simply cannot be repaired further. The problem is the high cost of original sensors from an official dealer.
As a result, most motorists decide to switch to using a universal sensor, which is suitable for almost any make of car and costs much less than its original counterparts. In addition, if you want to save money, you can purchase a lambda probe from disassembly. These are used sensors, but they may have a long warranty period. You can also immediately purchase a full-fledged model of the exhaust manifold, in which a lambda probe is already installed.
If the problem is only a small error in the operation of the sensor, you can quickly fix it yourself. The main symptoms of a malfunction are associated with its severe contamination when fuel combustion products settle. In order to understand whether the tightening of the cylinder head bolts affected the operation of the probe or not, you just need to show it to specialists at an auto center. After the experts confirm that the lambda probe you removed is working, all you have to do is carefully clean it from dust and carbon deposits, and then put it back.
On what cars does it occur?
An error such as P0130 can occur on cars of various brands, models and generations.
There is no need to say that in some cars error P0130 is observed much more often than others. It can appear on almost any vehicle.
If we single out cars whose owners actively complain about a similar problem associated with low voltage in the oxygen sensor circuit located in front of the catalyst, then the list will look something like this:
- Hyundai Solaris.
- Renault Logan
- Skoda Octavia Tour.
- Opel Insignia.
- Renault Duster.
- Lada Priora
- Volkswagen Polo Sedan.
- Lada Kalina.
- Lada Largus.
- Chevrolet Niva.
- Hyundai Accent.
- Kia Rio, etc.
Device and symptoms of malfunction
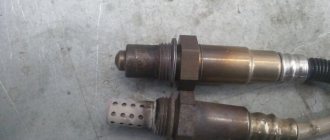
To completely burn 1 kilogram of fuel mixture, about 14.7 kilograms of air are needed. Therefore, data is very important in the fuel supply system, since its performance directly affects the smooth and stable operation of your car’s engine. Periodic checking of its performance is very important, however, before checking the lambda probe, we need to study the device, as well as the principle of operation. The oxygen concentration meter sensor, otherwise called a lambda probe, (in our case, VAZ 2112 lambda probe) contains the following elements:
- Metal body with threads for mounting
- Sealing ring
- Ceramic insulator
- Electrical signal current collector
- Wires
- Cuff that seals wires
- Live contact for heating circuit
- Protective shell (outer) with ventilation hole
- Ceramic tip
- A special tank with an incandescent coil in it
- Protective screen, with a hole for the passage of exhaust gases
All parts of the lambda probe are made of materials resistant to high temperatures, since the sensor itself has a fairly high operating temperature, so it is not afraid of overheating, while overheating, for example, a motor will have dire consequences (and this is possible if the probe faulty). Probe sensors can have from one to four wires in the device, respectively, the name comes from them: one and so on up to four wire sensors. By the way, some “craftsmen” claim that the VAZ 2112 works well without a lambda probe, but they are mistaken, it’s just that until the engine is warmed up, the readings of the sensor are not taken into account during injection, since it has not reached its operating temperature, therefore, you can trust such advice drive without it, only on a cold engine. Failure of the oxygen sensor is often caused by violations in the maintenance and care of internal engine parts and some other factors, such as:
- Cleaning the body (washing) with products that are not intended for this purpose
- Accidental contact with cooling fluid or
- Increased content of lead (metal additives) in fuel
- Severe overheating (red hot) of the sensor housing, which is caused by an unrefined combustible mixture
- In addition, the ingress of highly contaminated gasoline may occur due to a malfunction of the gasoline pressure regulator, or the DTOZh (coolant) temperature sensor, or a clogged fuel filter.
As a rule, if the lambda probe of the VAZ 21124 is faulty, this causes the following very noticeable problems in the operation of the engine:
- Its need for fuel increases, its consumption increases
- The car jerks when driving
- Unstable motor operation occurs
- The operation of the catalyst is disrupted
- Exhausts exceed permissible toxicity standards
Therefore, it is necessary to carefully monitor the operation of the probe and the condition of the exhaust gases; it is recommended to check its condition every 5,000-10,000 kilometers, especially this is necessary before the vehicle is certified for exhaust toxicity. In order not to bother with checking and replacing, no one bothers you to go to the service station, they will replace the sensor, they may not even look for what the problem is, or even find a couple of additional (not always existing) faults, which will raise the cost of repairs, and the quality of work may require the best.
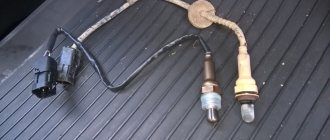
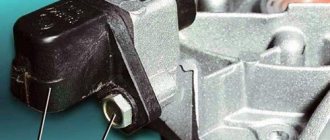
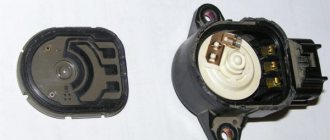
In the photo above we see what a replacement probe looks like, which is worth purchasing to replace it yourself.
Checking the probe status
So that you can check the performance of your oxygen sensor with your own hands, you will need the following items:
- Operating instructions for your car, which will tell you where the lambda probe is located in the car
- Digital voltmeter
- Oscilloscope
We have listed only the basic necessary auxiliary tools. The engine will need to be warmed up during the test. Now we’ll tell you how to check the lambda probe on a VAZ 21124 yourself, it’s simple:
- We first study the manufacturer's instructions; we are interested in the main parameters of our sensor. We check those indicators that will be affected by its unstable operation: voltage in the vehicle’s on-board circuit, ignition timing, condition and functioning of the gasoline supply system. In addition, we pay attention to the external condition of the mechanisms, for example, the presence or absence of mechanical damage to the housing and wiring
- Then we look into the engine compartment, find the lambda probe there. We inspect its condition for contamination. When the tip of the probe is covered with a layer of soot or lead, as well as a white-gray coating, it will most likely need to be replaced. The coating of the device with various deposits is usually caused by poor-quality gasoline composition. When the sensor tip is clean, then we continue checking further
- We disconnect the oxygen sensor from the car circuit and connect it to a digital voltmeter. We start the car, press the gas pedal, and increase the engine speed to 2500 rpm. We use a device to enrich your fuel mixture, reduce the speed down to 200
- If your car is equipped with an electronically controlled fuel system, remove the vacuum tube located in the gasoline pressure regulator. Now look at the voltmeter readings. And if the instrument needle approaches the 0.9V mark, this means that your lambda probe is in working condition. If the sensor malfunctions, the voltmeter needle will indicate a lack of response, as well as readings below the 0.8 Volt mark
- Do a lean test. To do this, you need to take a vacuum tube and provoke an air leak. When yours is working properly, then the voltmeter readings are about 0.2 Volt and below
- We check the operation of the probe in dynamics. We connect the sensor to the connector of our fuel supply system, install a voltmeter parallel to it. We increase the engine speed to 1500 rpm. If the sensor is working properly, the voltmeter should show 0.5 Volts. Any other value will indicate that the lambda probe for the VAZ 2112 is broken
Diagnostics
Based on the reasons considered, there are not many reasons for recording error P0130 in the memory of the electronic control unit. This allows the car owner or a specialist who works on the car to quickly detect the cause and try to eliminate it.
When diagnosing, it is recommended to adhere to the following algorithm of actions:
- Always check the wires first. This is the entire length of the wiring that connects the ECU and the lambda probe installed in front of the catalyst. Please note that in most cases, if the car complies with Euro-3 standards and higher, it will have 2 oxygen sensors installed. One is at the inlet, and the other is at the outlet, that is, after the catalyst. Error P0130 is associated precisely with the oxygen sensor, which is located before the catalytic converter. In the case of malfunctions of the second oxygen sensor, a completely different error appears.
- If the power passes through the wiring, then you need to visually examine the connectors and contacts of the oxygen sensor. After all, another reason may be pollution, oxides and corrosion processes that disrupt contact. Hence the low voltage in the circuit.
- Then the voltage is checked by connecting the multimeter probes to the signal wire of the oxygen sensor and to ground. The multimeter itself is switched to voltage measurement mode (voltmeter). If the oxygen controller is working properly, then the voltage on the multimeter will be about 0.45 V. The reference values are indicated in the instruction manual. If the check shows a significant deviation from the norm, the culprit of error P0130 has been found.
- Using an ohmmeter or multimeter in resistance test mode, the corresponding parameters are measured on the oxygen sensor heater. In most cases these are 2 white wires. A normal resistance is considered to be between 2 and 10 ohms. This depends on the specific make and model of the car. To check the benchmarks, check the technical documentation.
If no problems were found with the wiring or sensor, then you will have to dig further. Among the heated ones are the air flow sensor, a broken exhaust manifold seal, or suction behind the flow meter.
What repairs can fix error p0134?
To resolve this error you may need to:
- Check for the error code using a scan tool, clear the code from your computer's memory, and test drive the vehicle to see if the P0134 error code appears again and the Check Engine light comes on.
- Repair or replacement of electrical wires or oxygen sensor connector
- Replacing a faulty oxygen sensor
- Check and, if necessary, repair or replace the exhaust pipe or oxygen sensor heater fuse
More about Aveo: Buy Renault Sandero Stepway at a price of 442,000 rubles in Rostov-on-Don - more than 109 Renault Sandero Stepway on Avto.ru