Repair and tuning of the Six's interior includes the dismantling of car seats. Before removing the seats on a VAZ 2106, you will need to buy a socket set to “8” and an open-end wrench to “13”. When carrying out installation work, the lack of connection between the front seats is taken into account. They are mounted on a skid fixed to the body using 4 brackets.
Step-by-step instruction
First, the front seats are moved all the way forward (to provide access to the rear brackets). Then the chairs are moved back. To unscrew the bolts you will need a “13” wrench. Disconnect the electrical connector from the front seat. The next stage is dismantling the seats.
If necessary, factory seats are replaced with new analogues. Before installing the seats, you will need to make sure that the guide rails are parallel. Then the regulator is raised and the seat is moved back all the way.
The brackets are tightened to a torque of 20 N.m. The seats are moved forward, the rear brackets are tightened using the same method. The wires are connected to the battery. If the slides are installed, they are lubricated with Fiol-1 or Litol-24.
To tune the interior of the VAZ 2106, you will also need to remove the rear seat. First, experts advise studying the design of the rear seat. This sofa consists of a cushion and a backrest. The first element is fixed with two spikes welded to the body of the “six”. These spikes are installed in special holes located along the edges of the sofa.
To remove the seat, you will need to insert a screwdriver between the floor of the “six” and the edge of the part being removed. By pressing the screwdriver, they undermine the sofa from its seats. The next stage is dismantling the backrest. This element is fixed with two brackets welded to the vehicle body.
Repair work
Standard six car seats can break during operation. More often the chair adjustment does not function, misalignment or bedsores have appeared. To repair the seat, you will need to remove special latches along the edges. To remove the plate, use a flat-head screwdriver.
After dismantling the slide mechanism, it is recommended to inspect the chair frame. If the seat is damaged, repair work is carried out using a grinder, welding and a hammer. Then the frame is painted. The structure is assembled in reverse order.
To repair the back, you will need to remove the standard cover.
To do this, bend the teeth using a screwdriver. The next stage is dismantling the canvas and decorative inserts. After removing the entire cape, the back is dismantled. The frame is inspected for defects.
If a crack appears in the back, repair work is carried out using a hammer and plywood. A crack may also appear in the fastening of the rotating mechanisms. In this case, it will need to be cut out with a grinder. We repair the mechanism by welding and hammering. The next stage is assembling the rotating mechanism and synchronizing it. You will first need to clean and lubricate the connecting rod.
If the mechanism in the repaired unit works well, the structure is assembled. Then the functionality of the node is re-checked. The component elements of the mechanism must work synchronously and in parallel. The structure is clamped with a clamp, welded, protected and painted.
If the headrest of the VAZ 2106 seat is loose, insert copper strips into the clamps. It is recommended to clean and lubricate rusty fasteners. The headrest pillars have straight bottom slots. To quickly dismantle the head restraints, it is recommended to install lower grooves. The back and headrest are assembled in the reverse order. Repair work on the “six” seats has been completed.
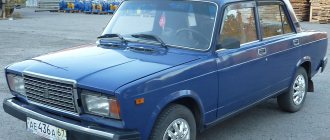
Removing the front seats of a VAZ 2107
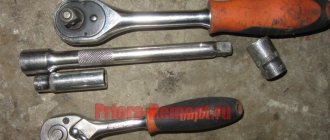
To dismantle the seats you will need a pair of keys - 8 and 13 mm. The procedure is as follows:
- Move the seat forward as far as it will go.
- Unscrew a couple of bolts securing the slide.
- Move the seat back.
- Remove the two bolts securing the front seat.
- Repeat the steps for the second chair.
- Remove the VAZ 2107 seats from the interior.
How to remove a seat on a VAZ 2107
- - wrench;
- - screwdriver (phillips).
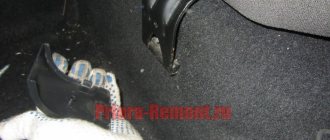
Open the car door wide to remove the back seat. After this, find the small handle from the pillow lock. It is located under the pillow on the side. Press this handle without applying much force so as not to break it, since it will be quite difficult to purchase the same one anywhere. Take extreme care when removing the pillow by lifting the edge. Next, go around the car and do the same on the other side. This is necessary so that all ends of the seat cushion are disconnected from the grooves. Remove the cushions from the interior by slightly lifting them.
Set the head restraints to the lowest position and, using considerable force, pull them up until they stop. To remove the head restraints from the back of the rear seat, you need to reach for the latch and press it.
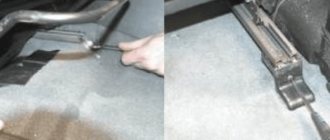
Look for the release strap on the back of the seat and begin to pull it up. If the seats in the cabin have been reupholstered, you may not be able to feel it the first time. But rest assured, it is there anyway. It is possible that the latch may jam during operation, then try again several times. If the result is still not achieved, lubricate this mechanism with lithol, and then remove all the elements.
Repair of front seat slides
VAZ front seat slides include the following parts:
| 1 — slide guides; 2 — slide sliders; 3 - roller; 4 — rubber roller ring; 5 - limiter; 6 — slide latch; 7 — retainer for the internal guide of the slide; 8 — back reinforcement; 9 - traction; 10 - spring; 11 — cotter pin; 12 — screw rod with the handle for the backrest tilt mechanism; 13 — latch handle for the slide movement mechanism; 14 — screw rod bracket |
Repair of seat mechanisms is carried out with the seats already removed. To restore the functionality of the mechanism, the following operations should be performed:
- clean from dirt;
- if necessary, replace worn or damaged parts;
- lubricate
Dismantling the slide is done as follows:
- Remove the spring.
- Remove the rod pin.
- Unscrew the bolts securing the slide to the seat.
- Remove the skids.
- Remove the screw rod from the bracket.
- Move the sliders along the guides.
- Remove sliders and rollers.
After disassembly, you can inspect the parts to determine the cause of the breakdown. The lack of fixation of the seat back of the VAZ 2107 can be eliminated by replacing it (or replacing the comb or clamp). To do this, you will have to cut off the broken part with a grinder and weld a new one in its place. The upholstery of the chair must be protected from welding by covering it with a wet cloth. If possible, it is better to leave one frame of the chair before welding. At the same time, you can wash the seat upholstery.
How to solve the issue with “subsidence”
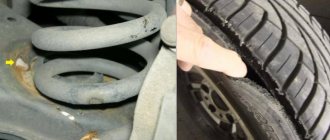
With the seat cushion removed, you can check the condition of the springs.
“Sagging” occurs because the springs break off from the sides of the chair, causing it to collapse under the weight.
To solve the “sagging” problem, you need to strengthen the seat. To do this, you should weld the metal plates and reattach the broken springs. Notice the wires that hold the seat springs together. If they are lost, install new ones.
If you want to make the seat harder, install a sheet of fiberboard and place it on top of the springs.
Front seat reupholstery
If covers were not initially installed on the chair, they will quickly become dirty.
When the upholstery is damaged, you need to re-tighten the seat:
- spread the sheathing along the seam;
- remove material;
- cut the workpiece according to the shape of the removed skin;
- inspect the structure - if necessary, replace the foam rubber and repair the springs;
- secure the new casing with thread, glue and heat sealing.
Installing the chairs does not require any special skills. The sequence of actions is the reverse of what you did when withdrawing.
Before installing the chair, be sure to lubricate the slides and other moving parts. You can use motor oil for this.
Reupholstery of the front seats of VAZ 2107
To reupholster the seats you need:
Rip out the old sheathing at the seams.- Moisten the places where the covering is glued to the cardboard elements with gasoline.
- Carefully remove the casing.
- Using the removed error as a template, mark and cut the workpiece from a suitable dense fabric.
- Renew foam elements and springs.
- Assemble the pieces of sheathing and secure them using heat welding, glue and thread.
Step-by-step instruction
First, the front seats are moved all the way forward (to provide access to the rear brackets). Then the chairs are moved back. To unscrew the bolts you will need a “13” wrench. Disconnect the electrical connector from the front seat. The next stage is dismantling the seats.
If necessary, factory seats are replaced with new analogues. Before installing the seats, you will need to make sure that the guide rails are parallel. Then the regulator is raised and the seat is moved back all the way.
The brackets are tightened to a torque of 20 N.m. The seats are moved forward, the rear brackets are tightened using the same method. The wires are connected to the battery. If the slides are installed, they are lubricated with Fiol-1 or Litol-24.
To tune the interior of the VAZ 2106, you will also need to remove the rear seat. First, experts advise studying the design of the rear seat. This sofa consists of a cushion and a backrest. The first element is fixed with two spikes welded to the body of the “six”. These spikes are installed in special holes located along the edges of the sofa.
To remove the seat, you will need to insert a screwdriver between the floor of the “six” and the edge of the part being removed. By pressing the screwdriver, they undermine the sofa from its seats. The next stage is dismantling the backrest. This element is fixed with two brackets welded to the vehicle body. If the seat cushion is removed, the backrest is removed by lifting it upward. Such movements must be sharp. First we pull one side, and then the other. Installation of the sofa is carried out in the reverse order.
Replacing seats
You can make the interior more comfortable by installing seats from another car model or special seats for auto tuning on the VAZ 2107. The latter are produced in various modifications, which allows you to choose a seat that suits the car owner.
You can install any car seats from foreign cars that are suitable in size in the VAZ interior. It should be noted that such a replacement requires welding to change the fastening design. During welding, it is necessary to protect the casing from sparks. If you don’t have a welding machine at your disposal, you will either have to be content with the available selection of car seats, or contact a specialist.
What seats can be installed in a VAZ 2107 car?
Initially, the car was equipped with inexpensive seats, since the car belongs to the “economy” class. However, the seats of the “seven” have a number of advantages compared to earlier car models.
They added:
- lateral support;
- headrests in a single body with the backrest;
- folding armrest in the rear seats.
In some cases, due to personal preference or necessity, drivers replace the basic seats.
Seats from foreign cars
Often, VAZ drivers choose seats from foreign cars for their cars.
The following options are suitable for the 2107 and will not require major modifications:
- Mercedes W210;
- Toyota Corolla.
A Volkswagen seat will do. However, in this case, the seating position is too high and is only suitable for short drivers.
If you want to install a seat from a Peugeot or Nissan car, you will have to spend time on installation, since the fastenings are different. For reliable fastening it is necessary to make additional holes.
Drivers often use seats from SKODA or Fiat cars.
Racing seat
Expensive option. Sometimes the cost of the seats is equal to the price of the car itself.
The main feature is the one-piece design of the back and pillow. The model uses fiberglass. These seats are chosen by racing drivers. Since the chair can be adjusted exactly to your figure. To do this, modeling inserts are installed in the seat.
Despite the robust design and comfortable ride, getting into and out of a car with racing seats becomes more difficult. The seat, made of fiberglass, makes driving absolutely uncomfortable on our roads. Such seats should only be installed when participating in racing; they are not suitable for other purposes.
Sports option
Unlike the racing version, the sports seats have adjustable backrests and shoulder rests. Added hip and back support feature. This is the most comfortable seat option.
This type of seat is equipped with a special belt to increase safety. Sports seats are recommended to be installed exclusively in cars with rigid suspension. If the suspension is soft, long-distance driving will not be comfortable.
Anatomical chair
For those who prefer a quiet ride, an anatomical chair will be the best solution. This type of seat stabilizes the body when turning, providing a comfortable fit.
Changing the adjustments will allow you to customize the position of the chair to suit you. Some models have added heating and vibration massage functions.
An anatomical seat is suitable for those who drive often and for a long time. This will be a solution for those who experience back and neck pain during long journeys.
Auto mechanics assure that this model can be equipped with a seat of almost any type and from any other car. The main thing is that the dimensions are respected and welding can be carried out.
Rear seat repair
The backrest of the rear seat can be easily removed. To do this, you need to lift it slightly so that the staples are separated from the latches. To remove the saddle, you should grab it by one edge with both hands and pull it up strongly, this will ensure it moves away from the lock. Then the same is done with the other side, after which the repair can begin.
Fastening the front seats
Many owners of the VAZ 2107 model, which has already been discontinued, want to decorate the interior by installing seats from other car brands. This primarily applies to the front seats. In this case, you should pay attention to UNP products. Which seats are suitable for VAZ from the company’s catalog? Almost everything. You can choose anatomical seats, such as “Boxer”, “Racer”, “Sport”, etc. They are quite lightweight, since the frame is made of durable fiberglass, have a steel frame and a bucket shape with side supports, which increases the quality of driving. The seat backs often have reinforcing pads, and the headrest is integrated. The seats are thin due to fiberglass, which gives additional space to passengers sitting in the back.
Sports UNP seats are perfect for the VAZ 2107. They have maximum lateral support, a one-piece design, an integrated headrest, allow you to install sports belts (3-6 attachment points), additional pillows, including lumbar support. All UNP products can be easily integrated into any car due to the availability of installation adapters, which are sold along with the seats. In the case of the VAZ 2107, we are talking about the slide and side mounting brackets.
Installing a sports or anatomical car seat is not a cheap pleasure, so many car enthusiasts want to know whether seats from a foreign car will fit in a VAZ 2107. Experts believe that almost anything that fits the dimensions can be supplied if it is possible to carry out high-quality welding work. For example, in the “seven” you can try to put parts from Opel (Vectra A, Cadet) or from Skyline.
It should be borne in mind that the installation of non-original seats may raise questions from regulatory authorities, since such an operation is considered to be making changes to the design of the machine.
Source: expertvaz.ru
Installing a new seat
Let’s look at some of the nuances of installing foreign-made seats in “classics”. True, we will analyze only the most common problems. After all, each chair has its own requirements for installation and it will not be possible to describe all the options step by step in one article. Drivers usually face the following difficulties:
- A common problem is the misalignment of the mounting slides. In this case, you will need to install the skids from the “original” car. To do this, you will need to drill additional holes for fastening in the bottom. Do not forget to carry out anti-corrosion treatment;
- The simplest drawback is that the driver's seating position is too low. As a result, you cannot fully control the traffic situation. To avoid this problem, it is recommended to weld cross members into the bottom and install the seat slides on them;
- Also, some drivers want to install an electric seat drive on the VAZ 2107. This approach allows them to be adjusted without effort. The process of installing an electric motor is not complicated. But, be sure to connect through a fuse. Moisture often accumulates on the floor of the car, which can lead to a short circuit.
- https://automotogid.ru/remont-perednego-sidenija-vaz-2107/
- https://semerkavaz.ru/raznoe/zamena-sidenijj-na-vaz-2107/
- https://expertVAZ.ru/2107/remont-sidene.html
- https://provaz07.ru/salon-i-kuzov/kakie-sidenya-podxodyat-na-vaz-2107.html
- https://www.vazzz.ru/kakie-sidenya-ot-inomarki-podhodyat-na-vaz-2107-bez-peredelok/
Disassembly and assembly of front seat adjustment mechanisms
- Repair manuals
- Repair manual for VAZ 2107 (Zhiguli) 1982.
- Disassembly and assembly of front seat adjustment mechanisms
Disassemble and reassemble mechanisms on removed seats.
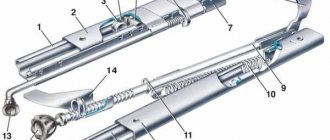
Rice. 9–22. Front seat adjustment mechanisms: 1 — slide guides; 2 — slide sliders; 3 - roller; 4 — rubber roller ring; 5 - limiter; 6 — slide latch; 7 — retainer for the internal guide of the slide; 8 — back reinforcement; 9 - traction; 10 - spring; 11 — cotter pin; 12 — screw rod with the handle for the backrest tilt mechanism; 13 — latch handle for the slide movement mechanism; 14 — screw rod bracket
Disconnect spring 10 (Fig. 9–22) and knock out rod pin 9. Unscrew the bolts securing the slide to the seat and remove them. Remove the cotter pin 11 and the screw rod 12 from the bracket 14. Sliding the sliders 2 along the guides 1, remove the rollers 3 and the limiter 5, remove the sliders from the guides.
Reassemble in reverse order.
Removing the front seats
The seat needs to be pushed all the way forward, after which you can see two mounting bolts on the slide that need to be unscrewed. After this, the chair is moved back as much as possible, the two fastenings at the front are unscrewed. In this case, you need to unscrew the nut on the left with a No. 13 wrench. After these steps are completed, the chair can be easily removed from the interior, making it possible to repair it.
The front seat adjustment mechanisms are known to jam quite often, so they can also be disassembled for the following work:
- cleaning from dirt,
- applying lubricant,
- repair, repair
- replacing worn parts.
The VAZ skid consists of a limiter, a bracket for a screw rod, a lock for the internal guide, a rod, guides, sliders and a roller with a rubber ring, a spring, a latch, a back reinforcement, a cotter pin, a handle for the latch from the mechanism for moving the skid, and other parts.
To carry out the work, you need to dismantle the spring, remove the pin from the rod, unscrew the bolts from the mounting of the slide on the VAZ seat and remove the slide. After this, the cotter pin/screw rod is unscrewed (removed from the bracket), the sliders are moved along the guides, the rollers with limiters are removed, and the sliders are removed. Assembly is carried out in reverse order.
Novikov Maxim Glebovich - Repair of the seat backrest tilt regulator VAZ-2107.
- Repair manuals
- Repair manual for VAZ 2107 (Zhiguli) 1982.
- Seats
9.7.1 Seats Removal and installation Dismantling and assembling the front seat adjustment mechanisms
9.7.2 Removal and installation Fig. 9–21. Front seat: 1 — pillow; 2 - back; 3 - base of the back; 4 - springs; 5 — pillow base frame; 6 — handle of the movement mechanism; 7 — handle for the backrest tilt mechanism Front seat. To remove the seat (Fig. 9–21), move it all the way back, to…
9.7.3 Dismantling and assembling the front seat adjustment mechanisms Disassemble and reassemble the mechanisms on the removed seats. Rice. 9–22. Front seat adjustment mechanisms: 1 — slide guides; 2 — slide sliders; 3 - roller; 4 — rubber roller ring; 5 - limiter; 6 — slide latch; 7 — retainer for the internal slide guide...
This is probably completely funny, but today I am publishing another article about repairing broken parts of VAZ cars, which, as usual, cost pennies anyway. I was prompted to write this article by another breakdown of my car, namely the passenger seat backrest tilt adjuster. I don’t know who I drove so heavy (and I never bombed), but on the passenger seat the adjuster comb was completely cut off, and the backrest did not lock in any position at all, tipping over into the back seat when I tried to lean on it. Naturally, I was too lazy to go to the service center, and I decided to see for myself what was broken there, and whether it was possible to fix it myself.
In general, this breakdown happens on Zhiguli cars quite often. Usually, for repairs, the chair is removed, the welded comb is cut off, and a new one is welded. But at home, it would be possible to do without welding, simply by drilling out the spot welds, cutting off the weld with a chisel, and screwing the new comb into place through the drilled holes. But I didn’t have time to look for a comb, and I had already taken the drill from the dacha to Moscow (and I started doing repairs at the dacha). Therefore, I decided to simply fix the backrest in one position, since none of the potential passengers are particularly trying to adjust it.
1. Remove the chair. To do this, move the chair all the way back, unscrew the two front bolts on its lower runners, then move the chair all the way forward and unscrew the two rear bolts on the same runners. We pull the chair out and turn it over, as if putting it on all fours. We study the lower part, in particular the latch itself.
The picture shows a chair back tilt lock with broken comb teeth. Thanks to the teeth, part 1 should be fixed in part 2, but since the teeth of part 2 are broken, fixation does not occur.
However, as you know, all the parts in Lada cars have clever design features, which are, as it were, specially laid down so that we can repair or modify these parts... Let's pay attention to the grooves of part 2, marked in the figure with arrows. They are approximately the same width as the distances between the ribs in part 1 (actually a little wider). This allows us to easily fix these two parts by inserting the part shown in the next photo.
2. We make a retainer. It is easy to make from a fairly common metal strip, a fragment of which can always be found by rummaging thoroughly in your or your neighbors’ barn. I found such a strip, and its width turned out to be exactly equal to the distance between the extreme points of the grooves, and the thickness was exactly equal to the width of the grooves, which is important for eliminating backlash.
All that remains is to cut out a notch in the center and use sandpaper to slightly narrow the thickness of the plate within the boundaries indicated by the red lines, since, as mentioned above, the distance between the edges of part 2 is slightly less than the width of the grooves themselves, and therefore the thickness of the part.
| Please note that the teeth of the clamp have different widths, corresponding to the depth of the grooves of part 2. |
Instead of a retainer plate, you can probably use large self-tapping screws, screwed either into the holes formed by the grooves and the ribs aligned with them, or between the ribs and broken comb teeth. But this fixation did not seem reliable enough to me.
I made the clamp 50 mm high, but, as you can see, it can be made a couple of centimeters smaller. Its size doesn't matter.
5. That's it. Turn the chair over and put it back in the reverse order. Now you can drive until you are ready to go to a car service center or until you scrap the car.
Source: automobilgroup.ru
Tip 3: How to insulate the interior of a VAZ 2107
Insulating the interior of a VAZ 2107 car also has a beneficial effect on traffic safety. The driver feels comfortable behind the wheel and the car windows stop fogging up. To avoid finding yourself in a cold car on a stormy day, you need to prepare it for winter in advance.
You will need
- – screwdriver;
- – a set of rubber seals;
- – sealant;
- - scotch;
- – heat insulator foil penofol 3mm.
Instructions
1. First of all, get rid of drafts. Deformation of low-quality rubber seals of domestic production in the VAZ 2107 car leads to the fact that it ceases to retain heat and “exhales” air. To check the tightness of your car, go to a car wash.
2. Check the interior after going through the exterior wash. Notice where and in what places the water has accumulated in the cabin. The presence of water indicates that the interior of the car does not retain moisture, which means that there is also a problem with the thermal insulation.
3. Don't waste time gluing or otherwise salvaging worn-out rubber seals. They won’t work anyway, and the cabin will be cold again. Purchase and install the latest kit, the one that will cost you 300-400 rubles.
4. Turn on the stove and check its operation in different modes. In case of malfunction, deal with the radiator. Disassemble the dashboard, remove the glove compartment and dashboard. Dismantling a radiator is not an easy job, however, its timely replacement or good repair with sealant will add 5-6 degrees of heat to the car in the winter cold.