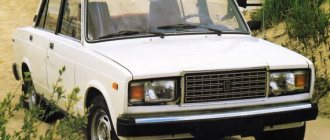
Structurally, the VAZ 2107 is not considered a complex device (especially if we talk about carburetor models of the “seven”). Due to the comparative simplicity of the car's mechanisms, many owners can independently service it and carry out repair work. But problems may arise with some elements - for example, with a generator. Not all car owners know how to work with electrical appliances, which is why they often make mistakes when replacing and connecting generators on their own.
- How to replace the generator on a VAZ 2107
Tool preparation - Dismantling works
Photo gallery: main stages of work
- Video: instructions for replacing the generator on a VAZ 2107
- Alternator belt sizes
How to remove the generator on a VAZ 2107? Everything is as simple as shelling pears
Car enthusiasts often wonder how to remove the generator on a VAZ 2107. This work is required quite often.
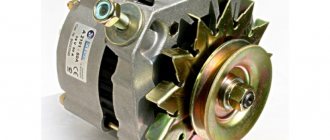
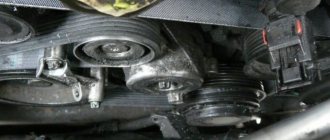
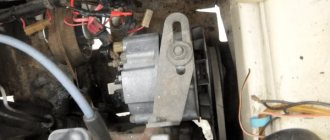
The frequency is related to the technical features of this model. There are more different electronics here than on other “classics”, which gave rise to the saying “wires are like on an airplane.” At the same time, the quality of the electrics itself leaves much to be desired. Even on new cars off the assembly line, electrical equipment failures were not uncommon, let alone well-traveled cars. The weakest link in the electrical system is the generator. There are plenty of problems with it, so repair and replacement of this structural element is not uncommon. How to remove the generator on a VAZ 2107? Before answering this question, you need to figure out where to look for this part. It is mounted on the right side of the engine on a special bracket. For fastening, a long screw with a nut is used, which at the same time serves as a tensioner for the generator belt. Access to this part is most convenient from below. Therefore, for dismantling it is better to use an inspection hole or overpass. If they are absent, you can remove the part simply on the garage floor, but this will cause some inconvenience.
Instructions.
- Remove the entire crankcase protection: the mudguard, as well as the so-called “ski”, after first blowing out all the fastening bolts and nuts with a WD tool.
- Unscrew the nut of the lower mounting of the generator. If you have problems with this, again spray it with WD, wait a little and try again.
- Move from under the bottom of the car to its engine compartment, remove the battery and, using a 17mm wrench and socket, loosen the alternator belt tensioner nut.
- Go under the car again and slide the generator towards the engine.
- Remove the belt from the generator pulley and inspect it for integrity.
- Unscrew and remove all terminals, “chips”, etc. wires connected to the generator.
- Spray the alternator mounting bolt with WD-40 type lubricant. To avoid damaging the thread, screw a nut onto it and tap it with a hammer to knock the bolt out of its seat. Then unscrew the nut and, using any convenient tool at hand (a pry bar, wrench, iron screwdriver, etc.) into its head and a hammer, knock it out completely. It is recommended to hold the generator with your other hand so that it does not accidentally fall out.
- Once the bolt is removed, use a gentle rocking and turning motion to remove the generator.
For reference: before removing the generator on a VAZ 2107 , the car should be driven into a pit or overpass. This will make dismantling work much more convenient.
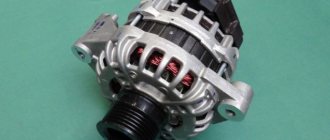
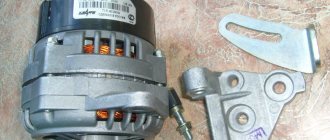
Which generator should I install?
Inexperienced car enthusiasts believe that only the standard generator 372.3701 can be installed on this model. Unfortunately, this device is not highly reliable, and it also produces little energy. This feature makes it almost impossible to use additional consumers on the car; even the stove turned on at full power can cause the battery to drain. Also, another generator could be installed on this model - 9412.3701. This option is the most powerful. The disadvantage is the high tendency to breakage.
In addition to standard parts, generators from other AvtoVAZ models are also suitable here. The most common option is a generator with a VAZ-2108. This is a fairly reliable unit. For full operation, you will need to install a relay regulator from a standard model. If this is not done, the battery charge sensor will lie, which is not very convenient. Another option is a generator from Niva (G222). This is a powerful device that can produce 80 A at peak. At the same time, there are significantly fewer problems with it.
Removal and installation
Before dismantling, you will need to prepare all the necessary tools:
- Keys 10, 17, 19;
- Set of heads;
- Ratchet;
- Mount;
- Hammer and punch.
It is also advisable to stock up on any liquid wrench or rust converter. It is recommended to use a new generator mounting screw; often, when removing the part, the thread is damaged.
Before work, be sure to put the car on the handbrake. Also turn off the power to the generator. To do this, remove the negative terminal from the battery. Then you can begin work on replacing the generator:
First, remove the chips from the generator. The wire to terminal “30” is secured with a nut; unscrew it using a 10-mm open-end wrench;
Repair instructions for the unit of the seventh VAZ model
To solve the problem of overcharging, replacing a pulley, regulator or diode bridge, repairs are performed:
- First, the nut that secures the pulley itself is unscrewed; at this moment you need to hold the rotor so that it does not turn.
- The pulley must be moved to the side, the impeller is removed and the key with washers is removed. After dismantling the pulley, the regulator relay is disconnected; to do this, unscrew the fixing bolts in advance and also disconnect the block. The regulator is removed with the brush mechanism.
- After removing the regulator, unscrew the nuts securing the device cover. The cover is moved to the side, after which the sleeve is dismantled.
- Now you need to check the performance of the bearing. If you see that when you turn it, a gap appears, then change the element by unscrewing it with an 8-mm wrench. Of course, to replace it, you need to remove all the screws and fixing nuts.
- The next step will be to dismantle the rotor. As practice shows, performing this procedure without the use of auxiliary tools can be problematic. Therefore, immediately take two small bars and fix them at the edge of the back cover. Using a special drift (preferably made of soft metal), you need to knock out the rotor. If the cover is damaged during dismantling, you can try to process it using a grindstone.
- Check the rear bearing in the same way. If you need to replace the device, remove it from the rotor. It will be more convenient to use a puller for this.
- The next step will be to dismantle the diode bridge. To remove the diode bridge, it is necessary to unscrew the nuts securing the bridge block, as well as the terminals on the winding. Next, you can remove the stator mounting screws and dismantle the device. You need to carefully diagnose the integrity of the winding. If there is damage on it, for example, broken wiring or signs of burning, the winding is changed and rewound.
- Next, you need to remove another nut, after which the bridge can be removed without any problems.
- Use a screwdriver to unscrew the bolt securing the capacitor and pull out the element.
Replacing the voltage regulator
Most often, the cause of a generator malfunction is the voltage regulating relay. Here it is produced assembled with a brush assembly. Removal and inspection are carried out in the following order:
- The wire tip is removed from the relay output;
- A pair of mounting screws are unscrewed; for this you will need a Phillips screwdriver;
- The relay is removed along with the brush holder. At the same time, inspect the condition of the brushes. If they are shorter than 10 mm, or one is noticeably smaller, then the relay should be replaced. The brushes cannot be changed separately;
- To check, terminal “B” is supplied with power from the positive of the battery, and negative is supplied to ground. After that, we check the voltage on the brushes, it should remain within 13-13.5 V without twitching.
If the voltage does not correspond to the required one, then the relay is faulty. Installing the unit on the generator is done in the reverse order.
Conclusion
. Cars from the classic AvtoVAZ model line are not highly reliable. Therefore, the question of how to remove a generator on a VAZ 2107 is not rare and surprising. There's really nothing complicated here. All actions are performed with a minimum of tools and effort. It is also important to select the right generator according to the vehicle's energy consumption.
Connection diagram
The connection diagram for the VAZ 2107 generator is shown in the photo:
Wiring diagram for VAZ 2107 generator circuits
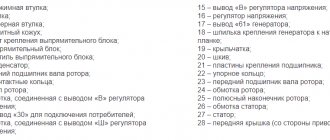
On the generator connection diagram 37.3701: 1 – battery, 2,3,5 – rectifier diodes, 4 – generator assembly, 6 – stator winding, 7 – charge relay, 8 – rotor winding, 9 – capacitor, 10 – fuses, 11 - indicator lamp, 12 - voltage meter, 13 - relay, 14 - lock.
If the output parameters are monitored and they do not correspond to normal values, a decision is made to dismantle and repair the generator
How to replace a generator on a VAZ 2107
Replacing a generator in a VAZ 2107 is a fairly rare occurrence. This unit usually works without failures and does not need repairs. However, in fairness, it is worth noting that it also has malfunctions, the elimination of which requires immediate repair, or even its complete replacement. The most common generator problems are listed below:
- Failure of the diode bridge (rectifier unit);
- Failure of the stator winding (break, short circuit);
- Failure of the excitation winding (break or short circuit);
- Worn or stuck brushes;
- Worn or jammed bearings;
- Failure of the voltage regulator.
Causes of malfunction
If the voltage generator does not work, first you need to understand the main reasons. As a rule, the need to diagnose a malfunction first arises if the device does not charge the battery or the so-called tablet does not work.
So, for what reasons the device does not work:
- Brushes. In practice, brushes are one of the main problems on a VAZ 2107 carburetor or injector engine. Brushes are essentially consumables. In fact, from time to time a malfunction in the form of worn brushes forces car owners to resort to disassembly, modification or replacement. Worn brushes will prevent you from using your car.
- The windings have burned out.
- Problems with the housing of the voltage generator on the VAZ 2107 injector or carburetor. As a rule, we are talking about mechanical damage.
- The need to modify, disassemble and replace the voltage generator on a VAZ 2107 injector or carburetor arises due to bearing wear. If the bearings squeak or make noise, they need to be replaced (video author - Avtoelektika HF).
How to remove the generator on a VAZ 2107? Everything is as simple as shelling pears"
How to remove the generator on a VAZ 2107? Everything is as simple as shelling pears
How to remove the generator on a VAZ 2107?
Before answering this question, you need to figure out where to look for this part. It is mounted on the right side of the engine on a special bracket. For fastening, a long screw with a nut is used, which at the same time serves as a tensioner for the generator belt. Access to this part is most convenient from below. Therefore, for dismantling it is better to use an inspection hole or overpass. If they are absent, you can remove the part simply on the garage floor, but this will cause some inconvenience.
Inexperienced car enthusiasts believe that only the standard generator 372.3701 can be installed on this model. Unfortunately, this device is not highly reliable, and it also produces little energy. This feature makes it almost impossible to use additional consumers on the car; even the stove turned on at full power can cause the battery to drain. Also, another generator could be installed on this model - 9412.3701. This option is the most powerful. The disadvantage is the high tendency to breakage.
In addition to standard parts, generators from other AvtoVAZ models are also suitable here. The most common option is a generator with a VAZ-2108. This is a fairly reliable unit. For full operation, you will need to install a relay regulator from a standard model. If this is not done, the battery charge sensor will lie, which is not very convenient. Another option is a generator from Niva (G222). This is a powerful device that can produce 80 A at peak. At the same time, there are significantly fewer problems with it.
Diagnostics
If the voltage generator does not charge the battery, this is a real problem. It is for this reason that disassembly, replacement or repair of faults, as well as assembly are carried out.
How to properly diagnose:
- Check the voltage generator on the VAZ 2107 by diagnosing the dashboard. If there are problems with the operation of the brushes, bridge or other components, the battery discharge lamp will light up on the device.
- If the VAZ 2107 unit does not charge the battery or an overcharge is detected in the system that needs to be checked, this also indicates a malfunction.
- Another sign of trouble to check is if the headlights are dim because the unit is not giving the battery the required charge. During engine operation, extraneous sounds may appear.
- If there are problems in the operation of the brushes, diode bridge or other components, the system may be overcharged, it is necessary to check. In this case, the brightness of the optics may increase as the speed increases.
VESKO-TRANS.RU
AutoNews / Reviews / Tests
- Home
- Auto garage
- How to Remove a VAZ 2107 Generator Without a Pit
How to Remove a VAZ 2107 Generator Without a Pit
How to change the generator on a VAZ 2107
Replacing a VAZ 2107 generator yourself is a rather difficult procedure. From time to time, when removing an old generator, severe tasks arise due to the fact that bolted connections and fasteners tightly “stick” to each other. Therefore, before work, you need to thoroughly prepare and stock up not only with tools, but also with the popular WD-40 liquid, which allows you to “free” rusted nuts.
Tools you will need:
- A universal puller for removing the bearing; as an option, you can use a rod puller, but I warn you, this is very inconvenient;
- Also find a good metal brush and a cloth-based sandpaper;
- Hammer;
- WD-40;
- Standard set of wrenches and screwdrivers.
This is what the VAZ 2101 generator looked like before repair, remember it like this, because after the overhaul it will change beyond recognition
1. First of all, you need to clean the generator from dirt, dust, oil, in short, from everything that has accumulated on it over many years of operation.
2. Unscrew the pulley nut; to do this, place the generator so that its pulley rests on the floor, then put a key on the nut at “19”. While holding the pulley against turning it, you need to apply several strong and precise blows to the key with a hammer. It is unlikely that you will be able to clamp the pulley “tightly” by hand, but this will be enough to “break” the nut and unscrew it freely.
3. Using a “10” wrench, unscrew the four bolts of the tie rods that assemble the generator into one unit.
4. Take a chisel and knock out the key (see photo above), to do this you need to install the generator so that the shaft is on top. Place a chisel on the key and begin to knock it out by hitting the chisel with a hammer. 5. After the key is knocked out, remove the front cover of the generator. If things get tough, try punching by weight.
6. Now remove the relay regulator from the generator.
7. Using the hole for the relay, knock out the rotor; you can use a drift to do this. While knocking out, constantly rotate the rotor so that it does not warp.
8. Using the socket on “8”, unscrew the three fastening nuts of the stator, as well as the diode bridge
Here you need to pay attention to the bolts; if they turn, hold them with pliers on the reverse side
9. It's time to remove the stator; before doing this, I treated the joints with WD-40. When everything has become a little sour, we arm ourselves with a hammer again and begin to knock it out. During execution, be extremely careful and careful not to damage anything. When the stator is removed, you need to remove the diode bridge. Unscrew the condenser and press out the rear rotor bearing using the universal puller mentioned at the beginning of the article.
10. Now unscrew the front cover and tension plates. The locked bolts that are installed there can be damaged, so at the beginning it was not in vain that I mentioned that you need to buy four “8” nuts. To prevent the bolts from turning when unscrewing, tighten them with pliers on the other side.
11. Remove the plates, then press the bearing through the mandrel.
As you can see, the VAZ 2101 generator is now completely disassembled, now everything needs to be cleaned, washed, scraped off, etc. I won’t go into details, because I think it’s already clear how to do this. You will need a metal brush, sandpaper and a knife.
Please note that since 1996, the location of pin 61 has changed. My old “old model” diode bridge, the differences are clearly visible in the photo, on the old one the contact is located on the wire, and on the new one it is soldered into the diode bridge
My old diode bridge is “old model”, the differences are clearly visible in the photo, on the old one the contact is located on the wire, and on the new one it is soldered into the diode bridge.
How to remove a VAZ 2107 generator
The VAZ 2107 is located in a rather awkward place. To make it easier to access, it is better to carry out work on a lift or pit. Before work, you need to de-energize the vehicle's electrical systems by disconnecting the battery terminals. Subsequent actions are performed in the following sequence:
- Remove the engine protection and the right front fender liner.
- Disconnect the wires from the generator (with all this, you need to understand how they were connected.
- Loosen the nut holding the generator and remove the belt from it.
- Unscrew the nut from the bolt securing the generator to the bracket. If it is rusty, use WD-40.
- Remove the mounting bolt. If it does not come out, it must be treated with WD-40 and carefully knocked out.
- Remove the generator.
Removing the generator VAZ (Lada) classic 2101-2107
Shown how to remove a generator without a pit
, overpasses, just in the courtyard of a private house.
How to remove a VAZ classic generator. (for beginners.)
how to remove the generator
from a
classic VAZ
Next, in order to ensure the removal of the VAZ 2107 generator along with the bracket, you will have to move the radiator. There is no need to drain the antifreeze, disconnect the pipes and remove the radiator from the car. It is enough to unscrew its fastenings and move it, providing free access to the bracket and generator.
When removing the generator, you can do without an inspection hole or lift by removing the generator through the wheel arch. This method is only suitable if the bolts and nuts are not rusty and it is possible to remove the generator without a mounting bracket.
Also check out
How to remove a VAZ 2107 generator with your own hands
Another way to remove the VAZ 2107 generator is possible. This happens if the car is new or the generator was installed not so long ago. In such cases, experienced owners will be able to reach it through the right wheel arch. The difference between this procedure and the previously described one is that in this case there is no need to remove the radiator; it is enough to remove it from it. In this case, to get the generator, you need to turn the steering wheel all the way and remove the mudguard.
When installing the VAZ 2107 generator,
perform all steps in reverse order. It is important that the belt tension allows it to be rotated 90
° along the longitudinal axis.
Worth checking out:
How to install a VAZ 2107 radiator
Installing the generator is not particularly difficult, since there is no need to deal with rusted bolted connections. The procedure for installation is the reverse of removal. After installing the generator, you need to install the belt and tension it. If you tighten it too loosely, the belt will slip when the generator is loaded, producing a characteristic whistle. Excessive belt tension will cause premature wear of the alternator bearing. It is easy to check the correct belt tension: it must be turned by hand along the longitudinal axis by 90 degrees. If the angle is smaller, the belt will be tightened. If more, it is weakened.
After installing the generator, connecting the wires to it and tensioning the belt, you can connect the battery terminals.
Everything is ready for testing. You can start the engine. The functionality of the generator can be checked with a voltmeter by measuring the voltage on the battery. When the car engine is running, the on-board voltage should be 14 volts.
Capacitor check
The capacitor serves to protect the vehicle's electronic equipment from voltage surges in the ignition system, as well as to reduce interference with radio reception. Damage to the capacitor or loosening of its fastening on the generator (deterioration of contact with the housing) is detected by an increase in interference to radio reception when the engine is running.
Approximately the serviceability of the capacitor can be checked with a megger or tester (on a scale of 1-10 MOhm). If there is no break in the capacitor, then at the moment the probes of the device are connected to the terminals of the capacitor, the arrow should deviate in the direction of decreasing resistance, and then gradually return back. Capacitor capacity 2.2 µF±20%.
Where is the generator located on the VAZ 2107
The generator on the VAZ 2107 functions in close connection with the battery. As with any other car, this device generates electricity to power all elements of the car. In this case, the generator performs its function only when the engine is running.
On the VAZ 2107 this mechanism is located directly on the surface of the power unit on its right side. This position is due to the fact that the generator is started by the movement of the crankshaft through the V-belt.
Alternator belt for VAZ 2107
"Seven" came off the assembly line of the Volzhsky Automobile Plant in the period from 1982 to 2012. Initially, the model was equipped with a drive belt of a currently outdated model, which had a smooth surface without any roughness. However, later VAZ 2107 began to be re-equipped to meet the requirements of the time, which led to the emergence of a new type of belt with teeth.
It should be emphasized that the most popular manufacturer of belt products for the domestic automotive industry is Bosch. For many years, the German manufacturer has been producing high-quality products that, both in size and service life, completely satisfy VAZ 2107 owners.
Alternator belt sizes
All parts used in the design of the car must have markings and manufacturer numbers. Design numbers and sizes of belts for the VAZ 2107 are specified in the operational documents for this model:
- 2101–1308020 (smooth surface), dimensions - 10.0x8.0x944.0 mm;
- 2107–1308020 (toothed surface), dimensions - 10.7x8.0x944.0 m.