Main brake cylinder VAZ 2110
The GTZ is the main part of the brake system; when you press the brake pedal, it distributes the brake fluid through the lines to the calipers and creates the necessary pressure to compress the brake pads.
Below are signs that indicate the need to replace the brake master cylinder.
Signs of a malfunction of the GTZ:
- Traces of brake fluid leaking through the O-rings are noticeable;
- The force on the brake pedal disappears and when you press the pedal, the car does not brake;
- The pedal does not engage due to the jamming of the GTZ rod;
With these signs, it is not recommended to delay replacing the gas turbine engine.
Replacing front brake pads on a VAZ-2112
Please note that the pads are changed only in pairs, meaning on both front wheels, otherwise the system will not work correctly and the wheels will seize at different times, and this is no good
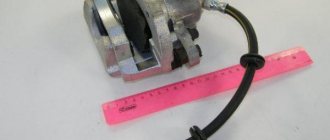
Brake disc assembly with caliper
The replacement process itself can take about an hour for the first time, and then it’s like clockwork. First of all, it is worth taking safety measures - remove the negative terminal from the battery (if the car has a wear sensor), fix the car on a level area and place wheel chocks under the diagonally opposite rear wheel.
After this, you can tear off the fasteners, hang the body on a jack and remove the wheel. It’s better to play it safe and install a stand, it’s more reliable.
- The wheel has been removed and placed under the ball, now you can remove the brake hose from the bracket and disconnect the wear sensor terminal.
The wheel is removed, you can start working
Removing the stopper on the caliper
Removing old pads
Checking the condition of the brake disc
Installation of brake pads
We press the brake piston using a lever
- You won’t be able to install new pads just like that, the piston of the working cylinder will not release. Therefore, it needs to be drowned, and for this you can use any lever (if you have experience), a clamp or a special puller, although almost everyone gets by with a simple clamp.
- When the new kit is installed and the bolts are tightened, you must remember to roll the stopper.
Inserting new brake pads
Consequences of brake fluid leakage from the GTZ
When brake fluid leaks from the master cylinder, brake fluid can get onto various parts of the car. As you know, TZ is quite chemically active and often damages other parts of the car.
For example, when liquid leaks, it can fall on the vacuum booster membrane, which will soon lead to its rupture and, as a result, air leakage from the receiver, and of course, replacement of the vacuum booster itself.
VUT membrane rupture
Also, when brake fluid leaks, it gets into part of the engine compartment, behind the steering rack, and causes great damage to the paintwork.
Which cylinder is best to buy for replacement?
Rear brake cylinder from Kraft.
If you definitely decide for yourself that you will not go to a service station for repairs, then the spare part necessary for repairs will need to be purchased at a car store. Since spare parts for domestic cars are inexpensive, there will be no problems when purchasing.
When purchasing, you can buy both the original, which has the article number 21050-3502040-00 , and a “non-original” from another company. Unlike spare parts for foreign cars, where the original spare part is always better, the situation with spare parts for VAZ is the opposite. It often happens that non-original spare parts turn out to be of higher quality than the original.
Replacement without bleeding the brake system
Below are instructions that allow you to replace the GTZ without bleeding the brake system and without a large loss of brake fluid. To carry out repairs, you need to prepare the necessary tools and DOT-4 brake fluid.
When replacing, it is necessary to dismantle the brake fluid reservoir from the old GTZ; when dismantling it, breakdowns of the tank occur; it is recommended that when replacing the GTZ, you also purchase a new TJ reservoir.
Required tool:
- Ratchet with extension and 17mm socket;
- Open-end wrench 10mm;
- Syringe;
- Phillips screwdriver;
Step-by-step instruction
- Remove the hood seal and unscrew the interior heater insulation with a Phillips screwdriver;
- We unscrew the cap of the brake fluid reservoir and use a syringe to pump out the brake fluid into a previously prepared container;
- Using a 10mm wrench, unscrew the fittings of the TJ tubes;
- Using a ratchet with a 17mm head, unscrew the 2 nuts securing the GTZ to the vacuum booster and pull the GTZ towards you;
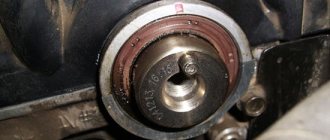
- We remove the tank from the GTZ (if you haven’t bought a new one). We install the reservoir on the new GTZ, lubricating the rubber seals with brake fluid;
- We install the new GTZ on the vacuum booster and fix it;
- We insert the brake fluid fittings into the GTZ, but do not tighten them;
- Fill the TJ tank up to half;
- We wait for brake fluid to flow out of the holes into which the brake pipe fittings are screwed;
- Then we twist and tighten the fittings of the TJ tubes;
- Add brake fluid between the MIN and MAX marks and close the cap;
The replacement process is complete. With this replacement, bleeding the brake system is not required.
We hope our article was useful to you.
Front wheel brake
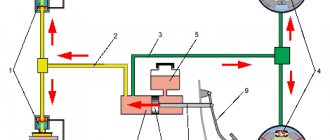
Rice. 6-20. Pressure regulator performance test diagram: Pi
— pressure at the inlets to chambers A and D (see Fig. 6-18) of the pressure regulator, MPa (kg/cm 2 );
Pr
—pressure at the outlet of chamber B, MPa (kg/cm2);
Re
is the pressure at the outlet of the chamber C, MPa (kg/cm2);
1 - nominal pressure value Pr;
2 - upper limit of pressure
Pr;
3 - lower limit of pressure
Pr;
4 - the pressure
of the Re
manometer Mg) should fit into the shaded area (Fig. 6-20).
The readings of pressure gauges Мз and Мг (see Fig. 6-19) should not differ by more than 0.4 MPa (4 kgf/cm2) in the pressure range from 0 to 10 MPa (from 0 to 100 kgf/cm2) at regulator inputs.
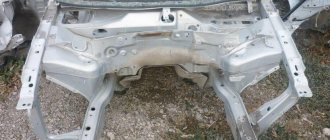
Front wheel brake
Withdrawal. Raise the front of the car, place it on stands and remove the wheel. Unscrew the pipeline fitting and disconnect the flexible hose from the line; Plug the holes in the hose and tube to prevent brake fluid from leaking. Remove the hose from the guide bracket.
After unscrewing the two bolts that secure the shoe guide to the steering knuckle, remove the guide assembly with the caliper and working cylinder.
Installation of the brake mechanism is carried out in the reverse order of removal. After installation, restore the brake fluid level in the reservoir and bleed the hydraulic drive system to remove air.
Rice. 6-21. Unscrewing the cylinder mounting bolt:
1 — cylinder mounting bolts; 2 - cylinder, 3 - bolts holding the cylinder to the caliper
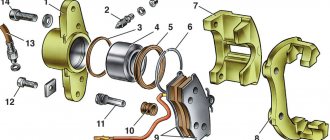
Rice. 6-22. Front wheel brake parts:
1 — wheel cylinder; 2 — fitting for bleeding the brake drive; 3 - sealing ring; 4 - piston; 5 — protective cap; 6 — retaining ring; 7 — caliper; 8 — pad guide; 9 — brake pads; 10 — protective cover; 11 — guide pin; 12 — guide pin fastening bolt; 13 — brake hose; 14 — bolt securing the cylinder to the caliper
Disassembly and assembly
Disassembly. Disconnect the hose from wheel cylinder 2 (Fig. 6-21). Unlock and unscrew bolts 1 securing the wheel cylinder to the guide pins, holding the guide pin by the edge with a wrench. Remove guide 8 (Fig. 6-22) of the pads and pins. Remove the brake pads 9.
Do not unscrew bolts 3 (see Fig. 6-21) connecting the caliper and cylinder, except when replacing the caliper or cylinder.
Remove the retaining ring 6 (see Fig. 6-22) and the protective cap 5 from the cylinder and piston. Carefully push a stream of compressed air through the fluid inlet to push the piston out of the cylinder. To avoid damaging the piston on the surface of the caliper when pushing it out, install a wooden pad under the piston (Fig. 6-23).
Unscrew the bleeder fitting from the cylinder body and carefully inspect the working surface of the cylinder. There should be no scoring, damage or corrosion.
Assemble the brake mechanism in the reverse order of disassembly. In this case, it is recommended to replace O-ring 3 (see Fig. 6-22) and cap 5 with new ones. Lubricate the cylinder mirror, piston 4 and the sealing ring with brake fluid, and apply graphite grease to the surface of the piston, install the piston in the cylinder and, without removing any remaining lubricant, put on the protective cap 5 so that its edges fit into the groove of the piston and cylinder,
then install retaining ring 6. Lubricate the guide fingers with UNIOL-1 grease (1.5 g for each finger). Tighten the bolts securing the caliper and cylinder to the pins to the torques specified in Appendix 1, then lock them. Before tightening the bolts, apply sealant to them to prevent corrosion of the threaded part of the connection. After assembling and installing the brake mechanism, restore the fluid level in the reservoir and bleed the hydraulic drive system.
Checking the technical condition of parts
Clean all parts and carefully check their condition for signs of wear, damage or corrosion.
Pay special attention to the surface of the piston and cylinder. If they are worn, damaged or severely corroded, replace the cylinder and piston
Remove corrosion from the cylinder body with a wire brush.
Check the guide pins 11 (see Fig. 6-22) and their covers 10. Make sure that the pins are free of corrosion and
Rice. 6-23. Pushing the piston out of the cylinder
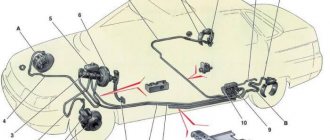
General provisions of the system
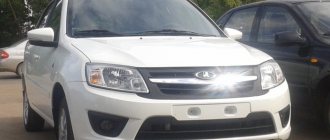
The brake system of the VAZ 2112 is distinguished by reliability and high efficiency, which is made taking into account modern technological components. The pressure regulator performs an important function by ensuring uniform distribution of fluid pressure in all elements. The front mechanisms are disk, with automatic clearance adjustment, the rear ones are drum type. The parking brake is of a manual type and is driven by the rear wheels.
Components of the brake unit
The modern brake system of the VAZ 2112, the scheme of which is also used in the VAZ 2110 and VAZ 2111 models, includes:
- master brake cylinder
- tank
- vacuum booster
- pedal
- pressure regulator
- drive lever
- front and rear wheel mechanisms
- pipelines and flexible hoses
It is important to note that, despite the high reliability and structural safety, this most important automotive component must be constantly monitored, promptly replacing worn pads, system tightness, purging, checking the integrity of the tank and pipelines.
Comprehensive check of the performance of the brake mechanism
When choosing a service station, you should give preference exclusively to trusted companies that have a high level of technical equipment and a good reputation. It is here that the brake system of the VAZ 2112, malfunctions of which can lead to big troubles on the road, can be thoroughly checked. During computer diagnostics, a detailed report on the condition of components and mechanisms will be presented, as well as recommendations for repair and further operation will be given.
Features of using a vacuum brake booster
Considering the good speed characteristics of the VAZ 2112 model in comparison with the “classics”, a vacuum brake booster, designed taking into account modern requirements, is very important. Transmitting a smooth force, it makes it possible to very effectively influence the mechanisms of the rear and front wheels, thanks to which the unit accurately responds even to small pedal forces. Thanks to such a braking system for the VAZ 2112, the design and reliable operating principle of which has already been proven by time, is widely used in other models of the VAZ line.
Replacing brake caliper guides for VAZ 2110, 2111, 2112
Lately, there has been a grinding noise when braking. An inspection of the brake system showed that the discs and pads were in good condition.
One of the reasons for grinding and rattling of calipers may be worn guides. Also, worn guides can lead to uneven wear of the pads (when one of the pads wears out faster than the other). This is exactly the wear that was on the old pads when they were last replaced.
Inspection of the guides showed that they are not jammed, but the lubricant has coked and thickened, and there is also noticeable play.
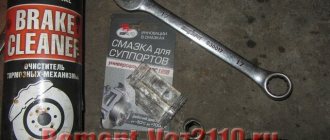
4 guides were purchased along with anthers, the price was 40 rubles per piece. And also a special lubricant for brake systems BOSCH SUPEFIT (5000000151) for 50 rubles. One bag is just enough for four guides.
It is important to know that not any high temperature grease will work for caliper guides. Do not use ceramic grease or copper-based grease.
These lubricants coke and cause the guides to jam. They can also be aggressive towards anthers. As it turned out later, BOSCH lubricant is not suitable for guides; the temperature range is only -25°C +130°C, which is naturally not enough for this unit. Although the manufacturer claims that this lubricant is universal and is exactly suitable for guides. I found supporting information in the official brochure about the use of lubricant.
We'll ride it for now, and we'll see.
Before replacing the guides, remove old grease and thoroughly wash the bracket. To remove the old grease I used 646 solvent.
Its disadvantage is that it is aggressive to the rubber from which the anthers are made, so after using the solvent, I washed the staples with a degreaser. New lubricant should be applied in a thin layer.
The boots on the new guides turned out to be complete crap, several tore at once, so I had to install the old ones, which turned out to be in good condition. By the way, when assembling, you should first put the boot on the bracket, and then on the guide. This makes it much easier and less likely to tear the boot.
After replacing the guides, the grinding noise when braking no longer bothers me.
https://www.drive2.ru/l/5112419/
next article:
Main causes of malfunction
The VAZ 2110 caliper is structurally an element that holds the brake pads and is responsible for the degree of their pressure on the brake discs. It is also responsible for uniform wear of the brake pads and guarantees the driver reliable braking in extreme situations.
Thus, the importance of the caliper in the operation of the car is difficult to overestimate
If by this time you have a completely reasonable question, what can happen to the caliper on a VAZ 2110 (2112), we will be happy to answer you. The main cause of malfunctions is “acidification” of the moving elements, coating them with an oxide film, clogging due to the destruction of protective boots or the use of improper lubricant, namely:
- acidification of the main piston mechanism;
- acidification of guides.
Piston mechanism and caliper guides VAZ 2110
A clear sign of problems that the caliper can cause on VAZ cars is uneven wear of the brake pads and an increased braking distance. In this case, the VAZ pads must be changed, and the caliper mechanism itself must be subjected to comprehensive diagnostics:
- check the condition of the piston, its degree of freedom, the presence of moisture, metal oxide, oxide formations and build-ups, the condition of the protective boots;
- Similarly, check the condition of the guides, make sure that there are no uncharacteristic scuffs, abrasions or deformations of the rod on the surface.
We must also not forget about regularly replacing the brake fluid in the system. This should be done approximately every 40 thousand km. mileage of VAZ-2110.
Since brake fluid is hygroscopic, it easily absorbs moisture, thereby oxidizing the piston mechanism and causing it to fail. The piston stroke becomes difficult and uneven wear of the brake pads and wheel wedge occurs.
How to extend the service life of a new fuel pump
Before installing the part, you need to know the rules that will further extend the service life of the part:
- Choose the best products in the store, created by experienced manufacturers you can trust. By saving on brakes, you won't end up cheap.
- Pay attention to marriage. A defective product is characterized by the pistons coming out of the cylinder structure by a couple of millimeters. However, this is quite enough to cause another breakdown and replacement of the part.
- Buy good brake fluid.
- Ideally, you need to change not one cylinder, but two at once. As practice shows, if one element of the system has already failed, the second one will not be long in coming either.
Do-it-yourself dismantling of the caliper on a VAZ-2110
The very simple design of the product and the triviality of the process of dismantling it allow even a novice motorist to carry out repairs and maintenance. If you carefully follow the recommendations below, you are unlikely to encounter difficulties at any stage of the process. You will save a lot of money spent on a trip to a service station, and a considerable amount of time, because the service time is comparable to the time required to travel to the workshop.
The sequence for dismantling the product is as follows:
- The first step is to jack up the car and remove the wheel. To be on the safe side, it can then be placed under the bottom of the car in case the jack fails;
- On a VAZ 2112, the caliper is attached to the bracket using two M17 bolts, which you should unscrew. Penetrating lubricant may be needed to strip the bolts;
- If you need to replace the VAZ caliper or carry out a comprehensive repair, unscrew the product from the brake hose. You seal the hose tip and you can begin further disassembling the product.
VAZ-2110 caliper maintenance and repairs
It is mandatory to service the VAZ caliper after each replacement of brake pads, as well as in the event of a forced inspection due to its malfunction, for which it is first necessary to check the condition of all rubber elements, shock absorbers and anthers. It is also imperative to replace the grease for the caliper guides. You need a good synthetic based silicone lubricant that can withstand high temperatures.
If you had to buy a repair kit, it contains such lubricant, all the necessary gaskets, new guides and a piston. The price of such pleasure will cost you about 500 rubles. Buying a new VAZ-2110 (2112) caliper, depending on the store and region of Russia, will cost from 1000 to 1500 rubles.
Required spare parts
Just 10 years ago, old pads were not replaced; they were glued on, linings were changed, or they were riveted. Today on the market you can easily purchase the entire mechanism. To replace, you need to prepare new pads. Experts believe that it is better to install replacement factory parts, article number 2110-3501080-60 (TIIR-260), 21100350180082 or 2110-3501080. There are other opinions. Some motorists believe that pads from well-known brands provide the best braking parameters on the VAZ 2110, 2111, 2112. These are parts from brands such as Brembo, ABS, Ferodo, TRW, Bosch, Optimal or Delphi.