The cigarette lighter socket is rarely used by the owners of the practical Lada Kalina model for its intended purpose. Many people connect “charging” for mobile devices or other electrical consumers to this socket. Over time, the cigarette lighter becomes damaged and does not work.
Some Lada Kalina owners are disheartened by this “incident”, after which they furiously head to the service center to fix the problem. However, the breakdown is not quite as complicated as it might seem at first.
For repairs, the owner needs to stock up on the usual set of hexagons, as well as a screwdriver, pliers and a small soldering iron. And also study a small manual on how to remove the cigarette lighter, and then how to change it and fix the breakdown.
What are the reasons why the cigarette lighter does not work? How to repair it? Read about all this in our material.
How to replace a lamp in a cigarette lighter?
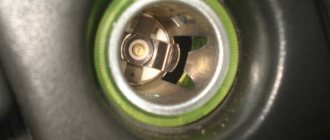
The socket is equipped with a backlight, which is very convenient. However, the lamp may burn out, after which it must be replaced with a working lighting element.
Let's take a closer look. How to do this in LADA Kalina?
- Following safety traditions, we disconnect the battery.
- We find a fuse block from which it is necessary to remove the fuse-link marked “F20”.
- We “defeat” the screws that are designed to hold the transmission lever casing and the tunnel. For ease of operation, we recommend moving the transmission to the 4th gear position.
- Now you need to pry the device, applying force to the green filter, after which it “comes out” out.
- To disconnect the clamps, you will need to turn the element clockwise.
- We proceed to dismantling the metal base.
- Next, the housing must be removed (painted green).
- We detect a cartridge. Naturally, there is a lamp in it.
- Finally it can be replaced.
- We carry out the assembly, of course, in reverse order.
Help will be provided by the video, which shows the manipulation algorithm.
When is replacement not needed?
In some situations, the cigarette lighter may not please the owner due to its lack of functionality. For now, this is not a reason to be inclined to replace it. First, it is advisable to check the serviceability of the fuse. It would also be a good idea to make sure there is stable contact with the ignition switch. The indicated “bottlenecks” should be carefully checked, and then a verdict about a malfunction of the cigarette lighter socket should be made. In most cases, the problem can be solved by correcting the specified defects. And then you won’t have to figure out how to remove the cigarette lighter.
Common cigarette lighter malfunctions
Among the most common cigarette lighter malfunctions you can see the following breakdowns and defects:
- Blown fuse element. Let us remind you that the mounting block with inserts is located under the panel in the cabin. We are interested in the component labeled “F20”.
- Broken filament of the power element.
- Progressive corrosion on the socket contacts, as a result of which they do not “show” sufficient electrical conductivity.
Detailed electrical diagrams of car components
Instrument panel wiring harness wiring diagram
Electrical connection diagram for the wiring harness of the ignition system Lada Kalina 11174, 11184, 11194
Electrical connection diagram of the front VAZ-11184 wiring harness
Electrical connection diagram for rear wiring harness VAZ-11184
Useful: Connection diagram and pinout of the VAZ power window button
Diagram of electrical connections of the additional rear wiring harness (tailgate wiring harness) and the wiring harness of the license plate lights of the LADA KALINA 11174 car.
Electrical connection diagram for rear wiring harness VAZ-11174
Electrical connection diagram of the front VAZ-11174 wiring harness
Electrical connection diagram for rear wiring harness VAZ-11194
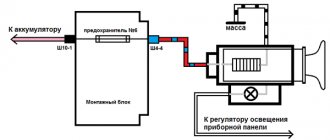
Wiring diagram for fog lights
1 - fuse in the assembly block; 2 — immobilizer output; 4 — rear fog lights; 4— external optics control unit; 5 — ignition switch; A - to power supplies.
Components of the Lada electrical network.
The Lada Kalina vehicle has three working groups responsible for the safety of the wiring: installation, main and additional. It is customary to place fuses in a certain group. Group arrangement of devices allows for greater security of the on-board network. In the event of a malfunction of one of the devices, the rest of the on-board network continues to operate without interruption.
Important! Before carrying out work, it is necessary to turn off the battery power to avoid injury. During diagnostics, strictly follow safety requirements when working with the vehicle’s on-board network.
The mounting block is located near the steering column. On a Lada Kalina car, the mounting block is located on the left side of the dashboard. In order to correctly diagnose the unit, it is necessary to analyze in detail the diagram provided by the manufacturer. The block diagram allows you to determine the dependence of a specific on-board network device on a specific fuse. Having identified the fuse responsible for the correct operation of a particular device, it is necessary to begin diagnostics. If during the inspection it was revealed that the fuse is faulty, it should be replaced with a new one.
The installation group is the most important part of the power supply to vehicle consumers. Among the devices for the correct operation of which the mounting block is responsible are the following: power mirrors, light and sound alarm signals, windshield wipers, dimensions, fog lights, low and high beams, security system controller and electric power steering (if equipped) .
In the main group there are fuses responsible for the electronic control system of the internal combustion engine. The main fuse group diagram includes the following elements: test connector, fuses - main relay, electric fuel pump relay and ECU fuse.
An additional group is located in the Lada Kalina car under the dashboard. For ease of work, you can unscrew the fasteners of the block and dismantle it. The additional group circuit includes the following components: electric cooling fan relay, electric fuel pump relay, electric cooling fan safety element and main relay.
Faulty Lada Kalina relays require replacement just like other network components. Relays and network safety devices should only be replaced after the causes of the malfunction have been identified. When replacing, it is necessary to use elements recommended by the Lada Kalina manufacturer. Since each component of a safety electrical network is designed to carry an optimal amount of current, the use of a foreign element can lead to malfunction of the electrical appliance.
The power supply unit of the Lada Kalina has a fairly simple and understandable design. If you have the appropriate diagram, any car enthusiast can handle servicing the power system. Replacing block elements is a simple but very important procedure. After all, the successful operation of all electrical devices in the car directly depends on the safety of the fuses. Timely replacement of the unit elements will restore the operation of the device and restore the safety of the machine’s on-board network.
Happy fuse replacement!
No car owner is insured against problems with the electrical equipment of his car. At least once such a problem can arise for anyone, even the most attentive car owner. Most likely, it is associated with the failure of the fuses.
Replacing the cigarette lighter in Kalina
Replacing the cigarette lighter is identical for both generations of Lada Kalina. Using a similar algorithm, the cigarette lighter on Grant and Priora models is replaced.
How to remove the cigarette lighter? We proceed in the following sequence:
- After opening the hood, disconnect the “negative” terminal from the battery, thereby de-energizing the vehicle’s on-board network.
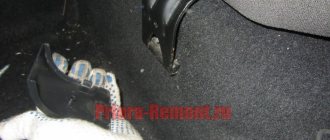
- Inside, unscrew the three screws that hold the protective panel of the parking brake limit switch. We also unscrew the rear screw and side fasteners.
- We remove the protective cover from the gear selector lever, and then remove the protective cover of the tunnel.
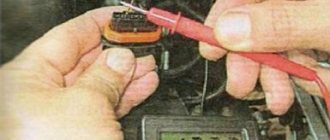
- Now you can get to the cigarette lighter socket. We disconnect the connector with cables from it.
- We see special latches that we gently press to release, which allows you to remove the cigarette lighter.
- Having replaced the old socket with a new product, we assemble the unit using the reverse algorithm.
Cigarette lighter replacement is complete.
Cooling system Kalina
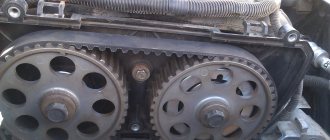
Replacing the timing belt Kalina 8 valves
EUR does not work on Kalina
General diagram of VAZ-1117, VAZ-1118, VAZ-1119
Elements of the instrument panel harness connection diagram
1, 3, 4, 5 — blocks of the tidy wire bundle to the front harness; 2, 8 - the same for the rear “pigtail” of wires; 6, 7, 9, 10 - continuation of the direction to the assembly unit; 11 — power supply for the lighting control device; 12 — set of instruments; 13 — toggle switch for the electric motor of the stove; 14 — power supply to the air supply box; 15 — ignition switch Lada Kalina; 16 — immobilizer block; 17 — block of the dashboard wiring harness to the ignition system wire bundle; 18 — cigarette lighter power supply; 19 — alarm switch; 20 — rear window heating switch; 21 — brake light switch; 22 — alarm light breaker; 23 — adjustment of computer modes ; 24 — windshield wiper control; 25 — VAZ horn switch ; 26, 27 — heating and ventilation control lighting lamps; 28 — glove box lighting; 29 — power supply to the on/off button in the glove compartment; 30, 31 — pinout for the standard radio; 32 — power supply to the electric motor of the stove; 33 — heater resistor network; 34 - electric amplifier control unit.
Simple folk method
Replacing and adjusting kingpins on an UAZ: detailed instructions for selection, repair and complete replacement.
Required
: screwdriver, awl, remove the negative terminal from the battery or pull out the cigarette lighter fuse.
- Remove the metal cartridge by squeezing out the antennae with an awl.
- Disconnect the connector with wires from the socket by pressing the latch.
- Remove the illuminated plastic ring by squeezing the antennae.
- Disconnect the connector with wires from the lamp socket.
For those who like to repair their car themselves, collections of technological instructions (for Granta and Kalina) will be useful.
Modern car enthusiasts rarely use this socket for its intended purpose. Additional devices such as phone chargers are connected to the cigarette lighter socket. However, over time the device breaks down.
If you have the necessary knowledge and tools, replacing the cigarette lighter on a Lada Kalina car is a simple procedure. For repairs you will only need a standard set of hexagons, a screwdriver, pliers and a soldering iron.
Read about why a malfunction occurs, how to identify it and replace the device, and why you should pay attention to the fuse.
How to replace the socket in the cigarette lighter?
The seat in the socket can also cause anxiety for the owner of a Lada Kalina. The faulty product can be replaced with a working component by following the steps below.
- After opening the hood, disconnect the battery from the network.
- Again, remove the casing from the tunnel in the cabin.
- Remove the transmission lever boot.
- We unscrew all the screws that hold adjacent decorative plastic elements.
- After disconnecting the block, release the socket from the seat.
- We change the part.
- We assemble the knot.
The video shows a detailed sequence of actions.