As you know, the operation of most electrical devices in a car is regulated using special units. In this review, we will look at one of them - the VAZ 2110 rear fog lamp relay, especially since the system is very simple, and you can understand its operation without special education in this field. This part has been installed on models since 2000; before that it was not installed.
Comparison of six and four contact relays - the difference is obvious
How does the device in question work?
The main features of this relay can be considered the following:
- The type of device is normal open, the type of block is six-pin; to ensure convenience and simplify the connection, the numbering of the contacts is present on the body of the product.
- The system is assembled in such a way that the contacts close by trigger. In simple terms, the design functions like this: when you press the button, the system turns on, when you press it again, it turns off.
- The most important feature of the device is that it functions only when there is voltage on two additional contacts. It is thanks to them that the button automatically turns off when the car’s ignition is turned off.
- The relay can be designed to operate in systems with a current not exceeding 20A .
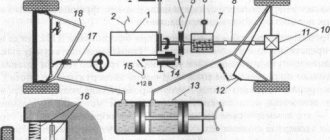
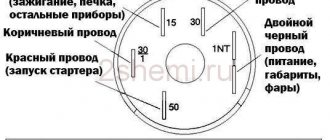
This is what the circuit of the relay we are considering looks like
Important! As noted above, the unit began to be installed in cars since 2000, so you should not believe experts who claim that the relay was not installed on this model. They just haven’t encountered this version of the system, and since products fail quite rarely, such a question does not arise so often.
What you need to know about the device
In order to properly connect the system or replace a failed element, you need to know several important features, which we will consider. Many motorists turn to car repair shops, while the work can easily be done with your own hands, especially since the price of this simple repair is for some reason high.
Relay replacement
This diagram shows how the system for turning on the rear fog lights works.
Sometimes the rear fog lights simply stop working, and if everything is in order with the bulbs and the button, then most likely the reason lies in the failure of the relay. In this case, the sequence of actions is as follows:
- First of all, you should purchase a new relay 23.3777; if you previously had a problem purchasing this modification, now you can order it in the online store, and they will simply send you the necessary spare part by mail or send it via express delivery service. It is at least unreasonable to disassemble the system before purchasing a new unit.
- Next we need to find our device. The question of where the rear fog light relay is located in the top ten is one of the most common, so we will pay special attention to this nuance. First of all, the right cover of the center console (that is, on the front passenger side) is removed. It is attached to several self-tapping screws, so this type of work will not cause difficulties.
- After removing the cover you will see the ECU connector and a whole fuse and relay block, but this is not what we need. Our unit is located on the top left; if you look at the structure, it is attached separately to the center console bracket, which is why it is often not noticed when checking the unit located below.
- Replacement is very simple: unscrew the fixing screw, remove the assembly, disconnect the connector, put a new relay in its place, after which everything is assembled in the reverse order.
If you decide to install a relay in a model where it is not provided for by the design, then you will additionally need a block for six contacts
Important! It is not recommended to replace the relays with regular four-pin ones, since you need to redo the entire system, and this requires certain knowledge and skills.
A service that is popular these days, such as the production of stickers for headlights, is also justified on fog elements, helping to extend their life. The main thing is that it does not affect the brightness of the light and does not create any interference.
Advantages of this system
So how does the operation of a six-pin assembly differ from the usual and widespread four-pin version? Everything is very simple and clear:
- The main advantage of the option under consideration is the fact that when the system is de-energized and the ignition is turned off, they turn off and do not turn on when the ignition is turned on, that is, they must be turned on again. This system allows you to protect the battery from discharge in cases where you forget to turn off the fog lights.
- The system is turned on and off using a button by pressing it once, which is also very convenient. In order to see that the fog lights are working, there is a special indicator on the button, so you can glance at the console and see that you need to turn off this type of lighting. The button is shown in the photo below.
The indicator on the button is another useful little thing to increase comfort.
Sometimes a problem arises with the pad - in some regions it is difficult to find, but you can get out of the situation, simple instructions will help you with this:
- First, you need to purchase a “mother” contact strip.
- Next, two pieces of three contacts are cut off and placed one on top of the other, resulting in the configuration we need. First, you should attach them in this position to make sure that nothing is in the way.
- After this, you need to fix the block; the best option is to put on a heat-shrinkable tube of the appropriate size and then heat it up - this way we get an almost complete structure, firmly connected into one unit. A simpler solution is simple electrical tape, but still the first option is preferable and looks much better.
Relay 23.3777 is responsible for the operation of the rear fog lights
Connection diagram for fog lights via relay
Before starting installation, you need to decide on the connection diagram:
Autonomous, the fog lights will turn on independently, although then the headlights can drain the battery completely, which is fraught with problems. Connection occurs to the positive dimensions or ignition wire +ACC
Watch the video below to see how to properly connect the relay.
With the ignition, in this case, the fog lights cannot be turned on without the engine running, usually the plus from the ignition switch or IGN2 is used, which is best looked for using a voltmeter, since if you use a lamp probe, there is a possibility of damage to the car's electronics.
To connect the fog lights via a relay, it is not necessary to disassemble half of the body. The main part of the work is carried out in the cabin, where it is necessary to provide access to the car's electrical system by removing part of the front panel.
The role of the relay
The relay is necessary to reduce the current in the wires feeding the fog lights to prevent them from melting. It has 4 contacts, two switching and two control, sometimes a five-pin device is used. The excitation winding must have a resistance of at least 70 Ohms; with a lower value, the current may exceed and the fuse may fail. The relay current is 30 A, it is possible to use 70. The contacts are connected according to the following diagram:
- 1st switching - fuse block;
- 2nd switching – fog lights;
- 1st manager - on/off button;
- 2nd manager – mass.
Circuit breakers
After connecting the wires to the relay using terminal blocks, you should install fuses that serve to protect the circuit from short circuits. A 15 A fuse must be installed in the fuse block and power the circuit from the battery through it. If such installation is not possible, the fuse should be installed separately, as close as possible to the battery.
How to connect the power button?
The on/off button must be powered by any 12 V wire. Depending on preference, this can be not only the control wires from the ignition, but also any other source. Most often it is attached to the side lights.
Connecting the headlights themselves is not difficult. The red wire is positive, connects to the relay, and the black wire is ground, to the car body.
After checking that the fog lights are connected correctly through the relay, you can finish installing the fog lights.
Published: February 23, 2017
Conclusion
The video in this article will help you understand some of the nuances of the topic under consideration even better. It will clarify some important points even better and allow you to perform work at the highest level.
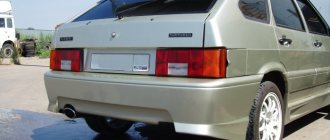
If you install fog lights on a VAZ 2110, you can kill two birds with one stone. Namely, to transform the appearance of the car, and increase the level of your own safety, and add comfort to driving at night.
Kirzhach with lamp H1
Therefore, today we will talk about how to connect fog lights on a VAZ 2110, what is required for this and what result you will ultimately be able to achieve.
Historical reference
The four-door VAZ 2110 sedan was produced by the Volzhsky Automobile Plant from 1995 to 2007. And unlike the usual Lada cars, the model was positioned as a higher-class car.
VAZ 2110 on the factory conveyor
In particular, the car was equipped with:
- electronic engine control system (ECM);
- diagnostic unit (on-board computer);
- galvanized metal was actively used in body parts;
- the body was painted using a new, more progressive technology.
Why are fog lights needed?
The very name “fog” lights already speaks about their essence. Their light penetrates fog, a wall of rain, and contributes to more efficient illumination of the road.
The presence of PTF provides three important advantages.
- PTF or fog lights are characterized by a flatter luminous flux, which literally spreads above the ground, spreading more in width than in height. This was done on purpose, since the temperature of the road surface is higher than the temperature of the air and fog, so it does not fall to the ground itself. Consequently, fog lights provide a certain range of illumination compared to conventional headlights. You will see approximately 10 meters further than with low beam.
- The width of the PTF light beam allows you to see the markings and the side of the road, which will allow you to make a maneuver in time and not end up outside the road surface. Unfortunately, this is a common occurrence in foggy conditions. Moreover, those who do not have fog lights suffer much more often. It is a fact.
- PTF does not blind oncoming cars, but allows them to see you. Only if the headlights are adjusted correctly, of course. Therefore, fog lights on your car have a big impact on safety by signaling oncoming cars that you are approaching.
Question about glass color for fog lights
On old cars, the glass of fog lights was yellow , so many people think that it should be like this now, it is more correct and more efficient.
Article on the topic: Independent replacement of the cylinder head gasket on a VAZ 2114
In reality, everything is different. Today, auto industry leaders use exclusively clear glass for fog lights, which are superior to yellow ones in many components.
The current fog lights on the VAZ 2110 are available in two versions - transparent and corrugated. Most people choose transparent glass, although in fact, corrugated glass is better. They provide a clear directional beam that can show its best side during fog or rain.
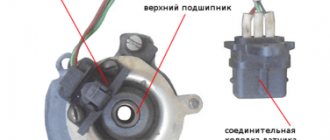
Reverse relay VAZ 2110
A rubber gasket is visible under the pressure ring.
Rear fog light fuse.
Where is the ignition relay located?
Low beam relay.
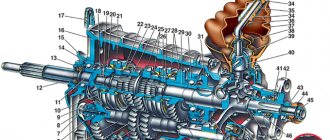
How to remove and install the gearbox on a VAZ 2110 (instructions).
Additional “CHARGE RELAY”.
Replacement of ignition relay and hazard warning relay and direction indicators.
The operation of the PTF relay is described in the FAQ, in the article.
The circuit itself is for 2 relays.
By the way, where is this relay located?
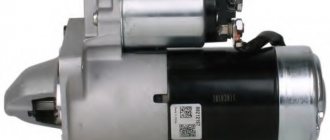
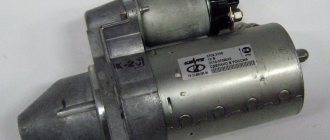
Where is the starter located on the VAZ 2115 photo.
Starter relay VAZ 2114 photo.
I immediately went to the store and bought 2 relays.
VAZ 2106 replacement of the reverse light switch and brake light.
Rear fog lamp relay 23.3777 VAZ-2110 for fixed implementation.
Electrical diagram of VAZ 2112-2111-2110.
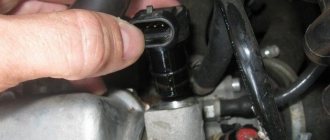
Removing the relay for turning on the rear fog lights.
Wiring installation for VAZ 2111.
Materials and tools
You can easily buy a ready-made PTF kit with all the wires, and then you won’t have to figure out where the fog light relay is located on a VAZ 2110. However, if you purchase spare parts separately, this will diversify the installation options, plus it will allow you to save money.
Connection kit
Therefore, you need to purchase the following:
- Two sets of headlights;
- Plastic pads;
- Headlight frames;
- A key with a yellow indicator for it;
- Relay;
- Wiring. Choose an option with two copper conductors and double insulation, for example ShVVP2. A cross section of 0.5 mm is suitable, but if the lamps are powerful, 0.75 mm is better;
- Ground terminals;
- Female/male terminals - wide and narrow terminals.
It is not worth taking the mother-father complete with wires. It is better to crimp them using pliers when the wiring is already connected.
Pay attention to what kind of dashboard you have. If it is an old model, buy a set of fog lights for the VAZ 2110, and if it is a Euro dashboard, then it is better to use the PTF for the VAZ 2115.
As for the light bulb, 55V is more than enough power. We strongly do not recommend buying cheap fog lights, since their service life is very short.
Ready-made PTF kits
Today you can find 2 types of foglights on sale, in which the light spot is formed:
- Due to scratches on the glass (classic headlight with reflector);
- Due to the lens (so-called lensed).
Complete set of lensed headlights - wiring, relay and PTF with adjustment system and plugs
Tip: Making stickers for your headlights will protect your lenses from damage.
Which of them to choose depends not only on your desire, but also on the configuration of the set.
In particular, to install PTF you will need:
- Full compliance of the kit with your car model (in this case, VAZ 2110);
- The adjustment system is easy to use (meaning, without removing the bumper or partially disassembling the headlight itself);
- Visual instructions on how to connect fog lights on a VAZ 2110.
Each “correct” kit contains a wiring diagram for VAZ 2110 fog lights
Note! Only fog lights specially designed for the VAZ 2110 can be installed on a car without any body work. Manufacturers whose products are as easy to install as possible include the German Bosch and the domestic Avtosvet Plant, the price of whose products is significantly cheaper.
The famous “Kirzhachi” are produced at the Avtosvet Plant.
So, we found out that cars of the 2110 family may differ in the way they install PTF due to the technical features of the instrument panel and front bumper.
Everything else (installation of headlights and their integration into the electrical circuit) will not create problems, because:
- The automaker has prepared the vehicle as much as possible for the installation of PTF;
- Independent work will take only 1.5-2 hours of pure time.
Installation
A diagram for connecting fog lights on a VAZ 2110 is always offered with the purchased kit, so there shouldn’t be any special problems. But keep in mind that something may need to be corrected or adjusted to ensure effective operation.
Connection diagram
Before installing fog lights on a VAZ 2110, you need to decide on their location. If the design of the car does not provide space for them, then they will be mounted under the front bumper.
Article on the topic: Fog lights on the VAZ 2114: installation and connection diagram
The PTF connection diagram is as follows.
- We install the wiring for fog lights on your car. This is done through the left side under the hood along the fender. The main wiring is approximately the same.
- Now you need to connect power to the button, which is located on the dashboard. According to the factory diagram, power is installed from the fuse on the right dimensions. But you can use the light switch button or the lead from the ignition switch to turn on the head optics. That is, in such a situation, the fog lights will turn on when the ignition is on. Some take power from the output to the dimensions. This can be done, but is not recommended. If you forget to turn off the PTF, the battery will soon run out.
- We connect the plugs to the headlights. If after this the fog lights on the VAZ 2110 do not light up, an error was made in the circuit. Check every element of the circuit. It is not difficult to determine where the fog lamp relay is located on a VAZ 2110, so make sure that the relay clicks. If it is present, then the coil will activate it. It is not uncommon to have to change a relay.
The last stage of installation begins after all the wires have been connected, the power has been turned on, and the light from the fog lights has spilled out. It's about adjustment.
Checking whether the PTF lights are shining correctly is quite simple. Get out on the road and see how the fog lights work. If the light is directed slightly downwards, the luminous flux touches both the road surface and the side of the road, then everything is working perfectly, and you don’t have to worry about the wrath of oncoming drivers whom you will blind.
If there are deviations from the norm, be sure to make adjustments. This work can be done independently, but ideal room conditions will be required. Therefore, it is better to trust the specialists from the car service center, who have a special stand, a flat area, and equipment for adjustment.
Share with friends on social networks:
The VAZ 2110 car has not been produced from the factory for a long time, but you can find a large number of this model on the roads of our country.
Not all VAZ 2110 vehicles have factory mounted fog lights (PTF). Let's take a closer look at the starter kit for installing PTF. Should I look for factory wiring for the PTF, or do it myself? We are trying to navigate everything in this matter.
To install the PTF you will need: • A equipped set of PTF. • Control • Multimeter. • 1 set of paired male and female connectors. • 8pcs. connectors of the “mother” type. • Insulation tape. • Shrink packaging.
Where is the VAZ 2110 rear PTF relay located?
Dear visitors of the “Cars” website! We will be very grateful for your comments on the video clip “Where is the rear PTF relay of the VAZ 2110?” registration is not required for this. We also ask you to let us know if you have any problems playing the video.
Please make a video about installing the alarm. I will be very grateful
10.27.2017 — 13:36 Pavel Golikov
such a joke, in late autumn the K 700 was parked. It started on its own, the security shut down all the wiring burned out from the generator to the battery. in the spring we replaced the wiring with a new one, from Thursday to Friday it started up on its own at the tractor driver’s house, he turned it off and the same wiring burned out. The tourniquet did not touch anything, there were no abrasions, it was in the corrugation and burned out. The power wires from the generator to the battery were burning, and it looked like they were hooked nearby and also burned out. generator the whole bridge is not closed. and the tractor driver says he turned off the mass.
10.13.2017 — 21:11 Yuri Zhizhko
And we have some cool auto electricians for buses who also connect rear fog lights to the stop light line.
I wanted to know who is doing car repairs, after a Ford Kuga 2011 accident, there is no radiator, the fuel shut-off button worked, is it possible to push this button in and try to start it, I was told that it works like a fuse that closes and opens the circuit and if something is wrong accidentally make the circuit open forever and you will have to disassemble the floor of the car and bypass this electronic fuse
09.12.2017 — 13:20 Dmitrienko. 0144P Dmitrienko
Hello, please tell me, car 2115, I would like to make the door lights illuminated, so that they work separately from each door where to look for exits from the door limit switches.
08/15/2017 - 14:21 Dmitrienko. 0144P Dmitrienko
Hello, please tell me, car 2115, I would like to make the door lights illuminated, so that they work separately from each door where to look for exits from the door limit switches.
07/26/2017 - 01:31 Dmitrienko. 0144P Dmitrienko
Thanks for the advice, I'll experiment. I think it will work. I want to use a micro relay for control.
07/13/2017 — 00:34 Muslim Chechiev
The video, as always, is useful and instructive
07/09/2017 — 16:07 Sergey Loktev
Thanks for the video, out of ignorance I thought that the button was broken, since it also did not register. and here it is
06.17.2017 — 16:14 Dmitry Kuznetsov
good afternoon, I bought a VAZ 2110, the windows and the center lock do not work, all the wires are missing, but the drives were there once and someone removed them, I want to restore them in the diagrams, I don’t really understand how to do it, where to connect the buttons, there are between the seats, why splash, thank you
05.20.2017 — 18:02 Dmitry Kuznetsov
I have dozens of one small one on the goborit in the back
05/05/2017 — 00:45 Denis Azarkin
Very interesting. Can you tell me where to buy these posters?
05/01/2017 — 01:30 Evgeniy Last name
Thank you very much for telling me about the relay, I thought the button was sticking
03/31/2017 — 19:34 Andrey Kabanov
Hello. Please tell me where I can look at your list of serviceability of electrical equipment.
03.27.2017 — 17:05 Magomed Magomedov
Can you please tell me why my turn signals blink quickly? all the lights are on
03/11/2017 — 17:53 Sergey Fedorov
Please make a video of how to install the front PTF on a VAZ 2109, I will be very grateful.
02/19/2017 — 20:02 Artyom Gumarov
I like.. and subscribe