Often, owners of VAZ products have to remind their passengers that the door can only be closed if they slam it quite hard. And, unfortunately, both the front door and the back door close this way. It is difficult to imagine a VAZ-2107 car owner, or any other model, who would not want to correct such a defect. In this article we will show you how to find a way out of such a predicament, using silent car locks that are installed on more modern models, for example, on the VAZ-2114 or VAZ-2115. And since installing silent locks on a VAZ-2107 does not require special skills, every car owner can easily cope with this task if he performs the work step by step.
Design disadvantages of VAZ door locks
Over the 40 years of operation of the VAZ 2101-2106 and 2105-2107 door locks, no significant deficiencies in its design have been identified, and with appropriate care, which consists of periodic lubrication and cleaning of the mechanism, the locks fully meet even the most stringent requirements for reliability and safety, as has been stated repeatedly Tested for burglary and strength in critical situations.
A rattle when closing the door indicates incorrect adjustments of the VAZ door lock and insufficiently thorough maintenance of their mechanism. Noise when closing can occur primarily when the latch and locking bolt wear out, when wear leads to distortion of the geometry of the mechanism, which is fully compensated by proper adjustment followed by washing and lubricating the entire locking mechanism. Once again, we emphasize that the locks are designed to last a lifetime, subject to timely maintenance.
Get a 5.0% discount!
If a lock purchased for an entrance door must be as reliable as possible and able to withstand experienced burglars, then completely different criteria are required for a lock on interior doors. Quietness has become an important aspect of door handles that buyers pay attention to. Life in a state of endless racing of a hamster in a circle is extremely tiring, so it is natural to want to feel at home in peace and quiet, to isolate yourself from the surrounding noise. So door handles, fittings should be able to satisfy this desire.
In principle, any locking device can be closed silently by pulling the handle down, closing the door and carefully lowering the handle to its original position. However, this process is tedious and quickly gets boring for household members. If you do not live alone in an apartment, then the noise of doors opening or closing probably irritates you. Especially if this noise interrupts your sleep or distracts you from work and thinking. Did you know that the older the locking mechanism gets, the more noise it makes. We list the main reasons for increased sound when opening and closing doors, associated with wear and tear of the door lock:
Preparing to install locks
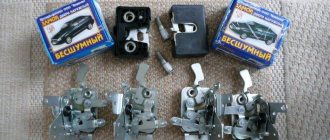
First, we purchase the treasured set of locks. You will need two sets, each with two locks. When choosing a manufacturer, pay attention to the fact that GAZ locks are the quietest option, but in this case you will have to file off the tongue. If we consider DAAZ, this is, of course, the noisiest option, but they can be improved. At the same time, the quality of construction and durability is one of the best. Well, the best option is silent locks for the VAZ 2110 Ptimash. In terms of silence, they are the most acceptable, and in terms of reliability, everything is fine with them.
Important! Before purchasing, be sure to carefully inspect the locks for defects. It is not recommended to purchase a set of locks with unclear manufacturer's name.
Set of silent locks
We prepare the necessary tools. For installation we will need:
- Hammer;
- Phillips and hex screwdriver;
- Drill;
- The castles themselves.
Lock installation
We start by carefully removing the old locks from all the doors. To do this, completely unscrew the top bolt. We do not remove the lower bolt completely, loosen it a little.
Dismantling the old castle
Now we slightly move the upper part of the lock and again install the bolt in this hole. Why are we doing this? In this case, we are considering the option of installation without removing the casing. If you follow the instructions exactly, you will save time on removing and re-stretching the trim. Thus, by reinserting the bolt, you prevent the lock located inside the door from falling down.
Everything else is logical. We remove the remaining bolt, dismantle the lock, and install a new one using the same scheme.
Final point. All we have to do is remove the old bolt holding the lock on the door and install a new one.
Replacing the old bolt with a new one
Now you can check the result of your work. The same must be done with the remaining doors.
In principle, we can stop there. If you are satisfied with everything and the result is what you expected, then congratulations. However, if something doesn’t suit you, or you want a greater effect, adjusting the VAZ 2110 door lock will help you.
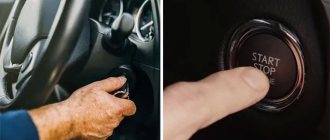
Installing central locking
Continuing to modernize and improve your “swallow”, you may be interested in installing a central lock on the VAZ 2110. There is no need to argue about the advantages of such an option. Poking around with a key in a rusty, frozen lock is not a pleasant pleasure. And we must not forget about protection against theft. Therefore, we purchase the treasured box, in which we will find:
- 4 engines, one of which is installed on the driver's door;
- Control block;
- Wires, fuses and strips.
Central lock kit
Next, we collect the necessary tools: screwdrivers, drill, electrical tape, etc.
We remove all the elements that interfere with us, such as trim and panels, and mainly decide where we will install the control unit. The driver's door, its lower left corner, is rightfully considered the best place. This choice of location will allow you to subsequently install window lifters or other systems without any problems.
To install the engines, we need special holes in the door. If there are none, then we make them using a drill. And we move on to installing the engines.
Central locking installation process
Let’s not forget that each of them has 2 outputs. And only one - 4. It is located on the driver's door. After successful installation, you need to stretch the wiring. It should not be carried out where it may be exposed to moisture or other influences. It is advisable to protect the wiring, for example, with a corrugated tube.
After the installation of the VAZ 2110 central locking is completed, check the entire system. Now the central locking is controlled using the key fob that was included in the kit. If your version did not have it, then control occurs when you turn the driver's door key. In the future, if you wish, you can install a special control button on the dashboard.
Disadvantages of silent locks VAZ 2107
Special “silent” locks, unlike standard locks on VAZ 2108 or foreign cars that can be installed on “classics”, include plastic parts instead of metal ones. Plastic does not knock when the mechanism operates, but its strength and wear resistance are much lower than that of metal.
Some silent VAZ 2107 locks, made in a homemade way, have design flaws, for example, reduced thickness of the latch or other elements of the locking mechanism.
Using low-quality locks is dangerous - a weakened mechanism may not hold the door under load, for example, if a passenger leans on it during a sharp turn. Therefore, when choosing locks, you need to realistically evaluate their quality and, in the absence of special skills, install standard “eight” locks, which make little noise but have a fair margin of safety.
If you decide to install silent locks with plastic elements, you should understand the consequences of a possible malfunction.
Cleaning and lubricating standard locks gives an acceptable result, making the operation of the doors not completely silent, but quite comfortable.
How to make a castle with your own hands
The easiest way to make a silent lock yourself is to come up with a special coating for the latch pin on the machine body, which is the loop for the lock latch, because the greatest noise occurs when the latch goes behind the loop. To do this, you need half a meter of heat-shrinkable tubing, which can be bought at a radio parts store.
- Unscrew the pins from the fasteners that need to be upgraded.
- Cut the tube to the required size so that the thread remains free for tightening.
- Place the pipe on your finger and heat it with a hairdryer or lighter.
- Allow the tube to cool and settle on your finger, then put another tube on the already installed one, repeating the heating procedure.
- After the tube settles, trim the uneven ends.
- Install the improved pin into the retainer.
The silent loop is ready. After the homemade finger is installed, some problems may arise with closing the door, after all, the tubes are of abnormal thickness. Then the question arises - how to adjust the locks. This is also a fairly simple procedure that does not require special skills:
- the fastening on the lock retainer, which is attached to the body, is slightly weakened;
- the latch moves in the direction required for easy closing of the door. If the door sags when closing, the latch rises. If, on the contrary, the door rests and rises, you need to slightly lower the latch. In the same way, its position can be adjusted by moving the lock forward or backward.
Silent locks are a useful thing that save car owners nerves and increase the service life of door fasteners. However, in order for them to work well and for a long time, they need to be looked after and constantly monitored for the correct door adjustments.
Features of installing silent on VAZ 2105, 2106, 2107
One important feature should be taken into account when installing silent locks on “classic” locks. After installing the lock, the lever that is responsible for opening the lock is directed in the other direction, i.e. it must be lowered to open the lock, unlike the factory lock, where the lever had to be raised. This entails modifying the standard door opening handles or installing the euro handle upside down. An additional metal flag must be installed on the internal mechanism of the handle of the VAZ 2105 and 2106, to which the rod will be attached, so that when the handle is opened, the flag presses down.
Additionally, a flag is made that will push the rod down
The flag is installed on the handle on the side that is closest to the lock.
The flag is bolted into a pre-drilled, tapped hole
We recommend: What to do if a hernia appears on the wheel
When starting work, you should be guided by the principle “Measure twice, cut once”; here it will come in handy more than ever. Having done everything efficiently, you will get a good result. Now you don’t have to loudly slam the door, sometimes several times. New locks will ensure quiet and easy closing of the door, which will be especially noted by owners of foreign cars who enter the interior of your car. Despite the fact that the process of installing silent locks on a car is very painstaking, requiring both time and material costs, the result will please you for a very long time.
A car door lock is a part that usually requires almost no repairs, since it rarely fails. But, like other components of the car, it wears out, especially on the driver's door, since every time a person gets in or out of the car, the lock is activated. Over time, this leads to the fact that the door begins to close worse, in particular, you need to slam it harder for the lock to work, and sometimes it completely loses its functionality. This is especially evident on cars of outdated designs, such as classic VAZs. Therefore, in today’s article we will talk about replacing the front left door lock on a VAZ-2107.
Tools and materials:
- 2 screwdrivers – regular and Phillips;
- 10mm wrench;
- Felt pen;
- Lock lubricant;
- New castle.
A new part is sold in almost any auto store and costs about 300 rubles. The latch, internal handle and cylinder cost around 100 rubles. for 1 piece or even less. External handles will cost the most - about 400 rubles. for 1 piece However, everything together rarely changes; usually, we are talking about one of these details.
It is better to replace the lock in a spacious and bright room, like any other repair. Also keep in mind that the door trim clips are not very strong and must be removed with care.
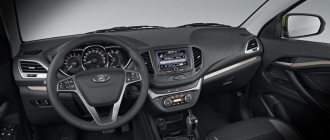
Adjusting interior door locks
The front locks are designed to be locked from the outside using a key and from the inside using a pull rod. The device has an external face located on the door handle. The structure is closed both from the inside and from the outside. Installing a lock is more difficult than installing a lock on the back door. The rear actuator is connected by a rod to the door lock button and the handle for opening it. It does not have an external locking mechanism.
Tools and materials
When starting work, you must ensure that you have the necessary tools and materials.
During the work you will need:
- impact screwdriver;
- hand drill;
- flat head sander;
- felt-tip pen;
- cushioning material.
In this case, you should carefully read the visual video lesson of operation and adjustment techniques presented on the websites of car enthusiasts. Step-by-step instructions and advice from experienced repairmen will help solve the problem with the least amount of labor.
The peculiarities of the repair are associated with the difference in the design of the lock of the rear doors from the front ones, but the locking mechanism is the same and consists of a latch on the pillar and an actuator on the door, which should fit perfectly together. In this case, the door should close easily and tightly without distortions or gaps.
Front door adjustment
The front door locking device is more complex to install, since it comes with an internal and external locking device. A lock is mounted inside the casing, which can be locked from the inside of the cabin and an external device located on the handle. The cylindrical cylinder is used to open the interior with a flat key of the sulfide type lock. After installing the lock, it can only be adjusted by a latch or a heel located on the rack.
The latch is a structure for receiving the executive part of the lock, the tongue. Depending on how the position of the receiving channel is set, the opening force and the difficulty of locking the lock depend. The front door must be positioned so that the gap on all sides is uniform, there is no distortion when opening, and the door must move easily. All this will be done in a VAZ 2109 car by adjusting the door locks.
If the door closes tightly, the fixation of the heel must be loosened by half a turn of the screw securing the latch and slightly move the receiving chamber outward, slightly moving the plate. Once you are sure that the problem has been resolved, tighten the bolts.
The door does not close tightly and a gap is created between the body. On the contrary, you need to loosen the bolts and push the lock deeper into the structure. When closing, the canvas goes up; the adjustment will consist of lowering the latch down and then stabilizing it with pads made of waterproof fine sandpaper. The door can be lowered down to 2 mm if a gasket of this thickness is placed under the counter part.
Before you begin adjusting the lock with the response mechanism, you should fix its primary position by tracing the outline with a felt-tip pen. After completing the adjustment, tighten the three mounting bolts until tight.
Rear interior doors
The lock installed on the door does not have a key. The closing mechanism is designed on the same principle and consists of a latch and a tongue. However, if the door is replaced, its adjustment is carried out in the canopy areas. The existing two units with the upper one fastened to three powerful bolts, and the lower point to two, allow you to set the gaps and fix the alignment before adjusting the lock. In this case, the door can be raised or lowered, pushed into the cabin or taken out.
When carrying out these operations, you will need an impact screwdriver; it will not be possible to simply twist the fastener only by using a jerk and twist. You can see in detail how this operation is performed in the photo in the materials of the car repair website. Having completed the alignment, all fasteners should be screwed in completely and gaskets and fastener position clamps should be installed.
Once the door is centered, you may not have to adjust the lock using the heel. If necessary, work is carried out as when adjusting the front doors.
What tools and components need to be prepared
Of course, you can install such locks in a car service center, but you will have to pay a lot for the service, and independent work will require a minimum of cash investments and very few tools and additional components:
- A set with external euro handles, it is best to give preference to a well-known manufacturer.
- Locking mechanism with latch.
- The part of the lock that is inserted inside the device is often called the “chocolate bar”.
- Two fixing bolts that fit VAZ-2114 or VAZ-2115 car locks. It is worth noting that such clamps can have both short and long sizes. Experts recommend choosing the longest fasteners.
- A connecting bolt for the rack and a tap with which you can cut the thread.
- A small cable, the diameter of which will be approximately 1.5-1.6 mm and drills measuring 8.5, as well as 9 and 10.
In addition, a drill and a hammer, as well as a set of screwdrivers and medium-sized sandpaper can be useful in the work.
What's wrong with mechanical latches?
To silently close the door, you have to press the handle to hide the tongue in the lock body and quietly close the door leaf. This causes a lot of inconvenience and leads to wear of the attachment of the handle to the bar and loosening of the mechanism.
The main advantage of such a lock is the ability to clearly fix the blade in the closed position, with the option of locking the latch from the inside. At the same time, such latches for interior doors have disadvantages, and they are the costs of the design features of the mechanism:
If you abandon the swing system and install sliding doors with soft rubberized rollers, then the opening and closing process itself will become silent. But if a small child is sleeping in the room, you will still have to maintain silence in the apartment, because sliding doors let in more sounds than swing doors.
To ensure sound insulation of a separate room and make the opening and closing of the door with fixation in the closed position silent, silent interior swing doors made using new technology are installed.
Design and device of the VAZ 2107 door lock
The standard Fiat door mechanism was developed almost 50 years ago, and since then it has not undergone any special modifications. Maybe that's a good thing. Nevertheless, we have to put up with some relics of the past, and although there are much fewer complaints about the locking mechanism than about some other parts and components, it can be brought to a state of combat condition without making any special design changes.
The door lock of the classic VAZ 2107 serves to securely lock the door in two positions: closed, latched with one click, and closed, latched completely. Stock DAAZ locks are designed taking into account the emergency loads that the locking mechanism must withstand, keeping the door closed. To do this, the thickness, material and geometry of the latch, as well as the method of its fixation on the lock body, were calculated in a production laboratory.
Another equally important structural element of the VAZ door lock is the fixing bolt, which is screwed into the center pillar reinforcement and into the rear door opening reinforcement. The fixing bolts are made of durable steel and are also designed to securely fix the door when closed. The locks are controlled using metal rods, some of them have adjustable plastic tips. Despite the fact that the lock design is primitive, it is quite reliable and cannot be replaced for the entire service life of the car.
Silent bolts, photo and description
In order not to spend a long time understanding the design of the simplest VAZ lock, let’s just look at the operation of the silent design mechanism.
- The photo below shows the plane on the plastic latch that holds the lock in the “closed” position.
- In this case, the plastic/metal connection keeps the door from opening, while in the stock lock the door is held in place entirely by metal latches. This is what happens in the lock in the "closed" position.
- Blue indicates the plastic plane that holds the door. In addition, amateur designers decided to change the thickness of the plastic latch itself, and this is what it led to.
- It's probably not worth commenting on these photos. And here is the stock DAAZ lock.
Here the lock is completely metal, only the tip is plastic to reduce noise when closing the door. And here is the promised silent bolt.
It’s easy to guess that it differs from the “noisy” one only in the polyurethane bushing
In a word, if the noise in the door of a classic VAZ 2107 does not allow you to live in peace, in our deep conviction it is better to spend time cleaning, adjusting and lubricating the standard locks than to trust the security of a suspicious and untenable design. Don't slam doors, and good luck to everyone!
We adjust the locks on a VAZ
There are several options for modifying and adjusting silent locks; let’s look at the most popular ones.
The first method is a sealant
In order to proceed to the adjustment stage, it is necessary to prepare the material needed for the work: a screwdriver, glue, lithol, seals and a knife.
Required material for adjustment
We take our silent lock and unscrew the spring from it. Next we glue the seal. We select the smallest spring and glue the seal again. Don't forget to remove any excess sealant. And finally, we lubricate everything with lithol.
The second method is a heat insulator
In the second option, we add alcohol, cotton swabs, and a piece of heat insulator to our previous set of tools. Using alcohol, degrease the entire surface. Next, cut off the required amount of heat insulation, insert it inside, glue it and cut off the excess.
Adjusting the silent lock
This method will help you soften the first click of the latch as it hits the lock.
After such an adjustment, the sound from closing your doors will not be any different from the sound that we hear when closing the doors in a foreign car.
Replacement process
Silent door lock VAZ 2109
First, let's arm ourselves with the necessary tools:
- An impact screwdriver that will allow you to unscrew and tighten the bolts (they are very firmly fixed and a simple screwdriver would be out of place here).
- A ratchet wrench with a suitable bit. We will need this tool for a kind of leverage.
- We unscrew the bolt, and in its place we put a pin, which will keep the old lock from falling inside the vase door.
- We dismantle the old castle.
- We install a silent lock in this place.
Types of installed silent locks
Adjusting and lubricating standard VAZ 2107 door locks does not completely eliminate the problem, making the locks quiet and silent, “like on a foreign car.” Here it is necessary to replace the locks with fundamentally different ones. There are two options to get out of the situation:
- installation of locks from VAZ 2108 or foreign cars;
- installation of silent locks VAZ 2107.
In the first case, you have to do a lot of work to fit the “non-original” locks to the doors of the “Seven”. The second option is simpler in terms of installation, but such locks are more expensive and slightly less reliable due to the use of plastic parts in the locks. The advantage of this solution is the almost silent operation of the new lock.
We recommend: How to change the fuel filter on a Chevrolet Niva
Adjusting the mechanism
Having installed silent locks-2107 on a car, in order to fully use all the advantages of the mechanisms, you need to configure them correctly. Adjustment is carried out by moving the latch fixing bolt. First you need to let him go a little and close the door. It must fall into place
Then carefully open the door, being careful not to move the bolt. Next, you need to check the quality of the door latch.
If it is not completely satisfactory, then you need to continue tuning. By releasing the bolt and moving it, it is necessary to achieve smooth operation of the mechanism. The door should close with minimal physical impact on it. By repeating the adjustment operation on all doors, you can enjoy the perfect operation of your car's locks.
How to adjust the door of a VAZ 2107
The front door of the VAZ 2107 is adjusted more often. This is especially true for the driver's side door. Door adjustment involves two stages:
- adjusting door hinges;
- adjusting door locks.
Before making adjustments, it is advisable to lubricate the locks and hinges with silicone grease. This will improve their operation and eliminate possible problems when the lock operates. To adjust the position of the hinges, you must perform the following steps:
- set the impact screwdriver to the unscrewing mode;
- loosen the hinge fastening screws with a sharp blow of a hammer;
- slightly lower or raise the door to even out the gap between it and the car body;
- tighten the fastening screws;
- check the door position;
- repeat the adjustment if necessary.
When the position of the door in the opening is adjusted, you can proceed to adjusting the lock, or rather, to adjusting the position of the latch. This is done like this:
- draw a line around the perimeter of the latch with a marker (this way you can find out its initial position;
- Using a 10mm wrench, loosen the three bolts securing the lock retainer;
- move the latch down or up so that the lock fits freely into it without hitting the top or bottom;
- if the door closes “with one click,” the latch must be moved slightly outward, but if it closes easily but dangles, move it deeper;
- tighten the fastening bolts;
- check the operation of the door lock;
- repeat the adjustment if the door does not close well enough.
This completes the adjustment of the VAZ 2107 door. You can hit the road.
Having bought my VAZ-21074, I almost immediately appreciated the inconvenience of the lack of central locking. I don't think you need to tell anyone. Therefore, the first step was to install a central lock on the car. Internet searches made it clear what exactly I needed. A central locking kit for 4 doors was purchased at the car market.
It contained: two 5-pin actuators for the front doors, two 2-pin actuators for the rear doors, a controller, a set of necessary wires, rods and mounting accessories.
I’ll immediately make a reservation that the wires were of sufficient length and thickness, the power of the actuators was enough for VAZ locks (about possible problems - below), so there was practically nothing to add. I wanted more, namely an electric trunk lock and remote control of the central locking from a key fob, so in addition I bought a simple alarm system and a solenoid for the trunk lock. What do we need for work? A certain amount of wires, 15-20 mm self-tapping screws with a press washer (such a wide flat head, you can use a drill, or better without, because the body iron is quite thin). I also needed rubber tubes (“corrugations”) to pass the wiring into the doors and other little things like wire lugs, electrical tape, heat shrink, etc. Tools: screwdriver with bits and drills, screwdrivers, standard set of power tools, marker. Some wrenches may be needed. Let me remind you that when working with the on-board wiring of a car, you must remove the negative terminal from the battery. It doesn't matter if you're cutting into wires or just moving bundles. Troubles in the form of melted wiring are much sadder than lost car radio settings. So, let's begin. Wiring You need to start by determining the location of the controller. I identified a place for myself on the body partition between the glove compartment and the shelf. Then you need to spread out and lay the wiring. After unwinding the wires from the kit, we determine by the length of the bundles which one to connect to which door. It is convenient to lay the wires to the rear doors under the plastic door sills, then along the middle pillar through the holes to be drilled into the door. We lay the wires on the left side of the car under the dashboard, then follow the same route to the doors. We draw a +12V wire from the battery to power the entire circuit. The same wire will be used to power the alarm. At first I wanted to do the smart thing and get the power somewhere in the wiring block (fuse and relay box) terminals, but after seeing how difficult it was to crawl to them, I decided to run the wire directly to the battery terminal. Again, in the event of any alarm breakdowns, this wire will be easier to disconnect. There must be a fuse on the power cord. Usually it comes already installed in the harness out of the box. There is no need to connect the central locking controller to the wires yet. Rear doors It is better to start installing actuators from the rear doors, so that later it will be more convenient to check the operation of the central locking system when unlocking/locking the door with the key. Remove the door trim and top plastic trim from the door. First, we determine where the wires will go from the stud to the door. We drill a 5 mm hole in the door with a drill, close the door, and use a marker to place a point on the counter through the hole.
Then we drill a hole in the rack. We check the alignment of the holes and drill them to a sufficient diameter. We push the wires through the holes, do not forget to thread the corrugation between the stand and the door. I had corrugations of a fairly large diameter, but I didn’t have such a drill, so in the back door I limited myself to heat-shrink tubing (which I later regretted and ended up converting to corrugation anyway).
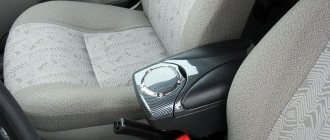
The hardest part was finding a place to mount the actuator. At first I wanted to attach it to the horizontal rod, but experiments showed the futility of this idea, so a place was found in the lower front part of the door, under the vertical rod of the lock lock button.
Although I found a description of the option with horizontal mounting on the Internet:
We put the rod from the kit on the actuator, insert the actuator together with the rod through the technological holes into the installation site (exactly in this sequence, otherwise it will not be possible to insert the rod later). We fix the actuator using a mounting strip, screw the actuator itself to the strip with the screws included in the kit, and screw the strip to the door with the self-tapping screws that I wrote about at the beginning of the article. We check that the actuator does not interfere with lowering the window. We fasten the actuator rod to the lock button rod using the fasteners included in the central locking kit. We are not fixing one of the rods yet. We lift the rod up, and put a mark on the actuator rod with a marker near the fastener. Then we lower both rods down and put another mark. We place the fasteners in the middle between the marks and fix the second rod.
We check the operation of the actuator. To do this, we pull a wire with +12 V from the battery. We connect one end of the actuator to this wire, and the other to the ground, and check the operation of the actuator. Then we change the polarity and check the operation in the other direction. We do this several times. If everything works as it should, then you're in luck. If the lock does not open/close completely the first time, this means that the lock is too tight and the actuator cannot cope with it. There are several possible solutions: a) lubricate the places where the rods are attached to other parts (it helps a lot!); b) adjust the position of the rods relative to each other; c) install a more powerful actuator; d) finish the lock by removing the unnecessary part. More about the latter. We remove the rocker connecting the lock lock button rod with the horizontal rod going to the lock itself. We remove the spring from this rocker. This spring is responsible for blocking the lock when the door is closed with the lock button pressed. After removing the spring, the door will not lock itself. If you have a central lock, especially one associated with an alarm, this function does not make much sense, so I easily parted with it. But you should keep this in mind.
We put the rocking chair in place and attach the rods. We check the operation of the actuator. If everything works well, cut off the excess traction. We check that the rubber corrugated boot on the actuator is in place; if not, we correct it. We connect the ends of the actuator to the wires laid in the door, wrap the connecting terminals with electrical tape for reliability, and put the door back together. We check the operation of the actuator again by applying voltage to the wires running from the door to the controller. If the door no longer locks/unlocks properly, check to see if anything is blocking it after reassembling it. It is possible that if the wires are used too thin, the actuator simply does not have enough voltage. Thicker wires will have to be re-routed. We do the same with the second door, but in a mirror image. Front doors With the front doors, regarding the actuators, everything is much simpler. To be honest, I thought it would be the other way around. Remove the trim from the door. You can leave the plastic cover on. We try on the location for installing the actuator so that the actuator's thrust axis coincides with the thrust axis of the locking button (see photo). We make marks for the holes with a marker, then drill holes with a diameter of 3.5-4 mm according to the marks.
We push the actuator with the rod into place, insert the screws from the kit into the holes, and screw the actuator without any mounting strips. We check how the glass goes down. We install the rod fasteners, make exactly the same marks with a marker as on the back door, and fix the rods.
Let's check. The check must be done behind closed doors, sitting inside. First, let's check for opening and closing. We connect the +12 V wire and ground to the ends of the same color as the two-pin actuators (for me these are blue and green wires). We change the polarity and check again. If everything is fine, connect all ends to the wires from the controller. We also connect the controller itself to the harness connector and supply +12 V to it (through a fuse). Now we check the operation of the key locks. We close the door and use the key to open/close the lock from the outside. In this case, the actuators of all doors should operate. You can also check the operation of the lock button. If the central locking does not work in any direction, you need to try to move the rods relative to each other. Once everything is checked, you can lay the wires. Just in case, we do not cut off the excess rod, but wrap its end to another rod with electrical tape so that it does not rattle. At the same time, this will increase rigidity. If you already have acoustics installed, then you probably already have the necessary holes and a tube for connecting the wires from the body to the door. If not, you will have to make them, just like at the back door. If the tube is thin, you may have to replace it if all the wires do not fit through it. I got a decent bundle: 5 actuator wires, 2 acoustic wires, 1 heated mirror wire, 1 ground wire (there is no reliable ground in the doors). I used a rubber tube with an outer diameter of 14 mm. In such a tube there was a reserve for the wires of the future electric window. On one side the tube is thinner, this side should be on the outside of the bend (sorry for the taftology) so that there are no kinks.
By the way, laying wires into the left door will be a little difficult - the steering wheel gets in the way. After installation, we connect everything, wrap the connections with electrical tape, and assemble the door. We check the operation of the central locking system with the door assembled. We do the same with the second door. Final steps We connect the controller to the block with wires. We connect the battery. Locks at this moment may work in either direction, so keep the door keys with you, or do not close the doors. We check the operation of the locks by unlocking and locking both front doors both from the outside with the key and from the inside using the lock buttons. If any of the locks works “out of phase,” it means that the polarity of its connection is reversed. The wires need to be swapped. The door lock buttons can be removed, or better yet left on. There is only one argument for “remove”: it is supposedly safer, the door cannot be opened with a hook through the slightly open glass. This argument disappears if you install safe buttons (without caps). There are three arguments for “leave”: 1) aesthetics are not violated; 2) you can see from the buttons whether the doors are locked or not (if the front door is not tightly closed, the central locking system may bounce back to unlock); 3) it is possible to lock and unlock the doors from the inside without installing any additional buttons in the cabin.
We recommend: Secrets of the masters - all the ways to straighten a dent without painting
Adjusting interior door locks
The front locks are designed to be locked from the outside using a key and from the inside using a pull rod. The device has an external face located on the door handle. The structure is closed both from the inside and from the outside. Installing a lock is more difficult than installing a lock on the back door. The rear actuator is connected by a rod to the door lock button and the handle for opening it. It does not have an external locking mechanism.
Tools and materials
When starting work, you must ensure that you have the necessary tools and materials.
During the work you will need:
- impact screwdriver;
- hand drill;
- flat head sander;
- felt-tip pen;
- cushioning material.
In this case, you should carefully read the visual video lesson of operation and adjustment techniques presented on the websites of car enthusiasts. Step-by-step instructions and advice from experienced repairmen will help solve the problem with the least amount of labor.
The peculiarities of the repair are associated with the difference in the design of the lock of the rear doors from the front ones, but the locking mechanism is the same and consists of a latch on the pillar and an actuator on the door, which should fit perfectly together. In this case, the door should close easily and tightly without distortions or gaps.
Front door adjustment
The front door locking device is more complex to install, since it comes with an internal and external locking device. A lock is mounted inside the casing, which can be locked from the inside of the cabin and an external device located on the handle. The cylindrical cylinder is used to open the interior with a flat key of the sulfide type lock. After installing the lock, it can only be adjusted by a latch or a heel located on the rack.
The latch is a structure for receiving the executive part of the lock, the tongue. Depending on how the position of the receiving channel is set, the opening force and the difficulty of locking the lock depend. The front door must be positioned so that the gap on all sides is uniform, there is no distortion when opening, and the door must move easily. All this will be done in a VAZ 2109 car by adjusting the door locks.
If the door closes tightly, the fixation of the heel must be loosened by half a turn of the screw securing the latch and slightly move the receiving chamber outward, slightly moving the plate. Once you are sure that the problem has been resolved, tighten the bolts.
The door does not close tightly and a gap is created between the body. On the contrary, you need to loosen the bolts and push the lock deeper into the structure. When closing, the canvas goes up; the adjustment will consist of lowering the latch down and then stabilizing it with pads made of waterproof fine sandpaper. The door can be lowered down to 2 mm if a gasket of this thickness is placed under the counter part.
Before you begin adjusting the lock with the response mechanism, you should fix its primary position by tracing the outline with a felt-tip pen. After completing the adjustment, tighten the three mounting bolts until tight.
Rear interior doors
The lock installed on the door does not have a key. The closing mechanism is designed on the same principle and consists of a latch and a tongue. However, if the door is replaced, its adjustment is carried out in the canopy areas. The existing two units with the upper one fastened to three powerful bolts, and the lower point to two, allow you to set the gaps and fix the alignment before adjusting the lock. In this case, the door can be raised or lowered, pushed into the cabin or taken out.
When carrying out these operations, you will need an impact screwdriver; it will not be possible to simply twist the fastener only by using a jerk and twist. You can see in detail how this operation is performed in the photo in the materials of the car repair website. Having completed the alignment, all fasteners should be screwed in completely and gaskets and fastener position clamps should be installed.
Once the door is centered, you may not have to adjust the lock using the heel. If necessary, work is carried out as when adjusting the front doors.
Tips for choosing a “quiet” lock
Now I would like to outline some general tips regarding choosing a “quiet” lock. These tips were specially formulated by experts to help you.
To summarize, we note that silent locks are not a myth, but very real devices, which have also recently become widespread. The cost of such locks is far from prohibitive; even the best of them can be afforded by almost anyone. Moreover, most of the “quiet” locking devices on the market can be considered quite decent and efficient. So, under these conditions, is it worth continuing to suffer with your old locks on interior doors that make unpleasant noise?
Source