Payment for goods and downloading of the book in electronic form (PDF format) is made on the website.
To do this, you need to find the book you are interested in and click on the “Buy” button. The price of the book is indicated on the button.
For convenience, the price on the website for residents of Russia, Belarus and Kazakhstan is presented in rubles.
For residents of Ukraine in hryvnias, and for all other countries - dollars.
After clicking on the “BUY” button, a payment window will open where you can select a payment system with which you can pay for the selected book using any bank card (Visa, MasterCard, MIR, etc.)
When you click on the “Pay by bank card” button, the Portmone payment system will open, which is the easiest way to make a payment.
In addition, the website offers four payment systems for payment:
- Yandex (payment from any bank cards, Yandex Money account, QIWI Wallet, terminals, etc.);
- Portmone (payment from any bank cards, Portmone account);
- PayPal (payment from any bank cards, PayPal account);
- WebMoney (payment from any bank cards, payment from WebMoney wallets).
Payment via Yandex Cashier
After selecting payment via Yandex, the Yandex Cashier payment system will launch, where you need to select a convenient payment method (bank card, QIWI, Yandex Money account, etc.)
After specifying payment details and confirming payment, payment for the goods will occur.
If you have a bank card in a currency other than the ruble, then the money will be debited from the card at the rate of the Central Bank of Russia at the time of the purchase.
This payment method is optimal for residents of Russia, Kazakhstan and Belarus.
Official website of the Yandex Kassa payment system https://kassa.yandex.ru
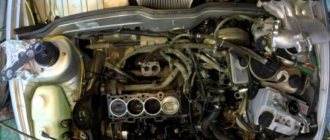
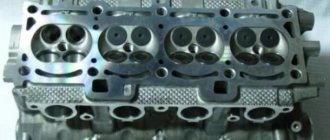
Description of the cylinder head of the VAZ 2106
The cylinder head (cylinder head) is an integral part of any internal combustion power unit. This mechanism controls the supply of the combustible mixture to the cylinders and the removal of exhaust gases from them. The unit has inherent faults, the detection and elimination of which are worth dwelling on in more detail.
Purpose and principle of operation
The main purpose of the cylinder head is to ensure the tightness of the cylinder block, that is, to create sufficient obstacles for gases to escape outside. In addition, the block head solves a whole range of tasks that ensure the functioning of the engine:
- forms closed combustion chambers;
- participates in the work of the State Russian Museum;
- is used in the engine lubrication and cooling system. For this purpose, the head has corresponding channels;
- participates in the operation of the ignition system, since spark plugs are located in the cylinder head.
The cylinder head is located on top of the engine and is a cover that ensures the tightness and rigidity of the engine
For all of the above systems, the cylinder head is a housing element that ensures the rigidity and integrity of the power unit structure. If a malfunction occurs with the cylinder head, normal engine operation is disrupted. Depending on the nature of the breakdown, there may be problems with both the ignition, lubrication and cooling systems, which require prompt repair.
The principle of operation of the cylinder head comes down to the following steps:
- The camshaft is driven from the engine crankshaft through a timing chain and sprocket.
- The camshaft cams act on the rockers at the right moment, opening and closing the cylinder head valves at the right moment, filling the cylinders with the working mixture through the intake manifold and releasing exhaust gases through the exhaust.
- The valves operate in a certain sequence, depending on the position of the piston (intake, compression, stroke, exhaust).
- The coordinated operation of the chain drive is ensured by a tension device and a damper.
What does it consist of?
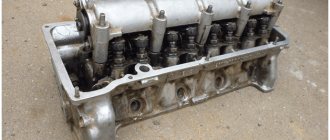
The cylinder head of the “six” is 8-valve and consists of the following structural parts:
- head gasket;
- timing mechanism;
- cylinder head housing;
- chain drive;
- the combustion chamber;
- tension device;
- spark plug holes;
- planes for mounting intake and exhaust manifolds.
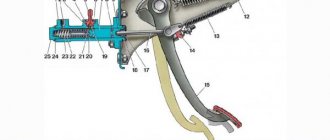
Design of the VAZ 2106 cylinder head: 1 - spring plate;
2 — guide sleeve; 3 - valve; 4 — internal spring; 5 - outer spring; 6 — lever spring; 7 — adjusting bolt; 8 — valve drive lever; 9 - camshaft; 10 — oil filler cap; 11 — cylinder head cover; 12 — spark plug; 13 - cylinder head The unit in question is common to four cylinders. Cast iron seats and valve bushings are installed in the body. The working edges of the seats are processed after they are installed in the body to ensure a clear fit of the valves. The holes in the bushings are also processed after pressing into the cylinder head. This is necessary so that the diameter of the holes in relation to the working planes of the seats is accurate. The bushings have spiral grooves to lubricate the valve stem. On top of the bushings are valve seals, which are made of special rubber and a steel ring. The collars fit tightly onto the valve stem and prevent lubricant from entering the combustion chamber through the gaps between the bushing wall and the valve stem. Each valve is equipped with two cylindrical springs, which are supported by special washers. On top of the springs there is a plate that holds two crackers on the valve stem, shaped like a truncated cone.
The valve mechanism ensures the intake of the working mixture into the cylinders and the exhaust gases
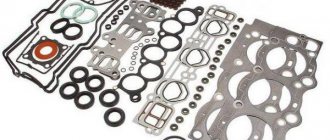
Cylinder head gasket
The head gasket ensures a tight fit of the cylinder head to the cylinder block. The material used to make the seal is reinforced asbestos, which is able to withstand the high temperatures that arise during operation of the power unit. In addition, reinforced asbestos can withstand high pressure under different engine loads.
The cylinder head gasket ensures a tight connection between the cylinder block and the head
Timing mechanism
The gas distribution device consists of a valve mechanism and a chain drive. The first of them is responsible for the operation of the valves and consists of direct intake and exhaust elements, springs, levers, seals, bushings and a camshaft. The design of the second includes a double-row chain, a sprocket, a damper, a tension device and a shoe.
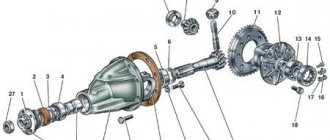
Diagram of the camshaft drive mechanism and auxiliary units: 1 - camshaft sprocket; 2 - chain; 3 — chain damper; 4 — oil pump drive shaft sprocket; 5 — crankshaft sprocket; 6 — limit finger; 7 — tensioner shoe; 8 — chain tensioner
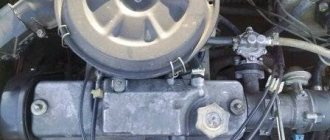
Cylinder head housing
The cylinder head is made of aluminum alloys and is fixed to the cylinder block through a gasket using ten bolts, which are tightened in a certain order and with a given force. The cylinder head has spark plug wells on the left side into which the spark plugs are screwed. On the right side of the body there are channels and planes, to which the intake and exhaust system manifolds are attached through a seal. The head is closed on top with a valve cover, which prevents oil from leaking out of the engine. The tensioner and timing gear drive are mounted at the front.
The cylinder head housing is made of aluminum alloys
Payment via Portmone
After selecting payment through Portmone, the payment system will launch, where you need to select the payment method: bank card or Portmone account.
The price in the Portmone payment system is converted into dollars at the exchange rate of the Central Bank of the country where you are located.
If you have a bank card in a currency other than the dollar, then the money will be debited from the card at the rate of the Central Bank of your country at the time of the purchase.
After specifying payment details and confirming payment, payment for the goods will occur.
Official website of the Portmone payment system https://www.portmone.com
Self tightening
As mentioned earlier, tightening the cylinder head bolts is not that difficult. However, so that this process does not turn out to be difficult for drivers, it is necessary to take into account the importance of this procedure and carry it out strictly according to the scheme, which can be found on the Internet resource.
To get started, you will need to prepare only one, but very important tool (a torque wrench), without which it will simply not be possible to tighten the bolts. Of course, such a tool cannot be in the arsenal of every car owner, so you will have to buy it or rent it at a service station. The bolts are tightened in the following sequence:
- First of all, you need to inspect the external condition of the fasteners. If their condition does not satisfy the car owner, then experts do not recommend tightening them, but using a new set of pins, which can be purchased both on the automotive market and in a specialized store. You need to choose bolts from a reliable manufacturer; when purchasing, be sure to pay attention to the quality of the thread. Before starting the procedure, the threads of the pins are lubricated with automotive lubricant, regardless of which element will be used: new or used.
- The tensioning process itself for the VAZ-2106 is similar to other VAZ models, but if you are considering a Niva, then experts recommend carrying out such work in two stages, after first familiarizing yourself with the diagram, which can be downloaded on the Internet. The diagram shows the exact sequence of tightening the bolts; all pins have their own individual number, so that car owners independently and strictly in order tighten the required elements.
- Using a torque wrench, you need to tighten all the bolts strictly according to the diagram. When performing this action, you should monitor the pulling torque, the indicator of which can vary from 3.4 to 4.0 kgf*m:
- The first to be tightened are the two elements located in the center of the head;
- then tighten the two upper bolts and two lower ones, which are located on the side of the middle clamp;
- The left outer bolts are tightened, and then the two right ones. You should not tighten only the element that is marked No. 11.
- After the first stage of tightening, according to the diagram, is completed, experts recommend repeating the entire operation again in exactly the same sequence. Making sure that when tightening the bolts, the tightening torque does not exceed 11.5 kgf*m.
- At the end of the tensioning process, you need to tighten the pin at No. 11, using the same torque wrench, making sure that the tension of this element does not exceed 4.0 kgf*m.
At this point the tightening process is considered complete. It’s quite simple to do this work yourself, but if during tightening some element is overtightened, a crack may form on the surface of the cylinder head, which, in turn, will cause a new breakdown, so the entire repair process will have to be repeated again. To avoid such a situation, you need to monitor the moment and perform the work strictly according to the scheme. And the video tutorial, which you can watch at a time convenient for you, will help you find the answer to any question on this topic and will further simplify the process of tightening the VAZ-2106 cylinder head pins.
Related posts:
- How to connect a triad car antenna
- Who is cooler than Nissan Laurel or Toyota Chaser
- Steering shaft VAZ 2106 price
- The price of a thermostat for viburnum 8 valves
|
|
|
|
|
|
Payment via PayPal
After selecting payment via PayPal, the PayPal payment system will launch, where you need to select the payment method: bank card or PayPal account.
If you already have a PayPal account, then you need to log into it and make a payment.
If you do not have a PayPal account and you want to pay using a bank card via PayPal, you need to click on the “Create an Account” button - shown with an arrow in the picture.
PayPal will then prompt you to select your country and provide your credit card information.
After specifying the information required to make the payment, you must click on the “Pay Now” button.
Official website of the PayPal payment system https://www.paypal.com
When Bolts Need Replacement
Before you begin tightening the bolts, you should inspect them. A visual assessment of the condition is not enough; it is necessary to check the fastener parameters. He must:
- have dimensions 12/120 mm;
- be with intact thread;
- have no curvature along the entire length.
Some mechanics recommend regularly screwing new bolts into the cylinder head. Others adhere to the rule that replacement should only be carried out if the fastener is screwed into the socket tightly. It is best not to skimp on bolts, since using a component that is obviously stretched increases the risk of its metal breaking. The consequences of this are almost unpredictable; in most cases, it will be possible to restore the operation of the power plant only with the help of specialists.
Payment via WebMoney
After selecting payment via WebMoney, the payment system will launch, where you need to select the payment method: bank card or WebMoney wallet.
If you already have a WebMoney wallet, then you need to log into it and make a payment.
If you do not have a WebMoney wallet and you want to pay in another way, you need to select any of the methods that WebMoney offers and make the payment
After specifying payment details and confirming payment, payment for the goods will occur.
Official website of the WebMoney payment system https://www.webmoney.ru/
Video.
In previous articles I explained how you can remove the engine from a VAZ 2109 without removing the gearbox and disassemble it yourself at home.
Now I will explain how to assemble it. The engine was disassembled for repair, the reason for the repair was that the VAZ 21083 engine was burning oil. After disassembly, it turned out that the oil consumption was due to the high wear of the piston group; the block was bored to accommodate the pistons of the first repair, 82.4. The crankshaft turned out to be completely new; it was not ground; only the bearings were replaced with new ones. I also lapped the valve and replaced the valve seals; the head grinding is described in the article Grinding in the head valves of a VAZ-2108 up to 15
Downloading a book
After successfully completing the payment (by any method) and returning to the KrutilVertel store from the payment system website, you will be taken to the successful payment page:
On this page you need to indicate your e-mail, where access to download the book will be sent.
If you are already registered on our website, then simply follow the link to your personal account.
The book you purchased will be in your personal account, from where you can always download it.
Please note that after making the payment, you need to return back from the payment system website to the KrutilVertel website.
If for some reason you did not return back to the site and closed the payment system tab with a message about the successful completion of the payment, please let us know - we will send you a letter indicating access to download the book.
Tightening torque for main and connecting rod bearings
Engine repair is considered the most difficult thing in a car, because no other part contains such a huge number of interconnected elements. On the one hand, this is very convenient, because if one of them breaks down, there is no need to change the entire assembly; it is enough to simply replace the failed part; on the other hand, the more component elements, the more complex the device and the more difficult it is for those who I'm not very experienced in car repairs. However, with a strong desire, anything is possible, especially if your zeal is supported by theoretical knowledge, for example, in determining the tightening torque of the main and connecting rod bearings. If for now this phrase is a set of incomprehensible words for you, be sure to read this article before getting into the engine.
Sliding bearings, their types and role in the operation of internal combustion engines.
Main and connecting rod bearings are two types of plain bearings. They are produced using the same technology and differ from each other only in the inner diameter (for connecting rod liners this diameter is smaller).
The main task of the liners is to convert translational movements (up and down) into rotational ones and ensure uninterrupted operation of the crankshaft so that it does not wear out prematurely. It is for these purposes that the liners are installed under a strictly defined gap, in which a strictly specified oil pressure is maintained.
If this gap increases, the engine oil pressure in it becomes less, which means that the journals of the gas distribution mechanism, crankshaft, and other important components wear out much faster. Needless to say, too much pressure (reduced clearance) also does not bring anything positive, since it creates additional obstacles in the operation of the crankshaft, it can begin to jam
That is why it is so important to control this gap, which is impossible without using a torque wrench in repair work, knowledge of the necessary parameters that are prescribed by the manufacturer in the technical literature on engine repair, as well as observing the tightening torque of the main and connecting rod bearings. By the way, the tightening force (torque) of the connecting rod and main bearing cap bolts is different
Please note that the given standards are relevant only when using new sets of parts, since the assembly/disassembly of a previously used unit due to its wear and tear cannot guarantee compliance with the required clearances. Alternatively, in this situation, when tightening the bolts, you can focus on the upper limit of the recommended torque, or you can use special repair bushings with four different sizes, differing from each other by 0.25 mm, provided that the crankshaft is ground until the minimum gap between rubbing elements will not be 0.025/0.05/0.075/0.1/0.125 (depending on the existing gap and the repair product used)
Examples of specific tightening torques for connecting rod and main bearing cap bolts for some VAZ family vehicles.
| Automobile model | Bed cover tightening torque, N*m (kgf.m.) | Tightening torque of connecting rod bearings, N*m (kgf.m.) |
| VAZ 2108 | 69,0–84,0 (6,9–8,4) | 44,0–54,0 (4,4–5,4) |
| VAZ 2106 | 68,31–84,38 (6,97–8,61) | 43,32–53,51 (4,42–5,4) |
| Lada Priora | 68,31-84,38 (6,97-8,61) | 43,3-53,5 (4,42-5,46) |
Problems when paying with bank cards
Sometimes difficulties may arise when paying with Visa/MasterCard bank cards. The most common of them:
- There is a restriction on the card for paying for online purchases
- A plastic card is not intended for making payments online.
- The plastic card is not activated for making payments online.
- There are not enough funds on the plastic card.
In order to solve these problems, you need to call or write to the technical support of the bank where you are served. Bank specialists will help you resolve them and make payments.
That's basically it. The entire process of paying for a book in PDF format on car repair on our website takes 1-2 minutes.
If you still have any questions, you can ask them using the feedback form, or write us an email at [email protected]
Why does this happen and how to avoid it?
- The lubricant was too viscous or there was too little of it. Abrasive got into the lubricant and disrupted the smooth running. Lubricant cleanliness is one of the key parameters for preventing any breakdown; it is better to change it regularly every 60-80 thousand km. mileage
- The motor was constantly operating in overload mode. You should not constantly “strain” the engine at high speeds and drive the car for a long time without slowing down.
- When installing previous bearings, the interference was too low. Check everything yourself, tighten the bolts well, it is better to use special equipment.
General information
An oil seal is a type of cuff that serves to seal various rotating (moving) joints in various mechanisms and devices. It is necessary to clarify that the concept of an oil seal is now outdated and incorrect:
- The modern name of the spare part is reinforced rubber cuff
- The concept of an oil seal has remained since those time immemorial, when felt or felt seals, their ancient analogue, were lubricated with oil
- A reinforced cuff is a unified part that is produced in factories that specialize in the production of a variety of rubber products
- Modern cuffs are widely used in industrial units, in the motor transport sector, the national economy and agricultural machinery
- In other words, oil seals (cuffs) are used in our time in all types (types) of units, mechanisms and assemblies where it is necessary to seal moving parts
Functions and purpose of cuffs
The main purpose of reinforced rubber cuffs is to seal the moving joint. In addition, modern oil seals provide reliable protection of the assembly they seal from dust and dirt. So:
- For most cuffs, the working medium is air in direct contact with lubricants, fuel or water
- Temperature range required for stable operation of the engine oil seal ranging from -60C (in northern latitudes) to +100C (engine operating temperature with a small margin)
- The working pressure of the reinforced cuff is 0.05 MPa.
Today, reinforced cuffs are considered important elements:
- Since if the cuff is slightly displaced, an oil leak will certainly appear
- It is believed that replacement of crankshaft oil seals on the VAZ 2105 should be done approximately every three years.
- However, such frequency is not strictly necessary - since earlier, unscheduled repairs may be required
- For example, if the engine overheated
- An oil leak in this case signals you that the cuff should be urgently replaced.