On cars with a manual transmission, the most common type is a dry single-plate clutch. On cars of the VAZ family, just such a clutch is used - consisting of a driven and driven disk, a release bearing, and a drive.
Structurally, the clutch elements are almost the same, but the drives on VAZs can be of several types - on cars belonging to the “Classic” family (VAZ-2101 - VAZ-2107) a hydraulic drive is used, and starting with the VAZ-2108 model they began to install a cable drive.
And if the cable drive is structurally very simple - there is only a cable connecting the clutch pedal in the cabin with the fork, which acts on the release bearing, then with a hydraulic drive everything is somewhat more complicated.
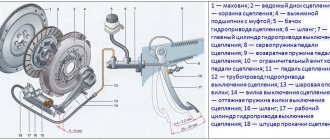
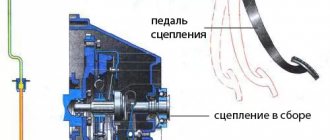
Design and principle of operation of the clutch
The clutch pedal is connected to the clutch master cylinder through a rod. The same rod acts as a piston in this cylinder. There is also a working cylinder - it is installed on the clutch housing. The piston of this cylinder is connected to the release fork.
The force from the driver's foot is transmitted through fluid, so the clutch cylinders are connected to each other by a pipeline.
Fluid is supplied to the master cylinder from the reservoir. The working element is ordinary brake fluid.
It all works like this: the driver presses the clutch pedal, the rod enters the master cylinder and pushes the fluid out of it.
To prevent the liquid from flowing back into the tank, the piston closes the supply fitting from the tank.
Since the fluid is not compressed, it moves through the pipeline and begins to press on the piston in the working cylinder. This piston comes out and pushes the fork, which acts on the release bearing.
When the pedal is released, the fork spring pushes the piston back into the slave cylinder and the fluid returns to the master cylinder.
This scheme seems simple, but may not always be reliable. If air gets inside the drive system, the efficiency of the clutch will decrease.
Air bubbles in the system will be compressed when pressure arises, this will lead to the fact that the full force will not be transmitted.
Because of this, even with the pedal fully depressed, the output of the working cylinder rod will be incomplete, the fork will not fully depress the bearing - as a result, the clutch “drives”.
Bleeding the system
The design of the VAZ-2106 clutch master cylinder is approximately the same as on a similar element of the brake system. Pumping is done in the same way:
- The entire system is assembled, threaded connections are tightened.
- Liquid is poured into the expansion tank to an average level.
- A tube is put on the bleeder fitting and lowered into a small container with brake fluid.
- An assistant presses the clutch pedal several times and then locks it in the pressed position.
- At this time, unscrew the bleeder fitting a little so that the air comes out.
Repeat the last two steps several times until air stops escaping from the system. Be sure to monitor the brake fluid level. Otherwise, the mechanism will run dry, and it may be necessary to disassemble the VAZ-2106 clutch master cylinder for repair.
The clutch system performs the function of briefly disconnecting the internal combustion engine from the engine. As a result, the transmission of torque from the power unit to the drive shaft of the transmission stops. This system includes many components. One of them is the clutch master cylinder, which we will talk about today.
What is he?
This mechanism is a small casting made of cast iron steel with a flange for attachment to the body. On its top there is a plastic tank with a lid. It is attached to the body using a threaded fitting. Thanks to this mechanism, a special fluid enters the clutch master cylinder. Inside the cast iron part there is a piston with a cuff and an o-ring. There is also a spring resting on it. It compresses the piston to the extreme right position. When these parts heat up, expansion occurs, and accordingly, the liquid in the system must go somewhere. For these cases, there is a special compensation hole through which it enters the tank from the cylinder cavity.
How does 2107 work?
This mechanism is designed in such a way that each time you press the clutch pedal, it moves forward using a pusher. And when the piston closes the hole, the pressure in the cylinder increases. Thus, the fluid flows to the working cylinder and disengages the clutch. When the pedal is released, a similar action occurs, only in reverse order. The liquid flows back - the valves open, the spring compresses and it moves from the working cylinder to the main one. If the pressure level drops to a point below the spring compression force, the first part closes and more pressure is generated in the system. This is necessary to sample the gaps of the mechanical part of the drive.
Symptoms and causes of malfunction
There are not so many symptoms of air in the clutch hydraulic drive - difficult gear shifting, crunching of gear teeth when shifting, especially when engaging reverse gear, weakening of the effort to depress the clutch pedal.
Often the cause of airing is a drop in the working fluid level below the minimum value; in this case, air enters the main cylinder through the fitting.
It is possible that liquid began to leak from the system due to loose connections of the pipelines, or their damage; a leak may appear from under the cylinder sealing rings due to wear.
There may even be an option when the hole in the tank lid is clogged. This hole is needed to equalize the pressure in the tank.
And if it becomes clogged inside the system, a vacuum occurs during operation, causing air to penetrate through the sealing rings.
Well, of course, after repair work related to the clutch and its drive, the system will be aired.
To restore the drive's functionality and remove air bubbles, the system should be bled.
This operation is in many ways similar to bleeding the brake system. But before starting work, the cause of airing should be identified.
Therefore, before starting work, you should carefully inspect all drive elements for leaks. If any are found, they must first be eliminated.
Also read - why the clutch pedal fails, reasons and ways to eliminate them.
Necessary tool
Then you can proceed directly to the pumping process. To do this you will need:
- Open-end wrench or socket wrench 8;
- Container for draining (with a small amount of liquid);
- New fluid;
- Silicone transparent tube;
- Rags.
This is all the required equipment.
An interesting fact is that with identically used drives on different “Classic” models, the bleeding process is different, so methods for pumping a hydraulic drive on VAZ-2106 and VAZ-2107 vehicles will be described below.
Work on top of the car
So, a start has been made, the goal is to remove the gearbox to replace the clutch. On VAZ 2106 and similar cars this is done quite quickly, it is only important to follow a certain sequence:
- Inside the car, remove the gear shift knob. It is attached using plastic latches. Sometimes difficulties arise with dismantling, and it gets to the point where the latches break off. The price of a new set of fastenings is no more than one hundred rubles, and you can purchase it even after repairs have been carried out. Therefore, do not be afraid if you suddenly break the plastic antennae.
- Go to the engine compartment, unscrew the four nuts that secure the exhaust pipe to the manifold. The fact is that the exhaust pipe will interfere with the removal of the box, but it is enough to move it a little to the side.
- Disconnect the battery and remove it from the car.
- Unscrew the two top bolts of the starter, disconnect the power wires for the windings and the solenoid relay from it.
- Disconnect the ground wire that goes to the gearbox.
Carefully inspect whether there are any “upgrades” on your vehicle specifically that will interfere with the removal of the transmission. If there are any, then make sure that they do not complicate further repairs.
Bleeding the clutch on a VAZ-2106
First, let's bleed the clutch on the VAZ-2106.
For ease of work, it is better to drive the car into a pit or overpass. Additionally, outside assistance will be required.
Before starting work, you need to clean the reservoir from dust, check the fluid level and add it if necessary.
The clutch bleeder located on the slave cylinder should be cleaned. Then the protective cap is removed from this fitting and the tube is put on it. The other end must be lowered into the drain container.
Before starting pumping, it is advisable to immediately check the possibility of unscrewing the fitting; often it becomes very sour in its seat, and it is quite difficult to tear it out of place.
If you manage to tear the fitting out of place, you need to tighten it back. After this, the assistant inflates the system by sharply pressing the pedal 4-5 times, after which he holds it.
The fitting is unscrewed half a turn, after which liquid with air bubbles will flow down the tube. As soon as the fluid stops flowing, the fitting must be tightened.
Afterwards, you need to repeat the process of pumping and draining the liquid several times, periodically checking the level in the tank.
It is important to ensure that liquid begins to flow through the tube without bubbles, after which the fitting is finally tightened and the cap is put on it.
Final check of the clutch for functionality!
It is recommended to check after completion of work, and this check should be done as follows:
In this case, the reverse gear should engage without grinding or knocking or any other extraneous noise!
- Now you can try another test, for this, when accelerating the car, try to engage each gear at the moment when it is necessary, but if the gears are engaged without grinding or knocking, then in this case the clutch is working properly.
- And finally, try to pay attention to the acceleration of the car, that is, the car should accelerate normally when accelerating, it should not be the case that you press the pedal in the red zone and the car does not move.
This example indicates that the clutch is slipping!
If this check does not give any results and the clutch still does not work correctly, then in this case, try to bleed the clutch first, and if this does not help, then remove it and, as a result, repair the clutch by replacing its worn parts with new ones.
You can also learn how to adjust the free play of the fork pusher from the video below:
Didn't find the information you are looking for? on our forum.
Bleeding the clutch on a VAZ-2107
On the VAZ-2107, the preparatory work is identical - the system is checked for leaks, the tank and fitting are cleaned.
It may be necessary to remove the dust shield to access the working cylinder fitting (on injection VAZ-2107 models).
Next, the tube is put on the fitting; first it must be “torn” out of place.
The bleeding process on this car is carried out as follows: the fitting is unscrewed half a turn, the assistant sharply presses the pedal, and then gradually releases it, while the fitting does not need to be tightened back.
The assistant must press the pedal sharply until liquid without air begins to flow through the tube, after which the pedal must be pressed and held, and the fitting must be tightened.
Checking the quality of clutch bleeding
Regarding the pumping itself, it should be noted that the process itself should not be long: on a VAZ-2106 - 4-5 pumps followed by draining and 5-7 sharp presses on the pedal with a leisurely release - on a VAZ-2107.
If the process takes more steps, you need to look for where air got into the system, fix the problem, and then pump it again.
You can check the operation of the drive after bleeding while driving.
Start the car, move slowly and change gears. If there are no signs of hydraulic drive malfunction, we can assume that the pumping was done correctly.
Purpose and operation of the VAZ 2106 clutch slave cylinder
In short, the working cylinder in the VAZ 2106 clutch system performs the function of an ordinary converter. It translates the driver's foot force into high brake fluid pressure in the vehicle's hydraulics.
The clutch slave cylinder for the “six” can be purchased at any spare parts store
However, the clutch slave cylinder should not be confused with the main one, because these devices are located in different places on the machine. The main cylinder is located in the passenger compartment, and the working cylinder is attached to the clutch housing with two bolts. Getting to the working cylinder is easy: just open the car hood.
The clutch slave cylinder is located on the crankcase cover
Working cylinder device
The clutch slave cylinder consists of the following elements:
Inspection and repairs
Inspection. a fundamental element in diagnosing the condition of a mechanism, allowing one to draw conclusions about its suitability for future operation, operability, the need for a complete replacement or the upcoming direction of work. The mirror (inner part) of the cylinder and the outside part of the piston must be completely smooth, without roughness or scratches. In a properly functioning master cylinder, the internal diameter is 19.05 mm. If there are large scratches, the element will not need repair, but replacement. Minor scratches and roughness can be sanded with fine sandpaper and oil. Beforehand, the edges are rubbed against each other to remove large abrasives.
Inspect the wear of the mechanical parts of the connection and the serviceability of the rubber cuffs. Then the return spring of the piston is inspected, and if its elastic parameters are lost, it is replaced. The seal rings need to be replaced. It is necessary to examine the protection cap at the rear end of the mechanism: if there is damage, the part needs to be replaced.
Bleeding the clutch of a VAZ 2106 with the help of a partner
Replacing the cylinder or any other manipulations with the clutch inevitably leads to depressurization of the hydraulic drive and air getting into the clutch hoses. To normalize clutch operation, this air will have to be removed by bleeding . Here's what's required:
- 0.5 liters of new brake fluid;
- a piece of rubber hose 30 cm long;
- open-end wrench 8 mm;
- empty brake fluid container.
Sequence of work
For normal pumping you will have to use the help of a partner. It is simply impossible to do everything alone.
- When the clutch slave cylinder is repaired and installed in its original place, brake fluid is added to the reservoir. Its level should reach the upper mark located near the neck of the tank.
The fluid in the clutch reservoir must be added to the mark next to the neck - The clutch cylinder has an air valve with a fitting.
One end of the hose is put on the fitting. The second one is lowered into an empty container (a regular plastic bottle is best suited for these purposes). The second end of the hose attached to the fitting is lowered into a plastic bottle - After this, your partner must press the clutch pedal six times. After the sixth press, he should keep the pedal completely recessed into the floor.
- Unscrew the air valve fitting two or three turns using an 8 mm open-end wrench. After unscrewing, a characteristic hiss will be heard and bubbling brake fluid will begin to flow into the container. You need to wait until the bubbles stop appearing and tighten the fitting.
- Now again we ask the partner to press the clutch pedal six times, unscrew the fitting again and bleed the air again. The procedure is repeated until the liquid flowing from the fitting stops bubbling. If this happens, the pumping can be considered completed. All that remains is to add fresh brake fluid to the reservoir.
Clutch replacement
Often, car owners prefer to simply replace clutch parts, since the cost is low and time can be saved significantly. Therefore, you can first consider the process of replacing clutch parts.
Replacing the clutch master cylinder
- First you need to drain the fluid from the clutch reservoir. This can be done using a syringe - select the liquid and pour it into another container.
- You can also remove the hose from the master cylinder fitting and insert it into the same container. Slightly straighten the clamp on the fitting to make it easier to remove the hose. Do whatever is more convenient for you.
- After this, you need to unscrew the pipe fitting that fits the clutch slave cylinder.
- Then spray the two studs that secure the clutch master cylinder to the car body with WD-40 or an equivalent to prevent breaking them when unscrewing the nuts.
- Take a 13mm wrench or a socket with extensions (whichever is more convenient) and unscrew the two fastening nuts one by one.
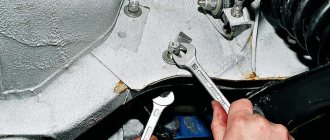
Removing the nuts securing the main brake cylinder VAZ 2107
- Remove the clutch master cylinder.
Ready! Withdrawal completed. Now let's install the new cylinder:
Advice! Before installing a new master cylinder, pay attention to the condition of the clutch reservoir flexible hose. It often happens that it cracks at the end. There are two options - either replace the hose or cut it (if the length allows).
- First you need to get the drive rod from the clutch pedal into the hole in the new master cylinder. For convenience, ask a friend to press the clutch pedal a little.
- Then install the clutch master cylinder onto the mounting studs.
- Tighten the fastening nuts with a 13 mm wrench or a socket with extensions.
- Using a 10mm wrench, connect the pipeline from the clutch slave cylinder.
- Install the clutch reservoir flexible hose.
- Fill the reservoir with brake fluid to the filler neck.
The master cylinder has been replaced.
Checking and replacing the hose on the clutch cylinder
The hose on the clutch slave cylinder is an extremely critical part that is exposed to high brake fluid pressure. Therefore, the car owner must monitor its condition especially carefully.
The clutch cylinder hose is a very important part, the condition of which must be carefully monitored
Here are signs that indicate that the hose should be changed urgently:
- cracks and other mechanical damage visible to the naked eye have appeared on the hose;
- the hose looks intact, but there are visible leaks of brake fluid on it (this means that it is still damaged and microcracks have appeared on it, which the driver simply cannot see);
- The threads on the hose ends are partially or completely stripped.
If you notice any of the above, the hose should be replaced immediately. It is better to install standard VAZ clutch hoses, their catalog number is 2101–16–025–90, and the cost is about 80 rubles.
Hose replacement sequence
Before starting work, you should stock up on an empty plastic bottle and two open-end wrenches: 17 and 14 mm.
- The car is driven into the pit and secured with wheel chocks. Open the hood and find the place where the slave cylinder hose is screwed to the clutch hydraulic tube.
- The main hose nut is held firmly with a 17 mm wrench, and the fitting on the hydraulic tube is unscrewed with a second wrench - 14 mm. After unscrewing the fitting, brake fluid will flow out of it. Therefore, there should be a container in the inspection hole to collect it (a small basin would be the best option).
- The second end of the hose is unscrewed from the working cylinder body using the same 17 mm wrench. There is a thin O-ring in the cylinder under the hose nut, which is very often lost when removing the hose . This ring should also be changed (as a rule, new seals come with new clutch hoses).
- A new hose is installed in place of the old one, after which a new portion of brake fluid is added to the hydraulic system.
So, even a novice driver can change the working cylinder on a six. All you need to do for this is to carefully prepare the necessary tools and strictly follow the above recommendations.
Replacing the clutch hose VAZ 2101-2107
A torn clutch hose always leads to fluid leakage from the system, which in turn leads to difficulty shifting gears and, of course, to a bad mood for the driver. Replacing the clutch hose can be done even by a novice driver, therefore, if you just recently got behind the wheel of a VAZ classic and have already encountered this problem, going to a service station is not at all necessary.
The work of replacing the clutch hose begins with disconnecting the rubber hose and the metal tube leading the fluid from
clutch master cylinder to the rubber hose. In order to disconnect the rubber hose, hold it with a 17-gauge wrench under the metal plate (see photo), and use a 13-gauge wrench to unscrew the metal tube from its fastening point. After the metal tube is unscrewed, you should pull out the metal bracket and push the rubber hose down through the metal plate. Already at this first stage, you may encounter a difficulty in the form of a broken metal tube. If it breaks when unscrewing, the old hose still sticks out,
but now you need to unscrew the broken metal tube from the clutch master cylinder - this is most conveniently done with a special 13-size wrench; a regular spanner wrench can lick the edges, but no one likes unscrewing a bolt, nut, or fitting with licked edges. Also, if you still need to unscrew the metal hose, you will have to remove the expansion tank from its mounts and move it to the side, because it prevents you from getting to the clutch master cylinder.
Once the old hose on top is no longer holding anything, the metal tube is either not damaged or is disconnected from the master cylinder after damage, you can begin to unscrew the old hose from the clutch slave cylinder. It is more convenient to carry out this operation in a pit or on an overpass, but if necessary, you can drive the front wheels onto bricks or boards to increase ground clearance - the main thing is to securely fix the car, because you will need to climb under it. The hose is unscrewed from the cylinder with a 17-size wrench, but it is screwed into the cylinder quite deeply - this leads to the fact that in some cases it is impossible to unscrew the hose even in a pit and even with a wrench with a long arm.
In this case, you will have to change the clutch slave cylinder.
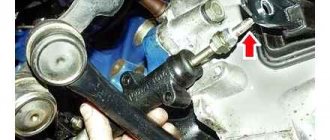
Clutch cyl. bolted to the gearbox with two 13mm bolts
Before you start unscrewing them, you should use pliers to remove the spring from the working cylinder, and then you can unscrew the bolts - pay attention to the photo
It is better to immediately screw the new clutch hose into the new slave cylinder, climb under the car, insert the slave cylinder fitting through the gearbox fork, secure the cylinder itself with bolts and adjust the free play of the fork to 1 cm using the adjusting bolts on the fitting.
Afterwards, all that remains is to install a new metal tube, or screw the old one (if it remains undamaged) into a new hose. After that, the hose will be pushed through the metal plate - it must be secured with a bracket. Now all that remains is to install the expansion tank in its old place, pour fluid into the tank and bleed the clutch.
The second time, replacing the clutch hose will take no more than an hour, even if disconnected and replaced
additional details.
Bleeding the clutch is carried out in the following way. Liquid is poured into the reservoir, and the assistant pumps it by sharply pressing the clutch pedal. After a series of sharp pumping of the pedal, the assistant holds the pedal in a clamped position, and you sharply open the fitting of the working cylinder and sharply close it. In this case, air will escape through the fitting of the working cylinder along with the liquid. The procedure should be carried out until the pedal becomes as hard as possible.
Start the car and warm up the engine to operating temperature, try to move off without gas; on a flat road, a properly adjusted clutch should allow you to slowly move off without gas, but in the second car the car should not drive with the gas pedal not pressed. If the car does not move, or you hear small extraneous sounds when the clutch pedal is not pressed, you should tighten the clutch a little.
Other articles on autobelyavcev.ru
Kraz 6510
Kraz 255
Below you can leave your feedback on replacing the VAZ 2101-VAZ 2107 clutch hose.
The device of the working cylinder in a VAZ
In classic VAZ 2106, 2101, 2107 models, the clutch consists of two cylinders - the main and the working. Essentially, they do the same job. The clutch slave cylinder in the VAZ 2106, 2101, 2107 is located near the vehicle’s gearbox - in these models there are no significant differences in the structure of the part. It is secured to the box body with several bolts. The location of the part in these VAZ models is designed in such a way that it can only be seen from below the car.
When you press the clutch pedal, a piston moves inside the master cylinder, causing the brake fluid to be pushed out. After this, the brake fluid passes through the entire cylinder and, under the influence of the created pressure, exerts work on the same piston, which in turn presses on the fork in the cylinder. Both clutch cylinders of the car are dependent on the presence of brake fluid.
Therefore, it is very important to check the presence of this fluid in the tank, which is located under the hood of the car, and not allow it to drop to a critical level.
It often happens that liquid leaks. This happens due to wear of parts or due to the use of brake fluid that is not intended for VAZ cars. For VAZ 2106, 2101, 2107 models, the DOT-3 brand is used. The use of another type has a bad effect not only on the clutch slave cylinder, but also on the main one.
There are also cases when the master cylinder may also be the result of a clutch failure in a VAZ car - such a failure is very easy to notice. It is enough to open the hood of the car and look at the reservoir into which the brake fluid is poured. There will be noticeable drips at the junction of it with the cylinder. In this case, you need to tighten the bolts. If the fluid continues to leak, then it is necessary to use a repair kit or replace the part completely.
Product location
The master cylinder on a VAZ 2107 is located under the hood, directly on the wall separating the interior from the hood, near the driver’s feet. Directly above it is the expansion tank, and next to it are the vacuum booster and the brake master cylinder. Usually, simply looking at the product is enough to determine the problem. The presence of a leak indicates that the part is faulty and requires repair or replacement.
Purpose of the device
Cars are equipped with clutch master and slave cylinders, without which the operation of the mechanism is impossible. The VAZ 2107 clutch master cylinder is designed to push out brake fluid. Below is a diagram from which you can visually find out the operating features of the unit.
When you press the clutch pedal, the piston moves in the device in question, thereby pushing out the brake fluid. This liquid enters the working cylinder through a tube, where the reverse process is observed (the liquid pushes out the piston). Brake fluid drives a piston, which is connected by a fork to the clutch disc. As a result, the clutch disc and flywheel are separated, allowing you to change gear. The GCS is also called the main one, since it is with its help that force is supplied from the pedal when it is pressed.
The need to replace the device: when required
Like all parts of any car, the GVC tends to wear out, resulting in the need for repair or replacement. The simplest breakdown of a product is wear of the boot, which can be determined by the characteristic signs of a fluid leak.
To identify a cylinder malfunction, an initial visual inspection is required. It is possible to repair a failed main circulation system on a VAZ 2107; for this you can look for repair kits, but this is not always rational due to the quality of modern spare parts, so it is easier and faster to replace it entirely. The malfunction can also be determined by the characteristic loss of pressure in the system, which is determined by pressing the pedal. Let’s take a closer look at how to change a faulty VAZ 2107 mechanism.
Monitoring the brake fluid
One of the main signs of failure of the clutch slave cylinder in VAZ 2106, 2101, 2107 cars is partial or complete failure of the pedal inside the car when pressed. This indicates a lack of tightness in the system - gradually the amount of brake fluid decreases, and the harder and more often you press the pedal, the more fluid will leave at a time.
This will cause the clutch to stop working and changing gears will be difficult or impossible. If you do not monitor the level of brake fluid in the reservoir and do not eliminate leaks in a timely manner, then consequences may arise - the clutch basket and release bearing will fail, not to mention the creation of emergency situations.
To eliminate the cause of the breakdown or completely replace the working cylinder, depending on the nature of the breakdown, you will need a new working cylinder, brake fluid and a standard set of tools. It is best to replace the working cylinder in a VAZ 2106, 2101, 2107 car from an inspection hole or on a lift. Before starting work, it is necessary to drain the brake fluid that is in the clutch system. Having all the necessary tools at hand, the procedure for removing the cylinder is very easy.
The first step is to pull out the pusher clamp, then remove the tension spring. Next, slowly unscrew the nut on the hose with the liquid, after placing a container to collect it. Then proceed to unscrew the cylinder mounting bolts, after first pulling out the pusher with the clutch fork. Move the fork with the pusher so that it does not interfere with you. Between the working cylinder and the rubber hose there is a rubber gasket with a sealing washer. It is very important not to lose it, because it is not included in the repair kit.
Replace the clutch slave cylinder and proceed with reassembly in reverse order. If necessary, you can adjust the depth of pedal pressing on the cylinder fitting. After completing all the work, fill the brake fluid into the clutch reservoir. Filling will help to completely flush the entire hydraulic clutch system of a VAZ car. Bleeding is performed to clear your system of air that is in the brake fluid.
When is clutch adjustment necessary?
- Pedal dips - when you press, you feel your foot drop to a certain level.
- Loss of elasticity under pressure.
- The car begins to move at the beginning or end of the pedal stroke.
- Loose lever or complete lack of working play.
- Difficulty shifting gears.
- Slipping of the clutch disc during acceleration and braking of the car.
Other deviations in the normal operation of the gearbox unit and unit are also acceptable.
What pedal stroke is considered normal?
In the correct position and in fully working order, the movement of the pedal until the mechanism disengages is 2.5-3.5 centimeters. The reference standard is established by the manufacturer and is considered a recommendation value.
Some car enthusiasts reconfigure the system to suit themselves, adjusting it within the range of 45-55 mm.
Preparing for self-adjustment
Before getting into the car, you should carefully study the manual and read the theory. Next, the operation is performed like this.
- Warm up the car and drive it onto an inspection pit, overpass or lift.
- Turn off the engine. Secure the vehicle in a stable position to prevent it from moving.
- Prepare in advance the necessary keys, tools and rags for cleaning up dirt.
READ How to correctly install the flywheel on a VAZ 2106
Description of design
- clutch pedal;
- master cylinder;
- pressure main;
- working cylinder ;
- clutch fork.
How to replace the clutch slave cylinder of a VAZ 2107. Adjusting the free play of the fork.
Inside the structure there is a special liquid that ensures the transfer of impulse from the pedal to the fork.
Frequency of setting
There is no strictly established time interval for servicing the mechanism. The manufacturer insists that clutch adjustment is mandatory after performing any repair and service work related directly or indirectly to the device.
- replacing the clutch disc/basket;
- pumping of highways;
- installation of new cylinders.
Symptoms of malfunction
The very first thing that should concern you is a decrease in the fluid level of the working cylinder. Even in the absence of drips, this sign indicates that the system is leaking liquid and the box is running almost dry.
If there are leaks, the situation is the other way around. The parts are most likely clogged and do not allow liquid to pass through, so pressure is created in the tank and it begins to leak out. In both cases, the box will work almost dry, and the clutch cylinder of the VAZ 2106 will need urgent repairs.
If the gearbox operates for a longer period of time, when the working cylinder breaks down, a third sign will appear - a characteristic sound (crunching) that occurs when changing gears, as well as difficulty when trying to place the lever in the gear cell. In this case, repairs should be done very urgently, otherwise the box may jam, and then there will be no cost.
Self-removal of parts
Having established that there is a problem in this mechanism of the VAZ 2106, in order to carry out repairs, it is necessary to remove it to determine the degree of damage and clean it. To do this, carry out the following steps.
- Unscrew the two nuts of the expansion tank and remove it, putting it to the side.
- Remove the fluid using a rubber bulb from the clutch tank by removing the fluid supply hose (if necessary, the tank is then either unscrewed or left).
- Taking the key to 13, unscrew the tube that goes to the working cylinder and move it to the side. At the same time, make sure that the working fluid from the tube does not get on the disc in the clutch.
- Using a ratchet with a long extension and a 13mm socket, unscrew the 2 nuts securing the damaged device (carefully so that the engraving washers are not lost).
- Remove the element.
It is advisable to have a special wrench for this work, which will not damage the edges of the tube fitting. But when disassembling a VAZ 2106 yourself, you can use regular keys (the main thing is that their edges are not broken) or adjustable ones. The key must securely fix the edges of the fitting.
Return to contents
Disassembling the mechanism
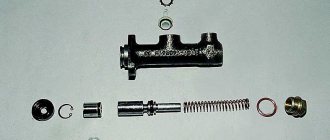
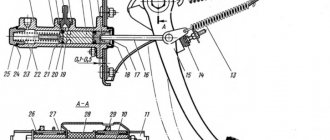
Pedal and clutch master cylinder: 1 — master cylinder body; 2 — bypass (compensation) hole; 3 — fitting gasket; 4 - fitting; 5 — lock spring washer; 6 — piston of the main cylinder; 7 - sealing ring; 8 — pusher piston; 9 - hook; 10 — pedal axis; 11 — bracket for clutch and brake pedals; 12 — clutch servo spring; 13 — clutch pedal release spring; 14-clutch pedal travel limiter; 15 — clutch pedal; 16 — piston pusher; 17 — protective cap; 18 — retaining ring; 19 — inlet; 20 — sealing ring (ring valve); 21 — piston bypass hole; 22 — working cavity of the cylinder; 23 - spring; 24 - gasket; 25 - plug; 26 — inner pedal bushing; 27 — outer pedal bushing; 28 — spacer sleeve; 29 — brake pedal
It is easier to independently disassemble the VAZ 2106 mechanism on a flat area or a workbench, where you can fix it in a vice. The part is cleaned of dirt; it is advisable to do this with an iron brush. They do this so that dirt does not get inside during disassembly. After unscrewing the plug, remove both the retaining ring and the protection cap from the body, which allows for removal:
- o-ring;
- floating piston with sealing ring;
- piston and its return spring.
In practice, this happens like this: the plug that holds the return spring is clamped with a vice and unscrewed with a 22 key. Unscrew the nut and pull out the spring. The clutch rod boot is removed. After removing the retaining ring, carefully (in the direction of the retaining ring) use a screwdriver to press out the piston. The mechanism has been disassembled and can be inspected and repaired.
A thorough inspection of the disassembled mechanism should either confirm the possibility of further functioning of the cylinder, or the need to replace it.
Return to contents
Clutch repair
Now let's consider another option - using a repair kit for the clutch cylinders - main and working.
Master cylinder
So, we have removed the main cylinder and now we begin to disassemble it.
VAZ 2107 clutch master cylinder repair
- We start by removing the fitting. Use a screwdriver to remove the retaining ring.
- After which you can easily remove the fitting with the gasket.
- Now remove the rubber boot (protective cap) by simply prying it with a screwdriver or other convenient object.
- Now, using a 22 key on the other side, you need to unscrew the plug of the VAZ 2107 clutch master cylinder.
- You also need to remove the retaining ring from the boot side. This can be done using two screwdrivers, or special pliers. It is more convenient to use expansion pliers.
- Now you can easily remove all the insides of the cylinder.
Now about damaged parts and their replacement:
Clutch master cylinder of VAZ 2107 disassembled
- All rubber seals should be replaced. 2 rubber rings - on the piston and pusher rod, one on the fitting, and we also replace the protective cap if necessary.
- If necessary, replace the spring. If it is deformed or damaged.
- Also pay attention to the internal mirror of the cylinder. It should not have burrs or chips.
- If the piston is damaged or the pusher is bent, then it is better to replace the cylinder with a new one.
- When assembling, all parts should be washed very thoroughly.
Note! Never wash parts in gasoline or oil and do not allow these liquids to get inside the cylinder. Lubrication is carried out only with brake fluid!
- Put all retaining rings back.
- Tighten the clutch master cylinder plug tightly!
Then install the cylinder back on the car. This is how the clutch master cylinder is repaired on a VAZ 2107 car.
Working cylinder
VAZ 2107 clutch slave cylinder repair
- Clamp the VAZ 2107 clutch slave cylinder in a vice and unscrew the rear plug.
- Remove the protective rubber cap.
- Remove the retaining ring from the plug side and remove all internal parts of the working cylinder.
- Using a 10mm wrench, unscrew the bleeder fitting.
- Check the condition of the spring.
- Replace all rubber seals of the VAZ 2107 working cylinder.
- Check the condition of the working cylinder mirror.
- Wipe the inside with a clean cloth if necessary.
- Clean the bleeder fitting. If the edges on it are “licked”, replace it.
- Wash all parts in brake fluid.
- Lubricate each part with brake fluid during assembly.
- Reassemble all parts in reverse order.
- Install the retaining ring, protective cap and plug.
Install the VAZ 2107 clutch slave cylinder on the car (see above).
