Signs you need to replace your brake pads
Replacing brake pads on a VAZ 2107 is necessary in the following cases:
- the thickness of the lining is less than 2 mm (for front pads) or 1.5 mm (for rear pads);
- the linings are oily;
- The linings have chips and cracks.
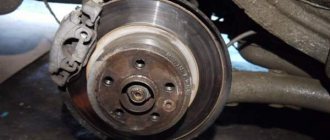
To determine the condition of the front pads, simply remove the wheel. To get to the rear ones, you also need to remove the brake drum, which requires some effort and a lot of time. Therefore, problems with pads can be determined by other methods:
- creaking (grinding) when you press the brakes;
- pulling the car away from the trajectory when braking.
These signs indicate that it is necessary to check the condition of the pads.
Signs of Brake Problems
You will know that there is something wrong with the brakes by the following “symptoms”:
- Low brake fluid level. This symptom may be associated with either a leak or physical wear of the brake pads. Having noticed a “symptom”, you need to carefully examine the calipers, tubes, cylinders, hoses and master cylinder for leaks.
- Low brake pedal. A sign of jamming of the automatic adjustment systems of drum elements. Which are responsible for routing the brake pads. To get rid of the problem, the automatic control system itself is cleaned/replaced.
- Brake pedal travel is too long. Possible causes include worn pads, improper drum brake adjustment, and air inside the system. If there is such a problem, the car is stopped being used until the repair is completed - after all, the pedal may fall to the floor, causing braking to be insufficient.
- Grinding. This unpleasant sound indicates a badly worn pad - it is rubbing against the surface of the brake disc. The latter requires either boring or replacement.
- An unnaturally soft brake pedal combined with reduced braking efficiency. A consequence of air accumulation inside the brake structure. This is preceded by both depressurization and the passage of air from the distribution tank, which is observed when the brake fluid level decreases. Other causes of the “symptom” are overheating, seized wheel cylinders, or problems with the master cylinder.
- Excessively hard pedal. We can talk about problems with the brake booster. If it is vacuum, there is most likely a vacuum leak in the intake manifold. Other most likely causes include some kind of failure in the amplifier, hose, or control valve.
- The deceleration of the car is accompanied by a whistling, squealing sound. The first reason is vibration of calipers and pads at high frequencies. The second reason is the poor quality of the pads. These elements need to be replaced, and the caliper needs to be cleaned and lubricated.
- The brake pedal has failed. A very alarming situation, the cause of which is depressurization or failure of the cylinders.
- Uneven or ineffective braking. The main reason is that brake fluid or lubricant has ended up in the working area of the pad. It is necessary to find and eliminate leaks and replace the pads.
- When you slow down, you feel either a vibration of the entire body of the car or a pulsation in the area of the brake pedal. This sign can be used to judge both a change in shape and serious wear of the brake discs. The working surfaces are most likely no longer strictly parallel to each other. To return everything to normal, the disc is bored out or replaced.
- When slowing down, the vehicle pulls to the right or left. It says that one of the pads is very dirty or oily. The reason often lies in the fact that the discs and front pads are worn unevenly, or the friction characteristics of the elements of the brake systems of the right and left wheels do not match.
Repair of VAZ rear brake cylinder
Well, I’ll take a more complicated route and try to repair the brake cylinder. To do this, it needs to be disassembled. It is disassembled quite simply - the body is clamped vertically in a vice, we place an impact screwdriver on the upper piston and lightly tap it in. Drive until the bottom piston falls out. Be careful, if there is an impact, the brake fluid remaining in the cylinder may splash out of the tube connection hole. Turn the cylinder over and carefully knock out the second piston in the opposite direction.
Now we remove the old cuffs, wipe all the parts well and pull on the new cuffs from the repair kit. Before installing new rubber bands, it is recommended to wet them in clean brake fluid.
After the repair kit has been replaced, slightly moisten the pistons with brake fluid and install them in the cylinder. They enter very tightly, so we help them do it faster with a hammer and light tapping.
In this simple and not tricky way, you can repair the rear brake cylinders of a VAZ or replace them. After installing the cylinders, do not forget to bleed the brakes. There is 100% air in the brake system that needs to be removed.
Leaking brake cylinders of the rear wheels of VAZ 2108, 2109, 21099 cars are a very common malfunction.
Required Tools
- 10 mm spanner
- 12 mm spanner
- 13 mm spanner
Instructions
So, how to replace the rear brake cylinder yourself? The VAZ needs to be placed on a flat area and the rear part must be jacked up, having first removed the wheel bolts. Next, remove the wheel itself. Getting to the brake cylinder is quite difficult. To do this we need to remove the drum and also remove the pads. In addition, the brake fluid hose is unscrewed.
How to remove the drum? Before dismantling it, you need to thoroughly clean it with a wire brush, removing all rust and dirt. After this, unscrew the 2 guide pins with a wrench. Next, remove the drum from its seat. This is done using a special puller. If this is not available, you can use 2 M8 bolts 6-7 centimeters long. We evenly tighten them with a wrench into the holes. This way the drum is compressed from the hub.
Next we move on to the pads. They need to be brought together. This is done using a small crowbar or special blades. Using pliers, bend the spring and remove it from the pads. An important point - do not press the brake pedal in order to remove the pads in this way. This will force the pistons out of the cylinder. It will be very difficult to install them in place. Next, similarly remove the lower spring and carefully remove the pads from the seat.
Now we need to remove the rear brake cylinder itself. So, remove the plastic protective cap and unscrew the bleeder fitting itself. To do this we need a key “8”. To remove the tube, you must use a 10mm socket. We break the tightening on the fitting and unscrew the element. Be careful - brake fluid will flow out of the tube. Wear protective rubber gloves when working. Next, unscrew the bolts securing the rear brake cylinder itself.
Operating principle of the rear brake cylinder
Rear brake cylinders are elements of the brake system that are directly responsible for acting on the pads, pressing them against the inner surface of the drum.
The main working parts of the rear brake cylinder are a body, two pistons, and two rings - a sealing ring and a thrust (adjusting) ring. When you press the brake pedal, the pistons move out of the housing, pressing the pads against the surface of the drum. They return back under the action of the tension spring of the pads. The purpose of the thrust ring is to limit this movement, so that the gap between the friction linings and the drum is maintained at the same level. The O-ring, in turn, prevents brake fluid from leaking through the cavities in which the pistons are located.
1 — block stop; 2 — protective cap; 3 - cylinder body; 4 - piston; 5 - seal; 6 - support plate; - 7 - spring; 8 - crackers; 9 — thrust ring; 10 - thrust screw; 11 - fitting; A - slot on the thrust ring
Thus, it is the rear brake cylinder that is responsible for transmitting braking force to the pads and for maintaining the distance between the surface of the drum and the friction linings as the latter wear out. Below you will learn how to check the rear brake cylinder.
Assembly and adjustment of hydraulic brakes
The procedure is carried out in the following sequence:
- A pair of adjusting eccentrics are inserted into the protective disk, after which springs are put on them from the outer part, and then the nuts are tightened.
- Assemble the wheel cylinder of the brake system. To do this, they put a pair of cuffs, a pair of pistons, a spring in it, put on sealing covers, and install thrust block pins.
- Rotate the cylinders towards the protective discs.
- Install the pads: secure them with brackets to insert the support pins.
- Lock nuts with spring washers are screwed onto the support pins from the reverse side.
- Put on the coupling spring of the pads.
- The protective disk is attached: for the rear wheel - to the flanges of the axle housings, for the front wheel - to the flanges of the steering axles.
- Install the brake system drum.
- Excess air release valves are screwed into the wheel cylinder from the side of the protective disc.
- Connect the hydraulic drive hose fittings.
To make adjustments before use, you need to:
- Raise the front wheel using a jack.
- While rotating this wheel forward, also rotate the front eccentric forward - until the very beginning of braking.
- Then that eccentric is turned in the opposite direction to achieve free wheel rotation.
- The rear pad is adjusted - to do this, the second eccentric is rotated back, also rotating the wheel back.
- All other wheels are adjusted according to the instructions given.
- Test the brake system while driving the car. If everything is done correctly, the car will come to a complete stop if the driver depresses the brake pedal approximately ½ of its possible travel.
- Another option for checking the brake system is at a special GARO installation, where (depending on the model) two or four wheels are checked at once. At the same time, they rely on data from the dynamometer, comparing the actual indicators with the factory ones.
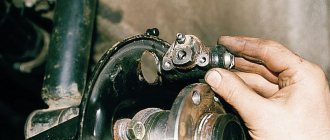
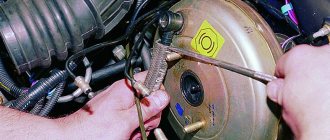
How to replace the front brake cylinder on a classic
- Remove the wheel and hang the hub
We turn the wheel to the left if we change the cylinders on the right caliper, if on the left, then to the right. Don't forget about safety measures - put stops or a stump under the lever of the suspended wheel - this will protect you from the car falling off the jack.
- Use a pry bar or pliers to separate the brake pads
This is necessary to easily remove the pads from the caliper, otherwise you will not be able to remove them.
- We unsplint the guides and knock them out of the brake cylinders with a hammer.
- We take out the brackets and pads. How to do this correctly and the points described above are described in detail in the article Replacing the front brake pads of a VAZ 2016. In order to avoid making mistakes, I recommend that you read this lesson.
- In order not to lose a lot of brake fluid, remove the cap from the reservoir, put a bag over the neck and screw the cap into place. Thus, the cover will be sealed and will not allow all the liquid to drain when removing the hose from the front brake cylinder of the VAZ 2107.
Or we pinch the brake hose so as not to lose the entire “brake housing” when unscrewing it from the caliper. In this case, there is a high probability of running into replacing the hose. It dries out over time and when it is forcibly compressed, it can begin to leak.
- Using wrenches or a socket “14” we unscrew the brake hose fastenings
- Using a “17” wrench, unscrew the two fastening bolts and remove the brake caliper from the hub
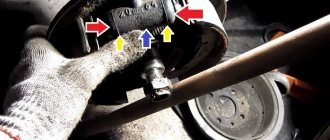
- We clamp the caliper in a vice, use special wrenches to unscrew the tube
To do this, we put a split wrench on “10” onto the nut securing the brake pipe. If necessary, you can lightly tap it with a hammer so that it is more securely fixed on the edges of the nut. We clamp this key with a screw, thereby its walls tightly compress the nut, and tear it off. This is the only way you will not “lick” the edges of this nut.
After you “tear off” the nut, you can unscrew it with a regular open-end wrench. We do this carefully, making sure that the brake pipe does not rotate together with the nut, it may break.
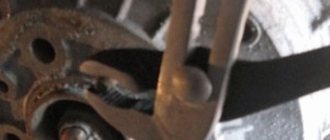
- We clamp the clamp and knock out the old brake cylinder from its seat
It is necessary to fix the clamp so that it does not interfere with knocking the cylinder out of the caliper. Try to save it, since it may not be included with the new brake cylinder. If you can’t fix it, you need to pull it out, no, with one hand we press on it with a sharp, thin object (a nail), with the other, we carefully knock out the cylinder with a hammer.
It is recommended to do this through a soft metal guide, but there may not be a third hand, so first we tap with a hammer so that the place where the latch is located moves and it hides in the depths of the guide. Then with the freed hand we hold the attachment and completely knock out the old part from the caliper.
- We clean the seat for the new brake cylinder.
It “walks” on a slide on which dirt and rust can accumulate. To avoid problems with installing a new part, you need to clean them.
- We remove the old retainer from the cylinder to install it on the new one.
If this is not possible, then we buy new ones for the brake calipers or make them ourselves. An object made of durable material, such as a nail, with a diameter corresponding to the diameter of the mounting hole in the cylinder, is suitable for this.
- Lubricate the cylinder slide with a thin layer of oil or lithol so that it slides better in the caliper. Using the adapter, we drive the new part into its seat until the hole for the clamp aligns with the slot in the caliper body. We insert the manufactured clamp and lightly knock the cylinder until it stops so that it is fixed with it.
- Screw on the brake pipe.
The main thing in order to “get” into the thread is to correctly align the tube nut and the hole for it. If, when tightening the nut, you feel that it is too tight to turn - you have not “got it”, it is better to remove the nut and re-align it with the thread of the hole. There is no need to tighten too much. After installing the caliper on the car and bleeding the system, if fluid leaks in this place, then tighten it with an open-end wrench.
Installation on the car occurs in the reverse order.
Video of replacing the VAZ front brake cylinder:
Adjusting car brakes
The brake system may require operational adjustments. For this:
- Raise either the axle or the wheel of the car.
- Rotate the squares of the brake levers to the right until the wheel begins to slow down slightly.
- Then they turn the square back.
- Set a gap of 0.3-0.4 mm between the drum and the block lining. To avoid mistakes, the gap is measured with a special feeler gauge, passing it in the middle zone of the lining - through the “window” in the drum.
- After adjusting all the wheels of the car, they test the system either on the machine or on the move.
After the drum is repaired, the pads are replaced and the linings are re-riveted, they turn to complex adjustment using eccentric support fingers. Follow the algorithm:
- Adjusting the brake lever square pads according to the instructions given above.
- Release the nuts of the support pins, after which they turn them towards each other, thereby pressing the pads against the drum as far as possible. It is in this position that the finger nuts are tightened.
- Achieve a normal gap between the drum and the linings.
- At the end of the adjustment procedure, they test how easily the wheel rotates.
labavto.com
The brake master cylinder (MBC) is one of the main elements of the brake system, which determines how safe the vehicle will be used. The driver is obliged to ensure that it is in good condition. If malfunctions are detected, action must be taken immediately. Negligence and delay in repairs can lead to an accident. You can identify faults and repair the VAZ 2107 GTZ yourself.
GTZ: device and purpose
The VAZ 2107 is equipped with a hydraulic brake system consisting of two circuits. When one of the circuits fails, the other continues braking. This improves traffic safety. The master cylinder changes the pressure in the circuits depending on the position of the brake pedal. The GTZ is located on the rear wall of the engine compartment. It can be found under the expansion tank of two sections, which is filled with brake fluid (TF). It looks like an oblong cylinder with holes for connecting brake hoses.
The GTZ housing contains 2 pistons with sealing collars. They are located sequentially one after another. The first one moves due to the influence of the pedal pusher on it and serves the contour of the rear wheels. It forces a second piston to move, which acts on the two brake circuits of the front wheels. Springs that are located between the pistons return them to place when the driver releases the brake pedal.
Video “Bleeding the brake cylinder”
The recording shows how you can bleed a car's brakes without an assistant.
When should the brake master cylinder be replaced? The master brake cylinder must be replaced if: 1. Various types of through cracks appear on it, as well as deep chips and deformations. In connection with all these malfunctions, the following may be observed: • Brake fluid leaking out of the cylinder, the cylinder in this case will be oily. • A very rapid decrease in the level of brake fluid located in the brake reservoir may also be observed.
Design and principle of operation of the unit
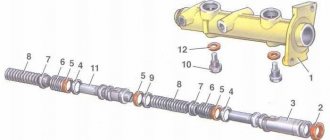
At first glance, the design of the master cylinder seems complex, since it consists of many small parts. A diagram and list of these elements will help you understand the device (the positions in the picture and in the list are the same):
- Die-cast metal housing for 2 working chambers.
- The washer is a retainer for the bypass fitting.
- A discharge fitting connected by a hose to the expansion tank.
- Sealing gasket of the fitting.
- Limit screw washer.
- The screw is a piston movement limiter.
- Return spring.
- Support cup.
- Compensation spring.
- Ring sealing the gap between the piston and the body - 4 pcs.
- Spacer ring.
- Piston servicing the circuit of the rear wheels;
- Intermediate washer.
- A piston operating on 2 circuits of the front wheels.
The main brake cylinder of the “seven” has 2 separate chambers and two pistons that push the fluid in different circuits.
At one end the cylinder body is closed with a metal plug, at the second there is a connecting flange. At the top of each chamber there are channels for connecting system pipes (screwed on threads) and discharging liquid into the expansion tank through fittings and pipes. Sealing collars (item 10) are installed in the piston grooves.
Both upper fittings of the GTZ are connected to one expansion tank
The GTZ operating algorithm looks like this:
- Initially, return springs hold the pistons near the front walls of the chambers. Moreover, the spacer rings rest against the limiting screws, the liquid from the tank fills the chambers through open channels.
- The driver presses the brake pedal and selects free play (3-6 mm), the pusher moves the first piston, the cuff closes the channel of the expansion tank.
- The working stroke begins - the front piston squeezes the liquid into the tubes and forces the second piston to move. The fluid pressure in all pipes increases equally, and the brake pads of the front and rear wheels are activated simultaneously.
The two lower bolts limit the stroke of the pistons inside the cylinder; springs push them back to their original position
When the driver releases the pedal, the springs return the pistons to their original position. If the pressure in the system rises above normal, some of the liquid will flow through the channels into the tank.
An increase in pressure to a critical level often occurs due to boiling of the liquid. While on a trip, an acquaintance of mine added counterfeit DOT 4 to the expansion tank of the “Seven”, which subsequently boiled. The result is partial brake failure and urgent repairs.
Rear cylinder design
In turn, the cylinder consists of:
- . A special sensor regulates the liquid level;
Note: The brake fluid reservoir does not have to be installed on the actual cylinder. It can be installed in another location if it is more convenient. It is important that it is connected to the cylinder cavity through tubes.
- The housing in which the pistons and return springs are concentrated;
- Return springs, allowing the pistons to return to their original position after pressing the brake;
- Sealing cuffs that create the correct pressure in the tank;
- Pistons with pushers;
- Differential pressure sensor.
Note: with its help, the driver learns about the loss of tightness in one of the circuits.
How it all works
As a rule, in normal condition and under optimal environmental conditions, the cylinder works like this:
- To slow down, the driver needs to press the brake. After this, the force is transmitted along the rod to the piston. This rod moves forward, helping to close the compensation hole. Thus, the pressure begins to increase.
Note: the same thing happens in the front cylinder, which helps the car brake quickly.
- After the car has been stopped, the driver stops pressing the pedal. As a result, the pistons return to their original positions. In addition, the pistons begin to act together with the reservoir. This helps the pressure in the second level out and become similar to atmospheric pressure. In addition, the wheels also return to their original position.
Note: If the front or rear cylinder fails, the second one will operate with less force.
Brake system VAZ 2107
It's no secret that the safety systems provided for the VAZ 2107 have not undergone significant improvements since the first production of the car. There are no airbags or related electronics in such a car. Once you get your hands on such a car, the first thing you need to do is check the brakes. In fact, a car's safety systems are based on the car's braking performance.
Crash test
As crash tests of domestic cars show, it makes no sense to rely on the car body itself. A frontal or side collision with an obstacle already at a speed of 64 km/h will turn the “seven” into an accordion.
Replacing the brake cylinder VAZ 2109
The RTC on the rear axle of the 2109 wheels is changed according to the same principle as on the VAZ classic; the wheel and drum are also removed, the tube and two cylinder fastenings are unscrewed with a ten key. It often happens that the tube and RTC bolts on the support disk boil; to remove them carefully, you need to spray the connections with WD-40, and wait 15-20 minutes before unscrewing. The brake pipe nut will be easier to unscrew if you gently tap the metal around it with a hammer.
When tapping, it is important not to break the bleeder fitting
Replacing brake cylinder 2109 is not a difficult task, and many drivers can do this work themselves.
Replacing rear pads
Replacing the classic rear pads with your own hands is a little more difficult - after hanging the rear axle with the handbrake released, start in order:
- Remove the pins holding the drum to the hub.
- Knock the drum outward if it cannot be removed by hand (care is required - it is easily damaged!).
- Clean the mating surfaces of the hub and drum. It won’t hurt to apply a thin layer of graphite lubricant to one of them - in the future, removing the drum will be noticeably easier.
- Using needle nose pliers, remove the upper spring that presses the pads to the working cylinder.
- Remove the soldiers by pressing on their spring-loaded cups and turning them 90 degrees.
- After removing the front shoe from the groove of the working cylinder, remove the lower spring.
- Disconnect the handbrake cable from the lever on the rear block.
- Depending on the design of the purchased set of pads, it may be necessary to move the handbrake lever from the old pad to the new one - to do this, you only need to unscrew the lever axis.
Before installing new pads, you will need to press the pistons into the cylinder - they have a primitive mechanism for maintaining the gap between the pads and the drum in the form of elastic spacer rings installed in the grooves on the pistons. Available means usually use a gas wrench “number two” or a clamp. The main thing is that the device presses on both pistons at once.
Having sunk the pistons, you can install the pads in the reverse order of disassembly.
Video instruction:
Replacing brake cylinder 2107
If the replacement operation on a VAZ classic is not performed on a car lift, it is more convenient to do the work sequentially - first on one side, then on the other side of the rear wheel. To perform the work, the vehicle must be placed on a level surface, then proceed as follows:
- We turn off the engine, set the car to speed, and put chocks under the front wheels. Don’t forget to fully release the handbrake;
- loosen the wheel nuts of the rear wheel, jack up the car and remove the wheel;
- To prevent the car from going anywhere, it is advisable to place a “tragus” next to the jack;
- remove the brake drum - use a 12 mm combination wrench to unscrew the two guides;
- the drum usually comes off tightly, so it should be tapped from behind with a hammer through a piece of wood. You cannot hit the part with an iron hammer; the drum can split;
- unscrew the brake pipe from behind the cylinder, also 2 ten bolts securing the RTC itself;
pull out the cylinder, freeing it from the pads;
We install the part prepared for replacement (it is important to get the pads into the slots on the RTC pistons, we fasten all the removed parts in their places;
After the work has been done, it is necessary to top up the fuel injection system reservoir and bleed the brakes.
Replacing the drum
How to replace the brake master cylinder? All actions are carried out as during its repair. Pump out the hydraulic fluid from the reservoir, disconnect all the pipes from the housing, disconnect the roller itself from the vacuum booster or car body and from the brake pedal. Installation of the master cylinder is carried out in the reverse order. After completing all repairs, you should bleed the brakes. Bleeding is carried out according to the following scheme: rear right and left wheels and then the front ones. After bleeding, the brake pedal height is adjusted.
We also recommend watching videos on the topic:
Source
Replacing the front brake cylinder
The following calipers are installed on the front wheels of VAZ cars:
- in a VAZ classic car, two front brake cylinders (FTC) are attached to the caliper brackets;
- on VAZ 2108-15 models, one PTC is installed on each side of the front axle.
Replacing the front cylinder 2109 is not difficult, it is also easy to do yourself:
- we put the car on a flat area (the work can be done without a pit and a lift), we put tackles under the rear wheels;
- jack up the car, take off the front wheel;
- unscrew the two caliper fasteners with a hexagon;
- loosen the brake hose nut;
- bend the locking washers on the upper and lower bolts, unscrew the cylinder fastenings to the caliper bracket
- we move the PTC to the side along with the bracket;
- disconnect the cylinder from the bracket, then from the hose so that the brake fluid does not leak; after disconnecting the PTC, it is better to immediately direct the hose upward;
we install another, new spare part, and perform the assembly.
How to adjust the gap between the valve and the cylinder block?
- We use a probe with a thickness of 0.15 (mm). It should fit under the valve with a slight tension (neither strong nor weak). If the dipstick falls into the gap or, on the contrary, does not fit, then from this moment the adjustment of the valves on the VAZ 2105 begins.
- We loosen the lower lock nut with one key, and with the second key we turn the valve stroke screw (up or down, depending on the result of checking with the feeler gauge).
- Tighten the locknut without much fanaticism.
- We do a control check with a feeler gauge at 0.15 (mm).
I hope the instructions are clear and understandable.
Related material: Replacing engine oil and oil filter on Lada Priora. Which oil to choose and how often to change
Additional Information
After adjustment, we assemble all the engine elements into place (valve covers, timing belt cover, air filter housing).
We make a test drive and listen to the sound. At this point, independent maintenance of timing valves can be considered successfully completed.
Please note that the VAZ 2105 is a classic of the bygone Soviet automobile industry. The classic line also includes the VAZ 2101, VAZ 2102, VAZ 2103, VAZ 2104 and VAZ 2106. Starting with the VAZ 2107, cars use an injection system for preparing the combustible mixture
That is, seven is no longer a classic. The procedure for adjusting valves 2105, as well as 2101, 2102, 2103, 2104 and 2106, is completely the same. That is, the classics are configured according to the same principle.
Starting with the VAZ 2107, cars use an injection system for preparing the combustible mixture. That is, seven is no longer a classic. The procedure for adjusting valves 2105, as well as 2101, 2102, 2103, 2104 and 2106, is completely the same. That is, the classics are configured according to the same principle.
Starting from the VAZ 2107, you need to configure the timing in a different way. Valve adjustment on the VAZ 2107 is carried out at a more subtle level. Only a properly qualified car mechanic can handle this work. Without solid experience in handling vehicles, it’s better not to go into the timing belt of VAZs, starting with the seven. It’s easier to take the car to the nearest service station.
I hope the article on how to adjust valves on a VAZ 2105 was useful. Have smooth roads and fewer breakdowns.
- Necessary tool
- Signs of poor valve clearance
- Procedure for checking valve clearance
- Adjusting valve clearance
- Video on the topic: Do-it-yourself valve adjustment on a Zhiguli
A feature of VAZ cars belonging to the “Classic” category, namely the VAZ-2101-2107 model, is the use of power plants that are structurally very similar. The engines of these models differ mainly in some technical characteristics. Thanks to this, many perform maintenance and repair work themselves.
For stable operation of the power unit of these cars, periodic adjustment of the valves is required. It is worth noting that this operation for VAZ “Classic” engines is performed by adjusting the gap between the valve drive lever and the camshaft cam. Since this operation is performed in the same way for different models on the Classic, let’s consider the sequence of work using the example of one model - VAZ-2105
The adjustment can be carried out both on a cold engine and on a warm one; for this, a 0.15 or 0.20 mm probe is used, respectively.
But for more precise adjustment of the valves, work must be carried out on a cold engine.
Master cylinder repair
After the master brake cylinder has been removed, it is worth inspecting for mechanical damage; if there is none, you need to disassemble it and replace the failed spare parts with those found in the repair kit. After disassembling the master brake cylinder, in any case, you must change all the rubber parts - cuffs, etc. The principle of disassembly is simple:
- Having previously secured it in a vice, unscrew the fluid supply fittings from the body;
- use a screwdriver to remove the retaining ring;
- Carefully disassemble and remove cuffs, pistons, springs and other spare parts.
Reassembling the brake master cylinder is carried out in the reverse order. Having replaced the spare parts that require replacement: a fitting, a set of cuffs and others with new ones, the question arises: how to check the brake master cylinder after assembly?
For this there is a special stand consisting of the following units:
- Bleeding valves.
- Pressure gauges.
- Absorbing rollers.
- Reservoir with hydraulic fluid.
- Maximum displacement indicator.
- Mechanical flywheel.
- Main roller housing.
DETAILS: Ignition switch VAZ 2110 - its diagram, repair, lubrication and replacement
This stand will help determine whether the assembly was done correctly by hand. After installing the main drum in place, you need to bleed the brake system. If mechanical damage is found on the body, then the master brake cylinder needs to be replaced with a new one.
After dismantling the GTZ, it is necessary to carefully inspect it for fluid leaks. If the rear oil seal is damp or damp, most likely some of the brake fluid has entered the VUT and is corroding its membranes. It is necessary to pump out the liquid from the VUT using a syringe and a thin tube.
To disassemble the GTZ, drain the liquid from it, then carefully clamp it in a vice so that the holes for installing the tank are at the bottom. Remove the locking screws that prevent the pistons from returning too far. Remove the GTZ from the vice and use a puller to remove the retaining ring from the VUT side.
Pull out the first piston and spring. Often the second piston comes out with difficulty, so you have to either knock the gas turbine engine on a wooden block, or plug one of the holes in the far cylinder using a suitable bolt and connect a compressor with a pressure of at least 6 atmospheres to the second hole.
Carefully inspect the inner surface of the GTZ. Any scratches lead to a decrease in braking efficiency and are therefore unacceptable. If scratches are found on the inner surface, the body or the entire GTZ must be replaced. After making sure that the internal surface of the GTZ is not damaged, buy the appropriate repair kit.
Do not confuse the direction of installation of the cuffs. Before assembling the GTZ, wash its body with water and detergents, dry it with compressed air and lubricate it generously with brake fluid. Do not use gasoline or other petroleum products for flushing; if you do not wash them off properly, they will corrode the rubber seals. Reinstall the pistons, tighten the retaining bolts, and insert the rear oil seal and retaining ring.
DETAILS: Anti-roll bar VAZ 2107
Installation and pumping of the gas turbine engine
Perform installation in the same way as dismantling, only in reverse order. After tightening the tube ends, fill in the brake fluid. Now you need to bleed the main brake cylinder. Ask an assistant to press the brake pedal smoothly and all the way 4 times, then press it again and do not let go. Loosen the rear right brake pipe tip to allow brake fluid to flow out from under it. Once fluid and air stop escaping, tighten the tip and have an assistant release the brake pedal. Repeat this procedure 3 – 4 times for each tube.
In half the cases, this approach avoids completely bleeding the brakes. After bleeding, the brake pedal should be very tight. Start the engine and press the brake pedal several times. If it easily pushes through more than 1/6 of the stroke, the brakes need to be fully bled. Drive onto any straight section where you can accelerate and brake without interference. Accelerate to 5 - 10 kilometers per hour and apply the brakes to make sure the brakes work. If everything is fine, accelerate to 30 kilometers per hour, then press the brake pedal sharply and firmly. If the car brakes quickly and without pulling to the sides, you did everything right. If the car pulls to the side, the brakes need to be fully pumped.
Repair of GTZ VAZ 2101
There are two ways to restore the operation of the hydraulic cylinder:
- repair the old mechanism;
- install a new product.
Many car owners, when problems arise with the GTZ, simply replace it with a new one. However, there are those who prefer to save money and install a repair kit, doing the repairs themselves. The cost of such a kit is about 100 rubles.
Removal
To dismantle the mechanism you will need the following list of tools:
- open-end and ring wrenches in sizes 10, 13 and 22 mm;
- wrench for loosening brake pipes;
- small flat-tip screwdriver;
- pliers for retaining rings;
- syringe or medical bulb;
- a lot of rags.
The GTZ is removed in the following order:
- Use a syringe to pump out the liquid from the expansion tank.
- Using a wrench, unscrew the brake pipe fittings from the hydraulic cylinder.
- We remove the fittings from the holes.
- Loosen the clamps and tighten the hoses through which fluid is supplied from the tank.
- Unscrew the GTZ mount to the pedal assembly bracket.
- Remove the cylinder from the studs without making any effort.
Disassembly
To repair the GTZ, we disassemble it as follows:
- Use a screwdriver to tighten the boot, which is located on the flange on the side of the mounting holes.
- We clamp the part in a vice and tear off the plug at the end with a 22 mm wrench.
- Unscrew the locking screws and the plug.
- We remove the mechanism from the vice and use a screwdriver to push the pistons and springs out.
- We wipe the turbocharger and pistons with a clean rag, and then inspect the working surfaces for damage (sinks, traces of wear). If defects are found, replacing the seals will not give any result.
- Using a screwdriver, we pull the cuffs off the pistons. We install new elements in their place.
- After replacing the seals, we assemble and install the master brake cylinder in the reverse order.
Video: replacing the GTZ repair kit on a “classic”
One day I had to change the lip seals on the rear wheel cylinder because fluid started leaking from it. I purchased a repair kit in advance in the hope that the repair would not cause much trouble. Everything would be fine, but when I disassembled the cylinder, removed the old seal and tried to install a new cuff from the repair kit, it simply tore. The element looked more like a product made of fragile rubber. There were 4 seals in the repair kit and all of them turned out to be unsuitable for use. My repair ended with installing the old cuff on the piston, since the nearest store was quite far away. Surprisingly, this brake cylinder still works today without leaking fluid or replacing the seal.
Which cylinder to install if replacing?
To avoid problems during operation, it is better to find the original Togliatti-made GTZ, catalog number 21013505008. But since the VAZ 2107 family of cars has not been produced for a long time, finding this spare part becomes difficult, especially in remote regions. An alternative is products from other manufacturers that have proven themselves well on the Russian market:
- ATE;
- "BelMag";
- "Basalt";
- LPR;
- Fenox.
Judging by the reviews of the owners of the “Seven” on thematic forums, defects most often come across among the products of the Phenox brand. Advice regarding the purchase of original spare parts: do not purchase them in markets and unverified stores; many counterfeits are sold at such points.
Original spare parts for the brake system in original packaging are becoming rare and are often counterfeited.
Defective spare parts were also found during the Soviet era. I remember an incident from childhood when my father took me to drive his first Zhiguli from a car dealership. We covered the 200 km journey all night, because the pads on the rear and front wheels spontaneously compressed and the rims became very hot. The reason was found out later - a defect in the factory master cylinder, which was replaced free of charge at the service station under warranty.
Replacing brake cylinder 2107
If the replacement operation on a VAZ classic is not performed on a car lift, it is more convenient to do the work sequentially - first on one side, then on the other side of the rear wheel. To perform the work, the vehicle must be placed on a level surface, then proceed as follows:
- We turn off the engine, set the car to speed, and put chocks under the front wheels. Don’t forget to fully release the handbrake;
- loosen the wheel nuts of the rear wheel, jack up the car and remove the wheel;
- To prevent the car from going anywhere, it is advisable to place a “tragus” next to the jack;
- remove the brake drum - use a 12 mm combination wrench to unscrew the two guides;
- the drum usually comes off tightly, so it should be tapped from behind with a hammer through a piece of wood. You cannot hit the part with an iron hammer; the drum can split;
- unscrew the brake pipe from behind the cylinder, also 2 ten bolts securing the RTC itself;
pull out the cylinder, freeing it from the pads; We install the part prepared for replacement (it is important to get the pads into the slots on the RTC pistons, we fasten all the removed parts in their places;
After the work has been done, it is necessary to top up the fuel injection system reservoir and bleed the brakes.
How to replace a brake disc on a Kalina with your own hands
You need to check the brake system on your car regularly. The identified wear factors show that you need to replace the brake discs on the Kalina-1 yourself, if you have experience, or from a specialist.
Safe driving depends on the performance of the vehicle's braking system. Brake discs on Kalina are replaced according to the degree of wear. While driving, the brakes do not work, but when the driver presses the pedal, the brake pads are pressed against the disc, braking occurs. Due to friction, wear of the metal product occurs. Defects in it also affect the operation of the car's braking system.
How to check the performance of brake discs
You need to check the brake system on your car regularly. The identified wear factors show that you need to replace the brake discs on the Kalina-1 yourself, if you have experience, or from a specialist.
The brake system of the Lada Kalina car has 2 circuits, they are located diagonally. The front right wheel is connected to the left rear wheel - this is one circuit. The front left wheel is connected to the right rear wheel - this is the second circuit. The design reduces the likelihood of complete failure of the machine's brakes.
The pressure is adjusted by hydraulic drive of the rear wheels. There is a warning light on the dashboard indicating the level of brake fluid in the reservoir. Each circuit consists of mechanisms and devices, valves. Exit from the operating state of one circuit, the second will work. The car will brake, but not as effectively.
Rear brake discs on Lada Kalina
The list of conditions and malfunctions of the car is reflected in clause 1.1 of the rules for operating the car. It has a procedure for checking the brakes. It is indicated that the braking distance should not exceed 12 meters when the car is traveling at a speed of 40 km/h and the brake pedal is pressed once.
- We accelerate the car to a speed of 40 km/h.
- We press the brake, the pedal is completely sunk into the floor, and hold it until the car stops.
- Use a tape measure to measure the braking distance.
- If its length is more than 12 meters, the brake system needs to be inspected and repaired.
- The test is done on one side of the road, and then on the other, to compare the indicators.
We determined that it was necessary to check the brakes, as is done on a Lada Kalina car:
- We put the car in the pit.
- To inspect the pads, you need to remove the front wheels.
- To inspect the left brake unit, turn the steering wheel completely to the left, and to inspect the right unit, turn the steering wheel all the way to the right.
- The movable caliper bracket has an inspection window, through which the brake pads and linings are visible, and we determine their thickness.
The regularity of inspecting the brake system is written in the car's maintenance instructions, but the brakes must be checked before each trip to the track.
The anti-lock braking unit distributes the braking force along the axles of the car, this is important when braking when entering a turn.
When should brake discs be changed?
In the period of time between maintenance, the owner of the car monitors its condition. Replacing the front brake discs with Kalina-1 is done after determining critical wear. Brake discs are replaced in pairs.
There are 3 reasons for replacing the brake disc (brake disc): critical wear of the disc, deformation as a result of overheating, mechanical failure of the disc. TC (brake pad) is the main consumable element in the car braking system. The disk also cannot be eternal; it is erased over a certain period of time.
Worn brake disc
Signs of TD wear based on car behavior:
- the appearance of vibration in the car body and on the steering wheel during braking;
- extraneous noise, grinding, comes from the front pair of wheels;
- The car brakes jerkily.
We inspect the car visually, with the wheel and braking unit removed:
- whether or not there is curvature of the TD;
- deep recesses on the TD;
- whether the disc is cracked or not.
Disk wear usually occurs from prolonged use; it can crumble and collapse at the edges. It can wear out unevenly when TCs are not changed in a timely manner. Metal parts of the brake assembly: pads, calipers, have contact with the brake disc, leaving deep scratches (grooves) on it.
Riding in mountainous areas is characterized by long descents. Maximum brake load. Overheating of the TD is fraught with:
- Deformation of the TD is manifested by vehicle vibrations.
- The operation of the TC, overheating affects the friction coating.
- If the caliper does not work properly, the lubricant loses its viscosity due to heating, and the rubber parts of the caliper fail.
Restoration of working cylinders
The feasibility of replacing the RC cuffs can only be checked during disassembly. If critical wear and other defects are discovered, there is no point in installing new seals. In practice, most drivers change the rear cylinders completely, and only the cuffs in the front calipers. The reason is obvious - the brake mechanisms of the front wheels are much more expensive than the rear wheel brakes.
Characteristic signs of a malfunction of the working cylinder are uneven braking, a decrease in the level in the expansion tank and wet spots on the inside of the hub.
To repair the DC, you will need the above tools, new o-rings and synthetic brake lubricant. The order of work when replacing the front caliper cuffs:
- Raise the desired side of the car with a jack and remove the wheel. Unlock and remove the pins and remove the pads.
- For convenience, turn the steering wheel all the way to the right or left, and use a 14 mm socket to unscrew the bolt that presses the brake circuit hose to the caliper. Plug the hole in the pipe to prevent liquid from leaking out.
It is not necessary to separate the cylinders from the body; this is done more for convenience. To lose a minimum of fluid during disassembly, use the “old-fashioned” trick: instead of the standard expansion tank plug, screw on the clutch reservoir cap, sealed with a plastic bag.
To change the rear brake seals, you will have to thoroughly disassemble the brake mechanism:
- Remove the wheel and rear brake drum by unscrewing the 2 guides with a 12 mm wrench.
If the brake fluid leaked as a result of a malfunction, clean and thoroughly wipe all parts of the brake mechanism before reassembling.
After installation, bleed off some of the liquid along with the air by pumping up the pressure in the circuit with the pedal and loosening the relief fitting. Do not forget to replenish the supply of working substance in the expansion tank.
Video: how to change rear slave cylinder seals
Rear brake repair
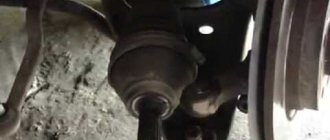
With rear brakes on a penny, everything is not so simple, and the reason for this is the wear of the brake drum. This defect occurs often and it may happen that you install new pads and there are no brakes anyway, because even despite the new pads their thickness is not enough for braking. Accordingly, the handbrake does not hold either.
But the reason for the rear wheels not braking can also be the “sorcerer”, so you need to make sure that it is working.
If the brake cylinder is leaking, then it is necessary to replace the rubber seals; this is not difficult to do; it is not even necessary to remove the cylinder from the car.
Rear brake cylinder
So what should you do with worn brake drums? Another option, and I use it quite often, is to make brake pads with my own hands, namely, rivet pads from a UAZ car onto the VAZ 2101 pads; they are somewhat longer, but the bending fits, and most importantly, they are somewhat thicker than the standard Zhiguli ones.