Prevention methods
Timely diagnostics and maintenance of brake system elements will help to avoid many malfunctions in the car, including situations where the front wheel jams or the rear wheel of the Granta does not spin. Here are some prevention tips:
- monitor the degree of wear of the brake pads and change them if necessary;
- check the condition of the calipers and guide mechanisms; if they are heavily soiled, clean and lubricate them;
- check the level and quality of the brake fluid, add or change completely if necessary;
- check brake lines and cylinders for leaks and defects;
- adjust the parking brake.
Prevention for Lada Granta
You should also bleed the brake system if there is air in it.
Replacement and repair of GTZ - some points
The recommendation for carrying out repair work on this element is simple - it is easier to replace it completely if a banal replacement of rubber seals is not required. The most common reason for incorrect operation of the brake cylinder is leakage of hydraulic fluid, therefore it is necessary to periodically check the joint of the brake cylinder.
In the absence of external mechanical damage, it is necessary to replace worn-out spare parts, making sure to wash the repair parts with isopropyl alcohol. The presence of swollen cuffs may indicate low quality brake fluid, so it is worth changing it too.
The parameters of the pressure regulator are set by the manufacturer, therefore independent adjustment and repair work is prohibited!
The car owner himself decides whether to repair the brake master cylinder personally or contact specialists. However, before drawing conclusions, the cause of the failure should be determined. How to check the brake master cylinder?
- You should pay attention to the instrument readings on the panel. As a rule, they promptly notify about problems that have arisen using indicators.
- When an alarm signal appears, you need to check for fluid leaks.
- Inspect the joints and outlets of each GTZ circuit.
- Check the pressure inside the vehicle.
If the test result reveals the cause of the brake malfunction, then urgent measures must be taken to eliminate it. If you couldn’t find the root cause on your own, but the problem remains, you should seek qualified help. In most cases, it is enough to clean or bleed the turbocharger. Replacing it entirely is provided in case of depressurization of the housing or damage to the piston.
How to replace Grant rear brake pads without ABS
Let's look at the whole process step by step. To work you will need:
- New pads (choose depending on whether the car has ABS or not);
- Keys 13: open-end and ratchet with long head;
- Wheel key;
- Head E-8;
- Head for 7;
- Screwdrivers for removing and installing springs;
- Pliers.
A long 13 socket will be needed if you are going to adjust the handbrake. It is not needed for simple pad replacement.
Delamination and severe wear of the rear pads = the handbrake does not work, noise and the car pulls to the sides when braking.
Preparing to replace pads
Getting ready to remove the brake pads. For this:
- We park the car on a flat surface;
- Remove the handbrake and put it in neutral;
- We support the wheels with wheel chocks (you can use bricks, bars, etc.);
- We pump out the brake fluid to the MIN level - use a syringe or an enema bulb;
- We remove the wheel bolts;
- We hang the rear wheel (jack up the car) and remove it.
We support the wheels, remove the handbrake and wheel. There are Ladas with disc brakes all around. They are often changed as needed, but sometimes re-grooving the brake discs also helps. If you don’t know what to choose, ask a diagnostician for advice.
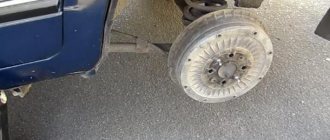
How to remove a brake drum on a Lada Granta
The drum on the Grant is removed like on any other VAZ model. To do this, use a 7 key to unscrew the guide pins and remove the drum.
If the drum is soured and cannot be removed, the same pins can be screwed into adjacent holes as shown in the photo - they are made for mechanical removal of the drum.
Unscrew the pins and remove the drum.
It is not recommended to knock the drum with a mallet or hammer - there is a risk of damaging it.
Replacing pads yourself
Attention: from this moment on, do not press the brake pedal. Otherwise, the brake pistons will extend and removal/installation will be difficult.
Step 1: To loosen the springs, press the pads inward. We press them out with a pry bar, focusing on the brake shield.
Move the brake pads.
Step 2 (based on the picture below) – remove:
- upper spring No. 5;
- expansion bar No. 6;
- lower spring No. 13;
- guide springs No. 7 (available on both pads).
At this stage we need springs 5, 13, 7 and bar 6. Step 3: freely remove the left block. The handbrake lever is attached to the right one - so we pull out the block itself and use pliers to remove the cotter pin securing its finger to the block.
We remove the handbrake lever from the cable, remove the cotter pin and disconnect the handbrake lever from the block.
Step 4: Reassemble with new pads in reverse order.
For ease of assembly: the retaining springs 7 can be put on using a thin wire or wire.
If the new shoes make it difficult to put on the drum, they can also be pressed inward using pry bars.
We change the brake pads of the rear wheels of Lada Granta and Kalina
The degree of wear of the brake pads of the rear wheel is assessed by the condition of the front pad, which wears out faster than the rear one.
14482791
If the lining thickness is less than 1.5 mm, the brake pads of both wheels must be replaced. The pads also need to be replaced if the linings are oily, have deep grooves and chips on them, or if the linings are detached from the base of the pads.
Attention! The brake pads of the rear wheels must be replaced only as a set - all four pads. Replacing the pads of only one brake mechanism can lead to the car pulling to the side when braking.
If the fluid level in the brake hydraulic reservoir is at the MAX mark, then before installing new pads, use a syringe or a rubber bulb to pump out some of the liquid from the reservoir so that when the pistons are recessed into the working cylinder of the brake mechanism, liquid does not flow out from under the reservoir cap. The parking brake lever must be lowered all the way (the car is released). Next, release the parking brake cables as much as possible. To access the parking brake adjustment area, remove the heat shield.
Remove the rubber cushion from the front suspension bracket of the additional muffler. We move the heat shield forward, opening access to the parking brake adjustment unit.
4b3f9dbaa71f5cd7929bfb
We remove the rear wheel and securely fix the car on a factory-made support stand.
If the car is equipped with ABS, then the brake mechanism has some design differences, shown below.
1452838542_122
On a vehicle equipped with ABS, the wheel speed sensor should be disconnected from the brake shield to prevent damage to the sensor.
1452778396_1
1452778400_12
Below, all work is shown on a car without ABS. The differences will be discussed separately.
14pppppppppppp
zzzzzzz
Attention! Do not press the brake pedal after removing the drum, as the pistons may come completely out of the cylinder.
DSC_09
Next, you need to recess the pistons inside the working cylinder. For this…
DSC_9001oooo
DSC_900zh0
DSC_9001zh
DSC_101311111zhzh
IMG_0083zh
IMG_0182zh
IMG_0182zhzh
IMG_0083zhzhzh
DSC_101311111zhzhzh
DSC_90лл00
DSC_8999ll
1452841424_1222
Install the parking brake lever onto the new pad in the reverse order. Install new pads in reverse order. To make it easier to assemble the pressure spring with the block, we hook a wire or cord about 0.5 m long to the hook of the spring.
DSC_9000ll
After replacing the pads on both wheels, the parking brake must be adjusted.
Rotate the adjusting nut clockwise to tighten the cables. It is convenient to adjust the tension of the cables with a high head with a ratchet and an extension. In this case, do not completely unscrew the locknut. Having aligned the edges of the locknut with the edges of the adjusting nut, put on the high head “13” and rotate both nuts at once. Use a locknut to secure the adjusting nut.
The full travel of the parking brake lever should be from 2 to 4 teeth (clicks) of the lever ratchet device. When the lever is lowered, the suspended rear wheels should rotate freely.
Replacing rear pads on a Lada Granta with ABS
Replacing brake pads in Lada Granta drum brakes, it would seem, should not cause any difficulties. Nevertheless, there are cases when inept handling of the brake mechanism ends in damage to the brake drum, friction linings of brake pads or brake cylinder boots. To avoid such disgrace, we will find out the secrets that the Lada Grant with ABS has related to drum brakes.
How to check brake pad wear on a Grant
No one will bother replacing brake pads right away. There are reasons for this, and mileage does not play a major role here. The service life of VAZ pads is quite difficult to predict. The level of wear on the rear drum brake pads greatly depends on the quality of the friction linings and their composition, as well as on the driving style.
First of all, poor performance of the handbrake will indicate wear of the rear pads. When braking under normal conditions, it is difficult to feel the wear of the rear pads, since 75% of the braking force falls on the front wheels.
But Granta has one clue - this is a hatch in the brake shield, closed with a rubber plug. It can be found if you pick up the dirt on the back of the shield.
If you open the hatch, the wear of the front pad will be clearly visible, and the front pad wears out much faster than the rear one.
If you replace the pads on only one side, the car may pull to the side when braking, especially on slippery roads.
Changing brake pads on a Grant with ABS
The process of replacing pads on a Grant with and without ABS differs only in small details. Firstly, a drive disc is installed behind the brake drum. Secondly, there is an ABS sensor installed in the brake shield on the rear side, which will need to be removed. Thirdly, the pads for cars with ABS have technological holes for this sensor.
First of all, you need to release the handbrake cables. If we still have the factory heat protection installed above the muffler, it will have to be removed by unscrewing 4 nuts.
Then we simply unscrew the handbrake tensioner locknut with a 13 mm wrench, and loosen the second nut until it stops.
We get to the brake mechanism. We fix the car with wheel chocks, jack up the right or left rear part, having previously removed the wheel bolts. We remove the wheel.
Using a socket or 7 mm spanner, unscrew the guide pins that secure the drum to the hub.
How to remove a brake drum on a Grant
To remove the brake drum without any problems, we use the civilized “impactless” method. We look carefully at the brake drum holes, located at the same diameter as the guide holes. They are diametrically opposite and have threads cut into them.
In order to remove the drum from the hub without effort and a hammer, we screw two bolts 50-60 mm long with the same threads as on the guide pins into these holes.
We screw the bolts evenly, 15.-2 turns on each side.
As a result, the drum will overcome the resistance of the pads even if a groove has formed on the working surface, and will be removed like clockwork.
Now the entire brake mechanism is within reach. First of all, we remove the master disk; nothing else holds it.
How to spot an upcoming problem
It is necessary to pay attention to any deviations that go beyond the normal operation of the brake mechanisms. It is necessary to immediately check the condition of the brakes if there are any of the following signs:
- whistling, squeaking or grinding of brakes when braking;
- skidding or pulling the car to the side when braking;
- braking of one wheel when the brake pedal is released (this can occur even with adjusted wheel alignment and the same pressure in all tires);
- insufficient braking efficiency;
- brake pedal travel is too long;
- hum or howl from the front or rear suspension.
Order of Operations
Before the procedure for replacing brake pads on a Lada Granta car, you need to perform a number of preparatory measures:
- check the brake fluid level and pump out excess;
- fix the wheels;
- loosen the bolts on the wheel rims;
- jack up the car;
- Turn the car's steering wheel in the direction where the pad is being replaced.
After these steps, you can proceed directly to the repair:
- You need to find a plate with a bend that locks the cylinder fixing bolt. Use pliers to push the edges apart until the fasteners are accessible.
The guide pin is fixed.
The cylinder fixing bolt must be completely unscrewed and removed along with the plate.
Now you need to open the bracket, this opens the pads.
- Old devices are removed, and all dirt must be thoroughly cleaned from the seats using brushes and rags.
- After cleaning the seat, you can begin installing new parts. First you need to push the piston completely into the cylinder, otherwise it is impossible to install the bracket. The operation is performed using a powerful screwdriver or pliers.
Read more: What winter tires to put on Lanos
Further operations will be performed in reverse order. The procedure is carried out similarly with the second front wheel. Before you begin, you need to reinstall the jack and turn the steering wheel towards the wheel on which the work is being done. After replacement, you need to check the brake fluid level in the barrel and top up if necessary.
Also watch replacing the front brake pads on a Lada Granta in this video:
Important! After replacement, you need to bleed the brakes. To do this, a beam or other device is installed under the rear wheels to tightly fix the wheels.
Then the car starts and the brake pedal is worked.
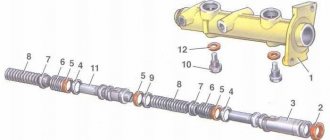
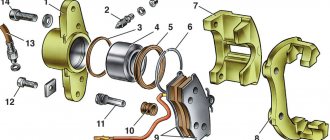
How does the GTZ function?
The unit consists of the following parts:
- metal housing with holes for supplying brake fluid, pedal rod and connecting the expansion tank;
- 2 pistons with rubber seals;
- 2 return springs;
- guide bushings;
- end plug with gasket.
An expansion tank is attached to the top of the main distributor body, where excess fluid goes through compensation holes. Inside, the element is divided into 2 cylinders with separate pistons standing on the same axis.
The blind end of the housing is closed with a threaded plug; on the other side there is a flange for attaching to the vacuum booster. The brake pedal rod is attached to the first piston. The brake circuit pipes are connected to the lower holes - separately for the front and rear wheels.
The operating principle of the master brake cylinder looks like this:
- When you press the pedal, both pistons simultaneously move forward and push fluid into the circuit tubes. Under its pressure, the wheel cylinders are activated, compressing the pads on the discs.
- Part of the liquid that does not have time to pass into the tubes flows into the expansion tank through special bypass holes.
- When the driver releases the pedal, the springs push the pistons back, returning them to their original position. Liquid from the tubes and reservoir refills the cylinders.
- To compensate for the expansion of the liquid (for example, from heating), another pair of holes is provided leading to the expansion tank.
Downloading a book
After successfully completing the payment (by any method) and returning to the KrutilVertel store from the payment system website, you will be taken to the successful payment page:
The book you purchased will be in your personal account, from where you can always download it.
Please note that after making the payment, you need to return back from the payment system website to the KrutilVertel website. If for some reason you did not return back to the site and closed the payment system tab with a message about the successful completion of the payment, please let us know - we will send you a letter indicating access to download the book
If for some reason you did not return back to the site and closed the payment system tab with a message about the successful completion of the payment, please let us know - we will send you a letter indicating access to download the book.
Why does the wheel jam?
A situation where the rear wheel jams on a Lada Grant can occur suddenly while driving and lead to an emergency on the road. Let's look at a few of the main reasons why a wheel (both rear and front) can get stuck, and find out how to fix this problem.
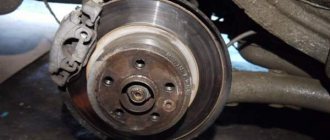
The piston of the working brake cylinder has soured
The rear wheel brake mechanism on the Lada Grant is a drum type with a two-piston wheel cylinder. When you press the brake pedal, the pistons move out of the cylinder and press the brake pads against the walls of the drum. Under the influence of moisture, street dirt, and friction dust, the wheel cylinder pistons can rust and sour. If the piston does not return to the cylinder, the brake pads remain pressed against the drum, the wheel jams and stops spinning.
Broken rear brake cylinder
The front brakes on the Grant are disc with a single-piston floating caliper, consisting of a caliper and a cylinder. If there are problems with the rotation of the front wheel, then the cause may also be a soured piston.
The pads are skewed
Another common reason for the rear wheel to jam on a Lada Grant is severe wear of the brake pad friction lining. If a worn pad is not replaced in time, the lining may physically collapse, its fragments scattering inside the drum and jamming the wheel. Also, misalignment of the brake pads can be caused by jamming of the pistons of the working cylinder.
Wheel bearing jammed
Bearings are used in the design of the chassis of any car. The wheel is attached to a hub, inside of which there is a wheel bearing, which ensures easy rotation of the wheel. Due to heavy loads, the bearing may collapse and jam, causing the wheel to stop rotating.
Characteristics and manufacturers
On VAZ cars, the rear brake cylinder is a device containing 2 pistons inside. The body itself is made of metal. But sometimes it cracks. Most often due to marriage. Today there are several original manufacturers of these elements:
- "Craft".
- "Basalt".
Among foreign ones it is necessary to note:
How much do VAZ rear brake cylinders cost? The price of a new element ranges from 300 to 500 rubles. The most expensive is a vacuum booster. Its cost varies from 1.5 to 2 thousand rubles for domestic cars.
How to replace brake pipes on a VAZ 2110-VAZ 2112?
Note! There are 8 brake pipes in total on cars of the tenth family, as well as on cars of the Lada Samara and others, the most difficult thing to change is the main pipes, because they are not convenient to install and additional removal of other parts will be necessary, but the easiest way to change the pipes is in the front, nothing complicated This one doesn't and won't take a lot of time, unlike the back!
Removal: 1. Removal is not difficult, but you still have to prepare to replace the pipes, start from the very first, this is pumping out the brake fluid from the brake reservoir, you can pump it out from there using a rubber bulb or honey. syringe (This fluid cannot be reused, just fill in a new one), sometimes people manage to change the tubes without draining the brake fluid from the system at all, this is not difficult to do, then you just need to pump the brakes a little and that’s it, but that’s if one tube changes, if that’s all, then it’s better to drain the liquid, so there will be less hemorrhoids, and the whole point is the following: when you disconnect the tube (Depending on what you disconnected it from), the other ends of the elements are plugged with something (If you disconnected the tube from the GTZ, then the hole is closed with a plug of some kind be it from the brake hose, then the end of the hose is closed with a bolt of a suitable diameter or something else), so the tube is changed without draining the brake fluid from the system.
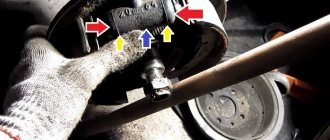
2. Both the front brake pipes and the rear ones are all changed identically, they have fittings at the ends, and the fittings have nuts, using special tools. key, they turn away and the tubes are disconnected, for more details on how to disconnect the tube from the hose, read the article entitled: “Replacing the brake hose on a VAZ”, in this article everything is described in detail, how the tubes from the Brake Master Cylinder are disconnected from the sorcerer, there is no point in telling we don’t see it at all, because everything is the same, the fitting nut is unscrewed (Indicated by the red arrow) and the tube is disconnected, everything is easy and simple.
3. And finally, let’s disassemble the brake main pipes, they are the longest and run under the bottom of the car (Go from the GTZ to the sorcerer), to remove them, you will need to disconnect them from all ends at the beginning, then unscrew the three nuts that secure the protection (see photo 1) and remove the plates, which are made of metal (one of them is indicated by a red arrow in photo 2), and remove the tubes from all the holders, replace those holders that will be deformed with new ones.
Installation: The tubes are installed in the reverse order, they are usually made of aluminum alloy, so they break easily, but they bend well, and the tubes will have to be adjusted 100%, when adjusting, do everything carefully, do not bend the tubes too much and do not break them, otherwise you will have to carry out the entire operation from the very beginning, to replace it.
Note! Upon completion of the operation, pour fluid into the brake reservoir and bleed the entire system (How to bleed the brakes, read the article: “Bleeding the brakes on a car”), otherwise there will be no brakes, after bleeding, press the brake pedal with great force, and another person (Assistant) let us look under the car to see if anything is leaking, if everything is tight, only after that you can operate the car!
Additional video clip: Brake pipes on most cars are replaced in a similar way; good tips for replacing pipes, using the example of a Volkswagen car, are given in the video below, be sure to study it.
Note! If you want to see with your own eyes how the tubes are changed, in this case, watch another video, which is also located below:
Failures are rare in the brake system of a VAZ 2110 car, but when they occur, repairs are required immediately, since safety depends on the proper operation of this unit. This material describes the replacement of brake pipes and the rear cylinder - these parts are rarely repaired, since they are easier and cheaper to replace with new ones. To work, you will need a set of new hoses and tubes, as well as a cylinder.
Replacement
To do this, we need a jack, a balloon, a hammer and a set of wrenches (if it’s a VAZ, then two for 10 and 12). First we put the car in gear. The handbrake cannot be used as it uses our cylinders. Next we remove the bolts on the rear wheel. Raise the car on a jack. Remove the wheel and unscrew the bolts on the drum using a 12mm wrench. We take the last one out. If it has become stuck, you can “stir” it with blows of a hammer. In order not to damage the drum (since such actions can crack it), we use a wooden block as a lining. After that, remove the pads and use a 10mm wrench to unscrew the brake hoses.
Be careful - when dismantling, liquid will flow from them. Wear rubber gloves. To prevent the liquid from splashing on the floor, prepare a container (for example, a plastic bottle). To remove the rear cylinder, use the same wrench to unscrew the two mounting bolts. At this stage, dismantling is complete. Now we fasten the new part into place. Installation is in the reverse order. After assembling the system, be sure to bleed the brakes. This operation is also performed when replacing pads and any elements of the system, be it a tube or a vacuum booster.
What to do if a wheel gets stuck on the highway and you don’t have tools or spare parts at hand?
If the rear wheel jams during a long trip, there is no garage or car service nearby, there is nowhere to buy spare parts, and you did not take the tools with you, then even this situation will find a way out. You can take the following actions if the rear wheel of the Granta is stuck:
- Create a load on the rear axle. To do this, you need to put three adult passengers in the back seat, start the engine and quickly move away. You can make several attempts, as a result the brake pads will separate from the brake disc.
- Rock the car back and forth. This can help if the rear wheel of the Granta is stuck due to the parking brake.
- You can simply call a tow truck and drive to a car service center, where professionals will certainly be able to solve your problem.
If there is a problem with the rotation of the front wheel, we can advise the following:
Clean the brake discs and calipers from dirt and try to mechanically press the brake pads off the discs. Another way is to disconnect the brake hose and put a plug on it made from scrap material. In this case, the wheel will rotate, but will not brake
You need to drive extremely carefully and have your brakes repaired at a service station as soon as possible.
In conclusion, we note that the information presented in the article applies not only to the Lada Granta, but also to the Lada Kalina, since the brake systems and components of these models are identical.
Replacing front brake pads on Lada Kalina
If you press the brake pedal hard, and your Lada Kalina (VAZ 1118) stops slowly, or when you press the brake you hear an extraneous sound, it means that the front brake pads on Kalina need to be replaced. Worn pads and brake discs are indicated by pounding of the brake pedal during heavy braking. Another sign of pad wear is the presence of a red coating on the brake discs from metal dust from the brake mechanisms. You can learn more about methods for diagnosing brake pads in the article “When to change the front brake pads?” On average, it is believed that replacing brake pads on Kalina is necessary every 40,000 kilometers of the car, taking into account the driving style. But this value is approximate, since there are a number of factors that can significantly shorten this period. So how to change brake pads on a Lada Kalina with your own hands? Before starting repairs, place the car on a flat surface and place wheel chocks or bricks under the front and rear wheels.
Pay attention to the hydraulic brake reservoir - if it is on about, then you need to pump out some of the fluid with a rubber bulb or syringe. This is necessary to ensure that fluid does not flow out of the reservoir when the piston is inserted into the working cylinder of the brake mechanism. Take the wheel wrench and remove the wheel bolts.
There is no need to unscrew them completely. Raise one side of the car with a jack. After this, unscrew the wheel mounting bolts completely and remove it
Take the wheel wrench and remove the wheel bolts. There is no need to unscrew them completely. Raise one side of the car with a jack. After this, unscrew the wheel mounting bolts completely and remove it.
It is better to place the removed wheel under the car, especially on the road. In this case, if the jack breaks, the car will fall on the wheel. Otherwise, the car will fall on the brake disc, which can be seriously damaged.
To make it easier to replace the pads, turn the steering wheel all the way in the direction you will be working. Bend back the locking washers with pliers or hammer to loosen them.
Take keys No. 13 and No. 17 and unscrew the caliper guide.
Move the brake cylinder piston inward. At the same time, make sure that the piston moves smoothly, without jamming or wedging. If the piston does not move when you apply force, the caliper will most likely need to be repaired or replaced.
Then completely remove the two guide bolts. Lift the caliper and compress the brake pad piston.
Carefully inspect all brake mechanisms.
- The brake cylinder and piston guide boots must not be torn or swollen.
- The brake hose must not contain any traces of cuts or cracks up to the reinforcement layer. In addition, the brake hose should not have any leaks or fogging.
- The brake disc must be worn evenly, and its thickness must not be less than the permissible value determined by the manufacturer
If any of the mechanisms has the above defects, it should be replaced.
Remove the brake pads. Clean the guides on which the pads fit from scale and rust. If you don't do this, you simply won't be able to put on the new pads. It’s better to do this with a brush, but if you don’t have one at hand, you can use a screwdriver.
Before installing new brake pads, try to recess the piston into the cylinder as deeply as possible. After which you can install new pads.
Check that the ferro-braking element of the pads is in contact with the brake disc. Insert the upper guide into place, slide the brake cylinder into the lower guide and tighten it.
Thanks for subscribing!
Turn the brake disc - it should rotate freely. If the disc jams, then most likely the reason is that you did not clean the pad guides well enough. The reason could also be the factory paint on the pads themselves. In this case, it must be cleaned with a file. Tighten the locking nuts back.
Level the steering wheel. Replace the wheel and tighten the bolts. The bolts should be tightened crosswise. Lower the jack almost all the way so that the wheel is on the ground, and tighten the wheel bolts. Now lower the jack completely.
Use the same procedure to replace the pads on the other wheel.
After replacing the pads, be sure to return to the car and press the brake pedal several times. You need to ensure that the pedal stops falling. Check the brake fluid level in the reservoir under the hood. If the pedal continues to fall, you should look for a brake fluid leak.
Ready!
Replacing the front wheel brake hose
Remove the front wheel and securely fix the car on the support stand. Turn the steering wheel all the way in the direction on which the hose is removed.
We remove the hose coupling from the shock absorber strut holder.
Holding the upper tip of the hose with a 15mm wrench, use a special 10mm wrench to unscrew the brake pipe fitting.
We remove the hose tip from the hole in the body bracket.
To prevent brake fluid from leaking, place a rubber cap on the brake pipe to bleed the brake mechanism.
Using a 15 wrench, unscrew the lower tip of the hose from the cylinder.
The connection between the lower tip of the hose and the cylinder is sealed with a copper washer
Install the hose in reverse order.
The hose must not be twisted during installation.
To control the twisting of the hose, there are two yellow lines on it.
After installing the hose, we bleed the hydraulic drive of the brake system.
How to fix a car
What actions should you take if the rear wheel of the Granta is stuck? Having found out the cause of the malfunction, you need to repair the failed vehicle component as soon as possible.
Cylinder replacement
If the cause of wheel jamming is soured pistons of the working brake cylinder, then the cylinder must be replaced. It is impractical to repair it, since often when cleaning the pistons, the seal of the cylinder is broken, and brake fluid begins to flow out through the pistons.
Reinstalling the pads
If the wear is severe, the brake pads can warp, move, or even break. To prevent the wheel from jamming due to worn pads, you need to promptly change them to new ones in accordance with the regulations.
Reinstallation of Lada Granta pads
The pads can only be replaced as a set on both rear wheels at the same time. It is unacceptable to change the pads on only one wheel or only one faulty pad out of two, as this can lead to uneven braking and skidding of the car.
Bearing replacement
If the rear wheel of the Granta is jammed due to a broken wheel bearing, then the problem can only be eliminated by replacing it. When replacing a wheel bearing yourself, difficulties may arise, since you need to dismantle the hub, press out the broken bearing and press a new one in its place. It is better to do such repairs at a car service center.
What to do if you can’t remove the brake drum
Having discovered that the rear wheel of the Granta was jamming, you decided to do the diagnostics and repairs yourself, removed the wheel, and suddenly a new obstacle arose in front of you: the brake drum was tightly stuck to the hub. There are several solutions to this problem:
- There are two threaded holes on the face of the brake drum. Bolts are screwed into these holes, which separate the drum from the hub. But often this method does not help due to thread stripping.
- The second way is to beat the drum using a hammer or sledgehammer and a wooden block. You cannot hit the drum directly with a hammer, as chips will appear on its edges, or it will crack altogether. The correct way is to tap the drum from the inside through a wooden block around its entire circumference.
- If it was not possible to remove the drum with a hammer, then you need to heat the area where the drum adjoins the hub with a torch, blowtorch or hair dryer. When heated, the metal expands and the two stuck together parts are easily separated.
- You can also remove a stuck drum using a three-legged puller. You can buy it at a car store or make it yourself.
Symptoms of problems
The fluid brake system consists of many parts that can become unusable: pipes, wheel cylinders, calipers, drums and pads. Typical signs of a faulty master cylinder:
- After pressing the pedal, the car stops slowly. The reason is that the cuffs of one or two pistons have lost their tightness - they have cracked or “floated”.
- To slow down, you need to press the brake pedal hard. The phenomenon occurs due to swelling of the rubber of the piston seals.
- The brake pedal travel is too short. The fluid inside the cylinder has nowhere to go because the compensation hole is clogged. Another option is that the passage is blocked by a swollen rubber seal.
- A common symptom is pedal failure, the brakes coming on at the end of the stroke. This indicates complete wear of the cuffs; as a result, liquid penetrates behind the piston and rushes into the expansion tank - the cylinder “bypasses.”
- The pads do not release the brake discs and drums and get very hot when driving. Options: one of the pistons is jammed or the bypass hole is clogged.
The listed symptoms of a GTZ malfunction are similar to malfunctions of other elements. Pedal failure also occurs when a large amount of air enters the tubes or loss of fluid in one of the working cylinders. Sluggish deceleration and increased force on the pedal are often caused by a breakdown of the vacuum booster - a cracked membrane or a lack of tightness at the joints of the hose that takes off engine vacuum.
There are signs that clearly indicate the performance of the main hydraulic cylinder and the malfunction of other elements:
- during braking, the car pulls to the side - the problem lies in a certain circuit or wheel;
- jamming of the brake mechanisms of one wheel;
- creaking and squeaking when braking;
- heating the discs and pads on one wheel.
If you eliminate these symptoms, it will become easier to check the brake master cylinder in a garage. This also includes obvious brake fluid leaks and the knocking sound of worn calipers.
Preparatory operations
Preparation for removing the pads is as follows:
- The car is placed on a flat surface.
- The handbrake is removed and the gear is set to neutral.
- Stops are placed under the wheels to prevent them from rolling back. If there are no special elements for this, ordinary bricks or solid wooden blocks will do.
- The brake fluid is pumped out to a minimum level; this can be done with a special pump or an ordinary syringe.
- The bolts securing the wheel are loosened.
- The car is raised on a jack installed under the corresponding wheel, after which it is dismantled.
How to replace the rear brake cylinder on a VAZ 2113-VAZ 2115?
Note! If you decide to save a little money and repair the brake cylinder, then we do not recommend that you do this, firstly, you will need special tools for this, and secondly, a new one does not cost that much money and it is not a fact that you have a repaired brake cylinder It won't jam after a while, so it's best to buy a new one and replace it with the old one!
Removal: 1) First, you will need to remove the brake drum from the car and also the wheel at the same time, then the pads must be removed and you can proceed to replacing the cylinder itself, if you do not know how to do this or you know how but simply do not remember the principle of removal and installation, then in this case, study the article entitled: “Replacing rear brake pads on a car” in which we described everything in detail.
2) Now, with the same brush that you were supposed to use to clean the drum from dirt, clean the back of the brake drum shield, namely in the place where the brake cylinder mounting bolts are located and where the brake pipe is located, if you have WD-type fluid. 40 then apply it to the back of the shield.
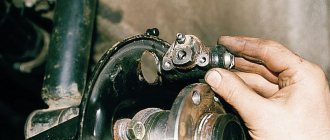
3) Then unscrew the nut that secures the brake pipe with a wrench, after unscrewing, disconnect the pipe and be prepared for brake fluid to flow out of it, so that a lot of fluid does not leak out, be sure to close the pipe with something (For example, you can remove the cap from the bleeder fitting, as shown in the small photo, the location of this cap is also shown so you know, with a blue arrow).
4) Finally, holding the brake cylinder with your hand, unscrew the two bolts that secure it and then remove it completely from the car and replace it with a new brake wheel cylinder.
Installation: Installation is carried out in the reverse order of removal, but you will only need to bleed the brakes after installation; for information on how to do this, read the article entitled: “Bleeding the brake system on a car.”
Additional video: Below we have attached a video in which a person explains in detail how you can remove the slave cylinder from a car and in which places you need to apply WD-40 to make it easier to remove.
The rear brake cylinder is responsible for effectively braking your car. Therefore, you need to check its operation from time to time. Your safety on the road depends on it. It is located under the rear wheel drum. To gain access to it, you need to remove the wheel and pull out the drum.
Selecting a brake cylinder.
Today there are a huge number of manufacturers of spare parts for cars. And it’s easy to get confused when choosing quality spare parts. In order to make a choice, you can read reviews on the Internet. We also read and came to certain conclusions. The most reliable brake cylinder is considered to be the ATE cylinder. The cylinder is also not inferior to it. You can also look at Kraft products.
How to determine a faulty brake cylinder.
The first sign of a problem in the brake system will be a brake fluid leak. You can also evaluate the condition of the cylinders when replacing the rear pads. Usually the rubber bands in the brake cylinders break and the pistons become sour. Of course, they can be repaired, but it is much easier to replace them with new ones, since they are not expensive. In stores you can find cylinders for around 400 rubles.
Replacing the rear brake cylinder.
- The first step is to remove the brake drum.
- Raise the handbrake all the way.
- Remove the cap from the bleeder fitting and use a size 8 wrench to completely unscrew it.
- Lubricate the fitting with grease.
- Loosen the brake pipe fitting.
- We finally unscrew the fitting.
- Unscrew the 2 bolts securing the working cylinder.
- Place the fitting cap on the tube to prevent brake fluid from leaking out.
- Remove the brake cylinder from the shield.
- Before installation, we clean everything from rust and dirt and degrease the working surfaces.
- Reinstall the brake cylinder in reverse order.
- Reinstall the brake drum.
- We bleed the brake system and check everything for leaks.
Video on replacing the brake cylinder:
Symptoms of a problem
How to determine that an element requires replacement? First of all, a breakdown can be detected by the level of hydraulic fluid, which has begun to disappear in the master cylinder reservoir. The latter is located under the hood, near the vacuum brake booster. It is worth noting that when the pedal is operated, the liquid always decreases from the reservoir. But as soon as you release it, the pistons will return to their original position and the level will resume. If this does not happen, look for the problem.
Leaks can also come from the cylinder itself. In this case, the rear drum will be wet. Well, the last sign is the behavior of the car when braking. The pedal begins to “grab” at the very end, sometimes you have to press several times to create the required pressure. These signs indicate that the car needs to replace the rear brake cylinder. Don't put off repairs until later - it's for your safety.