At night, most drivers rarely turn on the light bulbs inside the car. But when they don't work, operating the car becomes uncomfortable. Getting into the car is complicated, especially for passengers.
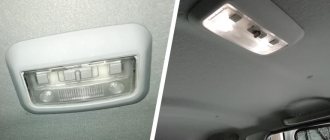
The VAZ 2109 has interior lighting in the form of two sources. The first beam lamp is located at the front of the headliner. The small round lamp can be moved to suit the desired area.
A lampshade with a rectangular diffuser is designed for general illumination of the entire cabin. It is also located on the ceiling, closer to the center, more precisely, above the space between the backs of the front seats. In addition, when the doors are opened, small lights come on, and each device has individual lighting.
Exterior lighting, brake and reverse lights, interior and trunk lighting of VAZ-2109
Interior lighting is represented by two sources.
One of them has a directional beam and is located in the front area of the headliner. The lampshade is small and round. It is under constant voltage. It can be adjusted and adjusted to the required zone. The second lamp is intended for general lighting. Its lampshade has a rectangular diffuser and is also under continuous voltage. It is located on the ceiling, in the middle between the two front seats. When the doors are opened, small lamps come on. Each device in the car is equipped with individual lighting.
Additional lighting
You can decorate the interior beautifully with LEDs and make your car original, even on simple car models. For VAZ 21209 and VAZ 21093, interior lighting is often supplemented with footwell lighting. When opening the door, the power of the BSK light bulbs is not enough to illuminate the driver's seat in the area where the feet are located. The central lamp provides diffused light, but the steering wheel and front panel create shadows. Any accidentally dropped object will create inconvenience when landing in the dark.
Based on the location of the wiring, plus it is most convenient to connect from the cigarette lighter. The minus is taken from the BSK at the outlet to the interior light on the driver's door. Then the backlight will turn on when the front left door is opened. The directional light can be placed near the floor anywhere and create additional light for any passenger at the time of boarding.
A more complex option, when the connection is completely tied to the interior lighting. In this case, the negative wire is laid from the interior lamp, and the footwell lighting also works in the forced-on mode of the ceiling lamp.
Modern LED bulbs allow you to create various options for interior lighting tuning. You can make multi-colored indicators on devices or create panel illumination at any connection point. Passengers will be amazed when you turn on the many spotlights in the headliner. Due to their large number, weak light sources will ensure good visibility inside the car.
When creating unusual lighting, you must have certain knowledge and skills in installing DC electrical circuits. It is most convenient to connect to the wiring system from the junction under the trim to the left of the driver’s feet in front of the door.
Delivery by transport company (cash on delivery, no prepayment)
Advantages:
- the cost of delivery of heavy and large-sized orders is much cheaper than that of Russian Post;
- There are practically no restrictions on the weight and dimensions of cargo;
- There is a wooden crate service - this is an additional guarantee of the integrity of the order.
Disadvantages: unfortunately, there are branches only in cities.
The estimated cost of delivery for an order up to 30 kg is 450 rubles.
List of transport companies with which we cooperate:
- TC "PEK" (cash on delivery service available);
- TC "Business Lines";
- TC "Energia";
- TC "KASHALOT" (KIT) (cash on delivery service available);
- TC "SDEK" (cash on delivery service available);
- TC "DPD";
- TC "ZhelDorExpedition";
- TC "VOZOVOZ";
- TC "Baikal-Service".
To send your order by transport company:
- Place an order in our online store by phone or on the website (registration is not necessary);
- After we receive it, our manager will contact you by phone to clarify the cost, delivery time and your wishes. Next, we will pack your order carefully and then send it to you;
- You will receive a shipment tracking number from us via SMS or email (if available). You can monitor the status of the order coming to you using our tracking service, as well as independently, on the transport company’s website using the track number. After the order reaches your locality and the manager of the transport company contacts you, you need to receive the order at their office or order home delivery;
- Upon receipt from the transport company, you pay the cost of delivery and order.
The cost of delivery is calculated based on the volume, weight of the selected product and the distance from the city of Tolyatti.
To send an order you must:
- indicate full name recipient;
- Your locality and region;
- series, number of passport or driver's license;
- Your phone number (contact).
TC "Business Lines" - Urgent delivery of goods from 1 kg throughout Russia. The exact cost can be found on the official website of the delivery service - https://www.dellin.ru TC "PEK" - Guaranteed safety of cargo for the entire duration of cargo transportation, clear information support, delivery of goods throughout almost the entire territory of Russia, Belarus and Kazakhstan in optimal time and accurately calculated cost of services. The exact cost can be found on the official website of the delivery service https://pecom.ru/ru/calc TC "SDEK" - Low tariffs compared to foreign courier companies, while the quality of the services provided meets modern international logistics requirements. Developed network of own representative offices. The exact cost can be found on the official website of the delivery service https://www.cdek.ru/calculator.html TC “ZhelDorExpedition” - Serves only large cities and towns. The exact cost can be found on the official website of the delivery service - https://www.jde.ru/branch TC "Energia" - Cargo transportation in Russia, the CIS and China. The exact cost can be found on the official website of the delivery service https://nrg-tk.ru TC "KASHALOT" (KIT) - Delivery of cargo from 1 kg to 20 tons throughout Russia and Kazakhstan. The exact cost can be found on the official website of the delivery service https://tk-kit.ru/calculate TC "Baikal-Service" - Transportation and delivery of groupage cargo by road in Russia. The exact cost can be found on the official website of the delivery service https://www.baikalsr.ru TC “DPD” - Transportation and delivery of groupage cargo by road in Russia. The exact cost can be found on the official website of the delivery service https://www.dpd.ru TC "VOZOVOZ" - Transportation of groupage cargo by regular delivery routes between Russian cities. The exact cost can be found on the official website of the delivery service https://vozovoz.ru
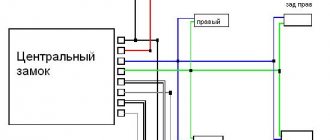
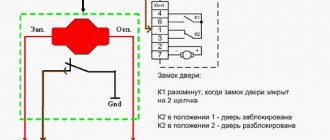
Diagram of the mounting fuse block for VAZ 2109, 2108, 21099 (block 17.3722)
In the diagram: (the outer number in the designation of the wire tip is the number of the block, and the inner number is the conventional number of the plug)
K1 — rear window washer time relay; K2 - relay-interrupter for direction indicators and hazard warning lights; KZ - windshield wiper relay; K4 - relay for monitoring the health of the lamps (contact jumpers are shown inside, which are installed instead of the relay); K5 - headlight high beam relay; K6 - relay for turning on headlight wipers; K7 — power window relay; K8 - horn relay; K9 - relay for switching on the electric motor of the engine cooling fan; K10 — relay for turning on the heated rear window; K11 - relay for low beam headlights.
Bulb
The principle of triggering the light elements in the cabin is simple. There are limit switches on the body pillars on all sides.
When the door is opened, this small part causes the contact to open, which gives a signal to turn on the lighting. When you open the door on 2114, only the main lamp turns on. Frequent opening of the door and constant activation of the light bulb leads to its gradual wear.
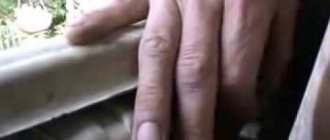
As soon as the life of the light bulb runs out, it burns out. You can check the integrity of the light bulb yourself. It is enough to lift the plastic cover of the main light source and the insides of the illuminator will be before your eyes.
The standard lamp option is AVS Vegas 12V. If desired, instead of a standard incandescent light bulb, you can introduce LED elements. The photo above shows just this option.
The driver's light has a slightly different form of light bulb with a socket - r5w with a power of 5 Watts.
It's a little more difficult to change. It is necessary to use a screwdriver to pry off the body of the fisheye, and then remove the wire block. Next, press the latches on both sides of the case and remove the base r5w .
If after the replacement procedure the interior lighting of the VAZ 2114 does not work, check the wiring.
Dismantling lighting
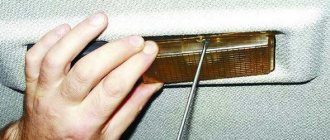
The diffuser is held on the base of the housing by a spring latch. Place the end of a flat-head screwdriver under the lampshade in the center and press lightly, removing the latch. After this, pull down and remove the glass cover from the lamp. Care must be taken to preserve the appearance of the lamp parts. Experienced specialists recommend placing a piece of cloth or paper on the end of the diffuser where you work with a screwdriver.
The light bulb can be removed and checked. Further dismantling is done using a Phillips screwdriver, the bolts that hold the plate and secure the base of the lampshade to the ceiling are unscrewed.
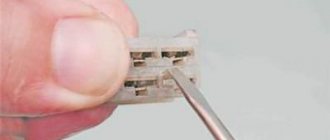
The four wires you disconnect should be labeled. Two of them are mass, and the obligatory “+” and “-”. When disconnecting wires, mark them so that there are no problems during assembly. If the new light is on, you don’t have to disassemble it any further.
The directional light canopy is removed in the same way, pryed off with a flat screwdriver and removed from the socket in the ceiling trim. Then mark the wires and disconnect them. Initially, all contacts are marked during assembly at the factory, but often when working in a cramped and poorly lit interior, the markings are difficult to see.
Technical characteristics of VAZ 2109 (Lada)
Initially, the “nine” used the following series of 4-cylinder in-line gasoline engines - 1.1 liters, 1.3 liters and 1.5 liters, which found its correspondence in the designation of the car models - 21091, 2109 and 21093.
The one and a half liter engine appeared in the Lada engine compartment a year late, but this nominal displacement was destined to become the main one. In 1994, it was modified to install a fuel injection system with distributed injection. The modern engine had a very difficult time taking root at first. Only in 1998, experiments with it ended, it acquired a look and characteristics suitable for mass production, displacing its carburetor counterparts from the automotive scene, slightly changing the official name of the model - VAZ 21093i.
Photo VAZ 2109 - side view
Photo Lada 2109 - rear view
Steering wheel and its tuning
All experts and professionals believe that the safest is the stock steering wheel of the vehicle. It is this wheel that was developed by the manufacturer and it is this wheel that has passed the necessary tests in accordance with the design of the car. As a last resort, it is recommended to replace the steering wheel with a wheel from the same manufacturer, a newer model. In particular, comfortable and “grippy” steering wheels from the VAZ 2115, etc. are perfect for the VAZ 2109. On the other hand, if the owner wants more, then you can always purchase any “steering wheel” on the market, both from a renowned manufacturer and a steering wheel handicraft wheel.
What can be changed in the electrical circuit
Let's figure out what exactly car owners undergo alterations.
Moreover, we will indicate only those alterations that are not prohibited by the manufacturer and current regulations:
- Installation of a new instrument panel;
- Alteration of internal (interior) lighting;
- Installation of additional turn signal indicators in the rear view mirrors;
- Installation of additional headlights (fog lights);
- Installation of an acoustic and multimedia system;
- Immobilizer installation.
For reference: the visual differences between the standard panel and the “high” one are that the radio compartment is moved to the level of the dashboard. Accordingly, the wiring on the VAZ 2109 under the instrument panel must be replaced.
Interior modifications
Many owners come to mind with the desire to improve the lighting in the car interior.
Let us remind you that inside a passenger vehicle there are several places equipped with lighting sources:
- The salon itself (interior lighting);
- Glovebox;
- Cigarette lighter;
- Instrument panel (instrument cluster lamp and symbol lamp)
If you, as the owner, like a high panel in the cabin, then you cannot do without replacing the standard wiring. Because the:
- Control devices have a different location on the panel;
- The standard length of wires is not enough;
- Terminal blocks may also differ.
Accordingly, without replacing the electrical wires it will not be possible to use:
- instrumentation;
- on/off buttons for various devices.
As for making changes to the instrument panel lighting, today there are sets of special lamps on sale along with the wiring with which they are connected to the car’s electrical network.
You can install such kits yourself; it is only important to adhere to accuracy and safety rules.
Advice: carry out all electrical wiring replacements and connecting instrumentation only with the battery disconnected.
Attention
Any instructions for working with electrical appliances state that repairs must begin by turning off the power. Disconnect the battery and turn off the power. A small amount of voltage in a lighting circuit is not life-threatening, but if it accidentally shorts out, you can get a serious electric shock. You can find any repair and maintenance operations in the video, but they assume that you know the rules for handling electrical equipment.
Faulty light bulb
The most common reason for the failure of interior lighting fixtures. Remove the bulb and check it with a tester or other method. If it burns, then look further for the cause of the breakdown by dismantling the lamp. When assembling the lampshade, you can put in an old lamp, only it has served for quite a long time, and its resource has been exhausted, so it is better to replace it immediately, then you will not have to remove the diffuser again soon.
Circuit breakers
It is easy to check the operation of the fuses. The wire goes through the interior lighting to the stops, so it is enough to make sure that when you press the brake the signals on the rear lights come on. If there is no contact, then the box is located under the hood on the right and there is a diagram on it indicating the location of each fuse. Unscrew the bolts and remove the cover. The replacement will take a few seconds. Just in case, you should have a 7.5A fuse in stock, since in case of any short circuit in the interior and trunk lighting, dimensions and turns, it is this that burns out.
Connections are broken
If the interior lighting of a VAZ 2109 does not light up, then the cause may be bad contacts. For example, when forced on, the general interior lighting turns on, but when the door is opened, it does not. Remove the diffuser and bend the copper plate to which there is a thin pin from the door wire.
In most cases, this is not enough and the copper strip will not make a reliable contact. Then wind a thin wire where it touches the pin, or place a rubber ring under the plate. This will ensure reliable contact. Be sure to turn off the power.
Broken wire
After dismantling the lamp, use a tester to check the integrity of the wires. This breakdown requires complex repairs, so you can’t do it yourself. Contact specialized salons. The price of services often corresponds to the quality of work; it is not worth saving. When choosing a service station, pay attention to the guarantee that the craftsmen give for their work and the conclusion of the contract.
If you are confident in your abilities, then there are photos of the car’s electrical circuit on the Internet, since you will not find it in the technical documentation.
Door lighting
When entering the car, the door lights turn on along with the ceiling light. If this does not happen, then they have one fault. The negative wire goes to the ceiling lamp through the BSK LED. If wires break, fuses burn out, and contact switches fail, the interior may not be illuminated. In this case, you need to start not by dismantling the interior lighting bulb, but by checking the contacts and wires that go to the door lighting.
When the BSK light bulbs work normally, and testing showed a break in the negative wire on the lampshade, this only happened in the gap from the door to the lampshade. You can fix such a breakdown yourself, since only one core needs to be replaced, without disturbing the circuit. First, make sure the contacts work, clean them. Test the wire itself. Don't forget to turn off the power to the system.
When replacing any wire, select the same color of the insulating coating. This will help you or the auto electrician at the service station quickly figure it out in the event of a serious breakdown.
Contacts are oxidized
Contacts require constant attention and periodic cleaning to remove dirt deposits and the formation of a film of chemical compounds when interacting with oxygen. The junctions of various metals oxidize most quickly. Copper is resistant to the formation of an oxide film, so it can work for a long time without prevention.
Climate control unit
How to use climate control? It's simple, you just need to know the purpose of the buttons. The main difference between the control units of cars with air conditioning and climate control is the presence of the AUTO button (20) on cars with climate control. This button is designed to automatically regulate air flow directions to more quickly achieve and maintain the selected temperature.
8 — adjustment of the stove blowing speed
9 - temperature adjustment in 1 degree steps
BACKLIGHT DOESN'T WORK
In cases where the light in the interior of a VAZ 2114 does not turn on, drivers who do not understand the electrical equipment of the car and its repair immediately begin to go to the Internet and try to find some advice or a solution to the problem there. But, no matter how strange it may be, you can fix the interior lighting of a VAZ 2114 yourself, you only need a minimum of tools for this and a detailed action plan, which we will analyze today.
INITIAL CHECK
It is better to start repairs by checking the functionality of a specific lamp - perhaps the light bulb has simply burned out and will simply need to be replaced. If the light in the interior of the VAZ 2114 does not go out or, on the contrary, does not turn on when the doors are opened, then you need to check the door switches for functionality, you need to see if the contacts are in order, if they have oxidized, then it is better to clean them and wipe them with alcohol.
There are also certain nuances if there are LEDs. Typically, drivers prefer to replace conventional lamps with LEDs as quickly as possible, this is due to the following factors:
- Cost-effective;
- Longer service life;
- Light brightness is much higher at low cost.
But when operating such lamps, it is necessary that the electrical circuit be fully taken into account, since for LED lamps it is important that the polarity be observed.
So you need to check the plus and minus, and if so, turn the light bulb the other way and see if it lights up after that. In any case, it is better to convert the lampshade of the individual lighting of the VAZ 2114 to LED lamps so that it produces more brightness.
Also, on all light bulbs you need to check the voltage at the contacts and find out whether current is flowing there. If it is not there, then you will have to look for a broken wire somewhere in the wiring. This will require disassembling certain parts of the car, but there is no getting around it - if the interior lighting of the VAZ 2114 no longer works, then it needs to be repaired. The greatest attention still needs to be paid to the limit switches; often the problem with breaking the circuit lies precisely in them; a wire can easily break there, and you won’t even notice it.
The VAZ “nine”, despite its advanced age, is still popular to this day. There are many car owners who speak negatively about this car, but there are also those who like the model. The car is especially popular among young people and novice motorists. The affordable price allows you not only to purchase this car, but also to carry out various modifications. Tuning can affect both the exterior and the interior of the VAZ 2109. It is worthwhile to dwell on interior modifications in more detail, because it is in the cabin that the owner and passengers spend most of the time.
Improved instrument panel lighting
The standard lighting of the instrument panel of the VAZ “Nine” does not suit everyone, since the yellow glow is not only dim, but also does not give the tidy any expressiveness. To correct the situation, you have to resort to replacing standard lighting elements with modern LED ones. To upgrade the instrument cluster you need to prepare:
- diode strip of the desired glow color;
- soldering iron;
- wires;
- light bulb base;
- hot glue gun.
Direct modification consists of the following steps:
- Remove the shield from the torpedo.
- Disconnect the sockets with the light bulbs and remove the board, after which the glass with the visor is removed. To do this, press the corresponding latches.
Free holes for the base must be sealed to prevent dust from entering.
Video: installing an LED strip in the instrument panel of a VAZ 2109
Refinement of instrument cluster scales
In addition to the lighting in the instrument panel, you can replace the scales, which will make the instrument more modern and readable. For tuning this unit, today a wide selection of linings are offered, which provide all the installation holes. After purchasing the overlays, you can begin upgrading:
- Remove the shield, and then the glass itself.
- Carefully remove the instrument arrows.
If the new scale is designed for clearance, then an LED element can be installed on each device, which will significantly transform the panel.
Dashboard upgrade
Often, interior tuning affects the dashboard, since the standard product does not have a very attractive appearance. Leather is mainly used to finish the panels. It is quite difficult to do quality work with your own hands. Therefore, it is better to entrust the reupholstery to professionals. The essence of modernization comes down to the following actions:
- The panel is modified if necessary, for example, for the installation of any buttons or additional devices.
- Patterns are made using the frame, after which the elements are sewn together.
Sometimes owners of "nines" install panels from other cars, for example, from a BMW E30 or Opel Astra.
This procedure is not easy, since choosing the size and then adjusting the torpedo to its location is not easy. In addition, you will have to completely redo the mount. When installing a different panel, the instrument panel must also be replaced.
Interior reupholstery
Interior tuning is not complete without reupholstering interior elements. Factory-made plastic and fabric in the decoration do not evoke any emotions, they look gray and ordinary. Those car owners who want to add some zest and improve the interior decoration resort to replacing standard ones and using modern finishing materials. Among the most popular are:
- leather;
- Alcantara;
- eco leather;
- velours;
- carpet;
- vinyl.
Door panels
One of the elements that cannot be ignored is door cards. Typically, the “nine” panels are trimmed with fabric or made entirely of plastic.
To improve the elements, you need to select the desired finishing material and prepare the tools:
- scissors;
- knife;
- marker;
- glue "Moment";
- screwdriver.
After the preparatory activities, perform the following steps:
- The panel is removed from the doors and the fabric insert is removed.
Noise insulation
An increase in the level of comfort, one way or another, is associated with a decrease in the level of vibrations and noise that enter the cabin from the outside from the wheels, engine, wind, etc. To carry out high-quality vibration and noise insulation, the entire body from the inside, i.e. the roof, is treated , doors, floor, trunk, engine shield. Today, the choice of materials for the purposes under consideration is quite wide, but from all the variety the following items can be distinguished:
- Vibroplast;
- Vizomat;
- Bitoplast;
- Splen;
- foam.
The following list of tools will be needed:
- construction hair dryer;
- cutter;
- roller
To begin work, it is necessary to completely disassemble the car interior, that is, remove the seats, front panel and all finishing materials. The old sound insulation is removed, the body in places of corrosion is cleaned and primed.
Motor baffle
It is recommended to start soundproofing with the engine shield:
- The surface is degreased with a rag soaked in solvent.
- Lay a layer of Vibroplast. The material is best applied in two layers, warming it with a hairdryer for better styling.
Floor and arches
In continuation of vibration and noise insulation, the bottom of the cabin is treated:
- Apply a layer of vibration-proofing material to the bottom and two layers to the arches. In places with an uneven surface, it is necessary to use a spatula.
Video: noise reduction of the “nine” interior
Roof
When treating a roof, Vibroplast is applied between the crossbars, for which the material is cut into pieces of the required size. Splen is applied over the vibration isolation, securing it with double-sided tape.
Doors
Although noise insulation on VAZ 2109 doors is present from the factory, it is in minimal quantities and there is no particular use from it. Doors are processed as follows:
- The outer part of the door is covered with Visomat.
Plastic elements
Interior elements made of plastic should also be treated with sound insulation:
- Dismantle all parts and linings.
- The part of the torpedo that touches the body is treated with 4 mm thick foam.
- The lower part of the dashboard, as well as the shelf of the storage compartment, the space for the speakers and the side panels of the panel are covered with Vizomat and Bitoplast.
- The visor of the instrument panel is treated with Visomat.
- To prevent metallic rattling of the latches, they are coated with sealant.
- The central panel is treated with the same materials as the torpedo.
- The inside of the glove box lid is covered with Vizomat, and the carpet is fixed underneath with double-sided tape.
- After all procedures, the salon is reassembled in the reverse order.
Sound insulation and cladding
After the dashboard has been tuned, it’s time to start soundproofing the interior. So:
- We dismantle all interior elements and standard trim.
- We cover all the necessary surfaces with sheets of vibroplast (how to carry out high-quality sound insulation is described in detail in the article “VAZ 2109 interior sound insulation”).
Note. Typically it takes about 14 pieces of insulating material measuring 0.6 x 0.9 meters.
- After soundproofing, we trim the interior.
- First of all, we change the covering on the ceiling (professionals advise gluing it twice, leaving an interval of 5 minutes).
Note. When upholstering the interior, it is imperative to take into account the color scheme and do not forget to glue the doors, dashboard, area next to the gearbox and other parts of the car.