Tailgate - removal and installation
Recommendation: To remove the door, you can unscrew the bolts that secure the hinges to it (access to the bolts is difficult, but you can unscrew them with a spanner).
However, the door will have to be held suspended, with the risk of dropping it, damaging the paintwork of the body. It will be even more difficult to tighten the bolts when installing the door. Therefore, the work should be done by disconnecting the hinges from the body (as shown below). To complete the work, you will need an assistant, as well as a piece of thin steel wire about 1.5 m long.
Removal
3. On the connecting blocks of the wiring harness laid in the door, mark the color of the insulation of each wire connected to it.
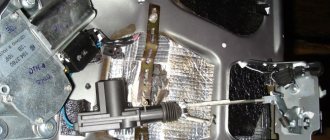
4. Disconnect the wiring harness block from the windshield wiper gear motor block (see “Rear window wiper - removal and installation”). In the block that supplies voltage to the gear motor block, use a slotted screwdriver with a thin blade or an awl to tighten the locking tendrils of the wire tips. Disconnect the wires from the block.
5. In a similar way, remove from the block the tip of the wire that supplies power to the additional brake signal (see “Spoiler - removal and installation”).
7. Disconnect the wire of the door glass heating element (see “Tailgate glass - removal and installation”).
8. Pull the wires out of the tailgate.
9. Inside the car, after removing the decorative trim, use a 17 mm
Unscrew the upper seat belt mounting bolt.
Warning! Be careful not to lose the spacer located under the bolt.
10. Using a Phillips screwdriver, unscrew the two self-tapping screws securing the rear pillar trim.
11. Release the trim from under the glass seal and move the upper part of the trim away from the pillar. We remove the trim on the other side of the car in the same way.
12. Remove the rear handrail trim. Use a Phillips screwdriver to unscrew the rear handrail fastening screw.
13. Remove the handrail support plate.
14. Similarly, disconnect the rear fastening of the handrail on the opposite side of the ceiling.
15. Using a puller or a slotted screwdriver, remove the clamps of the three holders of the rear part of the headliner.
16. Take out the holders.
18. We move the edges of the upholstery out from under the glass seal and move the back part of the upholstery away from the ceiling at a distance of 5-7 cm.
Warning! To avoid bending the headliner, do not apply force.
19. Under the headliner with a 10 mm
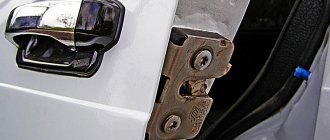
Using a ratchet, unscrew two nuts securing the door hinges to the car body and remove the tailgate.
Warning! One of the nuts on the left loop secures the tip of the “mass” wires. When installing the door, do not forget to connect them!
10 mm socket wrench
Unscrew two bolts securing the hinges to the door frame and remove the hinges.
Where to buy body parts (parts) for foreign cars in Rostov-on-Don?
You can now purchase original spare parts and carry out body work in Rostov-on-Don not only on favorable terms, but also of the required quality. This is exactly what most car enthusiasts dream of, a competent balance of price and quality. Craftsmen advise purchasing the necessary parts based on the required parameters, and not because of the low price. After all, many modern breakdowns occur precisely because of the use of low-quality goods. So, if you need to purchase body parts for foreign cars, you should first of all determine the parameters and price limit, and only then start purchasing the goods. From us you can purchase body hardware and parts for VAZ 2106, VAZ 2109, Niva Chevrolet, Gili Emgrand, GAZ 2705, Hyundai Accent, VAZ 2108, VAZ 2110, Niva Chevrolet, Citroen, Kia, Renault and others.
vote
Article rating
Installation
1. Before installing the door, pass a wire bent into a loop through the left side of its frame. We take the end of the loop out of the hole for the wiring harness.
2. Install the hinges on the door.
3. Install the door into the body opening. Having placed the tip of the “mass” wires on the stud of the left loop, we tighten the nuts securing the loops (without tightening them).
5. Close the door and make sure that its position in the opening is correct and that the gaps are even around its perimeter.
Tip: The design of the hinge fastening does not provide for adjusting the position of the door, so if the door in the opening is crooked, contact a service station (you may need the help of a tinsmith).
6. Tighten the hinge fastening nuts and install the lock retainer.
7. Using a wire, we pull the wiring harness through the door frame.
8. Using a slotted screwdriver with a thin blade, thread the outer end of the protective tube of the wiring harness into the door hole.
9. We put connecting blocks on the ends of the wires in accordance with the markings made and connect the blocks to the windshield wiper and the additional brake signal.
10. We fasten the headliner with holders.
11. Install the rear pillar linings and secure them with self-tapping screws.
12. Use a slotted screwdriver to straighten the edges of the side window seals (the edges of the seals should be located on top of the trim and headliner).
13. Check the functionality of the windshield wiper and additional brake signal.
14. After making sure that the windshield wiper and additional brake signal are working, install the tailgate trim (see “Tailgate trim - removal and installation”).
How to adjust the trunk lock on a VAZ 2112, 2110, 2111
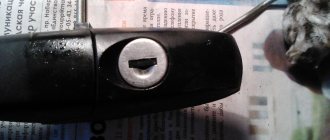
- Loosen the lock nuts.
- Remove the protection cover from the lock.
- Move the lock in the required direction and tighten the screws.
- Now we check whether the lock can be easily slammed.
- If necessary, the adjustment process can be repeated again. But if the lock closes well, tighten the fastening bolts.
If the lock on the body does not fit into the lock on the lid when closing, then loosen the bolts securing it and move it in the required direction, after which we tighten the bolts back.
Basic faults
The main trunk problems that the owner of a VAZ car may encounter include:
- inability to close the trunk - the reason for this is most often the misalignment of the guides or the locking platform;
- inability to lock the trunk - the reason for this, as a rule, is the bursting of the lock mate, made of silumin;
- the appearance of cracks - can occur either due to skewed fasteners or due to damage to the door frame itself;
- the appearance of squeaks during opening/closing - occurs, most often, due to wear of the seal.
To eliminate them, you need to dismantle the trunk and replace worn elements (and in some cases, for example, with a general misalignment, a simple door adjustment is sufficient - we will tell you how to adjust the trunk on a VAZ 2114 at the end of the article).
Description
Tailgate on VAZ 2109
Main characteristics: The fiberglass tailgate on the VAZ 2109 is made on the basis of glass mat and polyester resin. Geometric parameters and fastenings are similar to factory ones.
A fiberglass door for MOTORSPORTS contains a minimum amount of composite materials; therefore, the front surface does not have sufficient rigidity compared to the original (metal) door.
The weight of a fiberglass door for MOTORSPORTS is 3 kg (the intended purpose of the doors is motorsport only, use with a safety cage and buckets with developed lateral support!)
The maximum amount of composite materials is placed in the fiberglass door for TUNING; therefore, the front surface has sufficient rigidity comparable to the rigidity of the original (metal) door.
The weight of a fiberglass door for TUNING is 8-9 kg. (for everyday use)
Replacing the cover yourself
To remove the trunk door you will need:
- knob;
- set of socket heads;
- slotted screwdriver;
- set of open-end wrenches.
Before starting work, you should disconnect the ground terminal (negative) from the battery in order to eliminate the possibility of a short circuit.
Replacement procedure
The replacement of the VAZ 2114 trunk lid itself is carried out in the following order:
- Open the tailgate and secure it with a suitable size prop.
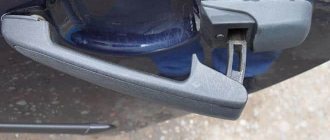
- Using a flat-head screwdriver, pry the mounting location of the upper hinge of the gas-filled stop, press it inside the trunk and disconnect it.
When disconnecting the wiring harness connectors that go to the trunk, be sure to mark them with colored markers or electrical tape to avoid possible problems when connecting them.
After the trunk door is removed, you should carefully inspect the condition of its hinges - if they or their fastening elements are skewed or have cracks, then they should be replaced.
It is produced as follows:
- Remove the gaskets from both hinges.
Reassembly and installation of the tailgate is carried out in exactly the same order as disassembly, but in reverse order.
Popularity of VAZ cars
In addition, the production produces vehicle kits for assembling Lada cars, as well as their modifications, based on orders from other manufacturers. The main branch and production facilities of the company are still located in Tolyatti.
Many cars produced by the automaker became a real hit of the Soviet automobile industry. For example, such a powerful version of the Zhiguli as the VAZ-2103 became one of the most prestigious cars in the USSR. And the VAZ Niva generally became a sensation in the global automobile market.
However, despite the numerous advantages of VAZ cars, these cars also break down. Especially when you consider that people still use cars of this brand that were produced decades ago. And, apparently, for a long time they will overcome the numerous potholes and holes of their native roads.
Possible malfunctions of brands of this company, in principle, correspond to similar problems of other cars. And we will be happy to offer you car repair work for such brands of the VAZ automobile concern as
- 2101,
- 2103,
- 2102,
- 2106,
- 2107,
- and other models of both Soviet and modern production (for example, Lada Kalina, Lada Priora, etc.).
Adjusting the trunk lid
Having talked about how to replace a door with your own hands, we’ll also tell you how to adjust the trunk lid on a VAZ 2114 after installing it.
To do this you will need:
- in the closed state, outline the approximate location of the symmetrical location of the lock and its latch;
- loosen the fasteners, and then fix the lock and its counterpart in the new position (you should not tighten the fasteners “to the fullest” - it is enough only for the lock parts to maintain their position);
- check the functionality of the trunk - if it opens and closes, unlocks and locks without problems, then you should finally fix the position of the lock, but if difficulties arise or a misalignment is observed, the fasteners should be loosened and the position of the lock and latch should be adjusted, and then repeat the check.
Thus, almost every driver can independently repair or replace the trunk lid of a VAZ 2114. The most important thing is not to put off this event “for later”, because when the first signs of distortion or difficulties when locking appear, you can get by with simply adjusting the lock, whereas if the latch bursts, the entire device will need to be replaced.
Preparatory operations
First you need to provide your workplace with the necessary equipment. This will be an affordable set that will include:
- open-end wrenches;
- Phillips and ordinary screwdriver;
- extension for the socket wrench and the wrench itself;
- cleaning material;
- marker or felt-tip pen;
- two bars to support the lid.
Rearranging the tailgate of a car is an operation associated with physical effort and precision installation, so you need to find an assistant for the job. Inaccurate installation will lead to problems with the locking mechanism and excessive noise effects when driving.
The best option would be to replace the unit in a specialized workshop that has all the necessary tools and the skill to perform the operation. In addition, during installation, specialists will replace all necessary fasteners, and the door will be installed securely.
When replacing a door with your own hands, you need to study the sequence of the operation. In this case, you should familiarize yourself with the materials on motorist websites on the Internet. Various resources provide photos and videos with a detailed description of the work.
It is also necessary to know that even slight deformation of the removed components and parts can cause difficulties when installing in the reverse order. Therefore, it is necessary to have a repair kit in stock.