Replacing the CV joint and boot on a VAZ-2109 - what is needed for this and how the replacement is carried out
Hello, dear car enthusiasts!
Greetings to all car enthusiasts, happy owners of the VAZ “Nine”! With the start of VAZ's production of eighth and ninth series vehicles, a change in priorities occurred on the domestic passenger car market. The rear-wheel drive “classics” now have worthy competitors, whose chances of getting higher positions in the sales rankings increase every day.
A more modern design, an economical and dynamic engine and, of course, front-wheel drive, became the distinctive features that allowed the new models to become the object of dreams of thousands of car enthusiasts.
The new car required car service technicians and their owners to gain knowledge and completely new skills in repairing components that were not found on previous models. One of the most mysterious parts that is often a dead end is the VAZ 2109 CV joint.
CV joint 2109 – the basis of front-wheel drive
Thanks to the fact that the front wheels became the drive wheels, the “Nine” gained excellent maneuverability and significantly reduced fuel consumption. For all good things, sooner or later you have to pay.
The ability for the front wheels to be driven was given by a special device - CV joint 2109. Constant velocity joint - this is how the mysterious set of letters is deciphered.
Internal CV joints of the VAZ 2109 transmit rotation from the gearbox to the axles, at opposite ends of which external CV joints are installed. They are the ones who spin the wheel and allow it to turn.
The importance of CV joints cannot be underestimated. In this regard, it is important to constantly take care of their condition.
Constant operation of a car requires, in relation to CV joints, the implementation of several simple rules, namely:
- periodically inspect the condition of the CV joint boots and internal lubrication;
- immediately replace the VAZ 2109 CV joint boot if it is damaged;
- If such signs as impacts or “crunching” of the CV joint appear, the CV joint must be immediately replaced with a VAZ 2109.
What is needed to independently replace the CV joint on a VAZ 2109?
In order for the repair work to go smoothly, you need to be properly prepared. It should be noted right away that it is only at first glance that replacing the VAZ 2109 CV joint boot or the hinge itself (both external and internal) seems like a difficult undertaking.
Having carried out the procedure of replacing the CV joint or boot once, any car enthusiast will be able to repeat everything, as they say, with his eyes closed.
Preparation for CV joint repair includes the following steps:
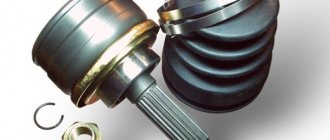
- purchasing a new CV joint, boot, lubricant, clamps and other accessories, which, as a rule, are included in one repair kit;
- the car is installed on an overpass or inspection hole, but in addition, a jack and “goats” should be prepared for the safety of the repair work being carried out;
- You should have a set of standard tools on hand, including: socket wrenches with extended handles or attachments, a hammer, brass or wooden spacers.
You need to start by putting the car on the parking brake and fixing the rear wheels with stops. After the hub nuts and wheel bolts are loosened, the front of the car is raised and placed on racks so that the wheels are suspended.
The wheel must be removed, as well as unscrew the hub nut and remove the lock washer. The preparation ends by unscrewing the two bolts securing the lower ball joint to the steering knuckle.
How is the outer CV joint of a VAZ 2109 replaced?
Before we begin describing the repair process, we note that regardless of whether it is necessary to replace one CV joint or both, and also how many boots need to be replaced, the shaft with two CV joints must be removed.
First, let's look at how to do this. Having turned the hub using the steering wheel, using gentle blows through the spacer, knock out the axle shaft of the outer CV joint from the splined joint of the hub.
Then, using a pry bar, you can remove the inner CV joint. All. The shaft with CV joints is ready for repair. If CV joints are removed from both sides at once, it is strongly recommended to insert old hinges into the gearbox mounting sockets so that the gears do not move.
For convenience, the shaft is clamped in a vice. Now you can remove or cut off the old boots and lightly hit the CV joint body with a hammer to remove it.
A similar algorithm of actions will always be used if it is necessary to replace the CV joint boot or the hinge itself.
If one CV joint is being repaired (changed), you should never be too lazy to disassemble, wash and re-lubricate the second one. It is better to change the anthers at the same time.
The shaft is installed in the reverse order.
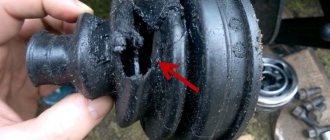
Reasons for replacing the boot
The service life of CV joints can be reduced very quickly due to damaged boots. Dirt and dust that gets inside the “grenade” act as an abrasive.
And since the hinge elements are heavily loaded and are constantly in contact with each other, the trapped dirt very quickly damages them and the “grenade” fails.
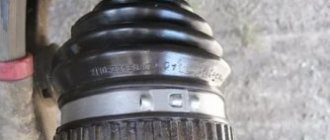
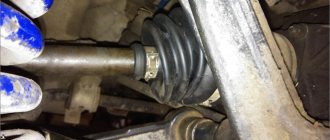
Even if you do not check the condition of the boot, the hinge itself will signal that it is damaged.
For example, as shown in the photo below, the CV joint turned.
When making turns, the CV joint with dirt trapped in it will begin to crack loudly. If the damage is not quickly repaired, the “grenade” will soon simply disintegrate and will have to be completely replaced.
But replacing a CV joint will cost much more than a boot. Therefore, upon discovering damage to the boot, or hearing a cracking sound from the CV joint, it is better to immediately begin troubleshooting the problem.
And such a malfunction is eliminated by replacing the boot, washing the CV joint and adding new lubricant to it.
Next, we will consider the sequence of actions for replacing the external CV joint boot of front-wheel drive VAZs using model 2199 as an example.
Similar work is carried out on the VAZ 2110, 2114 models, so we hope that the owners of these cars will not have any problems after reading the article.
We choose the outer boot because it is damaged much more often than the inner one, since it is located near the wheel hub and the impact on it is more intense, therefore the chance of a crack appearing on it is greater.
The process of replacing a CV joint on a VAZ 2109
Often, owners of domestic cars are faced with the need to replace the CV joint on a VAZ 2109, since the safety of those in the cabin directly depends on its functioning.
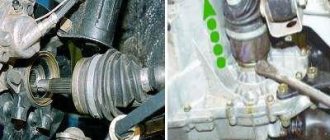
CV joint is an abbreviation that stands for constant velocity joint. The part must be replaced if there is any suspicion of a malfunction. For example, while driving a car you can hear noise from the front wheel drive. In this case, the first thing to check is the CV joint boots, which may be torn, have cracks or traces of grease. To check, just turn the steering wheel all the way in any direction and look behind the wheel.
If damage is found, it is necessary to change the dust cover so that grains of sand, water, stones and the like do not get into the CV joint, which will certainly render the joint unusable. Also, when the car turns into turns, a characteristic tapping sound may appear, which indicates a malfunction of the hinges themselves. To verify the need to replace them, check for the presence of play, which will require rocking the drive shaft.
Basic procedure
First of all, you should put the car on the parking brake and secure the rear wheels with blocks. After this, while the car is on the ground, the hub nut is loosened. You will first need to remove the protective cap. It should also be taken into account that this nut is tightened quite tightly, so you will have to make a significant effort. At this point you can loosen the wheel bolts.
Next, you need to raise the front of the car by placing the body on supports. After this, you can unscrew the wheel bolts completely, removing the wheels, and remove the hub nut stop washer. The next step is to disassemble the steering rod, or rather its tip. The fastening bolts of the lower part of the steering knuckle support are screwed together, after which it is necessary to turn the steering wheel in the direction from which the replacement is being made until the extreme position is reached.
Next, the spitz end of the outer CV joint of the VAZ 2109 is pulled out from the hub, after the steering knuckle and strut have been pulled out. The next step is to press out the inner CV joint secured in the gearbox, for which it is better to use a pry bar.
It is important to pay attention to the fact that if it is necessary to carry out work on all CV joints, it is recommended that after removing one drive, install a retainer in the box, which can be an old similar part of the inner CV joint. Otherwise, the gears will shift, making it impossible to install the CV joints in place.
If traces of oil were observed in the area of the gearbox during operation of the vehicle, then the seals on the CV joints will also need to be changed. Next, you need to clamp the drive shaft with a vice, remove the clamps from the hinges and unscrew the boots if they are intact. It is enough to cut off torn anthers with a knife.
The CV joints are knocked off the shaft with a hammer and drift, with the main forces being applied to the hinge cage. The same is done for the outer CV joint.
If you only need to replace the boots, the joint should be washed with gasoline to get rid of old grease and traces of dirt. The new boot is placed on the shaft, but it is important to keep in mind that the right shaft is longer than the left. In addition, it is better to immediately replace the lubricant in the CV joint, making sure there is enough of it.
Shall we get started?
- Before replacing the mechanism, you need to drain all the oil from the gearbox. Let's not touch the jack yet! You need to place a brick under the rear wheel of the car, after this procedure we take the 30 socket and, accordingly, loosen the nut. Don't be alarmed, you may need about a half meter long piece of pipe half a meter long as a lever. Remember, we only need to loosen the nut, not remove it yet!
- Everything worked out? Go ahead! We lift the car with a jack, and only now completely remove the hub nut along with the washer. Now you can safely remove the wheel from the hub.
- Take the 13mm head and remove the two bolts that secure the ball to the hub. After this, we move the hub and remove the outer grenade from it. Then we attach a pry bar to the internal grenade and, using hammer blows, knock it out of the gearbox. By the way, if you still don’t have a pry bar at hand, a piece of pipe can replace it.
- When the grenade is removed, we clamp its shaft in a vice.
- We remove the clamps from the unusable boot. After that, we shoot down the outer grenade. Attention! In order not to damage it, you need to hit it along the edge. When this operation is completed, remove all old grease from the mechanism, wash it in gasoline or kerosene and wipe it well again, this way you can better remove traces of grease.
- Now we put a new boot on the drive shaft, and using a hammer we hammer the outer CV joint back, after thoroughly lubricating all the parts of the product. After that, we put it on and tighten it with a collar.
- Then we insert the grenade into the gearbox, driving it there. We place it in the hub and return the ball to its place. We put on the hub nut.
Attention! The hub nut does not need to be tightened with great force. After installing the wheels, tighten the bolts without applying much physical force.
- We remove the car from the jack, place a brick under the front wheel and tighten the nuts tightly.
- Well, now pour oil into the gearbox.
That's all. Congratulations! Replacing the boot on the VAZ-2109 is complete!
Source: ladaautos.ru
Replacing the VAZ 2109 CV joint and checking it
Replacing the VAZ 2109 CV joint is necessary only in cases of damage, and their presence can be determined by characteristic signs. For example, if you begin to hear an incomprehensible crunching sound when turning, you can judge that there is a problem with the drive.
Of course, it is worth diagnosing the entire suspension. The fact is that knocks and crunches may not be due to grenades, but due to ball joints and rod ends. Even the steering rack can make such unpleasant sounds. Therefore, before starting expensive repairs (the price of a set of external CV joints will be about 2000 rubles - for the left and right sides), carry out diagnostics.
How to determine faulty CV joints on a VAZ 2109
It is advisable to conduct a full examination, but there is no specific method that will help make a final diagnosis. It is better to use several methods, only all of them together can identify breakdowns. Replacing the CV joint on a VAZ 2109 is necessary if there is a crunching sound when turning. This indicates that there is large play in the outer hinge.
When reversing, this unpleasant sound will bother you. Don't think that there is nothing wrong with this. This can all result in the joint jamming, which will lead to loss of control of the VAZ 2109. Frankly, the comfort when driving the car is deteriorating. When performing diagnostics, inspect all suspension components in parallel, namely:
- Front wheel bearings.
- Shock absorber boots.
- Ball joints and boots on them.
- Tie rod ends (and boots).
- Anthers of internal garnets.
As a rule, it is the outer pair of CV joints that fail; the inner one suffers much less during vehicle operation. The fact is that the load on the external ones is greater, their angle of rotation is more significant, which cannot be said about the internal ones.
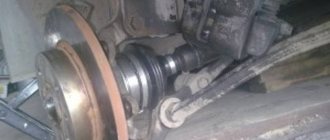
It is most convenient to carry out diagnostics on a pit or a lift, while the entire suspension should be suspended so that no loads are applied to it. However, replacing the outer CV joint of a VAZ 2109 should be carried out on a car that is in exactly this position.
Drive disassembly
First of all, you will need to remove the drive (in fact, the left and right ones are removed in the same way, the only difference is their length). The connection between the external CV joint of the VAZ 2109 and the hub is made using splines, a ring and a nut. Internal - using a special ring. So, you will need to carry out the work:
- The standard set includes open-end wrenches, ring wrenches, as well as a socket wrench with a large lever at “30”, a jack and stops, and stands.
- Hammer.
- Chisel.
- Mount.
- Vise.
Materials: a small supply of graphite-based lubricant. Everything you need for replacement is included in the kit:
- Hinge.
- Screw.
- Rings.
- Lubricant pack.
- Anther.
- Two clamps.
If you plan to change the anthers on the internal grenades, then be sure to purchase a set of clamps. Replacing the VAZ 2109 CV joint is carried out in a certain sequence, which you simply need to follow. The most difficult thing is to unscrew the nut on the hub. Sometimes you have to resort to extreme measures - drilling, since it is impossible to unlock it.
Partially unscrew the nut with the car mounted on all four wheels, and be sure to place stops under the rear wheels. After you have loosened the nut, unscrew it and lift the side to be repaired. After dismantling the wheel, unscrew the tie rod end nut (first remove the cotter pin). At the bottom, unscrew the ball joint mount. After releasing the entire strut and hub, you can hold the brake pipe and try to pull the hub towards you.
With difficulty, but you will remove the VAZ 2109 CV joint from the splines. After this, you need to remove the internal grenade - install a small chisel between the gearbox and the grenade. Apply several sharp blows so that the CV joint comes out of the gearbox. In just a few seconds you will be able to do this. That's all, now take the entire drive and clamp it in a vice. You knock out the old outer CV joint with a hammer, but before doing this, it is advisable to break the boot.
If you don’t mind the old grenade, then the new one should be stuffed carefully, trying not to damage the slots and threads. When replacing the VAZ 2109 CV joint, you must thoroughly wash and clean everything so that dirt does not get under the boot on the new grenade. Otherwise, after a while you will again be faced with the need to carry out expensive repairs.
How to identify the problem
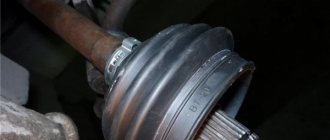
To avoid this problem, it is necessary to inspect the CV joint boots at least once every five thousand kilometers. It is better to do this from a pit or on a lift to carefully inspect the corrugated rubber. If you suspect damage to the material or the appearance of deep cracks, you need to clean it and carefully inspect this place. If the suspicion is confirmed, it is necessary to replace the torn boot; it cannot be repaired. At the same time, the hinge is thoroughly cleaned and new lubricant is added to it.
Another sign of a ruptured boot is a CV joint crunching when turning when the load on it increases. In this case, the insides of the grenade may simply disintegrate, it will jam and fail. Then it will have to be changed, which will cost much more. In the most severe case, the needles of the bearings of the internal grenade get into the gearbox housing and disable it. And the reason for this is often the destruction of the outer boot.
Video: Replacing the outer boot of a VAZ 21099 grenade
Replacing a VAZ-2109 CV joint: procedure
Front-wheel drive cars have in their design such elements as constant velocity joints, or, in short, CV joints. On the VAZ-2109, replacing these elements is quite simple, but you will need a little experience and special tools. Without this, repairs are unlikely to be possible. It is also advisable to purchase new elements in advance - depending on what financial capabilities you have, you can buy complete drives or separate CV joints (they are also called grenades for their external resemblance to this weapon).
Signs of CV joint malfunctions
Most often, the outer CV joint of the VAZ-2109 is replaced, since its resource is approximately three times less than that of the internal one. But the repair algorithm is generally similar.
Even to install new boots, you will need to completely dismantle the drive - it’s much more convenient to work this way. To determine if grenades are damaged, you need to do the following:
- Turn the steering wheel to the left all the way.
- Drive away and listen for any extraneous sounds.
- Turn the steering wheel to the right all the way, then drive off again and listen to the sounds.
Preparation
So, damage to the boot on the VAZ 2199 has been identified. You can replace it and wash the CV joint itself in the garage, the main thing is that there is an inspection hole.
Tools you will need:
- Set of wrenches (socket wrenches, open-end wrenches);
- Set of heads and collars;
- Metal brush;
- WD-40;
- Mount;
- Hammer;
- Jack;
- Wheel chocks;
- Wooden coasters.
You will also need a new boot, CV joint grease-4, a container for collecting oil, a container with gasoline for washing the CV joint, and rags.
It is better to do all work together with an assistant.
For convenience, we will describe the process of replacing the external boot on the left side. The replacement work on the right side is identical.
Replacing the CV joint on a VAZ 2109
CV joint (constant velocity joint) is a device that, when turning, equalizes the angular velocities of the inner and outer wheels, preventing the latter from slipping. This element is one of the main ones in the chassis of the Zhiguli ninth model, which has front-wheel drive, and is under constant load. If operating conditions are ideal, then the CV joint will work for a fairly long period, equal to the service life of the entire vehicle.
Content:
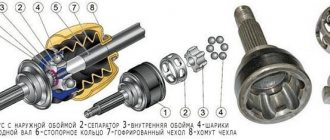
Types of CV joints
It wouldn’t hurt to find out how such a unit works. For the “nine”, both drives are equipped with four elements. Two internal ones transmit torque to the axle shaft from the gearbox. The external ones (there are also a pair of them) are mounted on the end sections of the axle shafts and transmit rotation to the wheels.
This placement option ensures wheel rotation when cornering and constant operation of the entire suspension. Simply put, the outer elements transmit torque when turning, and the inner ones are responsible for the vertical movement of the wheel. Now you can look at how the VAZ 2109 CV joint is replaced.
Causes of breakdowns, prices for service stations
In reality, CV joints serve less than they should, and this is due to the quality of roads, driving methods and other features. Major malfunctions can be caused by accumulations of dirt and dust that can form in the mechanism, getting there through a torn boot. Failure to timely replace a damaged boot will result in failure of the grenade.
Changing a CV joint is not easy, but with certain skills this task is quite doable. In any case, one requirement must be met - during installation, new CV joints suitable for the given car model are used. When contacting a service station, be prepared for the following expenses:
- the cost of the boot is 120-150 rubles
- replacing the boot - 450-600 rubles;
- the cost of the CV joint is 3200-5500 rubles, depending on its position and manufacturer;
- CV joint replacement - 1000-1200 rubles.
Causes and breakdowns
In reality, the resource of the CV joint turns out to be significantly less, which is caused by operating conditions, poor quality of roads, driving habits and other factors.
People usually call a CV joint a “grenade,” which is due to the external similarity of the element to this explosive device.
Here's what you should know about grenade malfunctions:
- Practice shows that the most common cause of CV joint failure is dirt, dust, and sand that enter the mechanism through a damaged boot;
- Sometimes the problem of a non-functioning grenade can be solved by replacing the boot. This is possible if the CV joint itself has not yet worn out due to exposure to contamination;
- If the damaged boot is not detected in time, the grenade will be completely worn out within literally 200 kilometers;
- If the CV joint fails, a strong crunching sound appears when cornering and accelerating. Such a symptom indicates the need to urgently replace the CV joint;
- The cost of new grenades is quite affordable; they are available at any auto parts store. But you should purchase those that meet the technical requirements of the VAZ 2109;
- If you have at least a little experience in repairing cars yourself, it is quite possible to replace a grenade with your own hands.
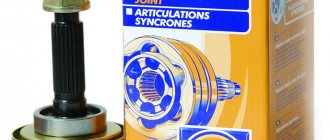
Old and new element
How to replace the constant velocity joint on the “nine” yourself?
- Briefly about hinges and fault prevention
- How to independently determine problems with the constant velocity joint on the “nine”?
- How to replace a faulty CV joint on a VAZ 2109 yourself?
mace The start of Volzhsky's production of the eighth and ninth series of cars gave an impressive impetus to a change in priorities - the rear-wheel drive “classic” received a worthy competitor, whose sales ratings increased every day. However, the appearance of a completely new unit - the constant velocity joint, and especially its diagnostics and repairs, have long puzzled not only ordinary car enthusiasts, but also craftsmen. After many years of operation, we can already talk about the accumulated experience in this area, which will be discussed below.
Briefly about hinges and fault prevention
The driving front wheels significantly increase the maneuverability of the car and also reduce fuel consumption. However, sooner or later you have to pay for this, because replacing a CV joint with a VAZ 2109 is due to the specifics of its operation - operation under constant load. External hinges transmit not only torque to the wheels, but also change the angle between the axle shafts during movement. After a certain period of time, wear appears between the rubbing units and the gap increases, and, therefore, at a minimum, extraneous noise appears.
The structural importance of hinges cannot be underestimated, so their condition should be regularly monitored. To do this, just perform simple operations:
- periodically checking the integrity of the boots and the presence of internal lubrication;
- if damage to the hinge boot is detected, replace it immediately;
- If you detect any extraneous noise or vibrations, immediately check the condition of the hinge and replace it if necessary.
Before you start replacing a suspicious CV joint on a VAZ 2109, it is important to know that there are external and internal hinges. The first transmits torque from the axle shaft to the hub, and the second turns the shaft coming from the gearbox.
How to independently determine problems with the constant velocity joint on the “nine”?
Lubrication Both types of hinges are structurally one unit, but the outer one breaks much more often due to high loads and rotation angles. Let's look at some signs of identifying a malfunction and ways to detect it:
- when trying to move the wheel hub in different planes, play is felt;
- when changing speed or starting off, the car moves jerkily;
- with the steering wheel turned to the maximum, start moving - the faulty outer joint makes a certain crunching sound;
- extraneous noise in straight-line motion indicates a problem with the internal joint.
Good diagnostic results are obtained by a technique that allows you to lift the car (at least jack it up). Here it is possible to rotate the wheel when the internal joint is maximally curved. It is in this way that you can hear the so-called hinge “crunch”, which allows us to speak with absolute certainty about the breakdown of the constant velocity joint.
Causes of CV joint failure
Unlike other cars, it is especially difficult for the VAZ-2109 to keep the grenade boot in working condition for a long period. The main reasons for its failure, first of all, can be unfavorable climatic and external factors. As a result, cracks will form on the parts, and further operation will be impossible. Through the torn mechanism, dust and dirt get inside the hinge, and because of this, the grenade parts wear out. It is not difficult to detect this: when the car is moving and when turning, the car makes a “crunching” sound, and this is already the first signal.
If, after you heard a suspicious crunch in your VAZ-2109, you came to the garage and found traces of grease on the hinge, then you immediately need to completely replace the CV joint along with the boot, since the parts of this mechanism cannot be interchanged.
Drive shaft assembly process:
- take a new dust cover and put it on the shaft;
- we drive the CV joint onto the splines, after filling it with new lubricant;
- put the boot on the bearing and tighten the clamps;
- We install a plastic plug at the end of the inner CV joint shaft;
- Before mounting the drive in place, install a new retaining ring on the inside of the drive shaft;
- insert and snap the shaft into the gearbox by lightly tapping the shaft with a hammer, preferably through the spacer;
- We insert the outer side of the drive shaft into the splined joint of the hub. We put on the thrust washer;
- be sure to install a new hub nut;
- tighten the nut tightly. If you have a torque wrench, the tightening force should be 25 kg/cm;
- We tighten the nut with a chisel, jamming its edge. To prevent spontaneous unscrewing of the nut;
- reinstall the protective cap of the hub nut;