If crunching and knocking noises appear in the front part of the car, the CV joint on the VAZ 21099 needs to be replaced. They are especially pronounced when driving over uneven places and on turns. Many car enthusiasts immediately head towards a car service center, but you can replace the CV joint on a VAZ 21099 with your own hands, without resorting to the help of specialists. In this situation, it is better not to leave the solution to the problem for later, so as not to lead to a disastrous result.
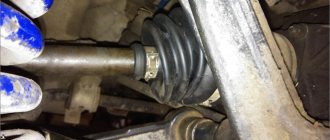
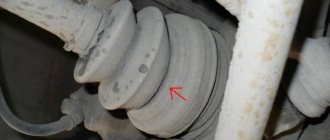
If you notice noise in the front of the car, you should immediately start checking the CV joint boots. Perhaps this is precisely the problem - there may be cracks, traces of grease, or even become unusable, namely, torn. To check, turn the steering wheel all the way to the side at your discretion and look at the area under the wheel.
If you find damaged areas on the dust cover, you must immediately replace it with a new one, otherwise it will become clogged with water, stones, dust and others, which will lead to its inapplicability. And when driving around corners, a knocking noise may occur, which indicates faulty joints. To check them, it is worth rocking the drive shaft - this is to check for the presence of play.
Replacing CV joints: practical recommendations
On the advice of specialists, the CV joint should be completely replaced. An exception may be anthers or other small elements of this type. In addition to lubrication, all the clamps in the CV joint must also be replaced with new ones, and during assembly, monitor the cleanliness of the work to prevent dirt particles from getting into the hinges.
To install the CV joint in place, it is better to use a hammer and a wooden spacer, watching your movements so that they are not strong and not sharp. Those. Simply place the spacer and tap it until the part snaps into place. If you neglect this and hit the part itself, you will simply damage it.
Once the hinge is in place, its boot is installed. First of all, the clamp is clamped onto the shaft using pliers. In this case, you will need to equalize the pressure in the part; to do this, just use a screwdriver to pick up the edge of the boot and unscrew it. After this, the clamp is clamped from the outside. The plastic plug must be installed at the end of the shaft, not forgetting about it. The remaining steps are performed in the reverse order in the same way as the CV joints were removed before.
Replacing the CV joint on a VAZ 2109, removing the drive
Despite the vulnerability of the rubber boots of the drives, it is often enough to replace them, while simultaneously washing the “grenade” with gasoline and adding a new portion of lubricant. Carrying out such repairs, with minor wear, allows you to do without replacing the drive.
Before starting work, you need to set the car to the handbrake and install wheel chocks.
First of all, you need to unscrew the hub nut using a socket and a suitable wrench. In this operation, it is necessary to remove the punching elements on the nut using a punch; this will allow the threads on the CV joint to be preserved during dismantling (the nut must be replaced with a new one).
An important point in this operation is to unscrew the nut (apply force) with the car wheels lowered to the ground, otherwise there is a risk of damaging the differential or other transmission elements.
Next, you need to jack up the car on the side needed for repair, after loosening the wheel nuts, and remove it.
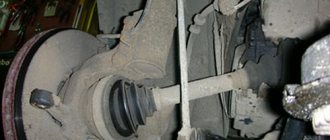
At this stage, or earlier, it is necessary to drain the oil from the gearbox. The next task is to release the steering knuckle at the bottom from the ball joint by unscrewing two bolts securing it.
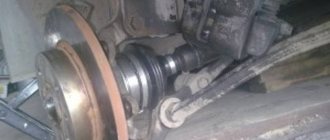
Since the hub nut is turned out and the ball joint is unscrewed from the steering knuckle, you can try to remove the splined part of the CV joint by pushing the brake disc and strut assembly towards you (it has sufficient travel, the main thing is to turn the steering wheel so that the tie rod end protrudes as much as possible).
Next, we remove the inner CV joint by prying it with a pry bar and pull out the drive
When you have pulled out the inner part, pay attention to the oil seal in the gearbox; if it was leaking before, it will have to be replaced.. In practice, replacing the outer CV joint of a VAZ 2109 is the most common drive repair
Since the internal drive operates at smaller angles and is less susceptible to damage to the boot, replacing the internal CV joint of the VAZ 2109 is quite rare.
In practice, replacing the outer CV joint of a VAZ 2109 is the most common drive repair. Since the internal drive operates at smaller angles and is less susceptible to damage to the boot, replacing the internal CV joint of the VAZ 2109 is quite rare.
Let's consider further actions that involve replacing the outer CV joint with a minimum number of operations. According to the repair rules, it is necessary to remove the entire drive and dismantle the CV joint in a vice, in a garage.
Attention! You cannot remove two drives from the gearbox at the same time, as the gears may move; dismantling occurs one at a time or a special insert is inserted instead of the hinge.
Interior
Replacing the internal CV joint of a VAZ 2109 is carried out if the following parts and tools are available:
- Vise;
- A set of keys;
- Hammer;
- Jack.
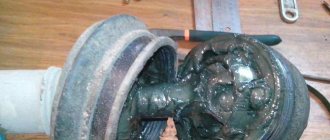
First of all, completely remove the drive from the car and secure it in a vice. To remove the boot, you will need to remove the CV joint clamps. After this procedure is completed, you can begin to remove the part itself. Using a hammer, give the part a few firm blows to force it out of the mount. At the end of this part there is a plastic tip. It must be carefully removed for subsequent installation on a new “grenade”.
Before replacing, all fasteners, and the CV joint itself, must be lubricated with a special lubricant. Next, carefully put the new part back onto the drive. To do this, use a hammer and a wooden block so as not to damage the part.
Next comes the installation of the boot. It must be installed at a distance of approximately 20 mm from the “grenade”. After installation, secure with clamps.
Repair tool
To independently remove CV joints on a nine or any other car, you need to have the following tool on hand:
- A socket wrench for “30” or a socket with a strong wrench.
- Hammer and chisel.
- Balloon wrench.
- Set of spanners and sockets.
- Penetrating lubricant such as WD-40.
- Capacity of at least 5 liters.
- Marker or metal scriber.
- Jack, support and wheel chocks.
You may also need a grinder, drill, drill bits, and other attributes. The work can be complicated if the drives have never been removed - the threaded connections become dirty, which complicates disassembly.
How to independently determine problems with the constant velocity joint on the “nine”?
Lubrication Both types of hinges are structurally one unit, but the outer one breaks much more often due to high loads and rotation angles. Let's look at some signs of identifying a malfunction and ways to detect it:
- when trying to move the wheel hub in different planes, play is felt;
- when changing speed or starting off, the car moves jerkily;
- with the steering wheel turned to the maximum, start moving - the faulty outer joint makes a certain crunching sound;
- extraneous noise in straight-line motion indicates a problem with the internal joint.
Good diagnostic results are obtained by a technique that allows you to lift the car (at least jack it up). Here it is possible to rotate the wheel when the internal joint is maximally curved. It is in this way that you can hear the so-called hinge “crunch”, which allows us to speak with absolute certainty about the breakdown of the constant velocity joint.
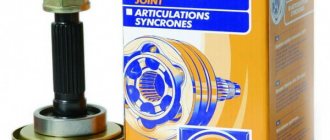
What is a grenade?
A grenade is the colloquial name for a constant velocity joint, which allows motion to be transmitted from the vehicle's gearbox to the wheels. Pay attention to the design of the car's drive. From the gearbox, consisting of shafts and a differential, there are two rods, at the ends of which there are moving elements (CV joints). They allow movement to be transmitted to wheels that are lower than the differential axis.
It is with the help of movable hinges that it is possible to realize the rotation of the front wheels. Essentially, this is a kind of crosspiece that is installed on the cardan shafts. But the grenade is much stronger and more durable. Why a grenade? Yes, it’s just that this element is very similar to this projectile and nothing more. Consists of three parts - outer and inner cages, balls between them. A special lubricant is pressed inside.
Replacement
It is most convenient to carry out this work in an inspection hole. This way you can easily get to all the details. Put the car on the handbrake. Raise the car on a jack. Remove the wheel. Pre-moisten all threaded connections with penetrating lubricant. Now you can proceed directly to the replacement:
- The nut securing the hub is unscrewed;
- The ball joint is unscrewed and removed;
- Move the shock absorber strut aside;
- Remove the outer joint shank from the hub. For greater convenience, you can use a special puller;
- The transmission oil (gearbox) is drained;
- Using a hammer and a drift, knock out the hinge body (inner) from the gear (axle shaft);
- Remove the drive.
- Install a new thrust ring on the inside of the CV joint;
- Center the position of the joint shank relative to the thrust ring.
- Then everything is assembled in reverse order. Don't forget to fill the box with oil. There are no difficulties during work. Sometimes you have to tinker with the alignment, but this is a fairly rare occurrence.
Replacing the VAZ 2109 CV joint: is it necessary?
Having decided to replace the CV joint on your car, do not rush to proceed immediately; perhaps only minor repairs are required.
So, first of all, check the drive shaft play by simply shaking it by hand
Next, inspect the CV joint itself - turning the wheels completely to the right or left, look under the car, paying special attention to the boots. If you find cracks, traces of grease, ruptures or other violations of the integrity of the structure on them, be sure to replace the CV joint covers
After all, if this work is not done in a timely manner, it becomes necessary to replace the entire assembly. If in your case such a need has “ripened”, well, prepare the car.
Determining the malfunction
First of all, when driving, there may be extraneous noise from the front. First you need to make sure that the CV joint boots are not torn and there are no cracks or oily marks on the surface. To check, just turn the steering wheel all the way and carry out a visual inspection behind the wheel.
Found any damage? Change the boot immediately so that stones, small particles, and water do not subsequently get into the CV joint mechanism. Otherwise, the hinge will quickly become unusable.
It is quite easy to determine the need to replace the hinge itself - during turning maneuvers the driver notices characteristic knocking noises. The presence of play during swinging of the drive shaft will help confirm this fact.
Removing the drive, replacing the boot, CV joint
Next, we will consider how to replace the outer CV joint, and this will be a simplified version that does not require complete removal of the drive shaft.
The sequence of actions is as follows:
- We put the car on the inspection hole, because it will be easier to do everything on it. We immobilize it with anti-recoil supports;
- Immediately use a 30mm socket with a wrench to loosen the hub nut (drive mount). While the car is not jacked up, this is easier to do than when the wheel is removed. It is difficult to remove the nut because it is cored, so you will need to extend the wrench with a pipe;
- We jack up the required wheel and remove it from the car;
- Unscrew the fastening bolts of the ball joint of the lower arm to the wheel hub;
- Use a puller to press out the tie rod end;
- Completely unscrew the drive shaft mounting nut;
- We take the brake disc with our hands and pull the shock absorber strut towards us, pulling the hub from the end of the outer CV joint;
And then we carry out work to replace the boot or hinge. This is where you should climb under the car. To remove the outer CV joint 2108, first disconnect the boot clamps (you can simply bite or cut them). We cut off the boot with a knife (even if it is whole, it is better to replace it with a new one).
Wipe the hinge with a rag to remove grease. We take the attachment, rest it against the end of the CV joint from the shaft side and strike it with a hammer. Moreover, they should not be strong, since it is only necessary to knock the inner race off the retaining ring mounted on the shaft.
If you plan to replace the boot, you should first wash the joint in kerosene to wash out all the dirt from it.
Installation
We take out the boot and put it on the drive shaft, after which we fix its inner part with a small clamp. The fixing process is very simple - after the hole gets into the recess, we tighten the clamp using wire cutters. Inside the boot we place at least 40 cm3 (the equivalent of two matchboxes) of CV joint grease-4, which comes complete with the new hinge.
Rice. 11 — Installing the boot and clamp tie
Attention! Never reuse parts such as clamps and hub nuts, as these parts are disposable!
After this, we put on the hinge and, with light blows of a hammer, hammer it in until it stops. We put on the boot and secure it with a large clamp, similar to the small one. Now you need to get the hinge splines into the spline hole of the hub, and then put on the washer and hub nut. Next, we bring the strut into position above the ball joint and tighten the pre-oiled bolts.
Rice. 12 — Installing a new hinge
Rice. 13 — Clamp tie
Note:
It is recommended to lubricate all bolts discussed in this article. This will slow down the oxidation of the bolts, and in the future will allow you to unscrew them with less effort.
We put on the wheel and first tighten the oiled wheel bolts. Next, you need to lower the car onto the wheels, and then place bricks under the “operated” wheel. Tighten the wheel bolts with normal force and the wheel nut with a torque of 220 Nm. If there is no special wrench, tighten the nut with maximum force, after which you need to lock it using an impact screwdriver and a hammer.
After the car has driven 500-1000 km, re-check the tightness of the ball joint bolts and, if necessary, tighten them.
How to remove the drive
In order to remove the drive assembly, you need to perform the following steps:
- Completely unscrew the nut on the outer joint to free the hub.
- Remove the nuts from the bolts that secure the strut to the hub steering knuckle. This will allow you to move the hub to free the joint. But it will be much more efficient not to unscrew the nuts on the strut, but to disconnect the ball joint.
- If you unscrewed the ball joint, you need to remove the tie rod end pin from the hole in the strut knuckle. This is done using a special puller.
- Now you need to pull the outer joint out of the hole in the hub. How to do this depends on the situation. You can use a thin drift, but without fanaticism, so as not to damage the mechanisms. You should also not hit the CV joint axle with a hammer - this will cause the edges to flatten and make it impossible to remove the element.
- After you pull out the outer joint, you can proceed to the inner one - to remove it from the hole in the gearbox, just apply a few light blows with a small chisel. You can also use a mounting spatula.
That's all, now the drive has been completely removed, you also need to learn how to remove the CV joint on a VAZ-2109.
conclusions
You can talk endlessly about how to change joints correctly, what lubricant to use, which manufacturer you should trust. In fact, the most suitable components are those whose manufacturers supply them to the AvtoVAZ plant. When replacing the external CV joint of a VAZ-2109, preference should be given to the manufacturer who supplies them to the plant. As practice shows, the service life of these elements turns out to be higher than that of foreign analogues. No matter how much they scold our auto industry, the reliability of domestic units is an order of magnitude higher than the vaunted German or Italian ones.
Basic procedure
First of all, you should put the car on the parking brake and secure the rear wheels with blocks. After this, while the car is on the ground, the hub nut is loosened. You will first need to remove the protective cap. It should also be taken into account that this nut is tightened quite tightly, so you will have to make a significant effort. At this point you can loosen the wheel bolts.
Next, you need to raise the front of the car by placing the body on supports. After this, you can unscrew the wheel bolts completely, removing the wheels, and remove the hub nut stop washer. The next step is to disassemble the steering rod, or rather its tip. The fastening bolts of the lower part of the steering knuckle support are screwed together, after which it is necessary to turn the steering wheel in the direction from which the replacement is being made until the extreme position is reached.
Next, the spitz end of the outer CV joint of the VAZ 2109 is pulled out from the hub, after the steering knuckle and strut have been pulled out. The next step is to press out the inner CV joint secured in the gearbox, for which it is better to use a pry bar.
It is important to pay attention to the fact that if it is necessary to carry out work on all CV joints, it is recommended that after removing one drive, install a retainer in the box, which can be an old similar part of the inner CV joint. Otherwise, the gears will shift, due to which the CV joints will not be able to be installed in place
If traces of oil were observed in the area of the gearbox during operation of the vehicle, then the seals on the CV joints will also need to be changed. Next, you need to clamp the drive shaft with a vice, remove the clamps from the hinges and unscrew the boots if they are intact. It is enough to cut off torn anthers with a knife.
The CV joints are knocked off the shaft with a hammer and drift, with the main forces being applied to the hinge cage. The same is done for the outer CV joint.
If you only need to replace the anthers, then the joint should be washed with gasoline to get rid of old grease and traces of dirt.
The new boot is placed on the shaft, but it is important to keep in mind that the right shaft is longer than the left. In addition, it is better to immediately replace the lubricant in the CV joint, making sure there is enough of it
We are starting renovations
So, the first thing you need to do is dismantle the old grenade. By the way, before changing the boot on the VAZ-2109 grenade, the same manipulations are performed. The thing is that it can only be replaced after the removal has been carried out.
Without this, installing a new boot simply won’t work. You will need to perform the following manipulations:
- On the side to be repaired, loosen the wheel fastening.
- Using a drift, you need to straighten the edges of the nut.
- Place chocks under the rear wheels to prevent the car from rolling away.
- Use a 30mm wrench to remove the nut.
- Raise the side of the car that is being repaired with a jack, remove the wheel, and place the car on a support.
- Completely unscrew the nut from the grenade. Please note that the washer is used when installing a new grenade - do not lose it!
- Drain the gearbox oil.
- Remove the two bolts that secure the ball joint to the suspension arm. Check the condition of the hinge - if it is deplorable, you will have to change it.
- You will most likely have to pull the pin out of the steering knuckle. The tip may interfere with the removal of the grenade.
- Now that everything is ready, you can pull the hub along with the strut to release the CV joint.
Drive design features
The main advantage of CV joints, in comparison with conventional joints, is the transmission of rotation without loss, even with a strong change in the angle between the components of the shaft (up to 70 degrees).
In total, the VAZ-2108 drive shaft includes three components:
- Shaft (with connecting splines);
- Internal CV joint (for interaction with the box);
- The hinge is external (provides interaction with the wheel hub).
Both hinges used on the VAZ-2108 are of the ball type; they are almost identical in design, but differ in size. Thus, the outer ring of the internal element has a significantly greater depth. This provides the possibility of axial displacement of the inner race, and as a result, a change in the length of the shaft, which is necessary for the drive wheels to make turns. In addition, the left and right drive shaft assemblies are different lengths.
The main components of the CV joint are:
- Outer ring (made in the form of a glass, special grooves are made on the inner surface);
- Inner race (represents a power fist, which also has grooves);
- Balloons;
- Separator (prevents balls from falling out);
All this is assembled into a single structure, so it is generally impossible to check the VAZ-2108 CV joint, even if it is completely disassembled.
The inner races are connected to the shaft using splines. They are secured against removal with locking rings.
The outer races are made integral with the limit switches, which are splined into the gearbox and hub. But the end stop of the inner CV joint is secured in the box with a retaining ring, but the outer joint is secured with a threaded connection (nut).
How to properly remove and disassemble the CV joint in your garage
AUTOSIZE
Hello, dear car enthusiasts! Front drive wheels provide car owners with many bonuses in the form of: more responsive steering, increased maneuverability, stability on slippery roads and other delights.
In return, the machine, namely its chassis coupled with the drive, will require additional attention. The front wheels are able to pull the car only thanks to the presence of a shaft connecting the hub to the variable gearbox.
However, that's not all. It would be impossible to transmit rotation from the transmission to the wheels without special devices installed at the ends of the shaft - CV joints.
A constant velocity joint is, today, the only way to transmit rotational motion between axle shafts located at an angle to each other.
In this regard, any self-respecting car enthusiast should know how to remove and disassemble the CV joint, diagnose, maintain and repair it.
How to remove a CV joint yourself without the help of a car service
Despite the apparent complexity of the front-wheel drive design of a car, regardless of its make and model, the design of this unit is quite simple and similar in all cars.
In order to remove and replace the CV joint, it is enough to have a garage with an inspection hole or an overpass to facilitate access to the lower part of the car, as well as a set of standard tools.
As a rule, experienced car enthusiasts manage their work without any special devices, but if there is a desire to speed up repair work, you can purchase a CV joint puller.
Considering that each drive wheel has two hinges, repair work can be carried out depending on the following types of failure:
- removal of the internal CV joint and its repair;
- removing the outer CV joint;
- Removal and repair includes a shaft and two joints.
How to remove the inner CV joint in the garage
Repairing an internal CV joint is an event that is quite rare, but you must have the skills to handle this mechanism, because for its long life it is necessary to carry out preventive measures, replacing the boot and lubricant.
Before describing the technology that includes removing the internal CV joint, it should be noted that in this case, an inspection hole will be simply necessary, because the joint cage is bolted (6-8 pieces) directly to the differential gears, and this is the lowest point of the transmission.
After all the fastening bolts have been unscrewed, the steering wheel should be turned to free the spline joints from moving freely. Using a pry bar, the CV joint is very easily removed from the mounting socket. Removing it from the shaft is also easy; to do this, you just need to unfasten the retaining ring and the boot clamps.
A strong recommendation to all car enthusiasts: you should not remove the CV joint from the shaft under the car and, especially, do not disassemble it. It is much more convenient and rational to remove the shaft with two CV joints at the same time, and then perform all the manipulations on the workbench with a vice.
How to remove the outer CV joint yourself
The outer CV joint, which is installed directly at the hub, although more accessible, will require more time and effort to remove. Here you will have to almost completely disassemble the front suspension.
The wheel is removed, the hub nut is unscrewed and the lock washer is removed. After unscrewing the lower ball joint, the moving strut allows you to remove the CV joint axle shaft.
Repairing CV joints can be associated with certain difficulties. The first is the inability to remove the axle shafts or shaft from the splined joint. There are several options for getting out of the situation. First you need to take a wooden or brass spacer and try to knock out the axle shaft.
If nothing could be done at this stage, you will need a CV joint puller. One of the most common and simple pullers is made in the form of a horseshoe, which is attached to the axle shaft, and the thrust bolts remove the CV joint when rotating.
It is not difficult to disassemble the CV joint itself; for this you need:
- apply marks on the holder and body for reassembly in the same position;
- tilt the shaft with the holder at the end as much as possible to one side;
- Remove the ball from the holder on the opposite side and perform the procedure with all the balls in turn.
There is an opinion among some experts that it is enough to simply wash the CV joint with diesel fuel and “fill it in” with lubricant again without disassembling it.
In this case, there is a high probability that fragments of old retaining rings or other debris will remain inside. If the CV joint has already been removed, then it is better to disassemble it, wash it, reassemble it and lubricate it.
Installation of the CV joint after replacement or maintenance is carried out in the reverse order of removal.
Preparatory work
Before replacing the CV joint boot or the grenade itself, you need to perform several preparatory steps. Without this, withdrawal is impossible
Please note that you cannot remove both inner joints at the same time - this will lead to destruction of the differential mechanism
If the bevel gears fall off, you will have to remove the gearbox and completely disassemble it. Preparation includes the following steps:
- Complete or partial drainage of oil from the gearbox. When removing the internal CV joints, oil will spill out; to prevent this from happening, it is necessary to drain at least 2/3 of the total volume.
- Unlocking the front wheel hub nut (or both, if two drives need to be repaired).
- Loosening the hub nut and wheel bolts. The hub must be unscrewed using a 30mm wrench with a large lever.
- Removing the wheel after installing the side to be repaired on the jack and support.
Having completed the preparatory work, you can begin directly replacing the VAZ-2109 CV joint.
Types of CV joints
Before you begin repairs, you need to find out exactly how the unit is designed.
The pair of drives on the VAZ 2109 is equipped with a total of 4 CV joints.
| CV joint type | Peculiarities |
| Interior | There are 2 of them. They transmit torque to the axle shaft from the gearbox |
| Outer | There are also two of them. Installed on the ends of the axle shafts and transmit torque directly to the wheels |
This arrangement of grenades allows the wheels to rotate during turns and constant operation of the suspension system. To put it simply, the outer CV joints are responsible for transmitting torque when cornering, and the inner ones are responsible for the vertical movement of the wheels. These are collisions with bumps, holes, roll in turns, etc.
Replacing anthers and hinges
Often, problems with CV joints occur due to damage to the anthers. In this case, you can get by by replacing these protective parts. It will cost much less than replacing the entire CV joint. To do this work, remove the drive and secure it in a vice. Replacement is done as follows:
Remove the clamps from the boot. Using pliers, remove the old boot. If there is no need to dismantle the grenade (hinge), then you can install a new part and secure it with clamps;
If there is a need to dismantle the hinges, you will need to remove the old ones. This is done with a hammer. The blows should be applied through a wooden drift; You need to take a plastic tip from the removed CV joint. It will then need to be installed on a replacement part; Be sure to fill the new grenade with lubricant, this will extend its service life. Carefully hammer the CV joint into place through a wooden block. Do not harm him; Place the boot on the hinge
At the same time, pay attention to the distance from the beginning of the grenade to the end of the boot should not be less than 21 centimeters; We carefully tighten the clamps on the boot, the service life of the CV joint depends on this.
Pay attention to the need to select hinges. They must be from the same set
Otherwise, they will not work for very long, and with some interruptions. Conclusion. Domestic cars for the most part cannot boast of increased reliability. That is why replacing the CV joint on VAZ 2109 and 21099 is familiar to many drivers. This is not a tricky thing, no special skills are required
But it is important to do everything as carefully as possible. This can significantly extend the service life of the part.
Causes and breakdowns
In reality, the resource of the CV joint turns out to be significantly less, which is caused by operating conditions, poor quality of roads, driving habits and other factors.
The CV joint is popularly called a “grenade,” which is due to the external similarity of the element to this explosive device.
Here's what you should know about grenade malfunctions:
- Practice shows that the most common cause of CV joint failure is dirt, dust, and sand that enter the mechanism through a damaged boot;
- Sometimes the problem of a non-functioning grenade can be solved by replacing the boot. This is possible if the CV joint itself has not yet worn out due to exposure to contamination;
- If the damaged boot is not detected in time, the grenade will be completely worn out within literally 200 kilometers;
- If the CV joint fails, a strong crunching sound appears when cornering and accelerating. Such a symptom indicates the need to urgently replace the CV joint;
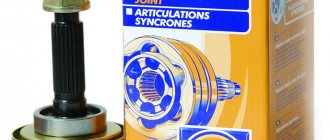
- The cost of new grenades is quite affordable; they are available at any auto parts store. But you should purchase those that meet the technical requirements of the VAZ 2109;
- If you have at least a little experience in repairing cars yourself, it is quite possible to replace a grenade with your own hands.