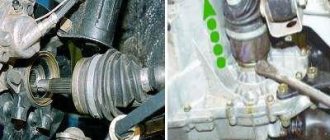
The constant velocity joint (CV joint), or, as it is popularly called, a grenade, appeared at the moment when front-wheel drive cars began to be introduced onto the market, and its main task is to transmit command from the gearbox to the drive wheel.
If you remember, in rear-wheel drive cars this function is performed by the cardan transmission. For a front-wheel drive car, such a mechanism will lead to an increase in its size, and, accordingly, the price will increase along with this. As for the VAZ-2109, this model has two CV joints: external and internal.
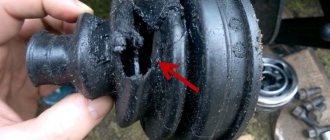
And today we will talk about how to replace the outer boot for a given car with your own hands, since it is this that most often becomes deformed and torn.
How to check the condition of the anthers yourself
This procedure is very simple and does not require special skills. A visual inspection for breaks, cracks and lubricant leaks is sufficient. To do this, you need to turn the front wheels of the car in either direction and carefully inspect the rubber dust covers.
If any damage or lubricant leakage is detected, the covers must be changed as soon as possible.
Otherwise, the drive shaft (CV joint) of the car will quickly fail.
This is interesting: How to properly charge a car battery with a charger
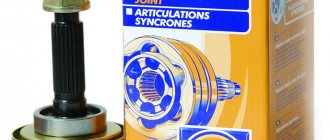
Which CV joint boot is better to install on VAZ 2110-2109, 2110
First of all, the outer boot must be suitable in size if we are not buying an original one, but an analogue. The dimensions of the VAZ boot are as follows:
It is also important to pay attention to the material from which the boot is made. Silicone work well , they are easy to distinguish by their softness, they are often made of unpainted silicone, translucent.
Types of anthers on CV joints and their main weak points
Polyurethane anthers on VAZ are a rather controversial thing. On the one hand, polyurethane is a durable and tear-resistant material. On the other hand, in severe frost they can harden so much that there is a risk of rupture right on the move. It all depends on the composition of the polymer.
rubber boots is also ambiguous, since rubber is different from rubber. If we choose this option, it is better to start with a brand that we trust. And a little about brands.
NTN-SNR, France
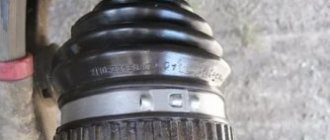
Definitely recommended for purchase. Made of polyester (PEEST marking), it has an interesting design feature - fillets are made between the corrugations to remove the load from a specific corrugation and distribute it evenly over the entire surface. The catalog number is the same as that of the branded VAZ boot - 2108-2215030. The resource is more than 150 thousand km , it is not afraid of frost and high temperatures.
HORS, RF
Sold in branded packaging, made of red-painted silicone. The packaging indicates a 1-year warranty; it responds well to severe frosts, but the total resource does not exceed 8-10 thousand km , depending on operating conditions. 2108-2215036 is indicated on the case body .
TRACK, country of origin unknown
Made of transparent silicone, packaged in a blister with a sticker stating a one-year or 40 thousand km warranty. It is absolutely not afraid of frost, it will last more than 50,000 km , if it is not a fake. The specified catalog number is 2110-2215030.
BRT, RF
Made of black material, chloroprene rubber. Indifferent to frost, service life at least 40,000 km . Sold without packaging, all information is embossed on the case, catalog number 2110-2215030 .
Trialli RG 0130, Russian Federation
Made of black chloroprene rubber, packaged in a bag with a sticker, logo and factory catalog number 2108-2215030. Judging by the reviews, it has performed well, is not inclined to become dull in the cold, users estimate the average resource to be within 30-40 thousand km .
TSN 3.2.1, China
It makes no sense for replacement, since the resource under normal conditions is no more than 2,000 km. True, it is sold complete with good clamps and lubricant for the CV joint. Marked with serial number 2108-2215030.
There are also a number of domestic and Chinese anthers that correspond to the factory catalog numbers, but you can buy them at your own peril and risk if you do not trust the VAZ cover.
Shall we get started?
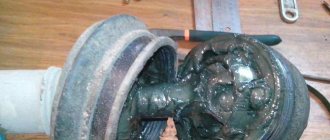
Before replacing the mechanism, you need to drain all the oil from the gearbox. Let's not touch the jack yet! You need to place a brick under the rear wheel of the car, after this procedure we take the 30 socket and, accordingly, loosen the nut. Don't be alarmed, you may need about a half meter long piece of pipe half a meter long as a lever. Remember, we only need to loosen the nut, not remove it yet!- Everything worked out? Go ahead! We lift the car with a jack, and only now completely remove the hub nut along with the washer. Now you can safely remove the wheel from the hub.
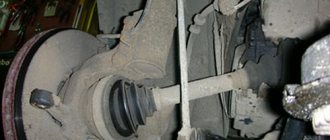
- Take the 13mm head and remove the two bolts that secure the ball to the hub. After this, we move the hub and remove the outer grenade from it. Then we attach a pry bar to the internal grenade and, using hammer blows, knock it out of the gearbox. By the way, if you still don’t have a pry bar at hand, a piece of pipe can replace it.
- When the grenade is removed, we clamp its shaft in a vice.
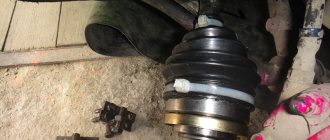
- We remove the clamps from the unusable boot. After that, we shoot down the outer grenade. Attention! In order not to damage it, you need to hit it along the edge. When this operation is completed, remove all old grease from the mechanism, wash it in gasoline or kerosene and wipe it well again, this way you can better remove traces of grease.
- Now we put a new boot on the drive shaft, and using a hammer we hammer the outer CV joint back, after thoroughly lubricating all the parts of the product. After that, we put it on and tighten it with a collar.
- Then we insert the grenade into the gearbox, driving it there. We place it in the hub and return the ball to its place. We put on the hub nut.
Attention! The hub nut does not need to be tightened with great force. After installing the wheels, tighten the bolts without applying much physical force.
- We remove the car from the jack, place a brick under the front wheel and tighten the nuts tightly.
- Well, now pour oil into the gearbox.
That's all. Congratulations! Replacing the boot on the VAZ-2109 is complete!
Causes and breakdowns
In reality, the resource of the CV joint turns out to be significantly less, which is caused by operating conditions, poor quality of roads, driving habits and other factors.
People usually call a CV joint a “grenade,” which is due to the external similarity of the element to this explosive device.
Here's what you should know about grenade malfunctions:
- Practice shows that the most common cause of CV joint failure is dirt, dust, and sand that enter the mechanism through a damaged boot;
- Sometimes the problem of a non-functioning grenade can be solved by replacing the boot. This is possible if the CV joint itself has not yet worn out due to exposure to contamination;
- If the damaged boot is not detected in time, the grenade will be completely worn out within literally 200 kilometers;
- If the CV joint fails, a strong crunching sound appears when cornering and accelerating. Such a symptom indicates the need to urgently replace the CV joint;
- The cost of new grenades is quite affordable; they are available at any auto parts store. But you should purchase those that meet the technical requirements of the VAZ 2109;
- If you have at least a little experience in repairing cars yourself, it is quite possible to replace a grenade with your own hands.
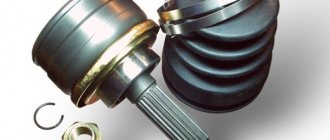
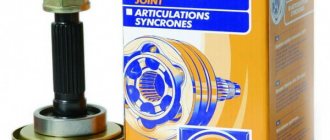
Old and new element
Drive shaft assembly process:
- take a new dust cover and put it on the shaft;
- we drive the CV joint onto the splines, after filling it with new lubricant;
- put the boot on the bearing and tighten the clamps;
- We install a plastic plug at the end of the inner CV joint shaft;
- Before mounting the drive in place, install a new retaining ring on the inside of the drive shaft;
- insert and snap the shaft into the gearbox by lightly tapping the shaft with a hammer, preferably through the spacer;
- We insert the outer side of the drive shaft into the splined joint of the hub. We put on the thrust washer;
- be sure to install a new hub nut;
- tighten the nut tightly. If you have a torque wrench, the tightening force should be 25 kg/cm;
- We tighten the nut with a chisel, jamming its edge. To prevent spontaneous unscrewing of the nut;
- reinstall the protective cap of the hub nut;
We carry out the entire procedure for replacing CV joint boots on a VAZ-2109 on the other side of the car, in the same sequence.
After installing the drives, you need to check the reliability of the connections by holding the drive with your hand and shaking it in different directions. In this case, no backlash should appear. Also, play is unacceptable in hub bearings. The wheel should rotate freely, without any difficulty.
With timely detection of defects and replacement of boots, the service life of components and drive mechanisms of your car increases.
Detailed video instructions:
Replacement
If problems arise with grenades, you should determine which ones have problems. Next we will look at how to change the drive and how to remove it. Additionally, we recommend watching the repair manual video.
The procedure for replacing inner and outer CV joints differs from each other, therefore each stage should be considered separately.
Let's start with the internal.
Inner CV joint
Rubber boots are a vulnerable element of the grenade design. It is not uncommon that by replacing the boot, washing the grenade with gasoline and applying new lubricant, it is possible to solve the problem. If the wear of the CV joint is insignificant, such measures can replace a full repair.
But if you discover the breakdown late, you will have to completely replace the inner CV joints.
- Apply the handbrake and install chocks under the wheels.
- Unscrew the hub nut using a wrench and a socket. Carefully remove the punching elements from the nut with a punch. This way you will be able to preserve the carving on the garnet. The nut itself will need to be replaced with a new one during reassembly.
- The main thing here is to unscrew the nut, lowering the wheels to the ground. Otherwise, you risk breaking the differential and other gearbox components.
- Raise the car using a jack on the desired side, first loosening the wheel nuts. Remove the wheel.
- Drain the gearbox oil. This can be done earlier, at your convenience.
- Release the steering knuckle from the ball joint at the bottom. To do this, unscrew a pair of mounting bolts.
- Since you have already removed the hub nut and unscrewed the ball joint from the steering knuckle, proceed to removing the splined part of the grenade. To do this, pull the brake disc and strut assembly towards you. She has a decent ride. Just remember to turn the steering wheel all the way so that the tip of the steering wheel extends as far as possible.
- Pry the inner grenade with a pry bar, which will allow you to remove the drive.
- Having taken out the CV joint, look at the condition of the oil seal in the gearbox. If you find traces of leaks, be sure to replace the element.
The internal drive (CV joint) is designed to work with smaller angles, its boot is less susceptible to negative influences. Therefore, the internal grenade is changed quite rarely.
Types of CV joints
Before you begin repairs, you need to find out exactly how the unit is designed.
The pair of drives on the VAZ 2109 is equipped with a total of 4 CV joints.
| CV joint type | Peculiarities |
| Interior | There are 2 of them. They transmit torque to the axle shaft from the gearbox |
| Outer | There are also two of them. Installed on the ends of the axle shafts and transmit torque directly to the wheels |
External
This arrangement of grenades ensures the possibility of wheel rotation during turns and constant operation of the suspension system. To put it simply, the outer CV joints are responsible for transmitting torque when cornering, and the inner ones are responsible for the vertical movement of the wheels. These are collisions with bumps, holes, roll in turns, etc.
Interior
This is interesting: How much does 1 liter of gasoline 92 weigh?
Drive installation
Finally, the entire drive is installed and the entire suspension side is assembled. First install the inner CV joint. You hit the splines, then give the drive a couple of sharp blows. This will allow the ring to slide in, having previously compressed to its minimum diameter. Please note that the grenade should fit snugly against the box; this is its normal position. But do not forget that the CV joint moves slightly along the wheel axis.
Next, what you need to know about replacing the VAZ 2109 CV joint is the installation of the external hinge. To do this, install it opposite the hole in the hub and, lightly pressing on the latter, carefully insert it. To make sure that the grenade has gone all the way in, you can give a couple of sharp blows to the hub. Just place a wooden beam to soften it. The hub will then be fully seated when you tighten the nut. That's all, now you can assemble the side and proceed to the second.
Preparation
So, damage to the boot on the VAZ 2199 has been identified. You can replace it and wash the CV joint itself in the garage, the main thing is that there is an inspection hole.
Tools you will need:
- Set of wrenches (socket wrenches, open-end wrenches);
- Set of heads and collars;
- Metal brush;
- WD-40;
- Mount;
- Hammer;
- Jack;
- Wheel chocks;
- Wooden coasters.
You will also need a new boot, CV joint grease-4, a container for collecting oil, a container with gasoline for washing the CV joint, and rags.
It is better to do all work together with an assistant.
For convenience, we will describe the process of replacing the external boot on the left side. The replacement work on the right side is identical.