The appearance of characteristic signs of engine malfunction, such as a sharp deterioration in dynamics, an increase in fuel and engine oil consumption, problems with starting the engine, especially in the cold season, indicates that the wear of the power unit has reached its limit, and further operation of the machine is impossible without outside intervention . The listed signs indicate a sharp drop in compression. If the engine is not completely damaged, then replacing the piston rings will most likely help restore it to vigor.
To save money, you can do the replacement yourself. In addition to the financial benefits, the owner of the car can be absolutely sure that the piston rings have been changed, and the exact ones he bought, and the work has been done efficiently. Unfortunately, when leaving a car at a car service center, the owner cannot know exactly how conscientiously the technicians did their job, since statistics stubbornly insist that they cheat everywhere, including at official services.
How to replace piston rings with your own hands is written in this article.
Briefly, the procedure is as follows:
- the cylinder head is dismantled;
- the condition of the rings is checked and the issue of the need to remove the engine from the car is decided;
- then the old ones are replaced with new ones, and the engine is assembled in the reverse order.
Next, each stage will be discussed in more detail.
Before installing new rings
Before you start work, you need to get everything you need. The operation will require wrenches, sockets, preferably with a ratchet, a torque wrench and a piston ring puller.
When choosing a new set at an auto parts store, you should pay attention to both the appearance of the packaging and the rings themselves.
The packaging must contain complete information about them, namely: who the manufacturer is, what they are made of, etc. The rings must also have markings indicating the top side, they themselves must not have any flaws, in addition, there must be There should be instructions that describe the correct installation of the piston rings.
If the seller claims that small defects will rub off, he is openly lying, trying to sell substandard goods, it is better to refuse such a purchase, since the money will be wasted.
Step-by-step replacement instructions
Piston repair work must be performed on an inspection ditch, lift or overpass.
What will you need?
To repair a VAZ 2109 engine with your own hands, you need the following tools:
- a set of keys;
- set of heads;
- funnels;
- extension cords;
- torque wrench;
- set of probes;
Set of gap gauges
- mandrel for pressing products on the piston;
- hammer;
- needle file;
- new repair kit.
New consumables for piston VAZ 2109
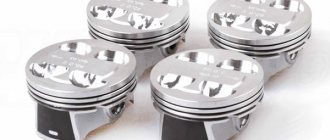
When purchasing piston rings for the VAZ 2109, you should take into account the material of manufacture and their width. It is better to purchase original products to avoid fakes.
Preparatory stage
First of all, you need to disconnect the battery. After this, you will need to drain the coolant from the cooling system and the engine oil from the oil pan. Replacing piston rings is possible in two ways: with or without removing the engine from the car. A check will help determine whether the engine needs to be removed: you need to remove the cylinder head and visually assess the condition of the liners.
If there are no exhausts, new ones can be installed without removing the engine from the car. The work steps for replacing piston rings, with the exception of dismantling the engine for restoration work, are the same.
Running in the engine after replacement
After replacing only the rings, without touching the pistons and cylinders, it is necessary to carry out a break-in, since the newly installed piston rings must grind into the old piston group for a longer time. There is a process of erasing micron irregularities to ensure a tighter fit of the rubbing surfaces.
Violation of the speed limit during running-in leads to an increase in the friction force between the ground surfaces and an increase in temperature. As a result, the wear of engine components accelerates. Proper initial start-up of the engine after replacing the piston rings is of decisive importance. It must be performed according to the following rules:
- the battery must be fully charged;
- the oil must match the make of the car;
- After starting, observe the oil pressure indicator. If it lights up for more than 7 seconds, turn off the engine and look for the cause;
- at normal oil pressure, without increasing the speed, warm up the engine to 80-90 degrees;
- turn off the engine and wait until the temperature drops to 50 degrees, then start the engine again;
- wait until the temperature rises to 90 and turn off the engine again. Repeat this operation 10 times.
After this process, your engine is ready to break in after replacing the piston rings.
Recommendations for running in the engine after replacing piston rings:
- do not transport a lot of cargo or passengers at this time; the weight of the loaded vehicle should be no more than 50% of the permitted maximum weight;
- for the first thousand km, do not exceed the speed limit, keep no more than 80 km/h, for the second thousand, no more than 90;
- do not move in one gear for a long time;
- Do not pick up speed too quickly, do not linger at idle speed.
- Before each trip, make sure that you have the proper oil level; after 1 thousand km, change the oil and filter.
Upon completion of the break-in process after replacing the piston rings, it is necessary to rinse the engine with flushing fluid, change the oil and filter element. Tighten the cylinder head and crankcase mounts again.
Replacing piston rings
The replacement process begins with removing the oil pan. Additionally, it is advisable to remove the oil pump and check how much it is worn. Then you need to unscrew the connecting rod caps and push the connecting rods and pistons up. It is important to remember that the connecting rod caps cannot be swapped; each one must subsequently be screwed to its own connecting rod.
The next stage is the actual replacement of the piston rings. The easiest way to replace it is if you have a piston ring remover. It is a forceps that opens rings. The main thing is not to overdo it and not to squeeze it too hard, as they may simply break. If there is nowhere to get a device for installing piston rings, you can get by with a thin flat-blade screwdriver. The task, of course, will become more difficult, but it can be overcome. They must be installed with care so as not to scratch the pistons with a screwdriver.
After removing the old rings, you need to remove carbon deposits from the grooves, which will interfere with the installation of the new set. The ideal tool for this procedure is a piece of an old ring, so one of them needs to be broken. Also, carbon deposits must be cleaned from the bottom of the pistons, if there is any there. To make the task easier, you can moisten the surface with kerosene. Again, you need to act carefully so as not to leave scratches.
The installation order is as follows: the oil scraper ring is installed first, then the second and first compression rings. Due to the fact that the second compression and oil control rings operate under less severe conditions than the first compression ring, less stringent requirements are imposed on the metal from which they are made, so the rings are more fragile. Particular care should be taken when installing them. It is almost impossible to accidentally break the first compression ring.
Design and principle of operation
The design of the compression ring is simple: it is a ring that has a gap so that its elasticity allows the ring to diverge and maintain the pressure of the working edge against the cylinder walls.
Material – high-strength cast iron, less often – high-alloy steel. The operating conditions of the upper compression ring are harsh: high temperature and pressure. At the moment the mixture ignites, the pressure reaches 90 bar, the temperature approaches 1500 degrees. As the cylinder wears, it loses its uniform diameter, and with each up-and-down stroke of the piston, the ring has to compress and expand, which contributes to the accumulation of fatigue stresses. To increase the service life, at least the upper ring is coated with a layer of chromium, which has high hardness.
The second compression ring operates in lighter conditions - in this place the piston is already colder, and direct heat transfer from hot gases no longer affects it. Therefore, it may not be chrome plated.
Oil scraper rings were initially made of solid cast iron; they had two working edges with a groove between them. The oil that passed through the lower edge was collected by the upper edge into this groove, and through the radial holes in it fell into the holes in the piston skirt and was discharged inside it. This design had a serious drawback: both edges worked simultaneously; in worn-out engines, where the ring was warped along with the piston, oil leaked past the ring. Therefore, composite structures were invented: in them, two thin rings are pressed against the edges of the groove with a spring expander, through which the collected oil flows into the piston. Due to the small width of the individual rings and their operation, this design remains effective when the piston is misaligned.
Checking the performance and running in the engine
After the engine is assembled, you need to make sure it is working. It must be started and allowed to idle for some time. If it works steadily, we can consider the work completed successfully. It should be remembered that new parts need running-in, and the more carefully it is done, the longer the repaired power unit will last.
Run-in lasts 2–3 thousand kilometers. To ensure that the replacement does not go in vain, the following rules must be observed during break-in:
- the motor should not be overloaded;
- If possible, fully loading the vehicle should be avoided (ideally the driver should drive alone);
- It is not advisable to overcome long climbs;
- It is absolutely forbidden, especially during the first thousand kilometers, to raise the crankshaft speed above three thousand;
- The engine needs to be warmed up before driving.
The fact that the car requires replacement of the piston rings, and not some other repair work, will be indicated by the engine itself. The signs of such a malfunction appear quite clearly, so it will be difficult not to notice them. But before we talk about the symptoms, you need to understand what the rings are and what role they play in the operation of the engine.
Signs and causes of wear (breakage) of piston rings
On VAZ cars, the engine wears out during operation, and the PCs also fail. Rings can:
- break into two or more parts;
- wear out in thickness;
- have general wear and tear.
Parts often break down due to overheating of the internal combustion engine; in this case, compression in the cylinders decreases and the engine loses power. Signs of a faulty PC are:
- bluish smoke from the muffler pipe, especially often it appears after a long period of idling when the gas pedal is sharply pressed;
- increased engine oil consumption;
- drop in power, the motor stops pulling;
- coking of spark plugs.
If there are signs of a malfunction in the piston group, the piston rings are replaced first. But replacing a PC does not always give the desired effect; often after repair the engine continues to smoke and consume oil. The reason for this is simple - there is wear in the cylinders themselves. In the block, the liners usually wear out unevenly - they take on an oval shape; due to wear, the piston rings do not fit tightly to the cylinder walls and do not provide a tight seal.
What are piston rings and their purpose
Piston rings are elastic, open elements that are installed in special grooves on the piston body. They are made of high-strength steel or cast iron, and covered with an alloying material on top. The alloy coating further increases strength and also reduces wear rates.
Typically, 3 rings are inserted into the piston: 2 compression rings (occupying the 2 upper grooves) and 1 oil scraper ring (the lower groove). The purpose of the compression rings is to prevent hot gases from breaking through along the piston into the engine crankcase. Oil scraper - removes excess oil from the cylinder mirror, preventing it from entering the combustion chamber. In addition, the rings reduce the temperature of the piston, transferring almost half of the heat from its surface to the cylinder walls.
When the piston rings no longer cope with the tasks assigned to them due to their wear, the car engine signals this by displaying the corresponding symptoms.
Signs of piston ring wear
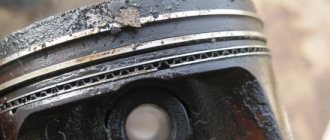
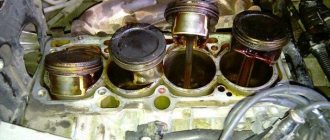
Blue or black smoke from the exhaust pipe indicates that wear has reached a critical stage. This indicates that excess oil entered the combustion chamber past the oil scraper ring and burned there along with the fuel. Black smoke coming out of the crankcase ventilation tube indicates that the compression rings, due to wear, allow gases to escape from the combustion chamber into its cavity.
Critical wear is accompanied by a decrease in compression (the ability to maintain pressure) in the engine cylinders. This means that some of the gases formed during the combustion of the fuel mixture, which was supposed to push the piston, broke into the crankcase without performing useful work. This is what will lead to a drop in pressure in the cylinder, therefore, the engine will lose some power. Increased oil consumption is observed.
Compression is checked with a special device - a compression meter. When the nominal pressure values are unknown (there are no operating instructions), it is first measured in a dry cylinder, then a little engine oil is poured through the spark plug hole, and the measurement is made again. If the compression increases, then the rings need to be replaced. Similar signs can be observed in the case of their “occurrence”.
“Sticking” occurs when carbon deposits formed in the piston grooves prevent the piston rings from springing, resulting in a decrease in the tightness of their contact with the cylinder surface.
This problem, if the case is not very advanced, can be corrected with the help of special fuel additives. For an engine with a carburetor system, you can try cleaning it with a carbon remover spray that is injected directly into the carburetor. If removing carbon deposits from the combustion chamber has no effect, then there is only one way out - replacing the piston rings and cleaning the grooves.
When is it time to change rings?
There are three piston rings on the VAZ 2109. They are not closed rims that are located on the outer wall of the cylinder in special grooves. These parts serve to seal the combustion chamber, regulate oil flow and improve heat transfer through the cylinder wall. Two compression valves prevent gases from the combustion chamber from entering the crankcase, and an oil scraper valve removes oil from the cylinder walls and prevents it from entering the combustion chamber.
Wear of piston group parts occurs after approximately 150 thousand kilometers due to the action of gases and friction of metal parts. They need to be changed if the following symptoms are present:
- compression drop;
- increased fuel consumption;
- the appearance of bluish smoke in the exhaust gases;
- increased oil consumption.
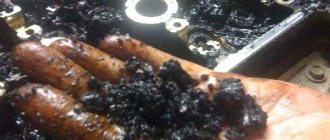
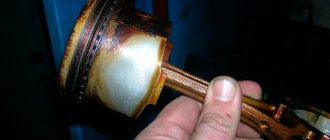
The cause of deterioration in engine performance may be coking of the piston and stuck rings. This happens when using low-quality fuels and lubricants that do not meet the manufacturers’ recommendations. During long-term operation, carbon deposits form, which covers the combustion chamber and its parts. Piston rings covered with carbon deposits “stick” and cannot perform their functions properly. In this case, they should be changed or decarbonized.
Coked piston with traces of carbon deposits
How to replace piston rings yourself
Of course, replacing rings is a rather labor-intensive procedure. It requires accuracy and certain skills, but by and large there is nothing complicated about it (unless you remove the engine). To do this you need:
- remove the cylinder head, following all the recommendations of the car manufacturer;
- drain the oil, remove the flywheel protection and engine sump;
- remove the oil intake;
- Having turned the crankshaft, set the desired piston to bottom dead center;
- unscrew the connecting rod cover and remove it;
- pull the piston along with the connecting rod out of the cylinder, pushing it upward with a wooden strip;
- clean the piston from carbon deposits. Based on its marking, determine the piston class, purchase a new set of piston rings corresponding to it;
- Before installation, each new ring is first inserted into the cylinder to check the clearance in the lock. The gap must correspond to the value specified in the vehicle's operating manual. If it is less than necessary, then the ends of the lock are carefully filed with a file;
- The pistons are thoroughly cleaned of carbon deposits. The holes intended for draining oil are also cleaned with a suitable wooden stick. The cleaned grooves are lubricated with clean engine oil;
- The rings are put on starting with the oil scraper. On one side of the ring is marked “TOP” (up), which indicates how it should be installed in the piston. The locks must be installed at 120 degrees relative to each other. This will prevent gases from penetrating through them. You cannot put the rings on in a “twist”; such installation may be accompanied by the appearance of microcracks, which will lead to their breakage;
- Reassemble in the reverse order, simultaneously cleaning everything with a clean rag and lubricating it with fresh engine oil. Pistons must be installed exactly in the cylinders from which they were removed. Also, the connecting rod caps with connecting rod bearings must be put on the same connecting rods from which they were removed.
Connecting rod and piston group
The main dimensions of the connecting rod and piston group are given in Fig.
2-13, 2-14, 2-15. Rice. 2-13. Main connecting rod dimensions
Rice. 2-14. Piston ring sizes
Rice. 2-15. Main piston dimensions
The piston is cast aluminum. According to the outer diameter, the pistons are divided into five classes (A, B, C, D, E) every 0.01 mm. The outer surface of the piston has a complex shape. Therefore, it is necessary to measure the piston diameter only in a plane perpendicular to the piston pin, at a distance of 55 mm from the piston bottom.
Based on the diameter of the hole for the piston pin, pistons are divided into three classes (1, 2, 3) every 0.004 mm. The classes of piston diameters and piston pin holes are stamped on the piston crown (Fig. 2-16).
Rice. 2-16. Piston marking: 1 –
arrow for orienting the piston in the cylinder; 2 – repair size; 3 – piston class; 4 – hole class for piston pin
By weight, pistons are sorted into three groups: normal, increased and decreased by 5 g. These groups correspond to markings on the bottom of the piston: “G”, “+” and “-“. All pistons on the engine must be of the same mass group.
Repair size pistons are manufactured with an outer diameter increased by 0.4 and 0.8 mm. An increase of 0.4 mm corresponds to a marking in the form of a triangle, and an increase of 0.8 mm corresponds to a marking in the form of a square.
The arrow on the piston crown shows how to properly orient the piston when installing it into the cylinder. It should be directed towards the camshaft drive.
The piston pin is a hollow steel, floating type, which rotates freely in the piston bosses and connecting rod bushing. The pin is secured in the piston hole by two retaining rings. According to the outer diameter, the fingers are divided into three classes every 0.004 mm. The class is marked with paint on the end of the finger: a blue mark is the first class, a green mark is the second class, and a red mark is the third class.
The piston rings are made of cast iron. The upper compression ring has a chrome-plated barrel-shaped outer surface. The lower compression ring is scraper type. The oil scraper ring has chrome-plated working edges and an expansion coil spring.
Repair size rings are marked digitally “40” or “80”, which corresponds to an increase in the outer diameter by 0.4 or 0.8 mm.
Connecting rod – steel, forged. The connecting rod is processed together with the cover, and therefore they are individually non-interchangeable. To avoid mixing up the caps and connecting rods during assembly, they are marked with number 2 (Fig. 2 - 17) of the cylinder in which they are installed.
Rice. 2-17. Marking of the connecting rod: 1 – connecting rod class by weight and by hole in the upper head; 2 – cylinder number
A steel-bronze bushing is pressed into the upper head of the connecting rod. Based on the diameter of the hole in this bushing, the connecting rods are divided into three classes every 0.004 mm. The class number 1 is stamped on the connecting rod cover.
Based on the weight of the upper and lower heads, connecting rods are divided into classes, marked either with a letter or with paint on the connecting rod cover. Connecting rods of the same weight class must be installed on the engine.
The weight of the connecting rods can be adjusted by removing metal from the bosses on the upper head and on the cover to a minimum size of 33 and 32 mm (Fig. 2-18). After removing the metal from the connecting rod cap, it is necessary to mark the classes of the connecting rod on it by the hole for the piston pin and by weight.
Carrying out compression measurements in cylinders
Let's look at an example of working on classic VAZ models. It is necessary to measure compression on a warm engine. Readings from a cold engine can distort the picture. For measurements, you will need a special pressure gauge equipped with a threaded tip. It can be bought at any auto store.
Compressometer appearance
The check begins by unscrewing all the candles from their sockets. Then the central cable from the ignition coil is disconnected. We set the gear to neutral and turn the throttle valve to the maximum opening. After this, screw the compression gauge into one of the spark plug holes. At this time, an assistant must turn the starter handle. Two or three pumps will be enough.
The readings are considered normal if the data on the device is 12-13 ks/cm2.
Level 10 to 12 is also acceptable. But if the numbers are below 10 kg/cm2, then this indicates low compression. If compression still reaches a satisfactory level, but a little late, then the valves may be responsible.
To clarify, you can pour about 20 ml of oil into the disputed chamber and crank the starter again, taking a measurement. When normal compression is established at 12 kg/cm 2, the reason lies in the rings. Correct installation of the piston rings can solve this problem. If the pressure remains low, then the valves are the cause of the decrease.
Installation using a mandrel
Disassembling the engine to replace rings
Before replacement, it is necessary to perform a number of preparatory work:
- it is necessary to drain the used engine oil, because after installing new rings you need to fill in fresh working fluid;
- We loosen the exhaust pipe of the muffler;
- you need to remove the valve mechanism cover and align the engine to the marks;
- we dismantle the camshaft star, and for front-wheel drive VAZs we remove the bolt securing the belt drive pulley, and then the timing belt itself with the pulley;
- in the classics, we loosen the tensioner, and then also dismantle the chain and sprocket mounted on the camshaft;
- then we dismantle the rocker with springs, laying everything out in the correct order to assemble the parts into place;
- remove the block head, before this you need to disconnect the manifold;
- unscrew and get rid of the pan and oil pump;
- remove the connecting rod caps, and then push the connecting rods up so that they can be pulled out along with the piston.
Removing the pistons from the cylinders
To carry out the work, we go to an inspection hole or overpass and prepare a set of tools:
- spanners;
- torque wrench (determines the degree of tightening of the bolt);
- mandrel for crimping rings;
- a set of feeler gauges for determining the gap.
Replacing piston rings on a VAZ 2109 begins with disconnecting the negative terminal of the battery. To provide access to the crankshaft from the pit, remove the lower crankcase cover. There is a gasket at the junction, it will need to be replaced with a new one. Using a 10mm wrench, detach the oil receiver from the main shaft cover and the oil pump housing.
Next, we detach the exhaust pipe from the bracket under the bottom. Since the bracket is also attached to the body, unscrew the fastening bolts. We bend the ends of the locking plates of the nuts that secure the exhaust pipe and the intake manifold. We unscrew these nuts, as well as the nuts on the clamp, and remove the clamp. Next, the receiving pipe and the resonator pipe must be unfastened. Access is open from below; all that remains is to unscrew the nuts of the connecting rod screws and remove the connecting rod caps so that the connecting rod can be knocked out from below.
We move under the hood. After unscrewing the nut and washer that secure the air purification filter, and unfastening the 4 clips, remove the filter cover. We take out the filter element and its housing. Then you need to disconnect the air intake hose and the pipe on the valve cover. To remove the valve covers, it is necessary to unscrew the nut securing the accelerator drive cable.
Next, remove the front timing drive cover, loosen the tension roller and tighten the belt. You can dismantle the camshaft pulley by prying it up with a screwdriver. Now your goal is to bend the rear cover away from the cylinder head so that the cylinder head comes out from under the end of the camshaft. To do this, unscrew the fastenings of the cover and water pump.
We take out the tips of the high-voltage wire of the spark plugs, disconnect the wire block from the distributor. By unscrewing two screws we remove the distributor cover with wires. To completely remove the distributor, disconnect the interfering hose from the vacuum corrector, unscrew the nuts, and remove the bracket. Then disconnect the fuel pump and carburetor hose and remove the fuel pump. Next, disconnect the thermostat hose clamps and dismantle this device.
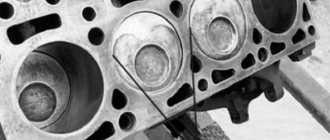
To unscrew 10 cylinder head bolts, use a 10mm hexagon. After pulling out the bolts and washers, finally disconnect the cylinder head. We remove the sealing gasket and always replace it. We clean the upper surface of the cylinder block from oil, dirt deposits and traces of the gasket.
We move into the pit. And, lightly tapping with a hammer, remove the piston assembly with connecting rod from the cylinder. We repeat the procedure with the three remaining pistons.
Checking rings and pistons
Each ring is removed from the pistons and checked in its own cylinder. In order not to confuse them with each other, it is necessary to immediately lay out the parts in a certain order. When checking old rings, their outer diameter should not create a gap with the cylinder walls of more than 1 mm. For comparison, you can insert a new ring into the same cylinder.
Checking the thermal gap in the rings
Measurements will usually be more accurate at the top of the block bore since wear is minimal.
The gap can also be checked in special gauges. You need to pay attention to the thermal gap in the piston rings, which should be in the range from 0.25 to 0.45 mm. It can be checked with a dipstick. If the parameter is smaller, then it is possible to increase the gap by filing the end plane with a diamond file.
The diameter of the pistons is checked at the bottom (skirt). This is done with a micrometer.
It is necessary to compare this indicator with the table of acceptable values. Additionally, you need to check the gap between the piston groove and the ring. If exceeded, the pistons must be changed. The tolerance limit is 0.15 mm. The pistons are also checked visually for cracks and the integrity of the ring bridges. After washing, satisfactory pistons can be used further.
Installation procedure
Branded products from trusted manufacturers have convenient markings, which make it clear how to correctly install the piston rings. On one side is written "TOP", which means "top" in English. This side should face the combustion chamber or the top of the piston.
Designation on the sides of the rings
If no inscription is found, then there should be a groove along the entire diameter. With this step you need to turn the ring down.
There are usually two installation methods used. One of them is safer, and the second is more often used by either great professionals or absolute beginners. Both are suitable for independent use during repairs.
Installation using metal plates
In the first case, you will need to cut several flat pieces of tin, approximately 0.3 to 0.5 mm thick. Three or four such sheets are placed along the diameter of the piston. Rings are put on them. And they drop down to the level of the slot. Then the mandrel for the piston rings is removed from the plates, and the ring fits into the desired groove. The method is perfect for any master.
Piston ring installation
The second option requires certain experience and skills. It consists of using your fingers to open the gap, increasing the inner diameter of the ring to the extent that you can pass the piston through it and install it in the desired groove. The disadvantages are that often inexperienced locksmiths break many rings by using more force than necessary.
Necessary actions after installing the rings
When each ring has taken its place in the groove, you need to install the slots approximately 120 degrees from each other. This reduces the likelihood of gases breaking through from the fuel chamber into the crankcase cavity.
Incorrect installation of piston rings
There is evidence that the first ring holds about 75% of the total compression, and the second - about 20%.
If the thermal gaps are separated, then when a certain amount of gas breaks through the first ring, it will not have time to get further, in contrast to the closer position of the second gap.
Review of popular models of piston rings VAZ 2109 – 2115
There are many companies that produce piston rings, as well as many fakes, and there is simply not enough time to look through them all. Therefore, let's look at those manufacturers of piston rings that differ from others in normal quality and price. The first thing I want to recommend is piston rings.
We recommend: 14 best spark plug manufacturers
Piston rings from .
These companies produce piston rings for VAZ cars of various diameters and are perfect for us. They are most likely produced in China, because the original ones will cost much more. But this does not mean that everything is so bad, their quality is excellent. I still recommend the rings, because their price is much lower than that of Mahle, and the quality is the same, so why pay more and overpay for the brand.
The upper compression ring of these manufacturers is chrome-plated steel, but its copper-plated one, which is clearly visible in the top photographs. The second compression ring is black and made of cast iron, but the ring from it has a darker color.
I recommend using metal oil scraper rings, because, unlike box-type rings, they fit perfectly in the cylinder, are resistant to overheating (they do not lose their spring properties) and their main advantage is that they work as two rings independent of each other. The rings are box-type, very afraid of overheating. When they overheat, they lose their spring properties and do their job poorly. And one more serious disadvantage: they require very careful running-in. At the slightest deviation from the running-in conditions, the working edges of the ring may break off in some places and allow oil to leak through.
Of course, there are other manufacturers of piston rings, but as usual they are complete fakes and sometimes it’s not possible to choose quality ones