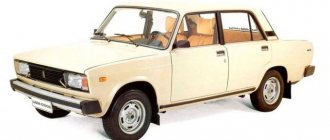
I found fairly old photographs from the repair of a VAZ 2101 and decided to show and talk about how to replace the driver's door panel on a VAZ 2101.
Straight to the point. The door was dented by a careless driver, he backed it up - he opened the door - he messed a little - the door opened in the other direction... As a result, the limiter turns the frame and it plays on the outer part of the door - the panels.
What to do in such a situation? Yes, it’s quite simple, there are only a couple of options:
I will use the second option, since it is not easy to straighten a bent door like this; it will take a lot of time and money; it is more profitable for the owner to install a new panel. Also, one of the advantages is the fact that if you are making a car for yourself and want to make a high-quality door, then you will have every chance to coat the bend of the panel and door frame with seam sealant, this will help prevent the rapid appearance of corrosion in this bend. They do this on foreign cars; if the car is for yourself, then it makes sense to think about it.
Replacing the panel must begin with dismantling the door and completely disassembling it; everything must be removed, from the locks, handles and ending with the glass. Next, you need to use a screwdriver to unscrew the bend of the old panel:
Unfold the bend with a screwdriver
Under the nickel-plated molding at the top of the panel, it is spot welded to the frame; this place needs to be drilled out and the old panel removed. I usually don’t throw them away, but use them as metal for future repairs.
This is where you need to drill
In the meantime, I have already removed the old panel, the frame needs to be cleaned to a shine, and the rusty areas must be treated with reactive primer.
“Bare” door frame of VAZ 2101
At the owner’s request, I simply primed the panel from the inside and, on the already installed one, sealed the gap between the frame stiffeners and the panel with seam sealant.
Primed panel, grent Ranal
Next, the new panel was placed on the frame and secured at the top with a semi-automatic device; this should not be done at many points, since the next step will be fitting the door; the bend of the new panel must be bent, but not bent completely. After trying it on, you may need to move the panel in one direction or another, adjusting it and bending the bend even more, fixing the panel on the frame. All this is done on a hung door.
Thanks for subscribing!
What and how to bend the folding on the panel? I do everything very simply, first I bend it slightly with a hammer, and then, placing 10mm plywood on the front side, I crimp the bend with pliers and finish the bend with a hammer.
Almost finished bend
Curved new VAZ panel
After the final bending and fitting of the door on the car, provided that everything is fine, you can, for reliability, grab the panel from the frames at points every 15-20 cm, this can be seen in the photo above.
VAZ 2101 door panel replaced
This is followed by grouting with transport primer, priming with reactive primer, then acrylic primer, sanding and painting.
Source
Replacing the door trim on a VAZ 2101-VAZ 2107
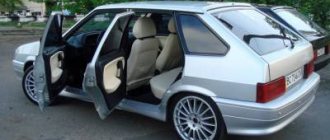
Welcome! Car door trim - it undoubtedly gives a different look to the car when you sit in it inside the cabin, because if you remove it, you can see the inside of the door, as well as the wires (If the door has electric windows), and this is often very unsightly, but Who knows, there are people who don’t pursue beauty and thereby create a sports car (In this case, everything is removed from the interior and only the steering wheel and one driver’s seat remain), but still not everyone needs this and therefore the trim will be in the car for a very long time (You could even say all your life) take its place in the cabin, while covering all the parts on which it is installed.
Note! In order to change the trim, you need tools, namely: You will need a screwdriver, in addition to it, we also recommend that you immediately buy holders at the auto store that hold the trim on the car door (There are seven holders in total that attach only one trim to the door, respectively, if you decided to change the entire door trim, you will need to stock up on 28 holders, they break very often because they are disposable and the broken ones are replaced with new ones, which cost a penny in the store)
Summary:
When should you replace your door trim? Everyone decides for himself when he needs it, someone changes it if the casing is torn, and someone changes it because it is very dirty (in paint, for example), but if it is very dirty, then do not rush go to a car store and buy a new one, try to wash off traces of dirt from the old one, if necessary, use special plastic cleaners or car interior leather cleaner, they clean well, in addition, they refresh the color of the part and give them a new look, and if you use them regularly, they will protect parts from their premature aging and the appearance of small cracks on them.
Useful information about making door cards
Speaker selection
Door cards are made in order to place the required number of speakers on them, with the help of which you can get loud and enveloping music. Car owners who undertake such a transformation pursue a variety of goals. Some people want to delight others with loud music from their car, others participate in loud sound competitions, and others have taken the path of improving the quality of music in their car and want to get surround and clear sound. In any case, we calculate the selection of speakers and the production of door cards on an individual basis and create door cards for a specific purpose.
When we receive the car for work, we first evaluate the shape of the door and the existing door card. We determine how many speakers and what diameter can be placed on the inside of the door in the new door card. We decide on the shape of the door card, the materials for its manufacture and the location of the speakers. We draw up a drawing indicating the dimensions and permissible connections, and draw a sketch of the project. After this, we proceed to its practical implementation.
Determining the number of speakers
When selecting speakers, we proceed from the rule that the speakers must be balanced in frequency and reproduce their fullest range. To achieve the desired result, we will install door cards on your car with a reasonable number of speakers, including speakers with a diameter of 16.5 cm, 20 cm and horn tweeters. As a rule, we place the places on the new door card for midbass and mid-frequency speakers in the lower part of the door, and tweeters in the upper part. We determine the place for the midbass column in the standard position so that the bass/midrange speaker plays into the volume of the door. Midrange speakers and tweeters will play into the volume of the casing.
When determining the number of speakers for new door cards in a car, we recommend stopping at 4-5 speakers. This is the optimal number of dynamic heads to get loud and high-quality music in the car. At the final stage of setting up an audio system, using channel-by-channel control, you can achieve harmonious sound from all speakers by setting the correct time delays for them and coordinating the reproduced frequencies for each speaker in the channel.
Loud front in the car door
When installing a loud front in a car, using 4-5 or even more speakers, we have to make a new door trim. We take a responsible approach to the manufacture of new door cards and ensure optimal strength to the products so that their base and body can support the weight of the speakers and do not resonate during operation of the audio system. The design is provided with a fastening system, with the help of which you can reliably attach the door cards to the metal of the door and eliminate the appearance of additional resonant frequencies and vibrations.
How to replace the door trim on a VAZ 2101-VAZ 2107?
Removal: 1) To remove the trim, at the beginning of the operation you will need to remove all the plugs that cover the screws securing the door handle to the car with a screwdriver, and after the plugs are removed, pick up a screwdriver and use it to remove all the screws that attach the handle and then remove it from the car door.
2) After the handle has been removed, proceed to removing the handle that raises and lowers the window at the car door. To do this, use a screwdriver as shown in photo number 1 to press the socket away from the lining, then slide the lining along the handle for lowering and raising the glass and remove it. (see photo 2), then remove the handle itself from the slots on which it is put on (see photo 3) and finally remove the socket itself, which is located under the handle and which you pressed out a little earlier (see photo 4).
3) Next, use a screwdriver to pry up the door handle trim in the place indicated by the arrow and then remove it by threading it along the handle itself.
Note! This facing is held on by only two tendrils (Indicated by arrows in the photo below) and is very easy to remove, but just do not overdo it with force and do not break the tendrils of its fastening!
4) And at the end of the operation, pry up the trim that is attached to the door in seven different places using a screwdriver, as you can see in the small photo below, it is already indicated in which places the holders are located that secure the trim, in the same places and pry it off using a screwdriver a When all the holders are removed or broken, remove the trim and then replace all the broken holders with new ones.
Note! If your car also has a trim that is located under the glass and you don’t know how to remove it, then study the article that describes its removal in detail, and it’s called: “Replacing the door trim on a car”!
Installation: New door trim, installed in its place in the reverse order of removal.
Additional video: If you want to study in more detail the process of removing the trim from a car door, then watch the video that is located just below, but in it the trim itself is attached to the door in a slightly different way, that is, using screws that you will not have , well, if they do, then it was done homemade because the trim has never been attached to the door in this way.
Source
How to properly upholster and trim doors on a VAZ 2107 car
The standard upholstery looks very inexpensive, which spoils the exterior design of the Russian car. "Sevens" after 2000 are equipped with a similar type of trim, just like earlier versions of this model. The standard casing is a narrow fiberboard, which is covered with cheap black polymer.
The standard upholstery is attached to pistons, which become unusable every time they are removed, and as a result they need to be replaced. Replacing the standard cheap upholstery on the VAZ-2107 with more advanced materials, which will brighten up the interior of the car. What is essentially changing the door trim of a VAZ-2107 at home, we will find out further.
Of course, replace the standard upholstery of the door cards with the following materials, which differ not only in price, but also in quality:
Use any of the materials listed, but the most affordable and common ones when working are: dermantine, leather and vinyl. In addition to the main material, to change the skin you will need plywood 4 mm wide. It is recommended to replace standard fiberboard because it is quite weak and wears out quickly. Latches for fastening the upholstery, foam rubber and glue will also come in handy.
Homemade door cards for the VAZ-2107 are an average solution for upgrading the standard trim. To remove the standard cards on the “seven”, you will need to perform the following steps:
If the standard card is removed, the doors can be silenced. Audio preparation is carried out immediately if you plan to install speakers in the front doors.
Making maps on the doors of a VAZ-2107 on your own is painfully easy, especially if you have a handy tool. Before work, you will need to have patience and time, because it takes up to 3-4 hours to make one upholstery.
The standard card is used as a template for the production of a new one. It is enough to attach the template to a sheet of plywood, then mark and cut out the base (it is better to use a jigsaw for cutting). On the prepared base, you should mark and cut holes for attaching handles and levers. When tuning the doors of the “seven”, you can immediately install an electronic drive on the power windows.
During the work, special attention should be paid to the correct marking of the holes for attaching the card. If you make a mistake by a few mm, the product will not fit well on the door.
When the base is ready, you should use sandpaper to process the sawn edges. This is necessary so that the base is very smooth. We continue tuning the door trim of the "seven", why take a piece of foam rubber (it is best to use two-layer foam rubber, consisting of a base and fabric) and cut it out according to the card template.
How to remove the door card on a VAZ classic 2106
Essential to know! If the tuning involves the production of speakers and shelves on the door, then the frame of these products should be made first. We often see how to make podiums for the VAZ-2107 in the corresponding material.
Of course, make the shelf separately, then sheathe it and install it on the door card. It is much easier to make such a shelf if you make a whole product together with the door card.
Foam rubber is glued onto the plywood using special superglue. When the foam rubber is glued to the door card, we begin to cover it. You can sheathe it either with a single piece of material or in sections, you just need to sew them together with a “French seam”, which is durable and attractive in appearance. The pattern is made in such a way that in this case there are 50 mm allowances on all sides. This is necessary in order to avoid the appearance of “bald” places on the sides if there is not enough material.
The casing is stretched onto the card according to the following scheme:
We recommend: Dashboard VAZ 2107
After covering the card, you can trim off any excess material. To prevent the upholstery from tearing at the place where the brackets are attached during operation, it is recommended to leave a small margin on the back side. Tuning of this kind is quite common, and is done in the same way for all remaining doors. Such a simple modification will significantly improve the appearance of the interior and radically transform the “Seven”. Below is a photo of car doors with the trim altered. Do the same for your own car.
Door trims (cards) for classic VAZ 01-07 (1 part)
Restoring door trims or cards VAZ 2101 2102 2103 2104 2105 2106 2107. Today my story will be about re-upholstering cards on a plastic base and the difficulties that you may encounter. First we need to find new cards with plastic bases. Next we will need a construction stapler and staples for it. Preparing door cards for installation on the door... recommended modification ♻ - give a like/thumbs up...
How to remove the door card of a VAZ 2107
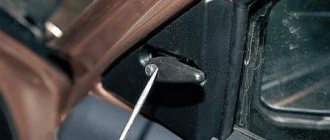
Figure 1. Removing the door 1 — screw securing the door hinges; 2 - impact screwdriver; 3 - door stop; 4 - door hinge. The arrow shows the direction of impact on the screwdriver
Knock out the limiter fastening pin 3 (Figure 1) and disconnect the limiter from the car body pillar.
While holding the door in the open position, use an impact screwdriver to remove 2 screws 1 securing hinges 4 of the door to the body pillar.
The door installation must be done in reverse order. Before final tightening the hinge screws, adjust the gaps between the door and the car body.
Disassembling the front doors
Door disassembly is required in case of replacement of parts and assemblies.
Figure 2. View of the inside of the door of a VAZ-2105 car
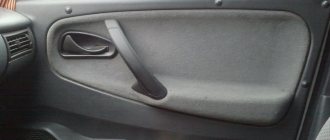
1- door lock button; 2- decorative plug for the door handle fastening screw; 3 — handle of the door lock opening mechanism; 4 — window lifter handle.
To remove the door trim, you must first remove the decorative plug 2 from the handle attached to the armrest. Under the plug there is a screw that needs to be removed. After this we dismantle the handle.
We remove the decorative rosette 1 from the inner door opening handle 3. To do this, you need to pry it off the trim with a screwdriver and remove it from the handle.
Figure 3. Door lock release handle
1 — decorative rosette; 3 — door opening handle
Now you need to remove the door lock button 3. To do this, use a sharp knife at point 2 to pry the button cover 1 and pull it out.
Figure 4. Door lock button
After dismantling the cover, you can pull out bracket 1 securing the button to rod 2 and remove button 3.
Figure 5. Door lock button
1 - bracket; 2 — rod of the door lock button; 3 — door lock button.
Now it's up to the window lifter handle.
Figure 6. Window lifter handle
1- window lifter handle; 2 - window handle trim, 3 - socket.
The window lifter handle consists of 3 parts. 1 - the window lifter handle itself, 2 - the trim of the window lifter handle, 3 - the socket. In order to disassemble and remove the handle, it is necessary to slightly recess the socket 3 under the trim 2 into the door trim and move the trim along the handle until it exits the annular recess on the axis. The direction is indicated in the figure by an arrow. Remove the window handle 1 and the socket from the axle.
In my case, it was still necessary to remove the screws securing the door trim, which were installed by the previous owner. In the general case, it is necessary, overcoming the resistance of the spring plastic holders, to remove the door trim. The location of the plastic holders on the door trim is shown in the figure below.
Figure 7. Location of spring plastic door trim holders
Next, remove the top seal of the sliding glass.
We unscrew the screw securing the front guide channel of the sliding window and remove it together with the upper seal.
Now you need to remove the lower seals of the sliding glass. The picture shows the seals along with decorative chrome molding (it was not installed on later models). It is necessary to remove it using dermantine strips inserted under the molding. You can place a small plastic spatula under the molding and use it to remove it. You need to do everything carefully, because... The chrome strip bends and dents easily, which is very noticeable later.
Remove the two fastening screws and remove the rear sliding window guide channel.
Loosen the window lift tensioner pulley bolts.
Now you can remove the sliding glass from the top.
Unscrew the three nuts securing the window regulator mechanism and remove it.
We unscrew the two screws securing the door lock drive handle and remove it along with the rods, having first disconnected them.
Attaching the door lock handle
1 — handle fastening screw; 2 - internal handle.
Unscrew the three screws securing the lock to the door. We take out the lock, having first disconnected the rods from it.
Front door assembly.
Reassembling the front doors must be done in the reverse order of disassembly.
When installing a window regulator, it is necessary to ensure that the cable is laid correctly on the drum (the turns of the cable should not overlap each other). After installing the window lift mechanism and correctly laying the cable on the rollers, adjust the tension of the cable with the tension roller, the stroke of the sliding window and make sure that the operation is smooth.
Before installing the door trim, it is necessary to check the presence and integrity of the plastic spring holders. If they are missing or broken, we install a new holder.
Rear sliding window drive
Rear sliding window drive
1 — window lifter handle; 2 — handle lining; 3 — window lift mechanism; 4 - roller; 5 — pressure plate; 6 - screw; 7 - tension roller
Operations for disassembling and assembling rear doors differ from operations for front doors in the removal and installation of fixed and sliding windows. The sliding glass of the rear door has only one bracket, on which the cable is attached with two screws 6 using a pressure plate 5.
— It is necessary to remove the sliding glass after removing the fixed glass through the top.
— To remove the fixed glass, first lower the sliding glass and, after unscrewing the top screw securing the pillar, remove it complete with rubber seals.
Cost of services
Simple card (direct) from 4 hours 2000–5000 rub. Complex map 3–7 days 6,000–15,000 rub.
Basically, the cost is calculated individually, based on the dimensions (number) of speakers and the desired configuration of the card (location, type of materials used, etc.). Contact us, we will make a good offer.
Manufacturing of other parts for car audio
Selection of audio system components 5 min – 1 hour free Adjustment of acoustics (during installation) free Audio preparation from an hour from 1000 rubles. Installation (installation) of coaxial acoustics 2–4 hours from 1400 rub. Installation (installation) of broadband acoustics 2–4 hours from 1600 rub. Installation (installation) of component acoustics 2–6 hours from RUB 3,500. Installation (installation) of subwoofers 1–4 hours from 500 rub. Installation (installation) of radio tape recorders from 15 minutes from 500 rubles. Organization of linear RCA outputs from an hour from 1000 rubles. Installation of a sound amplifier from an hour from 1000 rubles. Installation (installation) of the processor with configuration 4–6 hours 1500–4000 rub. Organization of control of the radio on the steering wheel from an hour from 2500 rubles. Disassembly and assembly of interior elements from 30 minutes from 300 rubles. Installation of a capacitor (storage) 1 hour 600–1500 rub. Crossover installation 1 hour 800–1200 rub.
Door cards Soundproofing. Replacement of factory caps. VAZ 2107
The excess material should be trimmed off after securing the spacer, leaving a few mm if you want it to not start to tear near the brackets.
It is necessary to make holes in the leatherette at the places where the handles are attached, under the window for installing plastic clips (at the back).
Making leather for the VAZ 2107 is very popular among DIY tuning enthusiasts. By combining different materials and colors, you get a beautiful, and most importantly, unique, exclusive look for seven interiors. Therefore, the main motive for making door cards yourself is not saving, but the desire to transform the interior of the car, making it comfortable and beautiful.
Installation of panels
On the VAZ 2107 door body, you install special bushings with internal threads yourself. Holes are pre-drilled on the panels in appropriate places, and decorative bolts are passed through them. When attaching the bushings, you must carefully follow the installation instructions to avoid turning the part. This mount allows you not only to visually tune the interior, but also to eliminate knocks and squeaks during the trip.
The door panels of the VAZ 2107 car are placed in place and attracted to the base using decorative bolts. This installation method is highly durable and provides optimal conditions for the operation of audio system speakers. Self-tuning by reupholstering the car interior with leatherette transforms the interior into a real work of art.
Source
Dismantling the door trim of a VAZ 2107
Old VAZ 2107 door cards are removed as follows:
The old sheathing should be used as a template for marking out the new one. You just need to attach it to a sheet of plywood and, using a pencil, mark the outline of the door card and the holes for the handle fastenings, the door opening lever and under the window handle axis. The latter need not be done if the car has (or will be installed) electric windows. Particular attention should be paid to the correct marking of the mounting holes. If you make a mistake, the door trim will not hold well and knock when the body vibrates.
After this, you can cut out the plywood base of the sheathing along the marked contour and drill the necessary holes. The edges of the casing and holes must be sanded.
The foam backing is cut along the finished contour of the skin, taking into account an allowance of approximately 10 mm. It is better to use a two-layer backing consisting of foam rubber and a fabric lining. This material is easier to glue to the plywood base of the upholstery. If you glue foam rubber directly, it, due to its porous structure, intensively absorbs the glue. As a result, it is not possible to achieve a uniform layer and high-quality sizing.
You can sheathe the base with a single piece of leatherette or vinyl leather, cutting it according to the size of the door card. The pattern must be made so that there is an allowance of 50 mm. This ensures that “bald” areas around the edges are avoided in case of an error. This is especially true for vinyl leather, which is subject to deformation and heating with a hairdryer during stretching.
To give a more original look to the covering, it can be made from several multi-colored pieces of leatherette, sewing them together. It is best to sew with a “French seam”, which is distinguished by good strength and attractive appearance.
When everything is ready, you can start gluing the foam backing onto the plywood. MAH glue, which is used in professional tuning studios, is well suited for this.
After gluing the backing, you need to cut it to the size of the plywood base and cut holes in it for attaching the door handle, speakers and the axis of the window handle.
Leatherette upholstery is stretched as follows:
Excess material must be trimmed after attaching the upholstery, leaving a few millimeters so that it does not begin to tear near the staples.
Making the trim for a VAZ 2107 with your own hands is very popular among tuning enthusiasts. By combining different materials and colors, you can achieve a spectacular and, importantly, unique, exclusive look for the “Seven” interior. Therefore, the main motive for making door cards yourself is not savings, but the desire to transform the interior of the car, making it comfortable and beautiful.
Welcome! Car door trim - it undoubtedly gives a different look to the car when you sit in it inside the cabin, because if you remove it, you can see the inside of the door, as well as the wires (If the door has electric windows), and this is often very unsightly, but Who knows, there are people who don’t pursue beauty and thereby create a sports car (In this case, everything is removed from the interior and only the steering wheel and one driver’s seat remain), but still not everyone needs this and therefore the trim will be in the car for a very long time (You could even say all your life) take its place in the cabin, while covering all the parts on which it is installed.
Note! In order to change the trim, you need tools, namely: You will need a screwdriver, in addition to it, we also recommend that you immediately buy holders at the auto store that hold the trim on the car door (There are seven holders in total that attach only one trim to the door, respectively, if you decided to change the entire door trim, you will need to stock up on 28 holders, they break very often because they are disposable and the broken ones are replaced with new ones, which cost a penny in the store)
Summary:
When should you replace your door trim? Everyone decides for himself when he needs it, someone changes it if the casing is torn, and someone changes it because it is very dirty (in paint, for example), but if it is very dirty, then do not rush go to a car store and buy a new one, try to wash off traces of dirt from the old one, if necessary, use special plastic cleaners or car interior leather cleaner, they clean well, in addition, they refresh the color of the part and give them a new look, and if you use them regularly, they will protect parts from their premature aging and the appearance of small cracks on them.
Additional lighting for the VAZ 2107 interior
Changes to standard lighting
– this is an opportunity to embellish the interior and make it unique. We took the lampshade from the new Priora. It looks good and has the necessary characteristics, both in size and in lighting effect. You will need regular masking tape, a knife with a sharp blade, a marker or pencil, and screwdrivers with a 12mm wrench.
We recommend running new wiring along the right pillar. Make the wire exits in the glove compartment area. We connect the minus to the body, and the plus, respectively, to the contact of the lamp. If you want the light to come on when the doors are opened, then you just need to throw an additional wire to the limit switch in the door and that’s all.
Soundproofing doors
It is necessary to disassemble the door not only because of damage to the cladding; sometimes this is done to increase sound insulation. The driver's door is soundproofed first. This procedure will reduce the level of extraneous noise, ensure silent closing of the structure, and improve the sound of music. The silence is broken not only by the bustle of the street, but also by the operation of the propulsion system, transmission, and suspension elements.
Before installation, raw materials for insulation and adhesive are selected. You need to purchase material based on bitumen or mastic using aluminum foil. Good glue has sealing properties, which help protect metal body parts from corrosion. Types of building materials for automotive insulation:
Any material can be used for door trim. Installation of sound insulation is carried out before the door element with trim is installed in place. The selected material is attached to the panel.
Materials for upholstery
When choosing fabric, you need to take into account quality, wear resistance, price, and color. The fibrous structure should stretch, this will allow the fabric to be securely fixed to the panel. Possible varieties:
Some car enthusiasts are experimenting and upholstering door panels with velvet and even faux fur. Such fabric will partially create sound insulation, but will cause difficulties during cleaning.
Need for replacement
The standard upholstery looks very cheap, which spoils the external design of the domestic car. "Sevens" after 2000 are equipped with the same type of trim as earlier versions of this model. The standard skin is thin fiberboard, which is covered with cheap black polymer.
The standard upholstery is attached to pistons, which become unusable every time they are removed, resulting in the need to replace them. You can replace the standard cheap upholstery on a VAZ-2107 with more advanced materials, which will brighten up the interior of the car. We will find out further what it is to replace the door trim of a VAZ-2107 with your own hands.
Materials for upholstery
You can replace the standard upholstery of door cards with the following materials, which differ not only in price, but also in quality:
You can use any of the materials listed, but the most affordable and easiest to work with are: dermantine, leather and vinyl. In addition to the main material, 4 mm thick plywood will be required to replace the sheathing. It is recommended to replace standard fiberboard, as it is quite flimsy and wears out quickly. You will also need latches for attaching the upholstery, foam rubber and glue.
Features of dismantling the casing
Homemade door cards for the VAZ-2107 are the optimal solution for upgrading the standard trim. To remove the standard cards on the “seven”, you will need to perform the following steps:
After the standard card is removed, you can silence the doors. At the same time, you can perform audio preparation if you plan to install speakers in the front doors.
Door card manufacturing process
It is very easy to make cards on the VAZ-2107 door with your own hands, especially if you have a handy tool. Before starting work, you will need to have patience and time, since it can take up to 3-4 hours to make one upholstery.
The standard card is used as a template for making a new one. To do this, just attach the template to a sheet of plywood, then mark and cut out the base (it is better to use a jigsaw for cutting). On the prepared base, you should mark and cut holes for attaching handles and levers. When tuning the doors of the “seven”, you can simultaneously install an electric drive on the window lifts.
Manufacturing of panels
Refinement of the VAZ 2107 interior begins with the dismantling of interior parts; the upholstery is removed from the internal surfaces of the body using a regular screwdriver. First, the window lifter and lock opening handle, as well as the large plastic handle, are removed from it. A flat screwdriver is inserted between the panel and the body and, acting as a lever, the resistance of the piston is overcome.
The door panel is removed and laid on a sheet of plywood, and its outline is traced using a pencil. To make a durable base for upholstery with your own hands, use a jigsaw; after the workpiece is cut, its edges are processed with sandpaper. The production of two-color sheathing is carried out using a sewing machine, the fabric is stitched, a backing is glued to the base, on top of which leatherette is fixed.
The process of manufacturing and installing a door card with trim
Making a door fragment with trim is no more difficult than dismantling the old one. To do this, you will need a standard set of tools, as well as: glue, soundproofing products, and a drill with attachments. First, a piece for covering is cut out from the purchased fabric, and an old piece of material is used in the form of a pattern. If measurements are taken from a panel structure, then you need to leave an allowance of at least 1–2 cm at the edges. It is important to immediately cut holes for the handle, speakers, and fasteners. Manufacturing instructions:
For cladding, it is better to use a solid sheet; otherwise, you need to make sure that the fasteners do not get into the joints.
Door opening limiter VAZ 2107, 2105, 2104
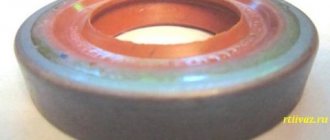
The door opening limiter 2105-6106082-00 for cars of the classic family VAZ 2104, VAZ 2105, VAZ 2107 is necessary to prevent excessive and sudden opening, for example due to a strong gust of wind and, as a result, deformation of the outer door jacket. The limiter is removed to be replaced with a new one in the event of a breakdown or when repairing the door itself, when its presence will interfere with the progress of the work.
Door stops 21050-6106082-00 are special devices that allow you to open and close doors silently, and also increase the service life of the structure. Using door stops, you will not have to carry out unplanned repairs or hide places of damage by repainting the vehicle, wasting your money and time.
Other articles of the product and its analogues in the catalogs: 21050610608200, 21050-6106082-00.
VAZ 2104, VAZ 2105, VAZ 2107.
How to independently replace the front door opening limiter on a classic car of the VAZ family and their modifications.
AvtoAzbuka Internet Store, repair costs will be minimal.
Don’t forget to share the information you find with your friends and acquaintances, as they may also need it - just click one of the social networking buttons below
Installation of silent locks VAZ 2107
Probably every owner of a VAZ 2107 noticed how poorly the standard door locks work. Sometimes they close poorly or make characteristic sounds. In general, you want the doors to work perfectly and with the least noise. There is a way out of this situation and let's look at it. Below is a brief instruction on how to replace standard locks with modern ones, similar to those of a foreign car, using the rear doors as an example. Similar operations are performed for the front doors.
Procedure. Materials
You should prepare in advance:
— Locks from figure eight (they are cheaper and of higher quality) — A set of silent locks, which are popularly called chocolates. — There are four bolts. — A drill and a set of drills for it. — A hacksaw for metal — A set of files — A couple of meters of cable — Rods from the “Constructor” set — Aluminum or plastic plates 10 x 6 cm. Thickness two millimeters. — Tools for cutting threads in metal.