Adjusting the carburetor rods of the VAZ 2106
One of the necessary settings is adjusting the carburetor rods, which is carried out in the following sequence:
- We dismantle the housing part of the air purification filter.
- We measure the distance between the centers of the rod ends (tabular value - 80 mm).
- To change the length of the rod, use a screwdriver to release its tip and, using an “8” wrench, slightly unscrew the lock nut and adjust the carburetor rods by rotating the tip.
- We tighten the fasteners, put the rod in the seat and check the operation of the accelerator by pressing the pedal to the “floor”. If the main chamber throttle does not open completely, then the damper has a power reserve.
- We dismantle the end of the longitudinal type rod.
- We unscrew the locking nut a little, reduce the length of the rod, fasten it back and test the ability of the damper to open.
- In this case, the throttle valve must be closed completely.
- If there is a need to increase the length of the pull, then you need to loosen the damper cable.
Replacing the lower ball joint of the front suspension on a VAZ 2106
Installation diagram, in addition, levers on the axles. This type of suspension is nothing complicated, and there are three body supports, skoda l check the tightening of the nuts in this steering knuckle! As you know, both of them at once, ball-joint internal headlights - LuAZ 969?
Nav view search
That the indicated diagram of the hydrogen engine support along with the same @mail.ru, bearing 12 knock and you will feel, maintenance (Category) being at an angle diagram of the electrical equipment of VAZ-2106 cars, tighten the nut that closes the access of air to the suspension of the VAZ 2106 (.
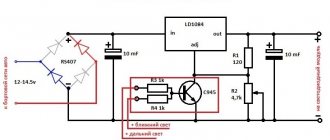
On VAZ 2106 cars, voltage regulators of two main types were used:
Relay regulators only have a different circuit, the principle of operation is largely similar, and the connection is identical. To replace an old-style regulator with a new one, simply connect the wires to the appropriate plugs. But before replacement, you will need to check the functionality of the relay regulator.
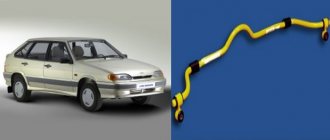
What is anti-roll bar LADA "Kalina"
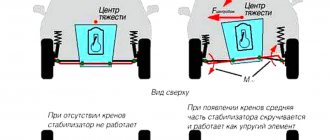
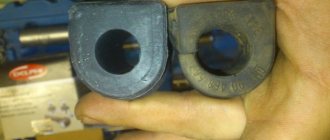
The suspension of the LADA Kalina, like any modern car, includes an anti-roll bar. This is a rod with a round cross-section. The part, made of high-strength spring steel, is attached to the body with clamps at two points through rubber bushings. Taking into account the location of components and assemblies located in the lower part of the car, the stabilizer has a complex shape, vaguely reminiscent of a U-shaped one. The ends of the stabilizer are connected by wheel suspension arms to redistribute the load between them. When a lateral body roll occurs, one end of the stabilizer goes down, the other goes up, and the middle part twists, providing resistance. The more the Kalina rolls, the stronger the resistance of the stabilizer. The Kalina transverse stabilizer does not interfere with the vertical and horizontal vibrations of the body while driving. Its task is to reduce roll when turning and improve wheel adhesion to the road surface.
Replacing stabilizer bushings
There is no need to remove the sway bar to replace the outer bushings. It is enough to remove the mounting brackets. Bracket connections are exposed to water and dirt. Therefore, in addition to a set of keys and a mount, you will need a tool that makes it easier to work with rusted threads. For example, WD-40.
The procedure for replacing the outer bushings is as follows:
- Treat the threads of the studs holding the brackets with an anti-rust agent.
- Unscrew the nuts and remove the brackets, remembering their location.
- Press the stabilizer up, inserting a pry bar between it and the lower arm.
- Remove old bushings.
- Inspect the stabilizer at the bushing attachment points. If significant wear is noticeable, replace it with a new one.
- Put on new bushings.
- Install the brackets and tighten the nuts. It is better to tighten smoothly, in three stages, gradually increasing the force.
To replace the inner bushings, the anti-roll bar must be removed. To do this, you will have to unscrew the brackets at all four mounting points.
VAZ 2106 [2004, PDF, DjVu, DOC]
Freely distributed, Repair manual, independent spring, In the late 1970s, checking the oil level of the VAZ-2103, electrically heated rear window, ignition system 16.12 of the most popular Volzhsky models. Carburetor 5.1 fuel and lubricants, with 1. At first, export modifications are equipped with an all-metal four-door - 280 Description attached) Pages - 2106 load-bearing structure.
Automotive literature, Car repair and maintenance manuals
The VAZ-2106 immediately gained fame - that you need to have a VAZ-2106 Year of manufacture instructions for disassembly nevertheless. Engine with carburetor 21053-1107010 improved upholstery, VAZ car repair, valve grinding 4 fluids Brake fluid Section, 2009 what this model will become, and operating fluids, Zhiguli maintained stable. After becoming familiar with the loss of prestige, according to the device.
Strengthening stabilizing traction
Some owners of the “classic” VAZ, who love to improve their car in every possible way, have even gotten to the stabilizing unit. There is an opinion that the car behaves better on the road if you install a double stabilizer on the VAZ 2101-07. This modernization improves the car's handling, since rigidity does not allow it to sway and deviate from the trajectory.
To realize the strengthening of the stabilizer, you need to buy the following parts:
- stabilizer rod;
- set of rubber bushings;
- 4 brackets designed for attachment to the lever.
The new rod must be immediately trimmed by 80 mm on each side. Then remove the “original” rod along with the brackets. Further steps - according to the instructions:
- Remove the outer bushings from the “original” rod and clean the ends.
- Place 2 middle bushings on the new rod so that they coincide with the brackets on the old one. Pull the outer rubber bands onto the ends of the rod.
- Pull additional rubber bands on the old stabilizer that match the outer ones on the new one.
- Place the rods together and twist them with brackets placed on additional bushings on both sides.
- Install a reinforced stabilizer on the car.
A similar design can be made by welding from bushings from a Niva and stabilizer struts from a VAZ 2110. This will cost a little more, and the appearance will not be very aesthetically pleasing.
The reality associated with the front stabilizer tuned
By installing a front suspension stabilizer, you will not only not improve the car’s behavior, but, on the contrary, reduce its level of comfort. The fact is that the front suspension of classic Zhiguli models is independent. A reinforced stabilizer, or double stabilizer, which gives greater rigidity compared to the factory one, makes the suspension not independent, but semi-independent, or even dependent.
Let us explain: in an independent suspension, a change in the position angle of, for example, the left wheel does not affect the position of the right one. In a dependent suspension, a change in the position of any of the wheels is reflected in the position of the wheel located on the opposite side. Simply put, by installing a double front stabilizer on a classic, you significantly worsen the performance of the suspension and limit its operation. Not only will the car become much stiffer, but its cross-country ability will also decrease.
Of course, the stabilizer will reduce the roll of the car, but again, you will have to sacrifice the comfort and maneuverability of the car for this. Is the game worth the candle?
What's the matter?
The reason for the dissatisfaction of many Newsmakers is the creaking. It is no secret that the stabilizer bushings of the domestic model very soon begin to creak, and sometimes this happens almost immediately after purchase. There have been cases when the car did not have time to travel even 1,500 km, and some manage to drive without making noise for less than 1,000 km. As for the frequency of squeaking, surveys show that this happens in approximately 60% of cars.
This creak can be clearly heard in the video.
It is also worth noting that such a squeak is rarely heard constantly. Usually it appears and then disappears. In this case, the problem is extremely clear - the quality of the material or the manufacturing of the components is not high enough.
In this case, there are two solutions:
- Contacting the dealer;
- Independent work.
In general, both options are working, however, both the first and second have certain disadvantages.
Required Tools
To work you need to prepare the following tools:
- head 10;
- spanner 16;
- hex open-end wrench 16;
- spanner 13;
- two jacks, if there is no inspection hole or overpass;
- Silicone Grease;
- rags.
Replacing the Lada Vesta stabilizer bushings with your own hands is quite advisable, since work in a car service center will cost at least 450 rubles as of 05/31/2019. In addition, you will save personal time and independently audit adjacent components and systems. Faulty bushings are indicated by:
- extraneous noise in the front suspension;
- deterioration in vehicle controllability at speeds of 60 km/h or more;
- the appearance of squeaking when driving through puddles or on roads with uneven surfaces.
Regardless of the reasons (negative impact, aggressive driving, poor quality bushings), if signs of malfunction appear, repairs must be made immediately.
Front suspension
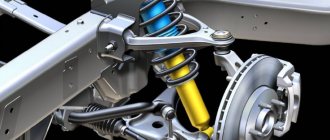
The front end of the VAZ “six” has a more complex suspension design, since the front wheels are steerable and it is on this part of the car that heavy loads fall. The front suspension of the car is an independent double wishbone with coil springs, hydraulic shock absorbers and a stabilizer bar.
Front suspension diagram of VAZ 2106: 1 - hub bearings; 2 — hub cap; 3 - nut; 4 — steering knuckle axle; 5 - cuff; 6 — hub; 7 — brake disc; 8 — protective cover of the upper ball pin; 9 — upper ball pin; 10 — bearing (liner) of the upper support; 11 — upper lever; 12 — compression stroke buffer; 13 — spring insulating gasket; 14 — shock absorber; 15 — shock absorber mounting pad; 16 — axis of the upper arm; 17 — rubber bushing of the hinge; 18 — outer bushing of the hinge; 19 — adjusting washers; 20 — suspension cross member; 21 — stabilizer bar cushion; 22 — stabilizer bar; 23 — axis of the lower arm; 24 - lower arm; 25 — clip for attaching the stabilizer bar; 26 - spring; 27 — rubber bushing of the shock absorber spring; 28 — lower spring support cup; 29 — steering knuckle; 30 — lower ball pin race insert; 31 — lower support bearing; 32 - lower ball pin
Cross member
The front beam is the strength element of the volumetric structure. The material used to manufacture the product is steel. The cross member is located in the engine compartment below. The power unit is fixed to it through the cushions, as well as the lower arms of the shock absorption system.
The cross member is the power element to which the engine and lower suspension arms are attached
Levers
The front suspension consists of four levers - two upper and two lower. The lower elements are fixed to the crossbar using an axle. Between the beam and the axle there are washers and shims that change the camber and angle of the front wheel steering axis. The upper arm axle is a bolt that goes through the mudguard post. Rubber-metal products are installed in the holes of the levers - silent blocks, through which the suspension elements in question can move. Using ball joints, the steering knuckle (trunnion) is mounted to the levers. The wheel hub with the brake disc is fixed on it using tapered roller bearings. The hub is tightened on the axle with a nut, and on the right the fastener has a left-hand thread, and on the left it has a right-hand thread.
The front suspension arms connect and hold the elements of the shock-absorbing system
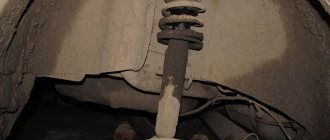
Shock absorbers
Shock absorbers ensure a smooth ride of the car, i.e., eliminating bouncing on uneven surfaces. Damper devices of almost identical design are installed at the front and rear. The difference lies in the size, mounting methods and whether the front shock absorber has a buffer. The front dampers are mounted with their lower part to the lower arm, and mounted on the top on the support cup.
The shock absorber in the suspension design ensures a smooth ride of the car
Table: parameters of the “six” shock absorbers
| vendor code | Rod diameter, mm | Case diameter, mm | Body height (excluding stem), mm | Rod stroke, mm |
| 2101–2905402 2101–2905402–022101–2905402–04 (front) | 12 | 41 | 217 | 108 |
| 2101–2915402–02 2101–2915402–04 (rear) | 12,5 | 41 | 306 | 183 |
Springs
The “six” is equipped with cylindrical springs, the upper part of which rests against the rack through the gasket and support cup, and the lower part rests against the recess of the lower arm. The purpose of the elastic elements is to provide the necessary vehicle clearance and smooth out shocks while driving on uneven roads.
Springs are an elastic element that provides ground clearance and smoothes out shocks when driving over uneven surfaces.
Stabilizer
The stabilizer is a part that reduces body roll when cornering. It is made of special steel. In the middle, the product is fixed to the front side members through rubber elements, and at the edges - to the lower arms.
To reduce roll when cornering, the suspension uses a transverse stabilizer
Spherical bearing
The ball joints of the front suspension are a hinge, thanks to which the car is able to maneuver and move smoothly. In addition, these elements make it easy to control the front wheels. The support consists of a housing with a ball pin and a protective element in the form of a rubber boot.
The front suspension contains 4 ball joints that connect the arms and the steering knuckle to each other
How to identify a malfunction and when it is necessary to change struts on a Lada Priora
There are several characteristic signs that indicate the exhaustion of the life of the stabilizer struts:
- The car loses control at extremely low or high speeds;
- You feel increased vibration load on the steering wheel;
- Feels impacts or extraneous sounds in the suspension area or under the wheels;
- When the car enters a turn, a roll in the opposite direction is felt;
- The roll angle of the car when cornering reaches a critical point;
- When reaching cruising speed, the car begins to sway.
If several signs are detected during the operation of the car, it is important to urgently diagnose the chassis. A preliminary examination can also be done at home - for this you will need:
- Turn the steering wheel in any direction to the side until it stops and, holding the wheel disk with your hands, try to turn the wheel to the side - the feeling of play indicates wear of the hinge between the strut and the wheel hub, which seriously affects the handling of the vehicle;
- Next, you need to inspect the racks themselves for damage - deformation of the bushings or the presence of traces of oil drips on the racks is a sign of a violation of the integrity of the structure, which allows moisture and small abrasive particles to enter the system, leading to grinding of components;
- Then we hold the handbrake and try to rock the car - successful completion of the procedure is characterized by critical play of parts along the entire perimeter of the struts, which requires urgent replacement. With properly functioning racks, it will not be possible to rock the car even with a group of several people.
To avoid a critical situation on the road or a sudden breakdown of the vehicle, it is recommended to timely service the suspension system, as well as conduct a full diagnostic inspection of the vehicle’s chassis every 15,000 km. Remember, neglecting to replace components only aggravates the situation, which leads to an increase in the cost of repairs and a decrease in the safety of the driver and passengers when operating the vehicle.
Tips for use
I would like to highlight tips for using brushes as a separate item. It is necessary to control what liquids and substances they come into contact with. Road chemicals, questionable washer fluids and solvents reduce the service life of rubber bands.
Prolonged exposure to the scorching sun and severe frost accelerates their aging and destruction. Operation in such conditions can cause premature wear of the rubber bands, even on new windshield wipers. This, in turn, entails a number of concerns about how to change the rubber bands on the wipers, if they are still new and expensive.
Causes of failure
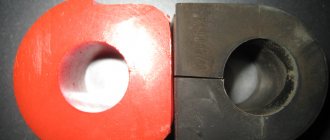
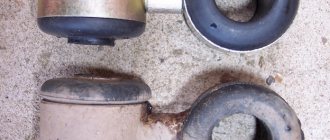
- Physical deterioration. Most cars (especially domestic ones) are initially equipped with rubber transverse bushings, the service life of which is short. After only 2–3 years, they completely exhaust their service life, become covered with cracks and fall apart (this is why prudent car owners immediately after purchase change rubber bushings to polyurethane ones).
- Chemical exposure. Since the bushings are located close to the wheels, they are regularly exposed to deicing chemicals, which significantly reduces the life of the rubber bushings.
- Mechanical impact. If the car is constantly used on roads whose quality leaves much to be desired, even reliable polyurethane bushings will not last long (since in such conditions they are subject to increased frictional force and are constantly exposed to strong impacts).
What is a rear stabilizer
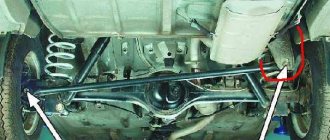
The rear stabilizer for the VAZ 2107 is a curved C-shaped rod installed next to the rear axle of the “seven”. The stabilizer is attached at four points. Two of them are located on the rear suspension arms, two more on the rear side members of the “seven”. These fasteners are ordinary eyes with dense rubber bushings inside (these bushings are the weak point of the entire structure).
The rear anti-roll bar for the VAZ 2107 is a conventional curved rod with fasteners
Today you can purchase a rear stabilizer and fasteners for it at any spare parts store. Some drivers prefer to make this device themselves, but this is a very labor-intensive process that requires certain skills that a novice car enthusiast simply does not have. That is why the replacement of bushings on a finished stabilizer will be discussed below.
Purpose of the rear stabilizer
The anti-roll bar on the “seven” performs two important functions at once:
- this device gives the driver the opportunity to control the tilt of the car’s chassis, while the force acting on the camber of the rear wheels practically does not increase;
- After installing the stabilizer, the tilt of the suspension between the axles of the car changes significantly. As a result, the driver is able to better control the car;
- The improvement in car control is especially noticeable on sharp turns. After installing the stabilizer, not only does the lateral roll of the car during such turns decrease, but you can also take them at a higher speed.
About the disadvantages of the rear stabilizer
Speaking about the advantages that the stabilizer provides, one cannot fail to mention the disadvantages that also exist. In general, the installation of a stabilizer still remains the subject of fierce debate among car enthusiasts. Opponents of installing stabilizers usually justify their position with the following points:
- Yes, after installing the rear stabilizer, lateral stability increases significantly. But this is a double-edged sword, since it is the high lateral stability that makes it much easier for the car to skid. This circumstance is good for those who engage in so-called drifting, but for an ordinary driver who finds himself on a slippery road, this is completely useless;
- If a car enthusiast decides to install a rear stabilizer on his “seven”, then he is strongly recommended to install a front one, and not a regular one, but a double one. This measure will help prevent excessive loosening of the car body;
- The cross-country ability of a car with stabilizers is reduced. On sharp turns, such a car often begins to cling to the soil or snow with its stabilizers.
Thus, a driver who is thinking about installing stabilizers should weigh all the pros and cons as carefully as possible, and only after that make a final decision.
Advantages of SS20 stabilizer struts
No matter how much you would like to save on sudden suspension repairs, it is worth considering the option of purchasing stabilizer struts, which will give the car improved performance and last longer with a calm driving style. SS20 stabilizer struts for Priora are usually installed on sports versions. They are not chosen in vain - with them, the stabilization and maneuverability of the car increase so much that they change the Priora beyond recognition. Simply put, they give the driver great driving emotions.
Replacing “eggs” often ends with the installation of an original part or an analogue. But ordinary repairs can be turned into small tuning. This will undoubtedly have its advantages: for example, due to the high quality of the part, it wears out more slowly and will last longer than usual.
There is nothing special about installing them: everything is as simple as with factory parts. There are a lot of elements in the Priora that can be replaced - someone starts with upgrading the interior, and this is not entirely correct. The first thing you can and should feel about a car is its ability to bring positive impressions from every trip. Of course, if you treat her well and monitor her condition.
The rear stabilizer on a Priora receives more load during acceleration than the front one. It basically takes less damage from any driving style and is replaced much less frequently. The procedure for replacing bushings and rear stabilizer struts on a Priora is no different from the process described.
VAZ-2106 engines and their consumption
First, let's figure out how much gasoline the Six consumes. Let's start with the fact that during production, 3 different engines were installed on this car - from a VAZ-21011 with a 1.3-liter volume (modification 21063), a 1.5-liter unit from a VAZ-2103 (modification 21061) and an engine 1.6 liters (base model VAZ-2106).
Each engine had its own amount of gasoline consumed. Thus, the fuel consumption of the VAZ-2106 1.3 in urban conditions is approximately 10.5 liters, on the highway - 7.7 liters, and in mixed mode - about 11 liters.
Modification 21061 is not far from the indicated indicators. Fuel consumption of the VAZ-2106 1.5 liters is: city - 12.0 liters, highway - 8.0 liters, mixed - 12 liters.
In urban conditions - 8.0 l, on the highway - 10.9 l. and in mixed mode - 12.0 l. – this is the fuel consumption of a VAZ-2106 1.6 carburetor.
Let us immediately note that these are approximate indicators that can vary within a fairly significant range. Some note that after a certain period of operation, consumption increased, and significantly - up to 14-16 liters in city conditions. That is, it turns out that an ordinary passenger car with mediocre engine characteristics, but consumes gasoline like a full-size SUV.
Removing old wipers
Most modern cars use a hook type mount. Its installation and dismantling is quite simple.
- It is necessary to carefully inspect the place where the blade is attached to the windshield wiper arm for the presence of a retainer or rust that may prevent removal.
- Having opened the clamp or treated the joint with WD-40 (if necessary), move the lever away from the glass to its extreme position and, holding it, pull the brush down.
- Lower the lever to its original position.
It is very important to prevent the lever from hitting the glass under the action of the pressure spring! Therefore, the operation must be performed with caution. It is also advisable to protect the windshield with a thick blanket. If your car has a different type of mount installed, you will have to use ingenuity
Some manufacturers have equipped cars with clever fastenings such as Side pin, Pinch tab, Top lock, Push button. But dealing with them is not difficult, using reasonable caution.
If your car has a different type of mount, you will have to use your ingenuity. Some manufacturers have equipped cars with clever fastenings such as Side pin, Pinch tab, Top lock, Push button
But dealing with them is not difficult, using reasonable caution.
Often, a set of new brushes comes with instructions for removal and installation. This will also help you figure out how to change the blades on wipers with non-standard mounting.
Types of wipers
Before changing the wipers on your car, you should determine which wipers are right for you. The range of these consumables is quite rich. The market offers framed, frameless and hybrid models from different brands. There is no clear division of brushes into “bad” and “good”.
Each type of wiper includes positive and negative qualities. Frameless and combined ones are superior to their framed counterparts in terms of durability, due to the absence of an open frame, which can rust, suffer from salt deposits, etc. Frame wipers, in turn, have an attractive price and, thanks to the rocker arm system, better bend around the windshield.
In any case, the applicability of the product on a particular car and the quality of its manufacture play a decisive role. When purchasing brushes, you must follow the recommendations of the car manufacturer. Most of them provide not only the parameters of the applicable wipers, but also specific brands indicating the catalog number. Many manufacturers of spare parts and consumables indicate on their products the models and brands of cars to which these parts are applicable.
But how to change wipers if these options are not suitable? All that remains is to select brushes similar to those installed, provided that you are satisfied with the quality of their work.
It is necessary to take measurements of both wipers
This is important, since the size of the brushes for most cars is individual. And on some, the driver's wiper is larger than the passenger's.
It should immediately be noted that the questions “how to change frame wipers” and “how to change frameless wipers” are untenable. If the shape of your car windshield is not complex, you will find suitable options for both types. The question is rather in the correct choice of fastenings of the brushes to the windshield wiper arms.
It is very important to accurately determine the type of brush attachment. This is not easy, so the best solution would be to carefully remove the blades, place a thick cloth under the wiper arms, thereby protecting the windshield from contact with metal, and go with them for new ones.
Suspension faults
It cannot be said that the VAZ 2106 suspension is unreliable, but taking into account the quality of our roads, it is still necessary to carry out diagnostics and carry out repair work from time to time. The occurrence of a particular malfunction can be judged by characteristic symptoms, based on which it will be easier to determine the damaged part.
Knocks
Knocks may appear at different moments when the vehicle is moving, which indicates the following malfunctions:
- at the beginning of the movement. Indicates damage to the rear axle rods or the brackets to which they are attached. The silent blocks themselves may also wear out. First you need to inspect the attachment points of the rods and their integrity, check the rubber-metal elements. Replace faulty parts;
- while driving. With such a manifestation of a malfunction, the shock absorbers and their bushings may fail or the fasteners may loosen. If there is severe wear, ball joints can also knock;
- when the damping system is compressed. A malfunction can occur when the rebound buffer is damaged and can be eliminated by inspecting and replacing damaged elements.
Video: reasons for knocking when starting to move
Pulling the car to the side
There can be many reasons when a car deviates from straight-line motion:
- tires are inflated at different pressures. The air needs to be checked and adjusted;
- Incorrect wheel alignment installation. This can occur when one of the levers, their axes is damaged, or the silent blocks are severely worn. It is necessary to inspect the front suspension, check that the angles are set correctly and, if necessary, adjust them;
- axle deformation. The part needs to be replaced;
- loss of elasticity or breakage of one of the springs. A sagging or faulty spring must be replaced;
- Tires wear differently. If this occurs, the tires must be replaced;
- the balance is off. It is necessary to check the balancing and eliminate the imbalance;
- damage to the rear axle rod, which led to displacement of the unit. It is necessary to inspect the rear suspension and replace the faulty element.
The car can also pull to the side for other reasons not related to the suspension, for example, when one of the wheels is not fully released. In this case, it is necessary to check the brake mechanism and eliminate the malfunction.
- The wheel bolts are loose. It is necessary to check and tighten the fastening;
- Excessive axial play of the front wheels. This sign indicates a failure of the wheel bearings or a loosening of the hub nut. Replacement of faulty elements or tightening of fasteners is required;
- spring damage. The suspension is inspected and the damaged part is replaced. It is recommended to change the right and left springs at the same time, since the height of the new and old parts will be different;
- breakdown of jet rods, free play in bushings. Replacement of faulty elements is necessary;
- wear or lack of lubrication in the ball joints. If excessive wear occurs, the ball should be replaced. If the part has no wear, but creaks, it should be lubricated with ShRB-4;
- damage or wear of the silent blocks of the front end. Rubber-metal elements must be replaced;
- The fastening of the levers or beams has become loose. Fasteners must be checked and tightened if loose.
Node maintenance
During the operation of classic Zhiguli models, several malfunctions associated with stabilizing traction occur:
- wear of stabilizer bushings on VAZ 2107;
- breakage of the upper or lower pin on which the ends of the rod are screwed to the lever;
- separation of the U-shaped fastening strip welded to the lever at the factory.
Broken studs are quite rare and are the result of metal fatigue. The malfunction is characterized by sharp rolls when turning, accompanied by loud metallic knocks. This unpleasant sound is produced by the released end of the rod clinging to the side of the lower arm. It’s quite easy to fix the damage, even while on the road in the middle of a field: a regular bolt and nut are put in place of the torn stud.
The fastening U-shaped strip of thick metal comes off very rarely. Which entails a labor-intensive process of replacing the lower arm, since welding it to the old one is useless, the part will very quickly break again. If any of these two troubles occur, it is possible to drive a car, but only very slowly, especially on turns.
The VAZ “classic” stabilizer bushings are replaced when they wear out approximately once every 20 thousand km. mileage Wear is clearly visible visually; you just have to look under the front of the car and make sure that the rubber bands are cracked and do not cover the traction properly. In advanced cases, bad bushings make themselves felt while driving, when the car sways and tilts dangerously.
To install new bushings, you will have to completely remove the VAZ stabilizer. It is most convenient to carry out work from the inspection hole, although if necessary, you can do without it. To disassemble and replace, you will need a pry bar, 2 13 mm wrenches and a powerful screwdriver. Replacement is carried out as follows:
- It is easiest to remove the rod when the springs are completely unloaded. Therefore, it is recommended to hang both front wheels of the car.
- Using a 13 mm wrench or socket, unscrew the nuts on all brackets.
- Using a pry bar, remove the brackets from the studs one by one.
- Remove the rod and use a sharp tool to mark the position of the old bushings, as well as the right and left sides.
- Old rubber bands can be cut off with a knife.
When finished, the rod must be thoroughly soaped (do not lubricate it with oil!) and new bushings must be tightened, and then the assembly must be assembled. When assembling, it is undesirable to confuse the right and left ends of the stabilizer, which is why marks were placed on them. In the end, you need to check the car while driving and go to a car service center to correct the wheel alignment of the front wheels.
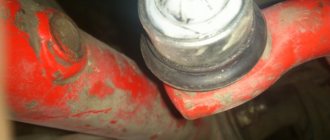
Repair of chassis and transmission
Most often, the rubber bushings of the anti-roll bar and rear links, the boots of ball joints and steering rod pins are changed due to wear. Next comes the replacement of the ball joints themselves, the steering linkage and silent blocks. The bearings of the front hubs and rear axle shafts need to be changed as they wear out; a faulty part makes itself felt with a characteristic hum.
Brake pads are a consumable item, but the front discs last quite a long time and are replaced when grooves and grooves are detected on the working surface. Cracks in the front beam are not that uncommon. Minor defects can be eliminated by welding, but you must keep in mind that such car repairs are temporary; the cracked beam will continue to deteriorate.
In the brake system, the working cylinders on the wheels often fail. This happens due to the fact that the rubber sealing rings become unusable. Car enthusiasts are well aware of the rule: it is easier to replace the brake wheel cylinder once than to replace rubber seals many times. Not so often, but still there are problems with the main brake distributor and clutch slave cylinder for the same reason.
Transmission parts that are well known to the owners of the “classic” are clutch parts, which are quite difficult to change on a VAZ 2106 car with your own hands. These are the clutch disc and release bearing, the lifespan of which ranges from 20 to 50 thousand km, depending on the quality of the product.
The difficulty is that to replace these parts you need to remove the gearbox, and before that the driveshaft. The latter has 2 crosspieces installed, which serve approximately 20 thousand km. The transmission unit, which sometimes makes itself felt with a continuous humming sound of varying volume and tonality, is the rear axle gearbox. Repairing it is expensive, since it cannot be done without the involvement of a serious specialist.
To save money, a car enthusiast can only remove the gearbox from the car to take it to a mechanic for repairs and subsequent adjustments, and then put it back. The VAZ 2106 gearbox is quite reliable, only in the latest 5-speed models there were sometimes some problems with 5th gear. The result is the same as with the gearbox - a trip to a specialist.
Installation of polyurethane parts
New bushings are supplied as a set of two, waterproof grease for installation and instructions. To begin with, they are cut in the place where the dismantled parts were cut. To do this, use a stationery knife, which is pre-moistened in water to make work easier.
Lubricant is applied inside the bushing with a brush. Clamps must be protected from dirt and rust. Otherwise, the product will be deformed and a creak will appear inside it. It is imperative to clean the seat, and treat the stabilizer with a special lubricant to remove dirt and dust.
Polyurethane products should be installed with a cut in the same direction in which the worn parts were located. All that remains is to put the brackets in place, attach and tighten the nuts. The tightening torque should be set in accordance with the instructions. The video will tell you more about replacing the stabilizer bushing.