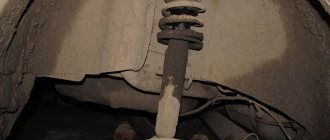
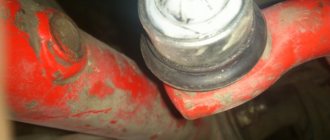
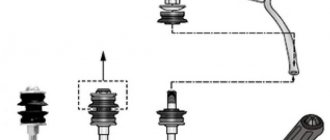
The anti-roll bar link is an important element of the engine chassis, which consists of a small pulley that has a hinge on each side of the base.
The functional purpose of the part is to connect the wheel hub to the stabilizer, which allows to reduce the vibration load of the body while driving and prevent the vehicle from rolling when the car enters turns.
Anti-roll bars may have different dimensions or form factors for a car of the same series, but have differences in body shape, configuration or year of manufacture.
| Manufacturer | vendor code | Structural arrangement | Component class | Approximate cost, rub. |
| TRIALLI | 21928-2906050 | Front axle | Budget | 450 |
| TRIALLI | 8200277960 | Front axle | Budget | 470 |
| SS20 | SS40111 | Front axle | Premium | 770 |
| SS20 | SS40134 | Front axle | Premium | 790 |
| TRIALLI | 6001547138 | Rear axle | Budget | 510 |
| TRIALLI | 2190-2906050 | Rear axle | Budget | 550 |
| SS20 | SS40134 | Rear axle | Premium | 770 |
Note! When selecting components, it is important to check the article number indicated on the box with the vehicle’s VIN number, which will ensure maximum compatibility of the parts with the vehicle’s design. If you purchase the wrong type of components, it is recommended that you return the parts to the store.
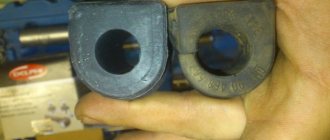
What are stabilizer bushings used for?
The answer to the question: “Why are stabilizer bushings needed?” very simple. The main purpose of this car part is that it will influence the noise produced by the suspension while the vehicle is moving, reducing it. It is also used to attach the stabilizer to the body of your car.
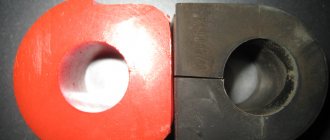
A special feature of this part is its elasticity. Due to the fact that it is made of materials such as polyurethane or rubber, you will not hear any sounds when changing the height of the wheel. The choice of these materials allows you to attach the stabilizer to the body, despite the constant change in the distance between them that occurs during bending.
Note! The shape of the stabilizer is similar for most cars, but can be modified due to design features.
Why change stabilizer bushings?
If you do not take care of timely replacement of stabilizer bushings, the following will happen. When entering a turn or driving on a road with an uneven surface, the vibration of the suspension that occurs during these actions will not be dampened. The finishing of the stabilizer bar on the car will also worsen.
You can drive with such faults for quite a long time, but this will wear out the life of your suspension and the entire car much faster. In addition, the failure of stabilizers leads to the appearance of rather unpleasant noises.
How to identify signs of wear on stabilizer bushings?
The occurrence of the following malfunctions during vehicle operation will indicate a malfunction of the stabilizer bushings:
- The first warning sign when the bushing fails will be the appearance of noise and knocking in the suspension when the car is moving. The difference from faults with shock absorbers will be that the suspension will knock not only when passing uneven surfaces, but also when entering turns with a small radius. Moreover, the road surface in this case may be in good condition and not contain any unevenness;
- If you do not pay attention to the knocking sound in the suspension and continue to drive the car, the situation will begin to worsen. The noise in the suspension will increase and will be caused by any change in the position of the suspension. This will happen due to an increase in cracks and deformation of the stabilizer bushings;
- the next step will be the appearance of a large roll of the car when making turns with a small radius. The body will sway violently;
- In some cars, play in the steering wheel may occur. This is due to their design features;
- Further ignoring the situation will lead to the car's controllability deteriorating. The car may start to move from side to side when trying to make any maneuver.
You should not bring your car to this state, because this endangers not only your life, but also the safety of other road users.
Important! Most stabilizer bushings have a service life of 30 to 40 thousand kilometers. Do not exceed this figure and risk your safety.
If you do not have the opportunity to take the car to a service center for diagnostics, you can verify that the bushings are faulty on your own. To do this you need:
- find an overpass or pit for inspection. In this case, you should not use jacks or lifts. The fact is that the test will be accompanied by strong rocking of the car and strong physical impact on the stabilizer. Because of this, the car may lose stability and jump off these devices. At best, this can result in injury, at worst, death. Therefore, to ensure maximum safety, it is recommended to use overpasses and pits;
- Next, a visual assessment of the condition of the rubber bands is carried out. If any cracks or breaks are detected, such a part must be replaced;
- Next, you need to make a strong physical impact on the stabilizer. Tug it in different directions. Creaks and noise accompanying this action will indicate the need to replace the bushing.
Guys, tell me if the egg stabilizer stands are suitable for the VAZ grant
Hi all. Guys, tell me if the stabilizer struts (eggs) are suitable for the grant from the VAZ 2110 or 2108? I looked in the store and there was a small hole for the stabilizer itself.
16 comments on “Guys, tell me if the egg stabilizer stands are suitable for the grant from VAZ”
They set it to eight, they barely pulled it, both broke after 3 months, they installed the original ones, and everything has been fine since November.
Elena, thank you. I will look for ss20 or original grant ones.
Elena, the knocking noise comes precisely from the stabilizer struts when it’s finished.
Konstantin, yes, they were the ones that were knocking, the rubber bands dried out after 2 years of driving, and the replacement ones broke in half
Elena, what changers. The new ones I installed broke on accident.
Konstantin, yes, the metal burst, they were not original, they were figure eight, they were very tight to put on
Elena, I barely pulled it today, I think I’ll let it sit until I buy the original one!
Konstantin, don’t worry, I drove with a broken strut for a month, and I didn’t know that it was dangling until my husband got behind the wheel and was amazed why the car was throwing itself from side to side like a dog. We stood on the pit, and there was a SURPRISE!
They are Grantov, there are 2 types, 2190 and 2192. 22mm and 24mm. 24mm is liftback and luxury
No, the grants have a larger stub in diameter.
Seryoga, thank you, I have exactly 2192
Seryoga, 24 mm is a luxury liftback and Kalina-2. On liftback standard and norm 22 mm
Evgeniy, That’s what it said on the box.
Elena, yesterday I changed the eggs and it turns out the clicking didn’t go away, I went on business in the evening and it still clicks! Today I want to change the bushing, can it still be done?
Konstantin, unfortunately I don’t know, I had a dull knock, so my husband, from his experience, definitely said that these were stabilizer struts, maybe he guessed, maybe he knows...
The clicks seem to be coming from behind
How to change stabilizer bushings?
Repair of rubber bushings is cheap and can be carried out at a service center with the help of experienced specialists. This procedure should not put a big dent in your budget. If you prefer to carry out repairs on your own or you do not have the opportunity to visit a service center in the near future, then you need to perform the following steps:
- drive the car to a pit or overpass. You can use a lift or jack, but these are less reliable and safe methods;
- loosen the wheel bolts next to which the faulty parts are located, and then remove them;
- the next step is to remove the nuts that secure the strut to the stabilizer. At the end of this procedure, disconnect the strut and stabilizer;
- Next, you should pay attention to the bracket mounting bolts. The rear ones need to be loosened and the front ones unscrewed;
- The next step is to remove dirt and clean the installation area for the new stabilizer bushings. Carry out this procedure carefully, because the service life of the new bushings will depend on the quality of its implementation;
- Lubricate the bushings on the inside. To do this, you can use silicone spray or regular soap solution;
- insert new bushings into their mounting location and return the vehicle to its original condition.
Note! Some car models, due to their design features, require removal of the crankcase protection.
The most difficult part is the process of replacing the front bushings of the vehicle. During its implementation, additional difficulties may arise due to the design features.
Removing the shock strut assembly with the steering knuckle
We carry out the work on a lift or inspection ditch.
Loosen the front wheel mounting bolts.
We remove the hub cap, unscrew the hub mounting nut with a 30mm socket and remove the washer.
Remove the front wheel.
We unscrew the nine screws and two bolts securing the engine mudguard and remove the middle engine mudguard.
Using pliers, undo the cotter pin and use a 19mm wrench to unscrew the nut 3 (Figure 2) securing the ball pin of the outer tie rod end 1.
We press the ball pin out of the swing arm 2 of the front suspension strut.
Using a 19mm socket, unscrew nut 3, Figure 3, securing the ball pin to the lower arm of the front suspension and press ball pin 2 out of lever 4 (article - Repair, removal of the ball joint).
Using a TORX E8 socket, unscrew the bolt securing the speed sensor (if the car has ABS) to the bracket on the steering knuckle and remove the sensor from the bracket.
We remove the sensor harness from the guide bracket on the front suspension strut.
Unscrew and remove the pad guide with the caliper and cylinder assembly.
We tie the bracket to the brake hose bracket (Figure 4).
We remove the outer CV joint from the wheel hub and fix it in a suspended state using a wire or a technological hook.
If after removing the shock strut you need to disassemble it, then use a 22mm spanner to loosen the tightening of the rod nut (Fig. 5), holding the rod from turning with a 6mm hexagon.
Using a 13 socket, unscrew the three nuts 2, Figure 5, securing the upper support of the telescopic strut 1 to the mudguard 3 of the body and remove the washers.
Remove the strut assembly with the steering knuckle and ball pin.
Remove the lower support from the upper support 1, Figure 6.
Installing the shock strut assembly with the steering knuckle
Install the speed sensor bracket onto the steering knuckle and secure it with a bolt. Bolt tightening torque 7 – 15 Nm.
We install the lower support on the upper support of the rack.
When installing the lower support, the direction of the arrow on it must coincide with the arrow on the upper support. On the left support to the right of the hole, on the right - to the left.
When installing the rack into the car body, the arrow on the support should be oriented in the direction of travel of the car.
We install the strut assembly with the steering knuckle, brake and ball pin into the car body, install the washers and tighten the three nuts securing the strut to the body mudguard. Nut tightening torque 20…24 Nm (2.0…2.4 kgf.m)
We insert the splined part of the outer drive joint into the wheel hub, put on the washer and tighten, without tightening, the new wheel hub nut.
We press the ball pin into the suspension arm and tighten the nut securing the ball pin. The tightening torque of the nut is 67…82 Nm (6.7…8.2 kgf.m).
We thread the front wheel speed sensor harness into the guide bracket of the front suspension strut, install the sensor in the sensor bracket and secure it with a bolt. The bolt tightening torque is 6…9 Nm (0.6…0.9 kgf.m).
Before installing the speed sensor, apply lubricant (LSTs-15 lubricant) to the surface of the mating hole.
We press the ball pin of the tie rod end into the swing arm of the front suspension strut and tighten the nut securing the ball pin. The tightening torque of the nut is 28…34 Nm (2.8…3.4 kgf.m).
We tighten the nut. If the cutout of the nut does not coincide with the hole in the ball pin, retighten the nut to an angle of no more than 60˚ to ensure cotter pinning.
Install the wheel and tighten it without tightening the front wheel mounting bolts.
We lower the car, tighten and lock the front wheel hub fastening nut, deforming the locking belt of the nut into the grooves of the shank of the outer drive joint housing. We install wheel caps. The tightening torque of the nut is 230 - 250 Nm (23 - 25 kgf.m).
Tighten the front wheel mounting bolts. The tightening torque of the bolts is 76 – 92 Nm. Install the engine splash guard.
What can cause stabilizer bushings to fail?
The main reason why these parts wear out is the strong impact on them during machine operation of the following factors:
- exposure to chemicals. It occurs due to its close location to the wheels of the car. During movement, various chemical compounds come into contact with the open parts of the bushings. The most dangerous of them are substances used in winter to remove ice on the road. They have a strong impact on the structure of the bushings, promoting their drying out and the appearance of cracks;
- strong mechanical impact. The quality of roads in each region differs from each other. However, even in the most favorable areas there are many trails whose quality leaves much to be desired. Accordingly, the more the car is used on roads with serious damage, the faster the strength of the parts is consumed. This happens due to the increase in friction that occurs when the suspension compensates for uneven road surfaces;
- the quality of the material from which the bushings are made. Typically, even the best rubber bushings have a relatively short service life. But most manufacturers install them on their cars. Therefore, when replacing old bushings with new ones, experts recommend using products made on the basis of polyurethane. These products have a significantly greater safety margin and will last you significantly longer.
Causes of knocking in the front suspension
In total, there are four main reasons why noises and squeaks can annoy the Lada Kalina car owner, and three of them can be eliminated independently and everything can be returned to a safe state.
- The first reason why knocking occurs in the suspension is the poor quality of the road surface. A suspension that is in good working order can also produce some extraneous noise. If the noise disappears when you drive onto a good road, then everything is fine with your suspension, you can move on to the point below.
- If knocking and simultaneous vibration occur in the steering wheel, the reason may lie in a faulty steering rack. If you can tighten the steering rack yourself, then it is better to entrust its repair or replacement to professionals.
- The third reason is the front suspension strut spring that has lost its elasticity. Since the spring tone is significantly reduced, the suspension hits directly against the body. How to change the front struts, and along with it the spring, is described in detail in this article.
- And the last reason is cracked silent blocks, which are simply necessary to thoroughly dampen knocks and vibrations that occur while driving. Read below for information on how to properly replace these front suspension elements.
LADA > Granta
What tools may be needed when replacing stabilizers yourself?
Performing this work will not require the driver to use high-tech devices. To do this you need to have the following tools:
- jack;
- extension for key;
- socket wrench for 10 and 13;
- ruler;
- socket heads for 13 and 14. Preferably elongated;
- ratchet wrench.
This is the minimum required set of tools, without which you definitely cannot carry out repairs. However, you may need an additional set. This need may arise when removing the fastening nuts. The fact is that during operation they can stick to the part. In this case, you may need a grinder or a hacksaw. You need to use these tools very carefully, because you can damage the stabilizer links. If this happens, then you will need to change them too.
Important!
If during the work you find that the bolts and nuts are in poor condition (there are cracks, traces of severe rust, bad threads - approx.), then it is best to replace such elements with new ones, using high-quality steel bolts and nuts with a self-locking element .
Other front suspension elements
The remaining elements of the front suspension, which contain rubber-metal and metal hinges, are replaced immediately as an assembly. These include:
- Spherical bearing.
- Stretch bracket.
- Steering end.
These elements cost about 500 rubles per set, and also do not require specific installation skills.
Conclusion
Despite the simplicity of eliminating this type of malfunction, perform all actions with the utmost care. Especially in cases where a jack is involved in the process.
Any careless movement can end in disaster. If possible, contact a service center where your car will be repaired quickly and inexpensively, without endangering your health and the condition of the vehicle.
Elements in the design of a car that perform the function of ensuring stability while driving on the road are called stabilizers. To ensure silent, soft and smooth operation, stabilizers are installed on bushings. Stabilizer bushings are relatively soft and elastic rubber parts.
Let's sum up the results
As a result, we received a new solution from AvtoVAZ related to the rigid fixation of the stabilizer bushings on the bar. Now, having installed such a new rod, we lose the opportunity to experiment with bushings.
Stabilizer bushing after 15 thousand mileage
If earlier replacing bushings cost a penny and for this you did not need to disassemble half of the front end, now to replace bushings you need to change them together with the bar ($50) and, most likely, with the stabilizer struts, which is another $50. Therefore, before replacing the barbell with a new model, it is worth considering whether there is another use for this hundred dollars.
If such signs are identified, it is better to immediately go to a service station for replacement or do the work yourself.
What are the features of the replacement?
When to do it?
In what order are new bushings installed?
Which units are best to buy?
We will consider these and other points below.
Causes of squeaking
Unlike a number of other cars, the Lada Vesta beam, which provides lateral stability, is located only at the front of the car.
The presence of such an element eliminates lateral rolls when moving. The composition of the stabilizer is standard - rubber bands (bushings), rods, clamps and fastenings.
The car owner's task is to maintain the unit in working order. Ignoring this requirement leads to deterioration of the vehicle's stability when cornering, loss of traction, and even a rollover.
Lada Vesta owners often complain about squeaking rubber bands, and the manufacturer is aware of this problem. The company's specialists assured that the defect will be eliminated in the near future.
It is not yet clear what actions the manufacturer plans to take. But the fact that existing car owners will have to deal with the problem themselves is a real fact.
The reasons for the appearance of extraneous sounds in the area of the stabilizer rubber bands are characteristic not only of the Lada Vesta.
This is a “disease” of many cars. It is known that the product plays the role of a torsion bar between two suspension arms (right and left).
For normal operation, the device must have several points of fixation of the torsion system:
When should I replace the front stabilizer bar bushings?
By carrying out a visual inspection of the stabilizer bushings from time to time, you can identify their wear. If there are cracks on the bushing, or the shape has changed (there are large abrasions), then the stabilizer bushings must be replaced.
The service life of stabilizer bushings for most brands and models of cars is 30 thousand km. If only one bushing is worn out, it is recommended to replace the complete set in order to increase the time between overhauls for replacing bushings.
If dirt is visible during visual inspection, it is better to clean them, thereby protecting them from accelerated wear.
Signs when it is necessary to change the stabilizer bushings in a car:
- if there is wheel play when turning;
- if the steering wheel shakes;
- if there are squeaks when the car tilts (roll);
- if the suspension vibrates (there is extraneous noise);
- if when driving straight the car pulls to the left or right;
- and, if at all, there is instability while driving.
These signs, first of all, indicate wear of the stabilizer bushings. The same signs may also be accompanied by wear of silent blocks. Such problems are eliminated by replacing the silent blocks of the front levers and subsequent work on wheel alignment. Therefore, you should check them and carry out repair work with your own or someone else’s hands to replace the stabilizer bushings. Play can also appear if the wheel is severely imbalanced. It disrupts the balancing when hitting a hole, or, for example, when pumping sealant into a tubeless wheel to close a puncture.
Which stabilizer struts are best to buy on Vesta
When choosing a replacement for the original, you must consider the length of the stand. It is measured between the centers of the ball pins and for a standard (not lowered or lifted) suspension it is 275 mm. The length must be strictly observed, since if the distance between the centers of the fingers does not match, the stabilizer will not work correctly. For example, by installing a strut just 10 mm longer, we will regularly hear the sound of the strut hitting the lever when driving over bumps. In addition, it will fail within a maximum of 15-20 thousand km.
If the suspension parameters have been changed, the ground clearance has been lowered or increased, the strut should be selected taking into account the changed ground clearance. It is highly not recommended to buy racks from little-known manufacturers, and judging by the reviews, users are not too fond of Belmag racks. Also, for the reasons mentioned above, you should not install racks from Toyota RAV4 with a length of 285 mm, neither the original Toyota ones (48820-42020), nor their analogues.
The article number of the original VAZ stub rack is 8450006750, the price is about $10-11. However, their quality is questioned by many owners. Based on public feedback, racks from the following manufacturers are most often purchased:
- STR CLMZ 19, tolerable quality, price within the original;
- full analogue of Renault 8200 669 065 ;
- SASIC 4005146 ;
- LEMFORDER 28334 01 ;
- SIDEM, article 19061, price about $15;
- Trek, part number SL70-198, $10 each;
- FEBI 12768;
- MONROE L15600.
It is very important to remember that it is highly recommended to replace the racks in pairs, while the nuts also necessarily require replacement, since they are not intended for reuse
How to change the front stabilizer bushings of a car
Although there are a huge number of brands and models of cars, the principle and procedure for replacing front bushings is practically the same. The main difference is in the tools used.
The correct procedure for replacing the front bushings is:
- Place the car on a lift (if available) or place it above an inspection hole.
- Loosen the front wheel bolts.
- Remove the wheels.
- Then the nuts securing the struts to the stabilizer should be unscrewed.
- Disconnect the struts from the stabilizer.
- Then the rear bracket mounting bolts should be loosened and the front bolts should be unscrewed.
- Clean the bushing installation areas from dirt.
- New bushings should be lubricated on the inside with soapy water or silicone grease.
- Install the bushings and perform the reverse steps to disassembly.
In some car designs, it will be more convenient to replace the front bushings if you first remove the engine crankcase protection.
The rear stabilizer bushings are changed in the same way as the front ones. Usually, the front ones are more difficult to remove than the rear ones. When the rear bushings wear out, a squeak appears.
Replacing “daisies” (silent blocks of the lever), bushings and stabilizer struts on a Lada Granta
Problems with silent blocks and levers manifest themselves in the form of extraneous sounds, as well as knocks that come into the cabin while driving. Among other things, you can understand that the chassis needs repairs by deteriorating the driving performance of the car, as well as reducing the comfort of movement.
Often, faulty silent blocks or levers are discovered during an attempt to adjust the wheel alignment. If there are malfunctions in the chassis, this adjustment is impossible.
From this article you will learn how to repair the chassis of a Lada Granta, namely: replace the silent blocks of the lever (“daisies”), as well as the struts and stabilizer bushings with your own hands.
For work, it is necessary to prepare new spare parts, as well as a set of keys (“17”, “19”), a vice (press), WD-40 and other auxiliary tools “for every fireman”. It is better to work on a lift or you will have to hang the wheels one by one.
Creak of stabilizer bushings
The driver and passengers often feel a squeaking sound when the car is moving. They especially begin to creak in severe frosts.
Let's look at the reasons why bushings squeak:
- The bushings were made of low grade material.
- In the cold, rubber becomes like oak and loses elasticity, which is why squeaks appear.
- The bushing is badly worn.
Ways to eliminate the creaking of car stabilizer bushings:
Logically, in order to eliminate the squeak, you need to lubricate the bushings, which is what some drivers do. But lubricant, be it lithol 24, various oils, silicone grease - all this attracts dust and sand. Adhering abrasives will only cause the bushings to wear out quickly.
Also, lubrication will lead to a partial loss of function of the bushings themselves, since they must tightly hold the stabilizers. The bushings are torsional and therefore protect against vehicle roll. For the bushings to function properly, they need to be seated tightly. And, if you lubricate them, they will already slide and can rotate.
Why do you need a stabilizer?
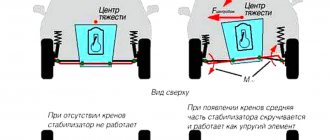
Before understanding the direct role of bushings, you need to understand what the purpose of the stabilizer on a car is. As can be understood from the name of this element, it stabilizes the position of the car. The stabilizer is activated every time the car turns and brakes. When turning, there is a risk of lateral roll, and when braking, longitudinal roll, and in each of these situations the stabilizer does everything to keep the car parallel to the road surface.
The stabilizer is structurally a conventional rod that connects the subframe to the wheel mount (we can say that with the suspension arm, if we are talking about the MacPherson front suspension). In MacPherson suspension, the camber angle is static, and it changes when the car rolls. Changing the camber angle certainly leads to a decrease in the area of contact between the tire and the road. To minimize the risk of such a situation occurring, you need to reduce the roll force, which is what the stabilizer does. In fact, we can say that it takes on the role of a torsion bar: at the slightest probability of lateral roll, the transverse ends located in the levers begin to move in different directions, thereby twisting the middle part. The moment that occurs during such movement is sufficient to prevent the continuation of the relative movement of the wheels, which reduces the roll.
Repair and service of passenger cars
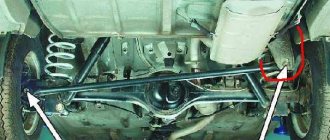
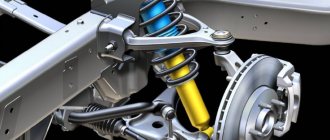
The front suspension of the Lada Kalina/Granta VAZ-2190 is independent, with telescopic swivel struts, wishbones, longitudinal bracing arms and a torsion-type anti-roll bar.
The front suspension strut consists of a housing in which a hydraulic telescopic coil spring shock absorber and an upper support are installed. A bracket for attaching the steering knuckle, a swing arm and a lower spring support cup are welded to the outside of the strut body.
Depending on the vehicle configuration, the strut may have a barrel-shaped or conical spring. The spring's lower coil rests against the lower support cup, and its upper coil rests against the upper support cup mounted on the shock absorber rod.
Also on the Lada Granta/Kalina shock absorber rod there is an upper strut support, consisting of a housing, a rubber cushion and a bearing. The support body is attached to the car body with three studs and nuts.
The bearing allows the shock absorber rod to rotate in the support when the strut is turned, and the rubber buffer prevents the transfer of vibrations to the car body. The shock absorber rod is protected from dirt and dust by a plastic casing. In the event of a suspension breakdown, the stroke of the rod is limited by the compression stroke buffer. The strut pivot arm is connected to the steering rod through a ball pin. Changing the length of the rod using its connecting coupling allows you to adjust the toe-in of the front wheels.
Fig.27. Steering rod adjusting sleeve Lada Granta/Kalina
1 — tie rod end; 2 adjusting sleeve; 3 — steering rod The steering knuckle is attached to the strut bracket with two bolts and nuts. The upper hole of the bracket is made oval, and the bolt installed in it has an eccentric collar and an eccentric washer. When this bolt rotates, the steering knuckle moves relative to the strut, turning on the lower mounting bolt as if on an axle. Thanks to this, the angle between the strut and the fist changes, which in turn allows you to adjust the camber of the front wheel.
From below, the steering knuckle is connected to the wishbone of the front suspension of the Lada Kalina/Granta VAZ-2190 using a ball joint.
The transverse lever is kept from moving by a stretcher, which is attached with its rear end through a rubber-metal hinge to the lever, and with its front end through a cushion to a bracket fixed to the car body.
By changing the number of washers in the front and rear brace mounts, you can change the position of the lever, thereby adjusting the longitudinal inclination of the wheel steering axis.
The ends of the anti-roll bar are connected using struts to the transverse arms of the front suspension of the Lada Kalina/Granta VAZ-2190. The central part of the stabilizer is secured through rubber cushions to the body with brackets.
The movement of one of the levers is transmitted through the stabilizer to the second. This allows you to partially synchronize the operation of both sides of the suspension and thereby reduce the sway of the car on uneven roads and roll in corners.
1 — stabilizer bar; 2 — bracket for fastening the stabilizer bar; 3 — transverse arm bracket; 4 - wishbone; 5 — stabilizer strut; 6 — telescopic stand; 7 — ball joint; 8 — steering knuckle; 9 — longitudinal stretch; 10 — extension bracket After repairing any suspension or steering elements, be sure to check the alignment angles of the front wheels. It is possible to properly check and adjust the alignment angles of the front wheels only in a service company that has a special stand for performing adjustment work.
1 — bracket for fastening the steering knuckle; 2 — rack body; 3 — bolt (eccentric) of the upper fastening of the steering knuckle; 4 — bolt of the lower fastening of the steering knuckle; 5 - steering knuckle A double-row ball bearing is pressed into the hole of the steering knuckle and secured with two retaining rings. The wheel hub is pressed into the inner ring of the bearing.
Source: https://autozapchastiremont.ru/lada_granta_kalina_podveska_perednjaja.html
Purpose of stabilizer bushings
Stabilizer bushings are extremely important for the proper operation of the entire mechanism. Since the stabilizer must be able to twist from multidirectional forces on the left and right wheels, it is usually secured with bushings. During operation, the stabilizer bushings begin to wear out, and backlash occurs, which leads to improper operation of the entire mechanism, increasing the freedom of the part. If you do not take any action to eliminate the play (replacing stabilizer bushings), all meaning in the operation of the stabilizer will disappear - the car will begin to roll in turns.