Winter has come and you, anticipating a comfortable and warm ride in your car, start its engine and wait for it to warm up. And now, the moment to turn on the stove has come! You redirect the airflow towards you, and what happens? Absolutely nothing! It's all because of the VAZ 2114 stove cables.
The side and central deflectors give out a portion of barely warm air, and blowing the glass does not melt the ice as quickly as we would like. Many car owners put up with such injustice, the quirks of the domestic automobile industry. But you and I are not one of them and are going to radically move the situation forward!
Causes of stove malfunction
There are as many reasons for stove malfunctions as there are drivers. The forums are full of requests for help: first one reason, then another, then a third. As a result, there is no consensus on how to eliminate similar faults.
This article is devoted to only a few, the most important problems of repairing your favorite iron horse with your own hands. Don't judge harshly if you didn't find a solution here that would help you.
You should not forget that you are just a car enthusiast, and not a professional master from a large service center that services equally cool cars. You shouldn’t consider yourself a woodpecker or complain that your hands are growing from the wrong place, you just need to start small.
This video shows how to repair a VAZ stove, and you can decide for yourself whether this adjustment method is right for you:
Some car owners solved the problem immediately. Suitable for the case when warm air blows directly in the center or on the legs, and only a stream of cold or slightly warm air flows on the sides or on the windshield.
For winter, such a malfunction is simply a disaster: you suffer so much that it doesn’t seem like much. After watching this video and adjusting the heater, you can at least temporarily make sure that hot air hits the windshield. The cabin will also become warmer. But don’t overdo it: there is an unpleasant trick: with “headless efforts” you can break off the plastic to which the cable is attached.
You can move the damper to the “hot” position: just secure it tightly, covering it with a sealed mass. In this case, send the ill-fated drive cable to the place where your spare parts are stored. You will feel the positive effect immediately, although the positive temperature of the cabin is now regulated exclusively by the “stove” tap.
The heat will increase so much that you can forget about earflaps and sheepskin coats: you, as a driver, will feel comfortable behind the wheel even in forty-degree frost. The cold air is now tightly sealed and has nowhere to penetrate. But the air on the right will still be somewhat colder. Depends on the deformation of the flap during operation of the car: on the opposite side of the cable, the lid will no longer close tightly.
The second “jamb”: dampers
Another problem with the VAZ 2114 stove is the operation of the dampers. In the car, their position is regulated by three more cables. They also tend to become loose and malfunction over time. An indicator of a violation of their adjustment is the fact that hot air comes only from the central air duct, while cold air goes to the passenger seats and to the front window heater.
Adjustment of these cables is carried out similarly to the cable of the stove faucet. When the slider is moved to the extreme right, the dampers should be fully open.
If you plan to adjust the heater while replacing the radiator, you should also pay attention to the condition of the dampers themselves. If they are not airtight, they should be glued with foam rubber or any other insulation. Any leaks lead to the dilution of the hot air flow with cold air and, as a result, to a deterioration in the operation of the stove.
Modification of the left deflector
The left deflector (driver's) is located farthest from the hot air entry point. As a result, all losses affect him more than anything else. It also happens that there is warm air everywhere except it. Naturally, the driver will not like this much, especially if he usually drives alone in the car.
To improve the heating system and provide the driver's air duct with a sufficient flow of warm air, an additional fan is installed in it.
A computer processor cooling fan is ideal for this purpose (it can be bought at any computer store, it costs about 500 rubles). They come in different sizes and power, choose the right one based on the supply on the market. Or if there is an old computer somewhere in the garage, take it from there - it will do.
- Pull out the deflector.
- Prepare a hole for installing the cooler.
- Prepare the wiring. If an additional pump is installed in the system, it is worth installing the power supply through the same switch. You can make a separate switch or, as a last resort, connect it from the ignition. It will turn on automatically when the engine starts.
- It is important to completely seal the remaining holes, otherwise the expected result will not be obtained.
By performing all these manipulations, you can achieve restoration or even significant improvement in the operation of the stove. If your work involves constantly moving around the city by car, these measures are simply mandatory.
Step-by-step replacement of the VAZ-2114 stove
For those for whom this method is not suitable, you can completely remove the stove and adjust it. This is done in stages.
Before you remove the heater (1), do not forget to disconnect the ground wire, otherwise the battery will play a trick on you. At the same time, drain the coolant from the system.
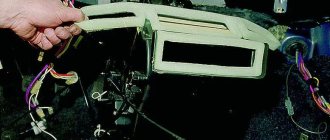
Now remove the instrument panel, as well as the floor tunnel lining. Now carefully disconnect the air duct (under No. 19) to heat the interior.
Start a new round of work:
Carry out the same manipulations with the electrical wires from the resistor (No. 18), the electric motor (No. 2) of the fan, the inlet (No. 12) and outlet (No. 13) faucet hoses.
- Sequentially unscrew the 2 nuts securing the faucet directly to the front panel.
- Remove the seal from the faucet pipes.
- It's time to unscrew the 4 nuts securing the stove to the body.
- You can easily remove the heater of your vase with control assembly.
- Once you finish the adjustment process, carry out the installation in strict reverse order.
How to replace the radiator of a VAZ 2114 stove
In this section you will learn how to replace a stove radiator yourself. Start by draining the coolant that is in the system. After you have completed this work, you can remove the instrument panel. Now let's go through the points:
- In your cabin, directly under the instrument panel, disconnect the pair of hoses that go to the heater tap pipes.
- To perform these manipulations without problems, loosen the clamps.
- Do the same steps in the space under the hood: disconnect the hoses from the valve nozzles themselves, unscrew the nuts that secure the radiator, remove the valve from the shield.
- Remove the faucet rod holder.
- Disconnect the rod from the lever.
- Go to the interior, remove the cover from the gear shift knob.
- Remove the plastic trim: it is located under the brake (manual).
- Unscrew and remove the floor trim (rear): it is located between the seats. For convenience, slide it back.
- Disconnect the air vent (cabin) from the heater body and remove it.
- Disconnect the connector from the motor and resistor.
- To the right and left of the heater, unscrew 2 pairs of nuts.
- Remove the radiator with the control panel.
- Make a replacement.
- Start the assembly process in reverse order.
In addition to what has been said, you can watch a video with the repair of the radiator frame, also more about the stove radiator and its replacement here and here
and one more small story:
The VAZ 2114 stove does not heat well
Oh, those stoves! Let's try to figure it out.
Situation: The car owner’s interior is poorly heated by the stove, although warm air is supplied, and the engine temperature remains within 90 degrees. According to external signs, the radiator of the heating system is also hot and the pipes are in normal condition.
Question: What should I do?
Answer: Unscrew the side of the passenger torpedo (the brains) yourself and inspect in the area of the engine shield there are 2 hoses that go to the heater. Feel how hot they are. If there is no heat there, then they are clogged. Clean it and everything will be as it should! Now check the engine using the sensor or on-board indicator.
The VAZ 2114 heater motor does not work
It happened: The owner got into his car, started his girlfriend, turned on the stove fan and heard... silence. He was not an experienced driver, but he immediately figured out how to get into that same fuse box. I was not confused and changed one of them. But time passed, and the motor still did not work.
Urgent questions: Is the electric motor covered, has the contact come loose?
- If the driver is just a beginner, then go straight to a car service center.
- For an experienced owner, the following steps: crawl under the panel and inspect the contacts on both the fan and the switch.
- Unplug the connector and check the voltage to the motor with a probe. If it is, then remove the motor.
- It is possible that the “minus” has fallen off from the electric motor itself. In his place! Five minutes later, your car is already warm.
Heater cables VAZ 2114
Winter has come and you, anticipating a comfortable and warm ride in your car, start its engine and wait for it to warm up. And now, the moment to turn on the stove has come! You redirect the airflow towards you, and what happens? Absolutely nothing! It's all because of the VAZ 2114 stove cables.
The side and central deflectors give out a portion of barely warm air, and blowing the glass does not melt the ice as quickly as we would like. Many car owners put up with such injustice, the quirks of the domestic automobile industry. But you and I are not one of them and are going to radically move the situation forward!
The principle of operation of the heater cables on the VAZ 2114
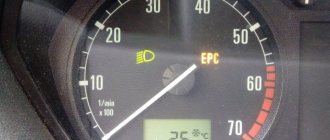
The operation of a car's heating system is to transfer and redirect the heat that is released as a result of engine operation. Heat is removed by the cooling system and supplied, among other things, to the heater radiator. Then, when the switch is turned on (turned on), the heating system starts a motor that blows out hot air and passes it through the car panel deflectors. Air redirection to a particular area is carried out directly by the driver by switching the airflow positions.
When clicked, the picture enlarges
Most cases of stove malfunctions are associated with just one reason and this is the VAZ 2114 stove cable. The fact is that over time the tension of the cable weakens. This occurs as a result of its constant tension, weakening when moving the lever for adjusting the heating mode (cold and hot). There are also cases when the cable completely flies off the stove tap. As a result, the stove valve does not open completely, thereby you do not receive significant portions of hot air from the heating system.
What to do? To change or not to change? Here are the most common questions from car enthusiasts. Let's answer this: before replacing anything, you should find the cause of the malfunction and try to eliminate it.
But first, check
However, before you start disassembling the stove and making technological changes to its operation, find out that other components of the system are working correctly. Improvements will not yield results if the problems lie elsewhere.
- Make sure the pump is working properly. Breaking off the impeller impairs heat transfer. If the car begins to overheat frequently in the summer, and the heater does not work well in winter, this may indicate this problem.
- Make sure the thermostat is working properly. If it is stuck closed, the stove does not heat up at all. Antifreeze does not go into a large circle. If it is stuck open, the car (and with it the stove) heats up very slowly, the air comes out only slightly warm.
- Make sure the stove fan is working. It should work in all speed modes.
- Make sure your cabin filter is not clogged. Where is it? This is probably your problem. Open the hood, you will find it in the part between the engine compartment and the passenger compartment, approximately in the center.
- Make sure your heater core is not clogged. It is recommended to wash it periodically (every 2-3 years) using special products.
And only after making sure that modernization is necessary and everything else works, proceed to disassembling the VAZ 2114 stove and modifying it. This is quite possible and even necessary to do it yourself. Car service centers are unlikely to undertake such work.
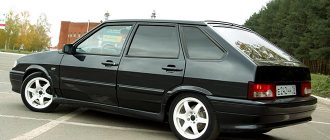
A good stove heater is installed in the interior of front-wheel drive VAZ cars - in winter it is quite warm in the Zhiguli. But sometimes various problems arise - the stove blows cold air (VAZ 2110, VAZ 2114, other Samara models).
- why doesn't the heater heat up?
- what needs to be done to ensure that warm air enters the cabin.
Diagnostics of the operation of the VAZ 2114 stove cables
In order to inspect the valve cable of the VAZ 2114 stove, you need to dismantle the side panel trim on the driver's side (to the right of the gas pedal). Further details:
- Start and warm up the car engine thoroughly.
- Unscrew the three side trim mounting bolts.
- Turn your gaze towards the heater valve.
- Check to see if the cable has come loose from the faucet.
- Move the heater lever on the instrument panel to maximum heating mode.
- Pull the cable towards you and hold it in this position
- Check if hot air is coming from the deflectors.
Now that the source of the problem has been identified. It is required to fix, give constant tension and thereby ensure good operation and correct throughput.
One of the options for increasing the tension is a method in which a part (0.5-1 centimeter) of the cable is bent at the point of direct connection to the heater lever. To do this you will need:
- Remove the second trim, only from the passenger seat side.
- Take pliers and pull the cable towards you (at this moment, the temperature switch should be at maximum heating mode).
- Bend the additional amount of cable formed (its amount is selected experimentally, and in each specific case it differs and, as a rule, amounts to 0.5 centimeters).
- We hook it up to the temperature switch of the stove.
Attention! To avoid damage, perform all tension-related actions carefully and do not use excessive force. If you overdo it with tension, you can damage the system and the functionality of the heating system.
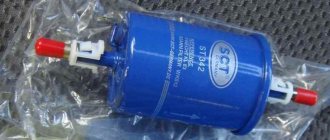
Which heater tap is better?
Arriving at an auto parts store. On the shelf you will see 3 options for heater taps:
- Factory standard.
- Ball.
- Ceramic.
Let's figure out how they differ, and which stove faucet is better.
The first option is a standard factory one, which costs 80-100 rubles. Its operating principle is based on a rubber membrane. In practice, it is very unreliable, susceptible to acidification, and its installation is not recommended.
Moving on, the second option is a ball valve. The principle of its operation is based on a ball with holes instead of a rubber membrane, as in the first option. In fact, this specimen is also susceptible to oxidation, but it is much more reliable than a standard factory faucet.
The third option is a ceramic heater tap. The body of this faucet is ordinary plastic, but the shut-off element already consists of two ceramic shut-off plates.
Of all those listed, the ceramic faucet is the most reliable, and it is recommended to install only it. But it is worth noting that the coolant capacity of a ceramic faucet is less than that of a ball valve, therefore the heat transfer is also less. In other words, the most reliable faucet is a ceramic faucet, but it will heat less efficiently than a ball faucet.
Replacing heater cables on a VAZ 2114
Sometimes situations occur when, for one reason or another, the product becomes bent or even breaks off. Such cases require removing the device and replacing it with a new one. Recommendations for analysis are as follows:
- The metal clips that hold the cable in place must be disconnected.
- One end of the cable is connected to the tap, the other side to the lever for adjusting the air temperature in the cabin. Any sequence of disconnection can be followed. But it will be most convenient to first disconnect the end from the stove tap, unfasten all the clips and, last of all, disconnect it from the lever.
- Now the product should be carefully removed from the case.
- When reinstalling the new part, start by attaching it to the tap.
There are a lot of different models on the auto goods market that differ in length, thickness, various types, and shapes of both ends. In order not to make a mistake when purchasing a new product, we advise you to take it with you to the store. Usually cables are sold in one set of several pieces at once.
So we learned how to change the heater cables on a VAZ 2114. The most important thing when carrying out work is not to rush, to understand the principle of operation of the hot and cold air supply mechanism. We wish you warm heaters!)
Malfunctions in the cooling system
The stove may blow cold air due to a malfunction in the cooling system. If the heater motor is working properly, we look for the reason for supplying cold air into the cabin instead of hot air in the following order:
- open the hood, check the coolant level in the expansion tank, if necessary, add antifreeze to the required level;
- Warm up the engine, pay attention to the readings of the temperature sensor on the instrument panel. If the temperature does not rise to the desired value, the valve in the thermostat may be faulty - it opens prematurely;
- The cooling system can also “air up”, often the cause of this phenomenon is a broken head gasket. A cylinder head burnout may be accompanied by the following symptoms:
- Antifreeze splashes out of the expansion tank.
- The gauge on the instrument panel shows a high temperature.
- The engine is tripping.
- Antifreeze gets into the oil, the engine oil becomes lighter.
If the cylinder head gasket breaks, cold air often blows into the cabin only at low speeds; when the engine is pressurized, the cooling system is “pierced” and hot air begins to flow into the cabin. Very often, replacing the PGBC solves the problem.
Causes of stove malfunction
There are as many reasons for stove malfunctions as there are drivers. The forums are full of requests for help: first one reason, then another, then a third. As a result, there is no consensus on how to eliminate similar faults.
This article is devoted to only a few, the most important problems of repairing your favorite iron horse with your own hands. Don't judge harshly if you didn't find a solution here that would help you.
You should not forget that you are just a car enthusiast, and not a professional master from a large service center that services equally cool cars. You shouldn’t consider yourself a woodpecker or complain that your hands are growing from the wrong place, you just need to start small.
This video shows how to repair a VAZ stove, and you can decide for yourself whether this adjustment method is right for you:
Some car owners solved the problem immediately. Suitable for the case when warm air blows directly in the center or on the legs, and only a stream of cold or slightly warm air flows on the sides or on the windshield.
For winter, such a malfunction is simply a disaster: you suffer so much that it doesn’t seem like much. After watching this video and adjusting the heater, you can at least temporarily make sure that hot air hits the windshield. The cabin will also become warmer. But don’t overdo it: there is an unpleasant trick: with “headless efforts” you can break off the plastic to which the cable is attached.
You can move the damper to the “hot” position: just secure it tightly, covering it with a sealed mass. In this case, send the ill-fated drive cable to the place where your spare parts are stored. You will feel the positive effect immediately, although the positive temperature of the cabin is now regulated exclusively by the “stove” tap.
The heat will increase so much that you can forget about earflaps and sheepskin coats: you, as a driver, will feel comfortable behind the wheel even in forty-degree frost. The cold air is now tightly sealed and has nowhere to penetrate. But the air on the right will still be somewhat colder. Depends on the deformation of the flap during operation of the car: on the opposite side of the cable, the lid will no longer close tightly.
Adjustment
Drivers solve this problem at the same time as replacing the radiator in order to combine the work. Or you can do without replacing the radiator if everything is fine with it. But it is imperative to check the screening devices for leaks. If the seal is broken, glue them with foam rubber or other insulation. Leaks will lead to cold air mixing with hot air, which will prevent the stove from working properly.
To adjust the device, you need to work on the faucet and the valve itself. It's better to start with the faucet.
- Remove the panel under which the device you need is located. It is not necessary to remove the dashboard, but for clarity it is possible. Plus, this will allow you to modify the cut-off device itself, glue it with foam rubber or other insulation. Basically you need a cable that responds to the cutoff. You will find it under the side dashboard cover near the gas pedal. On the body of the faucet itself there is a bracket that holds the cable sheath on itself. It needs to be removed.
- Remove the cable from the lever, after which you need to open the tap in the maximum open position.
- Now the cable can be disconnected from the lever block. You don't need the old cable, so throw it away. Close the faucet as needed.
- Adjust the length of the sheath and the cable itself. In this case, on the lever block, with the lever in the right position, the tap should be completely open.
- With the help of a latch, the cable is securely fixed in its place.
Important! The heater may not operate efficiently if the damper is not functioning properly. It is not always possible to tighten and adjust it. If an element wears out or fails, the only method of repair is replacement.
Now we move on to adjusting the damper on the VAZ-2114 stove.
- Remove the bracket that holds the cable sheath on the VAZ-2114 heater body.
- On the left there is a yellow lever made of galvanized steel. There is only one there, but you may have to grope for it manually.
- Pull this lever towards you, towards the interior of the car. In this position it is considered as open as possible.
- The cable needs to be tightened and its length adjusted. The adjustment is considered correct when, in the right position of the long lever located on the lever block, the device being adjusted is in the maximum open position.
- Don't rush to close the panel. After adjusting the position of the cable, be sure to securely fix it.
If the cold air cut-off works correctly, then your heating system will begin to effectively heat the interior and provide hot air to all heating points.
Important! Do not forget that on the VAZ-2114 in its heating system one lever is designed to simultaneously control two dampers - a faucet and a large damper.
Before doing this, check whether all elements of the heating system on your VAZ-2114 are working correctly. Sometimes the reasons turn out to be much more serious, so you have to do more major repairs or send the car to a car service center. In any case, a consultation is never superfluous.
Share your impressions of the operation of your own stove and tell us what problems you encountered. Don't forget to leave comments. Let's discuss pressing issues together.
Step-by-step replacement of the VAZ-2114 stove
For those for whom this method is not suitable, you can completely remove the stove and adjust it. This is done in stages.
Before you remove the heater (1), do not forget to disconnect the ground wire, otherwise the battery will play a trick on you. At the same time, drain the coolant from the system.
Now remove the instrument panel. as well as lining the floor tunnel. Now carefully disconnect the air duct (under No. 19) to heat the interior.
Start a new round of work:
Carry out the same manipulations with the electrical wires from the resistor (No. 18), the electric motor (No. 2) of the fan, the inlet (No. 12) and outlet (No. 13) faucet hoses.
- Sequentially unscrew the 2 nuts securing the faucet directly to the front panel.
- Remove the seal from the faucet pipes.
- It's time to unscrew the 4 nuts securing the stove to the body.
- You can easily remove the heater of your vase with control assembly.
- Once you finish the adjustment process, carry out the installation in strict reverse order.
How to replace the radiator of a VAZ 2114 stove
In this section you will learn how to replace a stove radiator yourself. Start by draining the coolant that is in the system. After you have completed this work, you can remove the instrument panel. Now let's go through the points:
- In your cabin, directly under the instrument panel, disconnect the pair of hoses that go to the heater tap pipes.
- To perform these manipulations without problems, loosen the clamps.
- Do the same steps in the space under the hood: disconnect the hoses from the valve nozzles themselves, unscrew the nuts that secure the radiator, remove the valve from the shield.
- Remove the faucet rod holder.
- Disconnect the rod from the lever.
- Go to the interior, remove the cover from the gear shift knob.
- Remove the plastic trim: it is located under the brake (manual).
- Unscrew and remove the floor trim (rear): it is located between the seats. For convenience, slide it back.
- Disconnect the air vent (cabin) from the heater body and remove it.
- Disconnect the connector from the motor and resistor.
- To the right and left of the heater, unscrew 2 pairs of nuts.
- Remove the radiator with the control panel.
- Make a replacement.
- Start the assembly process in reverse order.
In addition to what has been said, you can watch a video with the repair of the radiator frame, also more about the stove radiator and its replacement here and here
and one more small story:
The VAZ 2114 stove does not heat well
Oh, those stoves! Let's try to figure it out.
Situation. The car owner's interior is poorly heated by the stove, although warm air is supplied, and the engine temperature remains within 90 degrees. According to external signs, the radiator of the heating system is also hot and the pipes are in normal condition.
Question. What to do?
Answer. Unscrew the side of the passenger torpedo (the brains) yourself and inspect in the area of the engine shield there are 2 hoses that go to the heater. Feel how hot they are. If there is no heat there, then they are clogged. Clean it and everything will be as it should! Now check the engine using the sensor or on-board indicator.
The VAZ 2114 heater motor does not work
It happened. The owner got into his car, started his girlfriend, turned on the heater fan and heard... silence. He was not an experienced driver, but he immediately figured out how to get into that same fuse box. I was not confused and changed one of them. But time passed, and the motor still did not work.
Pressing questions. Is the electric motor covered, has the contact come loose?
- If the driver is just a beginner, then go straight to a car service center.
- For an experienced owner, the following steps: crawl under the panel and inspect the contacts on both the fan and the switch.
- Unplug the connector and check the voltage to the motor with a probe. If it is, then remove the motor.
- It is possible that the “minus” has fallen off from the electric motor itself. In his place! Five minutes later, your car is already warm.
- Electrical equipment
- Engine
- Brake system
- Other
- Steering
- Transmission
- Suspension
- Tuning
- VAZ 2110
- Other
- Engine
- Steering
- Electrical equipment
- Transmission
- Brake system
- Suspension
- Tuning
Refinement of the pipe
When the air flow from the left deflector is too small, you can force its intensity. To do this, you need to insert a small (about 50 mm) fan into the pipe. A cooler used in computers is suitable for tuning.
First remove the deflector. Make a hole for the cooler and install it. Seal. Put the branch pipe with the fan in place. Restore electrical. An alternative is to connect the cooler directly to the heater contacts. In this case, it will only work when the ignition is on.
Properly carried out modernization will add warmth to the interior and save the owner of the VAZ 2114 from many problems.
Repair of VAZ 2114 stove: radiator (heater) and other components
With the arrival of winter, car enthusiasts often encounter problems with the operation of their heating stove. The VAZ 2114 model is no exception.
The cause of the breakdown can be any part or component of the car's heating element. You can repair the heater yourself, without using the services of a car service, so first you need to understand the principle of operation of the heating system on a VAZ 2114 car.
The heater tap is used to regulate the air supply to the cabin. It is used to regulate the supply of coolant to the heater radiator. The liquid heats up to 95 degrees and heats the air to an elevated temperature, which already enters the cabin. When the heater is on, the heater fan runs, which “drives” air into the cabin.
Heater maintenance
To ensure that the VAZ-2114 heater heats well in winter, carry out maintenance of the heater before the cold weather:
- Remove it from the car.
- Disassemble and clean.
- Check the functionality of the dampers, seal their ends with sealants.
- Seal the joints with sealant.
- Flush the radiator.
- After assembly, adjust the drive cables so that when moving the sliders, the valves and the tap become in their extreme positions.
These measures are enough for the heating system to function normally in winter, providing warmth to the car interior.
Finally, we note that the reasons for the poor operation of the stove were discussed above, but it still continues to function. But this unit also has breakdowns and then the stove fails and stops working completely. Such reasons include breakdown of the radiator, leaks at the joints of the pipes, fan malfunction (open circuit, exhausted motor life or burnout).
The main reasons for the VAZ 2114 heater not working and repair methods
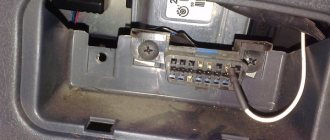
The cabin air filter needs to be replaced
The filter is located in the engine compartment - under the frill (furnace casing). On older 2114 models there is no cabin filter. To check, press on the stove casing and also watch for the reaction. If the casing fails, then there is no filter. The elasticity of the casing will indicate the opposite.
Replacing the cabin filter VAZ 2114
Let's take a closer look at replacing the VAZ 2114 cabin filter:
- Remove the rubber seal with all fixing devices;
- Unscrew all the screws and nuts. Don't forget about the plastic plugs;
- Disconnect the frill. You need to unscrew the screws and remove the plastic mesh;
- We change the cabin filter and restore everything in the reverse order.
Even if everything is fine with your heater, and there is no need to talk about repairs, try to change the filter once every 7-8 thousand km, because you will be breathing dust that comes from the street.
Lack of required pump pressure
If your stove does not heat up at idle, but only when you press the gas, then the reason is insufficient coolant circulation. No repairs are required here; the main problem is the insufficient amount of antifreeze.
Checking the antifreeze level in the expansion tank
To check, open the hood and check the amount of antifreeze or antifreeze. Do not exceed the maximum value indicated on the tank.
Fan problem
To check the operation of the fan, you just need to start the car, turn on the heater and try changing the position of the speed control. If you do not hear any sound, then the fan is not working and needs to be replaced.
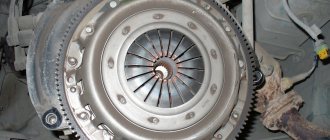
Checking and replacing the radiator
If your stove radiator is clogged, then it is worth flushing it with cleaning fluid and clearing it of dirt. If these steps do not help, then you will not be able to do without replacing the radiator.
Drivers recommend the DAAZ radiator, but it is very difficult to find.
This is what a radiator for a VAZ 2114 looks like
To remove the radiator, you need to do the following:
- Apply any cream to your hands generously (it will help with cuts and will make it easier to wash later);
- Drain the coolant (screw in the hose from the mixer instead of the drain plug to minimize the loss of antifreeze);
To drain the liquid, screw the hose from the mixer into the heater coolant drain plug.
Let's move on to the side panels and the glove compartment (consists of 3 parts). Remember there are two fastenings to the floor: near the ECU;
We unscrew all the screws securing the glove compartment, as well as the fastenings to the floor near the ECU. The glove box is easy to remove.
Unscrew the fastening screws holding the cables. They need to be unscrewed on both the left and right sides. Plus, 3 screws on the driver's side;
Unscrew the screws securing the cables. It is done on both sides.
Carefully try to pull the panel towards you. If it is difficult, then you need to check everything again for the presence of fasteners. After all, repairing the panel will be an unnecessary problem for you;
Let's try to remove the panel. We carefully pull it towards us. If it doesn’t work, check that all the fasteners are loose.
All we have to do is unscrew the two clamps from the radiator. But there is no need to rush, prepare a container for the remaining antifreeze, which will definitely “hide” in the heating system.
Use a screwdriver to remove the heater pipe clamps and remove the radiator.
All the fluid has been drained, the clamps and other fasteners have been disconnected, and the radiator is already visible. All we have to do is get him out.
It will be difficult for you to get by without the help of a friend. The VAZ 2014 panel is very heavy and you need to lift it quite high. One should lift it to a sufficient height, the second should pull out the radiator. The same steps must be followed during assembly.
Remember that all the coolant we drained will be fine for us to refill.
Stove valve malfunction
Unsatisfactory operation of the stove can be corrected by taking the time to repair the faucet. In order for the faucet to open completely, you need to take pliers and pull the cable near the gas pedal, increasing the tension. It doesn't hurt to be careful in your actions - by making a sudden movement, you can fill the interior with coolant.
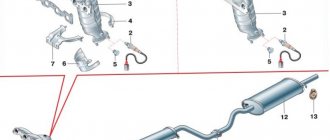
Thermostat not working
To check the thermostat, try starting the car and waiting a few minutes. Next, find the pipe connecting the thermostat to the radiator. If it is warm, then the thermostat is not closed well, and the liquid simply remains in the radiator. In addition to problems with the operation of the stove, such a breakdown increases fuel consumption. Please take this into account.
Thermostat and thermostat pipes VAZ 2114.
Air lock formation
An air lock occurs after air appears in the upper part of the radiator, and then in the thermostat. To remove the plug you need:
- Disconnect the hose from the fluid supply fitting to the carburetor starter;
- Unscrew the cap of the expansion tank;
- Blow until coolant flows out of the fitting;
- Reconnect the hose.
Air lock formation
On cars of the VAZ 2110 and VAZ 2114 models, an air lock often forms in the cooling system; it mainly occurs:
- due to loose connections in the pipes (for example, the clamps are loosely tightened);
- after replacing the coolant;
- if the cylinder head is broken.
The plug can be removed in several ways (provided that the head gasket is not broken), let's consider one of the options. To expel air from the cooling system, proceed as follows:
- put the car on a hill so that the engine is higher in level;
- unscrew the expansion tank cap;
- fill the tank with antifreeze to the maximum;
- we start the engine and warm it up to operating temperature, increase the speed to about 3000;
- Gently squeeze the lower radiator hose with your hand, it is important not to get burned while doing this, do not close the expansion tank cap;
- As air leaves the cooling system, the antifreeze will “sink” in the tank; it must be added regularly. As soon as bubbles stop appearing when you press the nozzle, hot air will begin to flow into the cabin when the heater is on.
Refinement of the stove in a VAZ car: how you want real warmth...
As a rule, it is the GDP that causes the most complaints about the operation of the stove - a rare example blows normally into the legs and onto the windshield, and if the air is also hot, it’s a great success. Moreover, now some new cars are equipped with a “modernized” heater (also known as the “14th”), which, in addition to everything, blows cold air out of the side nozzles!
In reality, everything is not so scary - it can be treated, even the “14th” heater. The most disgusting thing is that you need to do this... There are plenty of manuals on this topic, one of the most complete is in FAK and belongs to the pen of the famous handmaker VIC78. I went through my stove using it, and the results were simply excellent. True, this happened a long time ago and there was not the slightest desire to take everything apart again for photographing.
Therefore, an action was carried out to upgrade the stove in the M(i)tenka car - VAZ-21093i 1999. with the “14th” heater on board. The fine-tuning of the stove was combined with noise insulation of the torpedo. I did not plan to make fundamental changes to the design of the heater, but only wanted to properly assemble and adjust it.
Disassembling the heater
First you need to drain the antifreeze - unscrew the plastic tap in the radiator (opposite the generator), but coolant will still remain in the heater radiator. Therefore, to drain it, a piece of hose with a funnel was used, which was placed directly next to the radiator hose. And if you pour the antifreeze into a clean container, then you can pour it back later...
First you need to drain the antifreeze - unscrew the plastic tap in the radiator (opposite the generator), but coolant will still remain in the heater radiator. Therefore, to drain it, a piece of hose with a funnel was used, which was placed directly next to the radiator hose. And if you pour the antifreeze into a clean container, then you can pour it back later...
To assess the misalignment of the heater output nozzles with the holes in the dashboard, you need to remove the air duct cover. As a rule, the stove is shifted slightly forward. If the misalignment is more than 50%, then the stove will have to be filed.
The torpedo will have to be removed. This procedure has also been described more than once, including in the magazine “ZR” No. 10 for 1999. Connectors for buttons and light bulbs can be labeled (with a felt-tip pen or on a piece of paper tape) so as not to be confused during installation. You also need to remove the steering wheel with pads and pull out the steering column switches.
Radiator tuning
Approximately 30% of uneven heating of the interior is a clogged VAZ 2114 heater radiator. To clean it, you need to perform the following steps:
- 1. Remove the radiator and rinse with strong water pressure. In this case, disconnect the pipes and connect hoses instead. Water must be supplied to the outlet. Then the dirt will be “squeezed out”;
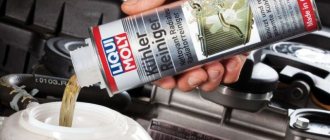
- 2. Use any sewer pipe cleaner for flushing.
Pour it into the system and drain it after 20 minutes. After repeating this procedure three times, complete the rinsing with clean water.
- 3. Attach the pipes in place and fill in antifreeze or antifreeze;
- 4. When installing the radiator, seal it.
It is also important which heater radiator is installed on the VAZ 2114 - aluminum or copper. In the first case, it heats up quickly and also cools down instantly. But it has a larger number of fins and channel width, which gives better heat transfer at idle speed. Minus - cannot be repaired.
Copper heats up more slowly, but also cools down much longer. It has fewer ribs and narrower channels. At idle speed the air flow is cold. But if a leak occurs, it can be easily repaired.
A painted radiator is not suitable for tuning. It has little heat transfer and an unpleasant odor.
In total, problems can arise with two types of cables:
- stove valve cables,
- damper adjustment cables.
It is these elements that VAZ-2114 car owners have to deal with when the heater stops functioning effectively. It is recommended to first check other elements of the system for serviceability and operability, so as not to carry out unnecessary disassembly, assembly and adjustment work in vain.
Adjustment
Hot antifreeze for the heating system on the VAZ-2114 model is supplied mechanically, for which appropriate cables are used. Over time, they become dirty and stretched out. The moment of weakening of the fastening element is also taken into account. Because of this, the stove begins to function incorrectly. When the cable is loose or stretched, moving the heater tap slider on the panel does not make it possible to fully open or close it.
The first thing you can do in such a situation is to try to tighten the crane cable. For adjustment you need:
- remove the driver's side panel skin,
- a little higher under the steering wheel you will see a couple of cables,
- you need the one to the left,
- find the crane cable itself (it is fixed to it), which is located in the gas pedal area under the panel,
- tighten the element so that when the damper is fully open, it opens fully,
- in some cases, it is enough to shorten the cable literally by 5 mm, making an additional turn,
- take into account the current state of tension. If the element is very loose, you will have to tighten it more or change it altogether.
Heater modification: 3 comments
Hello! Same problem on my car! I want to make repairs according to your scheme. Please tell me what is outdated in the article, can the materials be replaced with more modern ones? I’d be grateful if we could chat by email! Thank you
I think silicone sealant and screws are still in use, 13 years later.