What to do if the brake drum does not fit on the new pads when replacing.
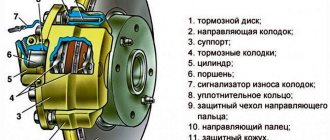
Sorry, friends, I probably annoyed everyone with my “nerdy” theme. I changed the pads and cleaned everything (photo) but here is the last stage - I ask for help - I can’t put the drum on. I tried both from below and from above. The brake pistons seem to be fully compressed. I understand the point is that the pads “float” and cannot form a “cylinder” shape along the outer contour; well, I don’t believe that the factories suffer so much. or I'm crooked. Maybe there is some trick.
There should be a wheel with teeth. It spins easily in one direction - it's pulled apart, but in the other direction it doesn't spin (you have to move the stopper to make it spin) - it's brought together.
You can see in the photo - plus, in order to compress the pistons more tightly, sometimes you have to loosen the fitting and compress the pistons - a little brake fluid will of course spill out
+500 it is under the cylinder. There is a threaded strip between the pads
You put the piston into the cylinder.. then you will have fun with the wheels.
in the second photo, the right piston should be recessed in the same way as the left one.. as the pads wear out, they will continue to come out.. and now you need to push it in.. but carefully.. it is not necessary to release the slurry.. unless the slurry in the tank is under cover.
if right now there is a “wheel-bar, etc.” twist.. then the piston will be pushed out.. on basins there have been cases of critical wear of the piston spitting out of the cylinder.. loss of brakes at this moment is quite understandable.. i.e. Now we bring the piston into the cylinder, take a clamp from the dealer and twist it... and its rod recesses both pistons. here we need to do something similar.
Last edited by Antropoff; 01/04/2010 at 21:31.
How to replace front brake pads
Replacing the front pads is easier than doing the same with the rear ones due to their design features.
The algorithm of actions is as follows:
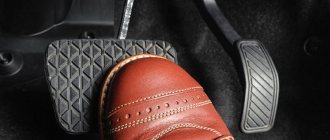
- Place the car on a flat surface.
- Set the vehicle's parking brake. Make sure it does not roll back when changing position.
- Loosen the bolts that secure the wheels.
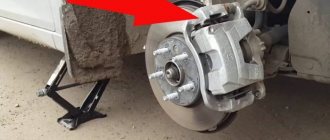
- Use a jack to raise the desired part of the car.
- Now you can remove the wheel from the hub and assess the condition of the brake system.
- If there is severe wear, unscrew the caliper bolt and carefully remove the caliper itself from the disc.
- Now you can remove the pads.
Before replacing the part, be sure to lower the piston completely into the cylinder. This is done so that the caliper can be reinstalled in its place.
Since the caliper is made of aluminum, you can apply force to it without damaging it.
Now you can install new pads, put the caliper and wheel back in place, and return the car to its previous position.
Incorrect installation of components or poor quality parts
It is quite possible that excessive heating of the brakes is due to the fact that the equipment was assembled incorrectly at the service center. In this case, you will have to completely disassemble the system and check the quality of its assembly. And this must be done as soon as possible. In the best case, you will be able to reassemble everything correctly and just drive the car without any problems. In the worst situation, you will have to disassemble and reassemble the device several times to find the real problem.
Problems arise for the following reasons:
- an incorrectly assembled mechanism does not return the pads back, so that when the brake pedal is pressed, the pads remain in the spread position and continue to slow down for some time;
- a dropped or not put on spring for adjusting the brake pads gives a similar effect; the elements are brought together only if you sharply release the brake pedal, and the adjustment will be incomplete;
- purchased low-quality spare parts can cause such problems - the parts may be too large, a 1-2 mm misalignment in size is enough to cause constant friction;
- a thick lining can also cause strong heating, in this case you purchased defective pads, they should be replaced, and not modified or sawed off their parts;
- Perhaps one of the parts of the brake mechanism has failed, rusted or become very dirty; this may well cause the unpleasant moments described in the article.
You shouldn’t disassemble the brake drum yourself unless you have experience and sufficient confidence that you can put everything back in place efficiently. It should be borne in mind that the braking process must work very well, so subsequent disassembly and reassembly of the brakes should be entrusted to specialists at a proven station. If you don't have one, it's worth asking other drivers of cars like yours. Perhaps they will suggest you a good service station or even a garage mechanic with golden hands and a low price tag for the job.
How to replace rear brake pads
- Disconnect the upper spring from the rear block . It is best to pry off the spring with pliers. But a screwdriver will do.
- Disconnect the upper spring from the front block.
- Removing the lower spring.
If there is rust on the springs or signs of mechanical wear, the springs should be replaced with new ones. Springs can be obtained from a repair kit.
- We remove the clamps from the pads . To remove the lock, you need to press the spring and turn the rod 90˚.
- We dismantle the old pads . When disconnecting the rear shoe, you must additionally remove the parking brake cable end.
- We install new pads . It is highly advisable to wipe the working surfaces with an alcohol wipe.
- Installing a new drum . Its working surface, as in the pads, must be wiped with a clean alcohol wipe. In order for the drum to fit into its seat, it may be necessary to move the shoes together. The pads are adjusted using the adjuster wheel.
- Adjusting the pad clearance . The drum should fit without any extra effort, and there should not be a large gap between the pads and the drum. When the drum rotates, there should be no parasitic resistance from the pads. In this case, slight friction on the pads is allowed. The new pads will wear in quickly. The gap between the pads and the drum should be adjusted on the back side of the hub. The hole in the adjusting mechanism is covered with a rubber plug.
Procedure for replacing rear drum brake pads
1. Raise the car and remove the wheel, to do this:
- place the car on a flat surface
- put the car in gear
- put a wheel chock (or bricks) under the wheels to prevent the car from rolling
- tear off the nuts (or bolts) securing the wheel
- put a jack on and lift the car until the wheel rotates freely
- place a lifting support or log under the machine. Don't rely on the jack alone!
- unscrew the nuts (or bolts) and remove the wheel.
2. Removing the brake pads:
- unscrew the brake fluid reservoir cap
- remove the brake drum (if the drum does not give in, gently tap it with a hammer, on some models there are special holes in the drum into which 2 bolts are screwed in and thereby push the brake drum out)
- disconnect the upper and lower tension springs, and the expansion plate (on some models there is an automatic feed mechanism, which also needs to be dismantled)
- loosen the brake pad clamps, disconnect the parking brake drive and remove the old brake pads
- disconnect the parking brake lever from the block.
Perform a visual inspection of the brake system elements for damage and leaks. Replace unsuitable parts if necessary. Wipe the drum thoroughly and remove excess dirt.
3. Install new brake pads in reverse order:
- attach the parking brake drive lever to the new block, and then the drive itself
- we put the springs and the expansion plate in place (if there is one, then the auto-adjustment mechanism), and the brake pad displacement clamps
- put the brake drum and wheel in place, and lower the car (if the drum does not sit in place, you need to loosen the tension on the handbrake)
- If necessary, add brake fluid to the level.
After replacing the rear brake pads, you need to check the effectiveness of the braking system. It may take some time for the pads to break in and achieve maximum braking performance. The rear and parking brakes may also need to be bled and adjusted.
Tips for replacing brake pads
- Pads must be replaced on both wheels
- Do not unscrew the brake hose from the brake cylinder, otherwise air will enter the brake system
- You cannot change the pads between the left and right wheels.
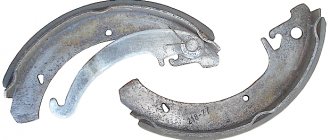
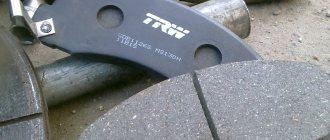
New set of rear brake pads
To replace the old ones, a new set of rear brake pads was purchased from.
We bought these pads for the first time, so there is nothing to say about them. At the same time, they “lifted the mood” a little. Pay attention to the upper right corner. The manufacturer focuses the buyer's attention on the protection against counterfeiting that this set of pads supposedly has. Nearby you can see a protective sticker, which, according to legend, ensures that the original cannot be replaced “anyhow.” Now let's turn the packaging over.
As you can see, there is no sticker on the opposite side! Open the package, take out the pads and put whatever you want in there. That's protection, that's protection! We can only hope for the integrity of the seller.
The right rear wheel pads are rubbing!
#1 DEADANARHIST
- Users
- 43 messages
- Registration 20-January 10
- Top
- Complaint
#2 ANGEL
- From: Kyiv
- Auto: 21053
two bolts are eccentric - something like this. you can let them down if it’s bothering you, as soon as they get used to it, adjust them again and separate them.
It’s better to adjust several times, otherwise the wear will be uneven.
- Top
- Complaint
#3 DEADANARHIST
- Top
- Complaint
#4 ANGEL
- From: Kyiv
- Auto: 21053
Do not remove the drum, they are behind it, from the inside. climb in and look, there is a protective casing behind the drum, on this casing they stand, from the outside. Turn them a little at a time with the key, turn the drum, listen, if you rub, turn them a little more, etc.
In general, the drum can be removed and seen, perhaps one of them is moved apart, the other is normal.
Right now, if I find a photo, I’ll post it.
Added after 7 minutes I can’t open the files or look at them. The computer is buggy. I'll take a look a little later.
- Top
- Complaint
#5 ANGEL
- From: Kyiv
- Auto: 21053
- Top
- Complaint
#6 riorom
DEADANARHIST, you remove the wheel under the shock absorber mount, put a block or some kind of stop, lower the car, remove the jack - in this position the handbrake cable will not be pulled, the handbrake is naturally released. You take it out of gear - the drum should turn easily by hand - if it rubs, there are two healthy nuts on the back side of the brake shield, rotating them in different directions, bring them in or spread the pads - then turn on the engine and stick in 1-2 gears, smoothly adjust them so that the pads are centered and adjust them again eccentrics until the drum rotates freely without catching the pads and will slow down at the slightest pressure on the brake
Replacing brake drums Lada Kalina
You will need : remove the rear wheel and prepare a high hex head “7”, a hammer, a wooden block, mounting blades.
To remove the Kalina brake drum :
- Unscrew the two wheel guide pins using a 7mm hex socket.
- Try to remove the drum with your own hands.
- If that doesn't work, try knocking it off with a hammer through a wooden spacer.
After removing the drum, do not press the brake pedal, otherwise the pistons may come out of the cylinder completely.
To install the brake drums, you must first recess the pistons into the working cylinder. To do this, we press on the pads with two mounting blades, leaning against the shoulder of the brake shield.
For Kalina's brakes to start functioning, with the car standing, press the brake pedal 2-3 times to bring the pads to the drum.
The drum does not fit after replacing the UAZ Patriot pads
DMS, under what circumstances did your drum break? With extreme sports?
[email protected] , and after such bathing you won’t have to buy a new drum?
I had a similar situation with new handbrake pads. As soon as I got the drum on, I removed the metal stops on the blocks and sharpened them myself.
Nikolai Zhdanov, carelessly, did not tighten the wheel, it became loose and broke the hub (in the place where the studs are driven in) and the brake drum.
Tomorrow I'll try to sharpen the pads, especially since there aren't many there, the pad linings rest against the drum in the area of the support pins (rear wheel).
In practice, it has been verified that nothing happens to it. It turns out that it is not the drum itself that will be cooled, but the wheel disk and hub. The drum itself is mostly hidden (isn’t it?) The main thing here is not to overcook the hub, otherwise it might jam (the lubricant will miraculously leak out, or it will thicken due to large temperature changes).
In general, it is better to change one pad at a time, i.e. leave one old one and install one new one, and when it gets used to it, change the old one. Drivers with vast experience advised this. And it’s true, I changed it a couple of times. More comfortable.
. Tomorrow I'll try to sharpen the pads, especially since there aren't many there, the pad linings rest against the drum in the area of the support pins (rear wheel). Speaking of fingers: have you tried to unfold them? There are also eccentrics there, and in my mind it is with the installation of these eccentrics that the adjustment of the pads begins. Try to loosen the nuts and “retract” the pads inside by turning the fingers, then return them to their place, but you will have to do this together, because turning the fingers until the pads stop in the drum must be done with the brake pedal pressed all the way. It’s easy to overdo it alone, which I did at one time, although I corrected it later, but this means climbing there several times almost after every trip, observing the nature of the abrasions on the pads, which is quite difficult on new ones.