The average service life of brake pads on Outlander 3G is from 30 to 50 thousand km. , and every 10,000 you need to do an inspection. This difference depends not only on driving style, but also on the manufacturer of the pads. The driver’s preference plays a role here when selecting analogues - softer pads wear out faster, but perform their function better, and hard friction material lasts longer, but wears out the brake discs faster. On average, pads are changed every second.
In order for the pads to wear evenly, both of them need to be changed at once, along one axis at the same time. If upon inspection it is revealed that the wear is different, this indicates a malfunction of the brake mechanism, which is quite common for a single-piston system.
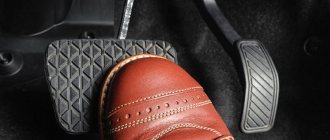
In this case, the procedure for replacing the pads was carried out using the example of a 2015 Mitsubishi Outlander 3.
What spare parts and tools are needed to replace pads on Outlander 3
- Jack;
- Balloon wrench;
- Wrench with 14mm head;
- Half a meter of wire for tying the caliper;
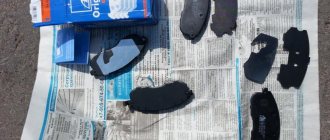
- Pads - 2 pcs. on one side;
Front brake pads for Mitsubishi Outlander III.
- Mitsubishi 4605A486 (4605A795) — 7500 RUR/set 4 pcs.
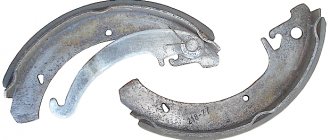
Rear brake pads for Outlander 3.
The rear pads are different for models with mechanical and electric handbrake. Moreover, brake pads equipped with an electric handbrake wear out almost twice as fast.
- Mitsubishi 4605A802 (4605A998) — 5500 RUR/set (mechanical handbrake).
- Mitsubishi 4605B562 (4605B989) — 8900 RUR/set (electric handbrake).
What to look for when replacing pads
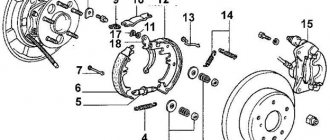
When performing repair work, it should be taken into account that the pads on the Outlander XL (as well as other modifications of the car) may have uneven wear. The reason lies in the wedging of one of the guides, which is why the caliper acts on the pads with a distortion. By mechanical action, you should check the ease of movement of the guides and replace the defective element.
Outlander pads
Before starting work, it is necessary to check the brake disc to ensure that it meets the thickness requirements. For example, its original thickness for the new Outlander XL is 26 mm. The minimum permissible thickness at which element replacement is regulated is 24.4 mm. The average service life is 250,000 km. But it can be reduced due to such amendments as unfavorable climate and aggressive driving style.
The thickness of the brake disc is measured with a micrometer. It is recommended to record the measurement in eight areas of the element. In each case the value should be the same, since the wave-shaped disc must be replaced or machined. The distance from the edge to the measuring point should be 1-2 cm. Such a detailed calculation will make it possible to determine the possibility of grooving the disc if it is damaged. The working surface of the disk must be smooth, without roughness, burrs or longitudinal grooves.
How to replace front pads on Outlander XL at home
You can replace the pads on the Outlander XL yourself - the whole procedure will take no more than half an hour for each wheel and will require a 17" wrench and a long slotted screwdriver. To install a new set of brake pads you need to:
- First, jack up the front of the car and place a wooden beam under the engine side members to relieve pressure on the supporting structure;
- Next, we dismantle the front wheel to get to the brake caliper. Using a “17” wrench, unscrew the central bolt on the caliper from the back of the part and turn the caliper outward to facilitate the replacement procedure;
- Then we dismantle and remove the pin from the caliper, after which we clean the parts from fuel oil and abrasive particles;
- Now you need to open the caliper structure and press out the brake cylinder with a screwdriver, after which you can remove the brake pads;
- Next, you need to treat the seat for the pads: be sure to clean the grooves from abrasive particles and check the wear of the components;
- We remove the plates from the old brake pads and install the parts on the new set, after which we mount the pads in the caliper. Then release the brake cylinders and close the caliper.
After replacing the pads, install the wheel and carry out a similar procedure on the other side of the car. When repairing brake pads, it is important to diagnose the discs - a comprehensive replacement of components may be required.
When replacing brake pads, it is imperative to lubricate the guide wheels, otherwise the components will become sour by the next repair. Neglect of lubrication and strong force when dismantling the guides can cause the hex bushings to grind off in the grooves.
Outlander. USA. Photo report. Replacing front pads
Outlander - Operation and repair, technical issues and exchange of experience
| 22.09.2008, 12:18 | #1 |
| Club Resident Auto: Outlander 2.4 4WDMessages: 108 | Outlander. USA. Photo report. Replacing the front pads. I will keep silent about the choice of pads, since a lot has been said about this on the forum. I bought these for 1080 rubles. REMSAN Let's go. 1. Jack up the car. We remove the wheel. 2. Using a 14mm socket, unscrew the bolt on the back side of the support (it is not visible in the picture)3. move the caliper bracket up and wrap it with wire so it doesn’t fall off4. We take out the old pads and move the metal pads from them to the new pads. Also, don’t forget to put wear indicators on the new pads (included with the pads).5. Now you need to compress the piston. To do this, open the reservoir with brake fluid and carefully, without distortions, press on the piston. I pressed with the handle of a hammer. There are also special tools for such work. At the same time, the liquid level in the tank rises. 6. If you have a micrometer, it would be a good idea to measure the thickness of the brake disc. For the American 4G64, the original size is 26mm. Maximum permissible 24.4 mm. I have 25.6 mm with a mileage of 85 thousand. Measuring must be done in eight places on the disk 1-2 cm from the edge of disk 7. If the old pads are worn unevenly, this indicates that the caliper does not move well along its guides. You can check this by tugging it back and forth (with a small amplitude, otherwise you will break the rubber!!!) Checking the lower guide is done by pressing the “plug” from which the bolt was unscrewed in step 2 8. Insert new pads, lower the caliper and give it a good screw it into place.9. We repeat the same thing on the second wheel, then do not forget to close the lid of the brake fluid reservoir. By the way, for me it rose from minimum to maximum after replacing the pads. PS Before fastening the wheels, I advise you to clean them from dirt from the inside, otherwise the balancing will be disrupted |
| 35 user(s) said thank you: | akapros, Alex.M, ALEX_VRN, Alex_XXX_, An77, archibas, belail, DaVinci, Denis Korovushkin, dew8, HiJacker, Jazichnik, johnny67, Kosmichesky-mujik, Latnock, malek, maxim12345, out512, Outlanded, pavlik100, poll off, silivanov, STIG, theirlaw, TURBINKA, Vit1943, Alexey 72, Artem Kuznetsov, Vovan Vovan#h, dan, KolyaKamazov, Konstantin7, RRoman, Semyon078 |
| 22.09.2008, 15:45 | #2 |
| Auto Club Old Member: EX35 Posts: 822 | Answer: replacing the front pads (American 4G64). photo report um...the topic is good...but the photo is invisible? |
| 22.09.2008, 15:56 | #3 |
| Club Resident Auto: Outlander 2.4 4WDMessages: 108 | Answer: replacing the front pads (American 4G64). I mean, the photo report Can’t they get bigger? Or are they not visible at all in the window? |
The user said thank you:
| 22.09.2008, 16:56 | #4 |
| Auto Club Old Member: EX35 Posts: 822 | Answer: replacing the front pads (American 4G64). photo report oh, now they have appeared! |
| 22.09.2008, 18:13 | #5 |
| Old resident of the Club Name: Dmitry Car: Subaru Legacy Messages: 1,478 | Answer: replacing the front pads (American 4G64). photo report Author, please write after some time your feelings about the Remsa pads, otherwise one friend recommended them. |
| 22.09.2008, 19:10 | #6 |
| BANNED Name: AlexanderAuto: Reliable friendMessages: 3,140 | Answer: replacing the front pads (American 4G64). photo report Everything is great except for one thing. It was necessary to get the guides out of the brake caliper, remove the old grease and carefully apply new one; on all Japanese cars, without exception, the guides jam if the old grease “boils.” At the same time, it burns so much that you have to heat the caliper with gas to get them out of the caliper. Otherwise, everything is just fine. The Rems calipers are a very good substitute for the original. Judging by the photo, there is air left under the boot on the brake cylinder, this threatens to burn out the boot, and the guides jam precisely because of the old grease. Don’t be afraid to take them out of the brake caliper, you won’t tear it up, there are specially made seats for the boot; it just fits on these places. By the way, you don’t have to remove the expansion tank cover. The main thing is not to forget to pump up the brake pedal after replacing the pads, otherwise it’s a disaster! Last edited by Alexander019; 09.22.2008 at 19:19. Reason: Message added |
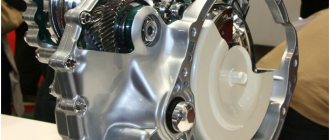
Mitsubishi Outlander brake caliper: features, device
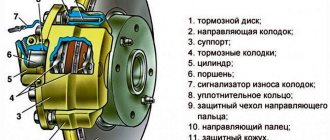
The Mitsubishi Outlander brake caliper is a device that locks the pads when the car is stopped. Its operation is based on the principle of liquid pressure in the brake line - pressing the pedal causes the caliper pistons to shift, activating the entire mechanism. In addition to the pistons, the assembly has guides, a boot, and clamping brackets. The design necessarily includes oil seals and sealing rings. The part is fixed directly to the hub.
The Mitsubishi Outlander uses a hydraulic brake drive with a vacuum booster. The anti-lock braking system (ABS), electronic distribution (EBD), and stability control (DSC) are also activated here. Both brakes are disc brakes (early models are an exception), with automatic adjustment of the gap between the pads. The front mechanism is ventilated, and the rear mechanism has a built-in hand brake system. The Japanese car's caliper has a simplified floating caliper assembly design .
The front brake mechanisms of the first generation Outlander are slightly different. They are made in different designs for the “American” and “European” versions. In the first case, single-piston mechanisms were installed, in the second - double-piston ones. “European” clamping devices have a slight advantage - the brakes react more powerfully and more responsively.
Service mode for replacing pads Mitsubishi Outlander 2022 -
1. Raise the car on a lift and install strong racks at the indicated locations. 2.Move the selector lever to position “P” and turn on the ignition (but do not start the car engine). Put the handbrake on! Fasten your seat belt. 3.Press the brake pedal. Note: Keep the brake pedal depressed until the ignition is turned off. 4. Attention Do not operate the parking brake switch too quickly (wait at least 2 seconds before operating again). Otherwise, the ECU will not be able to correctly recognize the switch status. This will cause the indicator or warning light to not flash. Steps 5 and 6 must be completed within 7 seconds of Step 4 (brake warning light (red) and electric parking brake switch indicator flashing).
Using the electric parking brake switch, alternately REMOVE and APPLY the parking brake 9 times, the brake warning light (red) and the indicator in the electric parking brake switch will flash.
Note: The multifunction display should display the message “PARKING BRAKE TEMPORARILY NOT OPERATING.” 5.RELEASE the parking brake once to disengage the parking brake. 6.Press Auto Hold 10 times in a row or more for as short a period of time as possible, then immediately RELEASE the parking brake. 7.Once the system enters maintenance mode, the electric parking brake warning light (yellow) will stay on (stop flashing). Note: The multifunction display should display “PARKING BRAKE SERVICING REQUIRED.” A continuous sound will immediately be heard from the electric handbrake mechanism. When the system enters maintenance mode, the electric parking brake will be completely released. If you did not complete the operation and did not enter maintenance mode, repeat the procedure after 60 seconds. 8.Attention Do not use the electric parking brake switch, otherwise the maintenance mode will be disabled. Applying the electric parking brake switch even with the ignition switch off will cancel the maintenance mode. Release the brake pedal. 9.Turn off the ignition. 10.Disconnect the cable from the negative terminal of the battery.
Which repair kit to install, what does it include?
Typically, during the process of rebuilding a brake caliper, replacement parts are needed. They can come separately or as a set.
| guides | Mitsubishi 4605A211, MB618228 |
| front caliper repair kit, including boots, guides and lubricant | Lucas/TRW ST1706, Seiken 26020423 |
| rear caliper repair kit | Seiken 27010651 |
| rear and front piston | Seiken 15010348, 15020313 |
| sealing washer securing the brake hose to the caliper | Mitsubishi MA111832 |
| anti-squeak plates | Mitsubishi 4605B926, MR389651 |
Replacing brake pads for Mitsubishi Outlander XL
We pay for photo reports on car repairs. Earnings from 10,000 rubles/month.
Write:
In this photo, instructions are made for replacing the rear brake pads on a Mitsubishi Outlander XL . This procedure is very simple, a beginner can handle it quite well.
The process for replacing rear brake pads is very similar to replacing front brake pads. The time limit for this operation, as well as for the front, is approximately 25-30 thousand km. mileage
Although this figure may differ, since brake pad wear directly depends on how the car is used.
100$, and if we take non-original ones, for example from HELLA, then it’s about 30$.
It is worth noting that it is recommended to inspect the brake system every 10 thousand km. . Since the braking system is primarily about the safety of your movement. Also, do not hesitate to replace the pads; excessively worn brake pads can damage the brake disc, which will lead to more expensive repairs.
Everything as usual). We tear off the bolts, lift the car, remove the wheel and see this picture.
If you hear a creaking noise from the front wheels when braking, then the pads are probably worn out and should be replaced with new ones. Check the condition every 15 thousand km. In this article we will tell you how to remove and replace the front brake pads on a Mitsubishi Outlander XL with your own hands.
You will need: new brake pads, jack, 17″ wrench, flathead screwdriver.
Loosen the wheel nuts, jack it up and remove the wheel.
From the inside, unscrew the caliper mounting bolt.
Turn the brake caliper towards you.
Unscrew and remove the pin from the brake caliper.
Thoroughly clean your finger of dirt.
We take the pads, place a stop with a wrench and press the cylinders with force.
It should turn out like this.
Replacing the steering column switch on a Kalina
- We remove the old brake pads using a screwdriver.
- We clean the cracks and niches under the pads from dirt.
- We remove the plates from the old pads and put them on the new ones.
- We install new brake pads for Mitsubishi Outlander XL.
- Be sure to get into the grooves when installing the pads.
- It should turn out like this.
Close the brake caliper and fasten it in the reverse order. Repeat with the other wheel. Change the pads strictly in pairs on both wheels at once. Upon completion of the work, pump the brake pedal until it becomes elastic. Running in new pads is about a thousand km.
The reason for the replacement was the tedious and constant squeaking of the front pads when braking. At first it appeared only during smooth braking, then it disappeared forever. Due to the circumstances that the original pads on the outs are very “soft”, a mileage of 20,000 did not surprise me, some even change it to 15...
In general, Brembo pads were chosen. Why them? No, not because of the name))) there were just a lot of good reviews on them, and the existentialist promised to bring them in 2 days, but they delivered them the next day, which is very pleasing)))
Source: https://avtotop.info/zamena-tormoznyh-kolodok-mitsubisi-autlender-xl/
Refinement of the brake system on Outlander XL
The unique combination of dynamic acceleration characteristics and off-road qualities makes the Outlander a car that you don’t want to change. It provokes tender feelings, hurricane emotions and always a great mood. Like a faithful friend, he will take you away from the bustle of the city and pull you out of the slush and despondency of gray everyday life. That is why a number of car owners are trying to equip their pet with the best and most durable.
Six-piston caliper from Porshe Cayenee
The fact is that the braking components on the Outlander XL are frankly rather weak. They overheat greatly and wear out quickly. Plus, a single-piston caliper makes its own adjustments to the operation of the braking system. However, car owners who maintain a speed limit of 130 km/h do not show concern about the size of the disc and the number of caliper pistons. And those who brake their “off-road car” to zero from 200 km/h have found a solution in a six-piston caliper from Porshe Cayenee.
To perform the operation you will need:
- Six-piston Porsche Cayenee calipers;
- Adapter bracket for mounting the caliper;
- 350 mm brake discs from Mitsubishi Lancer Evo 10th generation;
- Matching pads;
- Jack;
- Balloon wrench;
- Heads for 14 and 17;
- Pliers;
- Medium sized hammer.
The purchased parts must be new and of good quality. The price range for such an “upgrade” ranges from 80 to 100 thousand rubles. in a specialized workshop and within 60,000 rubles. at home. The cost can be significantly reduced if you use the BREMBO four-piston caliper as the basis. It is recommended to use a disk from Lancer, since the working surface of this disk is larger, and the hub and bolt holes are the same.
Replacement procedure:
- Jack up the wheel, loosen it and remove it;
- Unscrew and remove the brake fluid reservoir cap;
- Remove the caliper completely;
- Disconnect the brake fluid supply hose;
- Remove the brake disc. Very often the disc gets stuck, so the repairman’s hammer and impact equipment will come in handy here;
- Install the caliper adapter bracket;
- Install a new brake disc;
- Mount a new caliper;
- Fill new pads;
- Perform similar actions on the opposite part of the axis;
- Bleed the brake system (bleed air);
- Replace the tank cap;
- Install the wheels in accordance with the covering regulations;
- Make sure all bolted connections are securely tightened.
It should be noted that the offset of standard alloy wheels will not allow the wheel to get into place. The new caliper will rest tightly against the wheel rim. Therefore, casting with a large overhang will be required. Or installing spacers and replacing the studs with longer ones. Spacers are selected taking into account the existing rims. On average, they reduce the overhang by 2 cm.
Also, during the conversion process, it is recommended to completely replace the brake fluid with DOT4 .
Outlander HL
The test results of the new system are impressive. With repeated acceleration to 180 - 200 km/h and sharp braking, the performance of the system remained at its original level. The brake discs have not changed color or become deformed. The braking distance has become significantly shorter. Confidence in the Outlander's abilities, as well as in my own safety, has become higher.