Design and functions of the cooling system
The operation of the VAZ 2110 cooling system is aimed not only at cooling parts and the engine, but also at performing other functions, and, more precisely, at:
- heating the air in the cabin;
- lubricant cooling;
- cooling of working elements in the automatic transmission system;
- cooling the air in the turbocharger.
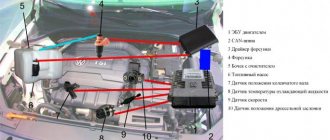
The cooling system diagram of the VAZ 2110 is quite simple if you look into it carefully. It is represented by the following elements:
- Cooling radiator, responsible for cooling heated antifreeze;
- A fan that enhances the cooling of antifreeze in the radiator;
- Heater radiator, responsible for heating the interior;
- An expansion tank into which coolant flows after strong heating;
- A pump that ensures continuous circulation of liquid;
- Thermostat regulating the circulation of antifreeze;
- Temperature sensor;
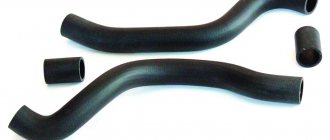
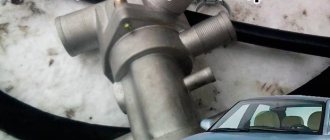
- The pipes through which the liquid moves, and the fixing clamps.
In the entire system, as in the whole car, it is difficult to identify important details, because its operation depends on the combined actions of all components. Of course, the hoses of the VAZ 2110 cooling system are secondary elements, but the circulation of antifreeze depends on them. All components must be firmly connected with clamps and treated with sealant. The cooling system pipe of the VAZ 2110 must be sealed, otherwise even a small crack can lead to a malfunction of the machine, a coolant leak and subsequent more serious damage.
The VAZ 2110 cooling system heater is the most amazing component, designed not to cool, but to warm the air in the cabin. Its presence implements the main technical task of any device - to make maximum use of available resources to perform basic and related tasks.
Preparation
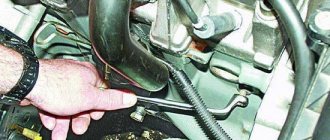
It is necessary to remove the pipes only if the car engine has completely cooled down. Therefore, if you have just entered your garage for procedures, take your time. It's better to leave the car overnight and return to work tomorrow morning.
- Make sure the hoses are actually damaged and need to be replaced.
- Be sure to drain the coolant from the system. If you recently changed it, there is no need to dispose of the fluid. Just use a clean waste container so you can refill it later.
- The operating procedure depends on the hoses used on the vehicle.
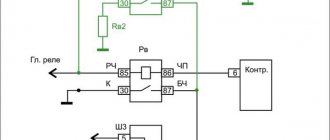
The principle of operation of the cooling system
As soon as you start the engine, the cooling system starts working. Of course, when starting, the main task is to heat the air in the cabin and achieve the operating temperature of the engine parts (approximately 90 degrees). However, the circulation of the cooling system of the VAZ 2110 is forced, that is, it is constant and is ensured by the operation of the pump, so it is impossible to influence its on/off.
The system is represented by small and large circles, in which liquid circulates depending on the temperature of the working parts and the engine. At the beginning of operation, the antifreeze moves in a small circle, which does not include the cooling radiator. As soon as the liquid reaches a temperature of 85-90 degrees, the main thermostat valve opens and antifreeze enters a large circle that connects the cooling radiator.
If the air flow passing through the radiator grille is strong, then the liquid is cooled well, but if you move slowly, the antifreeze cools slowly and the temperature gradually rises, then the temperature sensor is triggered and the fan turns on, which helps cool the liquid.
Preparation
Silicone
It is necessary to remove the pipes only if the car engine has completely cooled down. Therefore, if you have just entered your garage for procedures, take your time. It's better to leave the car overnight and return to work tomorrow morning.
- Make sure the hoses are actually damaged and need to be replaced.
- Be sure to drain the coolant from the system. If you recently changed it, there is no need to dispose of the fluid. Just use a clean waste container so you can refill it later.
- The operating procedure depends on the hoses used on the vehicle.
Basic faults
It should be said that the domestic auto industry is far from perfect, so it is important to be able to timely determine the cause of the breakdown and restore the operation of the car. The 2110 injector cooling system can also suddenly fail, but if this happens, do not panic - take a number of immediate actions.
First of all, you need to check the antifreeze level. This can be done visually by opening the expansion tank or looking at the indicator. Then you need to check if there is a fluid leak. It’s easy to do it yourself - the diagram of the cooling system pipes is not complicated. Often the main cause of antifreeze leaks lies in old clamps and leaky hoses.
A car malfunction may also lie in the brake system. You can read about this in this article. Read about how to tune a VAZ 2110 here.
Be sure to check the circulation of antifreeze throughout the system. To do this, open the expansion tank and see how antifreeze enters it. If you don't see this, it could be a clogged hose system or a faulty pump.
The thermostat of the VAZ 2110 cooling system also often fails. The main problem is that the thermostat does not switch the fluid flow from a small circle to a large circle, which causes the engine to overheat and the car to “boil”. Unfortunately, the thermostat is a non-separable element, so the breakdown can only be corrected by replacing the old part with a new one.
Sometimes the pipes and expansion tank swell. This is due to jamming of the control valves on the lid, due to which excess liquid cannot fully enter the tank.
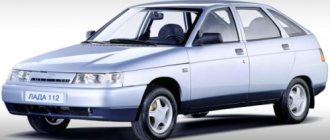
Hello dear readers of the blog RtiIvaz.ru. Today I want to continue the conversation about the auto radiator pipes of the cooling system of the VAZ Lada 2110 “ten”, Lada 2111 “eleventh” and 2112 Lada “twelfth”.
In the previous auto article, we looked at the radiator hoses of the cooling system of the VAZ 2108, 2109, 21099, 2113, 2114, 2115. We looked at the video and photos and found out what the sets of pipes of the “eight”, “nine”, “ninety-nine”, “thirteenth” are , the “fourteenth” and “fifteenth” Lada models differ from each other.
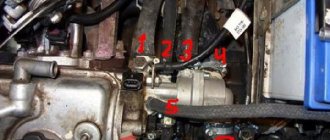
Standard pipes with union connector
In the case of such pipes, work on their dismantling is carried out as follows:
- Elements of this type are usually secured using clamps. Just check what kind of ties they are: disposable twisted or standard worm gear. If they are disposable, we strongly recommend replacing them with worm elements. They are more practical and reliable;
- Armed with a screwdriver, slightly loosen the retaining clamp and slide it along the pipe. This way you can completely free the siding;
- The tube is carefully removed from the receiver, that is, from the fitting, without unnecessary or sudden movements. Sufficiently new pipes that have not worn out can be easily removed, but old ones can “stick”;
- If the element does not want to be removed this way, turn it on the receiver, pry it with a sharp object, and pull it. You can not only put in a lot of effort, because the pipes are very fragile. If the situation is unsuccessful, cut the pipe with a knife. It is simpler, simpler, even if it requires large financial costs;
- When installing new hoses, clamps are first applied and then pulled onto the cooling system receivers;
- If you have previously used a swivel clamp, be sure to remove it. An alternative is a screw or worm-type clamp. There is not much difference in price, but the level of reliability is much higher;
- If you have difficulty attaching the elastic tube to the fitting, lightly moisten the latter with soapy water. Another option is to heat the ends of the pipes in hot water;
- Never use lubricants containing oils to facilitate installation;
- Pull the ends of the pipes onto the fitting, check the correct installation and gasket in the engine compartment;
- Now install the clamp in the desired position and fix it, thereby ensuring that the new element of the cooling system is firmly secured;
- Follow the procedure for filling the system with coolant;
- Start the powertrain and look for any signs of coolant leaks. It is quite possible that the clamp was not tight enough or the pipe itself was faulty. Although these things are worth checking before purchasing.
Article: 2110-1303010/25/92, additional articles: 09-13-83bM, 2110-1303010
Order code: 158420
- Buy with this product
- show more
- Passenger cars / VAZ / VAZ-21104 drawings
- » href=»/catalog/vaz-3/legkovye_avtomobili-30/vaz_2110-10/nasos_vodyanoiy_i_truboprovody-140/#part41196″>Coupling Cooling system / Water pump and pipelines
- » href=»/catalog/vaz-3/legkovye_avtomobili-30/vaz_2110-10/nasos_vodyanoiy_i_truboprovody-140/#part41194″>Supply hoseCooling system / Water pump and pipelines
- » href=»/catalog/vaz-3/legkovye_avtomobili-30/vaz_2110-10/nasos_vodyanoiy_i_truboprovody-140/#part41192″>Exhaust hose Cooling system / Water pump and pipelines
- » href=»/catalog/vaz-3/legkovye_avtomobili-30/vaz_2110-10/nasos_vodyanoiy_i_truboprovody-140/#part41197″>Connection hoseCooling system / Water pump and pipelines
Standard pipes with union connector
Standard
In the case of such pipes, work on their dismantling is carried out as follows:
- Elements of this type are usually secured using clamps. Just check what kind of ties they are: disposable twisted or standard worm gear. If they are disposable, we strongly recommend replacing them with worm elements. They are more practical and reliable;
- Armed with a screwdriver, slightly loosen the retaining clamp and slide it along the pipe. This way you can completely free the siding;
- The tube is carefully removed from the receiver, that is, from the fitting, without unnecessary or sudden movements. Sufficiently new pipes that have not worn out can be easily removed, but old ones can “stick”;
- If the element does not want to be removed this way, turn it on the receiver, pry it with a sharp object, and pull it. You can not only put in a lot of effort, because the pipes are very fragile. If the situation is unsuccessful, cut the pipe with a knife. It is simpler, simpler, even if it requires large financial costs;
- When installing new hoses, clamps are first applied and then pulled onto the cooling system receivers;
- If you have previously used a swivel clamp, be sure to remove it. An alternative is a screw or worm-type clamp. There is not much difference in price, but the level of reliability is much higher;
- If you have difficulty attaching the elastic tube to the fitting, lightly moisten the latter with soapy water. Another option is to heat the ends of the pipes in hot water;
- Never use lubricants containing oils to facilitate installation;
- Pull the ends of the pipes onto the fitting, check the correct installation and gasket in the engine compartment;
- Now install the clamp in the desired position and fix it, thereby ensuring that the new element of the cooling system is firmly secured;
- Follow the procedure for filling the system with coolant;
- Start the powertrain and look for any signs of coolant leaks. It is quite possible that the clamp was not tight enough or the pipe itself was faulty. Although these things are worth checking before purchasing.