The section will be of interest to anyone looking for a modern repair manual for the VAZ 2115, 2114 or 2113. Here any driver will find detailed instructions for diagnosing, replacing or repairing a faulty part. The materials are presented in the form of photo reports and videos , which makes them a visual aid, much better than the printed counterpart from the manufacturer. They will allow even novice owners to master any repair procedure in the shortest period of time.
Even if you don’t currently need to repair a VAZ 2113 yourself, you should know a number of procedures that are most often of interest to car owners. Familiarization with the manual for each of them will allow you to quickly fix the breakdown and restore the functionality of the machine part. As in the case of other representatives of the Samara 2 family, the driver will need information about replacing lamps in optics, repairing the gas distribution mechanism, diagnosing the cooling system, etc.
For those who have to repair the VAZ 2114 with their own hands, it will be useful to know how to replace the stove, change the oil and replace the thermostat of the VAZ 2114. For preventive purposes or in difficult operating conditions, it may be necessary to replace the timing belt. No less useful will be the VAZ 2114 repair manual, which describes in detail the replacement of VAZ 2114 light bulbs in the headlights and car interior.
For owners of the fifteenth model, instructions on how to replace a VAZ 2115 pump will be appropriate. This part often breaks down and cannot be repaired, which makes this knowledge mandatory for those who are interested in repairing a VAZ 2115 with their own hands.
If you are interested in a specific problem, then on the pages of the portal you can always leave your question to more experienced motorists and professional mechanics. Soon after its publication, a full answer will follow, which will help to cope with the problem that has arisen in the operation of the car.
VAZ 2114 - history of the model
Like the VAZ 2113, the model was a restyling of the previous generation VAZ 2109. It received a lot of components that increased the comfort of the car. The VAZ 2114 was produced from 2001-2013. During this time it underwent several changes , most of which affected the engine.
VAZ 2114 is a 5-door hatchback. A distinctive feature of the model was the update of the front part of the body, affecting the headlights, hood, radiator trim, etc. There are also new innovations inside the cabin - a Europanel, a new heater design, and an adjustable steering wheel. Under the hood of the VAZ 2114 were the following engines:
- 8-valve engine 1.5 VAZ 2111;
- 8-valve engine 1.6 VAZ 21114;
- 8-valve engine 1.6 VAZ 11183;
- 16-valve engine 1.6 VAZ 21124;
- 16-valve engine 1.6 VAZ 21126.
Repair manual for VAZ 2115 Lada
- Repair manuals
- Repair manual for VAZ 2115 (Samara 2) 1997+.
General information about the car.
VAZ-2115 Samara-2 is a front-wheel drive sedan, the first representative of the updated Samara family of cars. The VAZ 2115 car is the founder of the family codenamed Samara-2. The model range includes the 3-door VAZ 2113 hatchback, the 5-door VAZ 2114 hatchback and the VAZ 2115 sedan itself. The Samara-2 family is a modernization of the VAZ 2108, 2109 and 21099 models, respectively. In 1997, the VAZ 2115 sedan began to be assembled at Pilot Industrial Production (EPP); in 2001, assembly began on the factory assembly line. Currently, the VAZ 2115 is on wide sale; three versions are available: standard (21150-20), norm (21150-21) and luxury (21150-22). In terms of price, the car occupies an intermediate position between the Samara and the tenth family. The appearance of the car has noticeably changed - the front and rear parts have been changed, the interior has been updated, while the sides, doors and roof remain the same. The new model is distinguished by the front part of the body with original headlights, a modified shape of the hood and front fenders, new taillights with an insert between them, bumpers painted in body color, a trunk spoiler with an additional brake light, door moldings, door sill fairings, a new trunk lid with floor level connector. New efficient lighting technology is provided. The modernization has noticeably improved, modernized the appearance of the car, and also improved the aerodynamics of the car. The interior of the VAZ-2115 car has become more comfortable, a new, more convenient and advanced instrument panel has appeared, which has a more streamlined and ergonomic shape, backlit push-button switches and indicator lamps (the so-called “European panel”), an adjustable steering column, a steering wheel from the “tenth” "family, "console" between the front seats. The new heater design provides efficient heating of the interior. The standard equipment includes an on-board driver warning system for closing the door locks, unfastened seat belts, leaving the ignition key in the lock, the level of oil and coolant in the engine, and extreme wear of the brake pads. The luggage compartment has become more spacious and convenient due to the increase in the trunk lid. The power units are similar to the VAZ-21099. The cars use 1.5-liter gasoline engines, both carburetor and with an electronic fuel injection control system with a 5-speed manual gearbox. Initially, modifications with a carburetor engine were produced. In 2001, a modification of the VAZ 2115i was released with an injection (VAZ 2111) engine with distributed fuel injection. To increase service life and reduce noise at idle, a new clutch driven disc with an idle damper is provided. The model range of JSC AVTOVAZ includes a modification of the VAZ-2115 with an engine with distributed fuel injection, which has highly dynamic qualities, good handling and stability on various types of roads.
↓ Comments ↓
1. General information
1.0 General data 1.1 Technical characteristics of vehicles 1.2. Vehicle controls 1.3. Vehicle operation 1.4 Vehicle maintenance
2. Engine
2.1 Possible malfunctions, their causes and methods of elimination 2.2 Removal and installation of the power unit 2.3 Disassembly and assembly of the power unit 2.4 Disassembling the engine 2.5 Assembling the engine 2.6 Running in the engine after repair 2.7 Checking the engine on the car after repair 2.8. Cylinder block 2.9. Connecting rod and piston group 2.10. Crankshaft and flywheel 2.11. Cylinder head 2.12. Camshaft and its drive 2.13. Lubrication system 2.14. Cooling system 2.15. Supply system
3. Transmission
3.0 Transmission 3.1. Clutch 3.2. Gearbox 3.3. Front wheel drive
4. Chassis
4.0 Chassis 4.1. Front suspension 4.2. Rear suspension
5. Steering
5.0 Steering 5.1. Features of the device 5.2 Possible malfunctions, their causes and methods of elimination 5.3 Inspection and testing of the steering control of the car 5.4. Removal and installation 5.5 Checking the gap between the rack stop and the nut 5.6. Disassembly, technical condition check and assembly 5.7 Replacing the rivets of the elastic coupling of the steering shaft
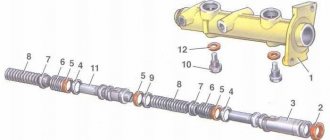
6. Brake system
6.0 Brake system 6.1. Features of the device 6.2 Possible malfunctions, their causes and methods of elimination 6.3. Checking and adjusting brakes 6.4. Vacuum booster 6.5. Main cylinder 6.6. Pressure regulator 6.7. Front wheel brake 6.8. Rear wheel brake 6.9. Dismantling and assembling wheel cylinders 6.10. Parking brake system
7. Electrical equipment
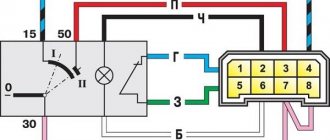
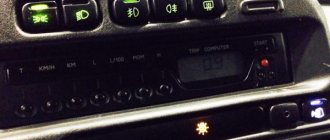
7.0 Electrical equipment 7.1. Wires and fuses 7.2. Battery 7.3. Generator 7.4. Starter 7.5. Lighting and light signaling 7.6 Sound signal 7.7. Windshield cleaner 7.8. Heater fan electric motor 7.9. Electric motor of the engine cooling system fan 7.10. Instrument cluster 7.11. On-board control system display unit 7.14. Electric windows and front door lifts 7.15. Door lock system
8. Body
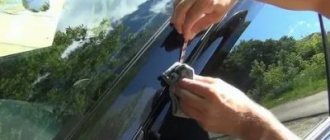
8.0 Body 8.1. Device Features 8.2. Body frame repair 8.3. Paint and varnish coatings 8.4. Anti-corrosion protection of the body 8.5 Sealing of the body 8.6. Doors 8.7. Hood, trunk lid, bumpers 8.8. Body glazing 8.9. Instrument panel, seats 8.10. Heater
9. Cars VAZ-2115-01, VAZ-2114-20
9.0 Cars VAZ-2115-01, VAZ-2114-20 9.1. Car VAZ-2115-01 9.2. Car VAZ-2114-20
10. Applications
10.0 Appendices 10.1 Appendix 1. Tightening torques for threaded connections 10.2 Appendix 2. Special tools for repair and maintenance 10.3 Appendix 3. Basic data for adjustments and monitoring 10.4 Appendix 4. Fuels and lubricants and operating fluids
Diagnosis of heater radiator malfunctions
If the stove begins to work less efficiently, you should not immediately change the radiator. The reasons for this unpleasant situation may be:
- heating system faucet that does not open completely;
- broken thermostat;
- clogged cooling system.
Therefore, before dismantling the stove radiator, you should definitely check these options.
Symptoms of a problem
The heater radiator usually fails for two main reasons:
- internal blockage;
- flow.
In the first case, the radiator tubes become clogged from the inside with dirt, corrosion and wear products. As a result, the coolant circulation in the heating system slows down or stops completely, and the air flow passing through the stove does not have time to warm up to the desired temperature. Cold or slightly warm air begins to flow into the cabin.
A leak occurs as a result of mechanical damage, drying out or corrosion of the radiator material. Most often, the tightness is broken at the junction of the tubes and tanks. It is sometimes difficult to immediately notice a leak, especially if the coolant begins to flow inside the stove. However, after some time, an unpleasant smell of antifreeze will appear in the cabin, and the inside of the car windows will become covered with an oily coating. At the same time, the coolant level in the expansion tank will noticeably decrease.
Repair or replacement
You can try to restore a clogged radiator by cleaning it with alkaline and acidic solutions of chemically active substances. At the same time, it is recommended to clean aluminum heat exchangers only with acidic solutions, and copper ones with alkaline solutions. Flushing can be done either with or without dismantling the radiator.
It is much more difficult to eliminate a leak. First, the leak is located, then it is sealed with a powerful soldering iron using special solder and flux. Using glue and cold welding will eliminate the problem only for a short time. It is much easier to solder a copper radiator. Aluminum, unlike copper, is difficult to solder.
In any case, a repaired radiator is only a temporary solution to the problem. Therefore, experts recommend replacing the heat exchanger with a new one in such cases.
Extraction from the top
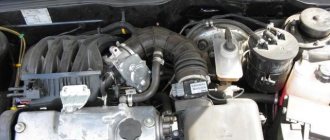
If you have a good winch or 3-4 reliable assistants, then there is no better solution on how to remove the engine from the VAZ 2114 through the top. This method differs from removal through the bottom in that it eliminates the possibility of damaging the engine itself or the car. The most important factor in the success of this operation will be your accuracy.
Removing the engine from the top
The procedure for removing the engine from the top must be carried out as carefully as possible. It is important to take into account everything that can affect the engine falling off its mounts. Moreover, if you do everything correctly, this method will be the least labor-intensive. At its core, this procedure is no different except for removal from removing an engine without a gearbox.
Carrying out repair and welding work
Repairing the underbody of a VAZ 2115 is quite difficult. Under the bottom of the car there is a fuel system, brake system and muffler pipes. When replacing an entire part, these systems must be completely removed and reinstalled after welding. Experienced tinsmiths recommend not dismantling the muffler elements, but cutting them out, after repairing the bottom, boiling the part and installing it in place.
If the underbody is partially repaired, there will be no need to remove the fuel and brake system pipes. When cutting out entirely, it is recommended to cut out the bottom not along the factory welding line, but leaving an allowance of 1-2 cm. The new element is welded with an overlapping seam, which increases the rigidity of the body and the durability of the weld seam.
Replacing parts or the entire bottom
Repairs begin with inspection and repair of thresholds. Rotting of the central part of the body begins with corrosion of the sills and wheel arches, so if rust has destroyed parts of the bottom by 30%, then we can confidently say that the sill is rotten by 60% and requires complete replacement. The bottom of the VAZ 2114 consists of the following elements:
- underbody panels under the seats;
- threshold extension;
- crossbars;
- side member amplifier;
- space for a jack or jacks;
- central support platform;
After cleaning the underbody from anticorrosion, the jacks, side members and panels under the feet of the driver and passenger are inspected. These are the most vulnerable parts. If the general condition is satisfactory, then it is recommended to cut out the problem areas and install the original floor parts from the repair kit. The process of partial overcooking of the bottom in steps:
- Drill out the spot welding points and cut out the rusted metal with a chisel.
- Clean the edge of the future weld with a grinder and treat with a degreaser.
- Attach the original part or the cut out patch. The metal patch should protrude 1 cm beyond the edges of the trim; welding will be carried out overlapping.
- Spot weld the edge of the metal. Weld the patch in increments of 2 cm welding, 4 cm skip.
It is not recommended to weld a one-piece sealed seam; when the engine vibrates, the body experiences torsional loads, and the solid seam may crack.
- Clean the weld seam.
- Treat with primer, apply a layer of oil anticorrosive or bitumen mastic under the sound insulation layer.
- After complete cleaning, treat the outer part of the bottom with bitumen mastic.
When repairs are required
For all VAZ models, the body was made of black or low-carbon steel of class 08Yu, 08KP. The parts were not galvanized, but were coated with a polymer anti-corrosion composition; the film protected the bottom from moisture for up to 6 months, then natural oxidation processes began. After the purchase, drivers had to carry out thorough anti-corrosion treatment of the metal.
Repair or complete over-welding of the bottom of the VAZ 2114 will be required in the following cases:
- It is impossible to jack up the car; the jacks fall through.
- The floor in the car became uneven, the metal sagged from corrosion.
- The driver's seat cannot be adjusted; when the doors are closed, increased gaps appear.
- Noticeable areas of corrosion on the sills and wheel arches. If you lift the car onto an overpass and check it with an awl, the anti-corrosion layer from the bottom will fall off, and traces of rust will be clearly visible.
Final processing
Primer, anti-corrosion treatment, installation of new sound insulation and installation of the interior with electrical connections are the final stage of work on the bottom. For external treatment, you will need bitumen mastic or anticorrosive Body 930. The product has a budget cost and is highly resistant. The mastic forms a dense but elastic protective layer that does not allow moisture to pass through and protects the iron. Final work step by step:
- Clean weld seams.
- Treat welding areas with a primer containing zinc.
- Cover the inner surface with mastic and install new sound insulation.
Rotten metal destroys the skimmer sheets in 3-5 months, so if the car needs the bottom to be overcooked, the sound insulation definitely needs to be changed.
- Treat the outer part of the bottom with bitumen anticorrosive. You can use paraffin aerosols; it is convenient to reach the hidden cavities of the bottom with an anticorrosive agent.
During operation, during routine inspection, it is recommended to periodically remove the plugs in the parts and pour the oil composition into the internal pockets.
- Install interior, doors. Connect the electrical.