- AvtoVAZ
By
admin
—
04.08.2019
590
Headlight levelers in a car perform a very important function. When the vehicle speed changes and the vehicle is loaded, the position of the body changes, the cut-off line shifts, and it must provide optimal visibility without blinding oncoming drivers.
As a result, in the absence of a corrector, even if your lighting devices are configured according to all requirements, you either interfere with oncoming cars, or you do not have enough light, since the headlights shine down onto the road.
Therefore, since 1999 in Europe, the presence of a corrector has been a mandatory option for all cars, without exception.
Types and purpose of corrector
The corrector, using a drive, changes the headlight adjustment, raising or lowering the cut-off line.
It can be of several types:
- With automatic control;
- With manual, forced regulation.
Automatic ones use sensors to determine the position of the car body, the subsidence of the front and rear suspension, and based on these data they adjust the headlight beam. In this case, no human assistance is required; all settings are included in the corrector control unit by the manufacturer.
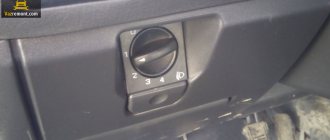
Manual correctors have several positions, and there is a switch between them in the cabin. Most often, on the threshold of the car on the driver's side there is a table with recommended positions for different vehicle loads. It can also be adjusted while moving, for example, if you have poor lighting, you need to raise the beam, or if oncoming cars signal that you are blinding them, you need to lower the beam.
The corrector drive can also be of several types:
- electric corrector;
- hydrocorrector;
- mechanical corrector.
Changing positions with a mechanical corrector occurs with the help of a cable; this is a fairly reliable solution, but over time the shirt can fray and the cable can jam, so it has not been used for quite a long time.
The hydraulic corrector is installed on the VAZ 2114 from the factory; it works on the principle of changing the fluid pressure in the tubes. The liquid is frost-resistant, and the system is closed, but this solution is considered unreliable and often fails, and accuracy is also poor due to the effect of temperatures on the density of the liquid.
see also
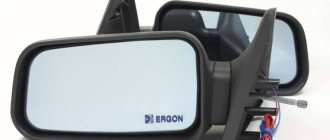
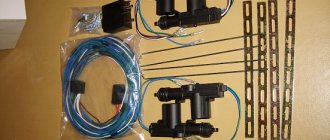
The electrical corrector is reliable and accurate. It uses electrical actuators to change the cut-off line. The headlight electric corrector kit for the VAZ 2114 is installed instead of the hydraulic corrector without any modifications and does not cost much more, but lasts much longer.
Lada 21099 kemo sabe › Logbook › Operation “candle wherever I want” part 5 Electric headlight range control
The “candle wherever I want” operation took a little longer for me... due to a jamb in the previous wiring. PTF and electric headlight range control did not work. Therefore, I wove new wiring according to Feng Shui, made everything in the corrugation even thicker, and made some other modifications: - I installed an engine temperature sensor from Kalina, it is similar to 08, but it has a different plug mount that does not merge - I simplified it and wove it in in the wiring there are oblique electrical wires. headlight corrector, previously it was a separate braid - completely redid the control of the corrector
Well, now that the wiring is ready, let's move on to the correctors themselves. I had VAZ 2110, there are also GAZ 31105, they are more powerful.
In the original design they have this kind of email. scheme
But as I wrote above, for some reason it only worked for 2 days and then fizzled out. So I was looking for an alternative. I found a connection option via the ESP button
, it was he who pushed me to the scheme that I used to assemble.
So, all control is carried out from the Kalina steering column switch. We press the Reset
and select where we want to lower the headlights down or up.
But my scheme based on 3 relays may of course be cumbersome, but it turned out to be very convenient.
The ends that go to the corrector are connected like this
If the correctors work in different directions, you just need to turn the plug over on one.
The motors operate at the same speed, so we set the correctors to a certain middle position and adjust the headlights as needed. For example, the height of adjustment is very large and more sensitive compared to the standard knob.
About 10 meters to the fence.
At the same time I finished up the wiring on the trunk lid
Well, now about the feelings:
- allows you to adjust the headlights (but only in height and both together) while sitting in the cabin - more precise adjustment compared to the standard electric version. corrector and ears, especially a hydrocorrector - you can install lenses + xenon without fear of blinding someone, not forgetting about other accompanying gadgets - you can still hear the clicking of the relays, although you don’t have to use it that often
Those who didn’t like, subscribe and share with friends are LYUSYA
Source
Installation of electric headlight corrector for VAZ 2114
There is nothing complicated in installing the electric headlight corrector on a VAZ 2114; it is installed in standard places instead of the hydraulic corrector and works on the same principle.
All procedures with car electrical wiring must be carried out by first removing the negative terminal from the battery. Failure to observe this precaution may result in a short circuit and failure of electrical equipment.
If your hydraulic corrector fails, it is better to immediately purchase a much more reliable electric corrector; there is nothing complicated in installing it:
- Remove the instrument panel light knob.
- Remove the hydraulic corrector handle.
- Use a screwdriver to pry up the lining with the corrector scale printed on it and remove it.
- Remove the light guide; it is fastened with a Phillips screw and ensures uniform illumination of the scale.
- The main cylinder is screwed with a nut 21, unscrew it and press on the cylinder, then remove it from under the instrument panel.
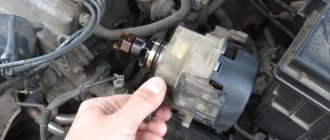
- To remove the working cylinders from the headlights, press the lock and turn it counterclockwise, after which it can be removed from the headlight housing.
- After cutting the tubes with side cutters, remove all parts of the hydraulic corrector from the car.
After all this, you can start installing the electric corrector on the VAZ 2114:
- Route the wire harnesses into the factory holes with rubber seals along the stock wiring.
- Insert the electric correctors in place of the hydraulic correctors into the headlight housings.
- Connect the wire block to them.
- Connect the negative wire to the vehicle ground, and the positive wire to the power that appears when the ignition is turned on.
- Connect the wire block to the regulator.
- Install the regulator in place of the hydraulic corrector master cylinder in the reverse order of removal.
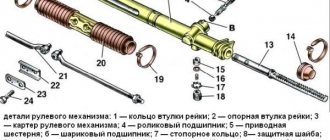
CORRECTOR DEVICE
The headlight hydraulic corrector is a one-piece, one-piece device that is designed to change the position of the light beam by changing the fluid pressure inside the pipes. For cars of this family, the corrector unit has a one-piece design, so it cannot even be repaired, much less independently. If it fails, you need to replace the broken elements with new ones and adjust the headlights to the standard.
Most designs of hydraulic correctors on the VAZ 2114 have the following form:
- Master cylinder, which is mounted under the dashboard;
- Small working cylinders that are attached under the headlights; they are needed to raise the headlights on a VAZ 2114;
- Working fluid that is resistant to low and very high temperatures;
- Pipelines that contain this liquid. Always secured with clamps.
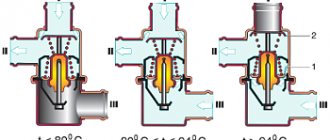
OPERATING PRINCIPLE
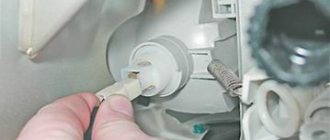
When the driver decides that the headlights need to be adjusted, he turns a special knob inside the car to do this. It controls the pressure in the corrector piping system. Accordingly, when you need the headlights to go down, everything happens as follows:
- The handle turns down;
The switch in the cabin looks like this
- The pressure in the system drops;
- The operating rod enters the housing;
- The headlight goes down.
Based on this, we can say that most of the time high pressure is maintained in the working mechanisms; this is necessary to maintain the horizontal position of the headlight.
In winter, or during the transition period, when the temperatures outside and in the engine compartment are very different from each other, pipelines and rubber seals can delaminate, and working fluid can leak out. In this case, the headlight range control will most likely fail, and the working cylinders will jam and require complete replacement.
In terms of calibrating the device, the instructions from any domestic hydrocorrector will do. This is due to the fact that structurally they are all made very similar and you can figure out any of them yourself.
Causes of mechanism malfunction
The cause of product failure may be liquid leakage from the cylinder or tubes, which causes disturbances in the structure of the seals. Poor quality rubber causes loss of working fluid, which leads to jamming of the unit pistons in one position. Accordingly, the angle of illumination of the headlights changes, which is simply impossible to eliminate without replacing the entire mechanism.
If an electronic corrector is installed on the machine, then very often the system sensor begins to act up due to the destruction of the mounting bracket of the unit. Sometimes there may be a problem with the contact connection.
The correct operation of the headlight range control directly depends on the safety of motorists and pedestrians. That's why you need a headlight hydrocorrector, serviceable and fully functional!
INSTALLATION OF A NEW DEVICE
If you decide to install a new headlight range control unit, then there are detailed instructions for this as well. We will look at the order in which to remove the old hydraulic corrector and how to adjust the headlights on a VAZ 2114, and simply install the new one exactly the opposite way. So, the step-by-step instructions look like this:
Hydrocorrector
In the article “Why the headlight range control does not work,” we examined the main malfunctions of the system, as well as the repair method by completely replacing all components of the system. However, in most cases the hydraulic corrector is perfectly repairable. In order for the hydraulic corrector to stop working normally, the loss of even a small amount of working fluid is sufficient. You can make up for the loss with regular antifreeze.
6 – knob for adjusting the light beam; 1 – main adjustment mechanism; 2 – working cylinders with a rod acting on the headlight reflector.
Barbaric repair method
Many drivers do not burden themselves with either repair or replacement of the hydraulic corrector. When the headlights begin to shine downwards, they simply screw in screws from the back of the working cylinder. Adjustment of the position of the rod and the level of the headlights is carried out by screwing in and unscrewing screws. After such a repair, the concept of a headlight range control is no longer applicable to the system, since the possibility of quickly adjusting the angle of the headlight reflector from the interior disappears. But such repairs have a right to life if the malfunction caught you on the road and there is simply no other way to raise the headlights.
Recovery without removal
- Pull the actuators out of the headlight assembly.
- Remove the tubes from their seats, and then secure the tubes so that the remaining working fluid does not leak out of them. It is better to preheat the landing site, but you can simply cut the tubes at the edge of the landing sites. Check the stroke of the actuator cylinders by moving them by the rod using pliers. The pistons should move without jamming.
- Each actuator has a plug for bleeding the system, which must first be pulled out.
- Turn the switch on the dashboard to position O. Fill the tubes with antifreeze so that a small drop remains on top, then put them on the fittings of the actuators.
- Position the slave cylinder bodies so that the bleeder hole is the highest point.
- Holding the rod in the maximum retracted position, fill the working cylinder with liquid until a small “hill” forms above the bleeder hole.
- Close the plug.
The system should work, but since the seals of the connections at the main cylinder, the regulator at the dashboard and the seals of the working cylinders were not checked, one cannot be sure of the long service life of the hydraulic corrector after such repairs. This restoration method will not work if the system is airy at the master cylinder in the cabin.
Restoration of headlight hydraulic corrector
You need to know where the headlight hydraulic corrector is located and how to remove it, since for a complete troubleshooting you will need to dismantle the working cylinders and the main adjustment mechanism. Take 2 small pieces of tube to connect the working cylinders to the main mechanism after removal, fill the system with water. If the device is operational, set the switch to the maximum headlight raise mode and leave the mechanisms in this position for several hours. If no leaks have appeared during this time, the system can be filled with antifreeze and installed on the car. If the leak does not appear in the pipe connections, it is better to replace the hydraulic corrector with a new one or install an electric corrector instead.
Only new coolant should be used so that dirt particles do not interfere with the normal movement of the pistons. Remember that the system must be completely filled with working fluid. To restore, you will need a syringe and a blunt needle so as not to damage the cylinder seals. Do-it-yourself repairs, the assembly and disassembly process are perfectly shown in the video.
Read with this
- Features of self-adjustment of headlights on a gazelle
- Headlight adjustment
- How to repair headlights yourself? Let's look at different ways
- How do Audi LED matrix headlights work?
- How to polish headlights with your own hands? polishing headlights at home
- DIY taillight tinting
- How to seal a headlight on a car
- Types of car lamp bases and their markings
- How to improve the light on a VAZ 2107
- Wheel width
DEVELOPING THE CORRECTOR WITH YOUR OWN HANDS
During scheduled maintenance, you may also need to adjust the VAZ 2114 headlights yourself. Most often this happens when the hydraulic corrector stops working properly, but does not fail completely.
The most common reason for such partial failure is the lack of normal engagement of the lever and rod in the working cylinder. Under normal conditions, the end of the rod should be engaged with a lever, the other end of which rests on another rod. The latter acts on the headlight itself, moving it in the desired direction. Simply put, this mechanism resembles a kind of swing, the fulcrum of which is on the adjusting bolt.
Adjusting VAZ headlights with your own hands consists of checking the position of this bolt. If it was screwed all the way, then the end of the lever on one side or the other could simply pop out. Also, the bolt must be set so that it can be lowered and raised with minimal effort for the driver.
INDEPENDENT REPAIR
If the hydraulic corrector completely fails, all that can be done is to completely replace it with a new one and that’s it. But if the headlight hydrocorrector does not work, then you can carry out certain manipulations and find out exactly what is the cause of the breakdown, and perhaps you will be able to return them to functionality without wasting money on new components.
So, if the machine has changed its tilt angle, but it is not possible to change the direction of the light beam, then the performance is checked in this way:
- First of all, you need to carefully examine the condition of all the tubes and rubber bands. Even the slightest smudges are unacceptable;
- If no leaks were found or their elimination did not bring results, then you need to examine the condition of each working cylinder. To make it more convenient to adjust the headlights, you need to remove the working cylinders from each headlight. Then the stroke of each rod is measured - under normal conditions it is 6.5 - 7.5 mm;
- If these diagnostic measures did not force the VAZ 2114 headlight hydraulic corrector to work normally, then the breakdown lies in the main unit, and then it is better to simply replace the entire mechanism with a new one.