Depending on how loaded the vehicle is, the headlights can be directed higher or lower. To adjust the light flux, special devices are used - hydrocorrectors. If the car is loaded, the headlights should be turned down so that the flow of light is directed not upward, but onto the road. This ensures the necessary illumination of the road surface and prevents the driver of an oncoming car from being dazzled. In the case of a minimal vehicle load, when the rear part of the frame is raised, the headlights should be turned upward.
Design of headlight hydraulic correctors
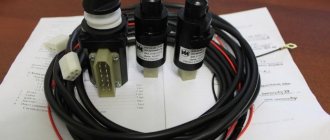
As a rule, the following components are included in the design of a hydraulic corrector:
- master cylinder mounted on the dashboard;
- actuator cylinders mounted on the headlights;
- connecting pipelines that are fixed with clamps;
- working fluid with increased frost resistance.
Typically, hydraulic correctors are made in the form of a non-removable structure that cannot be repaired. Therefore, if, for example, the hydraulic corrector of the VAZ-2114 headlights fails, it is repaired by replacing it with a new set.
The manufacturer provides a maximum operating pressure in the normal state of the corrector. To direct the luminous flux of the headlight downwards, the pressure in the system is reduced, as a result of which the actuator cylinder rod is retracted and the optics are rotated downwards. Thus, most of the time the device is under increased pressure.
Quite often, when temperature changes occur, especially in winter, the structure of the seals is damaged due to the poor quality of the rubber, which leads to leakage of the working fluid. In turn, this leads to jamming of the cylinder pistons in one of the positions.
Structurally, all hydraulic correctors that are installed on VAZ vehicles are made according to a similar design, with the exception of some differences in size, layout of cylinder fastenings and pipelines. Today the following modifications of hydraulic correctors are supplied to the market:
- “2105-3718010” - for VAZ 2105-2107;
- “2108-3718010” - for VAZ 2108-21099;
- “2110-3718010” and “2110-3718010-10” - for VAZ 2110-2112;
- “2114-3718010” - for VAZ 2113-2115;
- “21213-3718010” - for 21213 “Niva”.
Operating principle
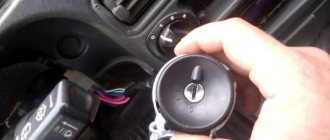
In order to adjust the position of the headlights, the driver should turn a special handle located in the cabin. It is this that allows you to control the pressure in the pipelines of the corrector. To lower the headlights, turn the handle down. It's a simple control system, but even that can break. What to do if the corrector turns out to be faulty?
Control knob for hydraulic headlight adjustment
How to repair a hydraulic corrector on a VAZ 2110 - 2115
Repair of the VAZ-2110 headlight hydraulic corrector is not provided by the manufacturer. Therefore, if it fails, the entire device, complete with pipelines and cylinders, is replaced.
If the angle of inclination of the optics is not adjustable when the vehicle load changes and it is not possible to achieve the optimal luminous flux using the adjusting screws on the headlights, you should check the functionality of the corrector as follows:
- First of all, it is necessary to inspect the device for the integrity of the pipelines and the absence of liquid leakage.
- If after these measures no malfunction is detected, we proceed to checking the performance of the actuator cylinders. To do this, remove them from the headlight unit and measure the stroke of the rods. Normal operation of the cylinders is ensured when the rod stroke is within the range of 6.5-7.5 mm.
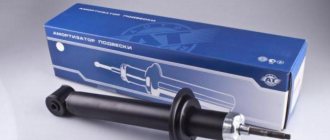
- Since repair of the VAZ-2110 headlight range control is not structurally provided for, we replace the non-working device with a new device included in the kit.
Installation of a new device
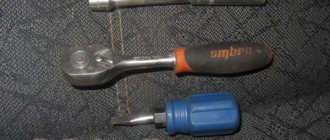
In order to install a new headlight hydrocorrector, there is no need to go to a service station. This is quite simple to do, so you can save time and money if you do the installation yourself. To get started, you will need a flathead screwdriver and an extension cord with a socket head.
Replacing headlight hydraulic corrector
Once these tools have been found, you should proceed to choosing a hydraulic corrector.
Today you can find a wide variety of models on the market:
- hydraulic, operating due to the pressure of the pistons and fluid;
- electrical;
- automatic, capable of independently adjusting the level of headlights.
The cheapest of them are hydrocorrectors. Their only drawback is frequent breakdowns.
So, in order to install a new hydraulic corrector, you need to remove the old one. Anyone can do this if you follow the simplest instructions, which are presented below in the text.
Instructions:
- First you need to find all the clamps securing the pipelines with liquid. They will need to be removed. To do this, you need to unscrew all the bolts.
- After this, you should return to the cabin and carefully remove the rotating handle from its seat. In this case, the rotating handle is located on the main cylinder.
- Now it's time to remove the main cylinder. This can be done using bolts. All bolts (which secure the cylinder) must be unscrewed and removed.
- When there are no more bolts left, you can start removing the cylinders from the headlights. The easiest way to pull them out is directly through the inside of the car. That's all!
Installing a new hydraulic corrector is as easy as removing the old one. To do this, all of the above steps should be carried out in reverse order, but before doing this, the O-ring must be replaced. Once the new device has been successfully installed, the entire system should be checked.
Warning! If the system is not checked for functionality in time, then while driving, light rays may be directed into the eyes of drivers of oncoming cars, and not onto the roadway. This may lead to an accident. In order to prevent such a scenario, you should check the operation of the lighting devices in advance.
Adjusting the headlight range control rod
Sometimes a malfunction of the headlight adjustment system can be caused by a misalignment of the adjustment lever with the lampshade rod. Therefore, if, for example, the hydrocorrector of the VAZ-2112 headlights does not work, do not rush to repair it by replacing it. First, make sure that the connection between the lever and the rod matches the operating position.
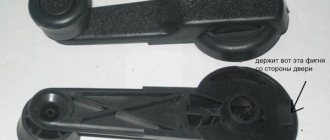
The rod of the corrector actuator cylinder rests on the lever, which, in turn, acts on a similar rod rigidly fixed to the headlight dome. The lever passes through the adjusting bolt, which is its fulcrum. The adjustment mechanism works on the principle of a swing. The corrector swings the lampshade, and the adjusting bolt allows you to raise or lower the support point of this swing. If the bolt is turned to the maximum position, the reverse end of the lever in the form of a ball may slip out of engagement with the lampshade rod.
In order for the VAZ-2115 headlight hydraulic corrector to work again, the device must be repaired by returning the lever to a special recess on the rod. To do this, first tighten the adjusting bolt until it stops, then press the lampshade down and insert the lever ball into the desired position.
Adjustment process
First of all, you need to cover the light of one of the headlights so that it does not interfere. To do this, it will be convenient to use a dark fabric or, for example, a jacket.
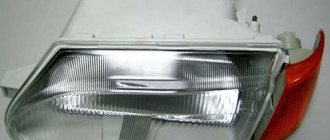
Next, you will need to open the hood and find the screws responsible for the position of the lighting fixtures. The upper left one is responsible for the vertical movement of the lantern, the right one is responsible for the horizontal movement, respectively.
There are three more screws located at the bottom - it is better not to touch them.
By turning the knobs manually, adjust the headlights according to the pattern previously drawn on the wall, so that the center of the light spot falls at the intersection of the upper horizontal side and vertical lines.
After this, the entire procedure is repeated with another headlight.
Replacing the hydraulic corrector for VAZ 2110, 2111, 2112 headlights
Replacing a faulty corrector yourself is not difficult. The replacement sequence is as follows:
- unscrew the screws securing the pipeline clamps to the mounting brackets;
- remove the handle from the master cylinder;
- Unscrew the nut securing the master cylinder to the dashboard;
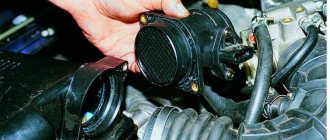
- We disconnect the actuator cylinders from the headlamp;
- we push the actuator cylinders together with the seals inside the cabin;
- install the new unit in reverse order.
Many car enthusiasts, instead of the standard hydraulic corrector provided by the manufacturer, install a more practical and efficient electric headlight corrector. Its difference from a hydraulic device is that electric motors are used as a drive. For VAZ cars, a standard electrical corrector of the Silich-Zenit series is provided. It is easily mounted in the same places as a conventional hydraulic corrector. The installation procedure for the electrical corrector is as follows:
- disconnect the negative terminal from the AC;
- turn the master cylinder counterclockwise and remove it;
- replace the o-ring;
- install the electric corrector in place of the main cylinder;
- dismantle the master cylinder lever in the cabin;
- We connect the positive terminal of the corrector to the socket of block No. 20;
- We attach the negative terminal to one of the body studs under the dashboard;
- we lay the corrector wiring instead of pipelines or along the power supply harness;
- connect the corrector's electrical wiring to the actuators;
- connect the negative terminal to the battery;
- We check the functionality of the corrector.
After installing the corrector yourself, you will have an idea of how this device works. If necessary, repairing the electrical corrector will not be difficult.
How to properly adjust headlights
You have to make sure that even during rain or fog, the headlights remain clear and do not create a curtain. This will allow you to use the car more comfortably and not disturb other road users.
Correct operation of headlights on a VAZ-2109 is achieved as follows:
Sit in the driver's seat and set the headlight adjustment control to the "driver and passenger" position. It is located immediately behind the steering wheel on the left. Turn on the low beam. Take an opaque material or thick cardboard and curtain one side. Open the hood. Locate the headlight protective housing. To the left and right of it are adjustment screws. The direction of the light will change depending on where and which screw you turn.
Please note that below are the screws for the fog lights. In low beam mode, the upper limit of the light spots should reach the lower horizontal line. The inclined and horizontal intersection of the light spots must coincide with the point corresponding to the center of the lamps. Repeat this procedure for the second headlight
Look at their joint work, the beams of light rays should go parallel to each other, and the boundaries of the spots should not be at different levels.
The oblique and horizontal intersection of the light spots must coincide with the point corresponding to the center of the lamps. Repeat this procedure for the second headlight. Look at their joint work, the beams of light rays should run parallel to each other, and the boundaries of the spots should not be at different levels.
To adjust the fog lights, you need to make additional markings on the shield. To do this, locate the centers of the lights used in the fog and draw horizontal and vertical lines through them. From the horizontal line passing through the central points, set aside 10 centimeters and draw a parallel line.
Adjustment of fog lighting is carried out according to the same principles as for conventional low beam lighting. The border of the light spots should reach the lowest line
It is also important to observe the correspondence of centers
Home headlight adjustments are not accurate and should only be used as a temporary measure. Try to find time to go to a service center equipped with a special stand for adjusting the optics. Only an adjustment made by a specialist can be accurate, because when creating the diagram you could have placed the lines incorrectly.
https://www.youtube.com/watch?v=E0744IgpQfI
Features of restoration of hydraulic correctors for VAZ 2107—2109
As a rule, on cars of the VAZ 2107-2108 series, a manual hydraulic headlight leveler is installed. With it, the driver can manually change the direction of the light flux depending on the load of the car, moving the headlights up or down within small limits.
The design does not provide for repair of the VAZ-2107 headlight hydraulic corrector, therefore, if it fails, it is replaced with a new device. The only thing you can try to do if it is impossible to adjust the angle of the headlights is to adjust the operation of the corrector in the order indicated above.
There are no fundamental differences in the optics adjustment device in the “nine” compared to other models. Therefore, the VAZ-2109 headlight hydraulic corrector is repaired using the replacement method.
Causes of hydraulic corrector malfunction
One of the most likely causes of failure lies in the ingress of liquid, which flows out of the cylinder when a crack appears in the rubber seal. In such a situation, the pistons often jam, and the angle of the headlights changes and it becomes impossible to adjust it using levers. In some cases, the whole point is a malfunction of the adjustment lever itself. In order to get rid of these problems, you will have to replace all broken parts.
Important note! If an electronic corrector is installed on the car, a possible breakdown may be associated with the contact connection. It also happens that a malfunction is associated with the fastening of the device bracket.
labavto.com
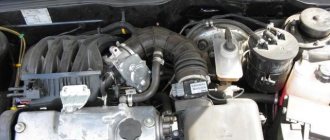
The light beam from the headlights changes direction depending on the load on the vehicle. If it is carrying a heavy load, it sags and the headlights shine at an angle that makes it difficult to see the road. To adjust the headlights, the VAZ 2114 is equipped with a hydraulic headlight leveler. A malfunction of the device makes it inconvenient when driving on the road at night. It is easy to change a faulty hydraulic corrector on a Lada Samara without the help of others, using the step-by-step instructions.
Hydraulic device system
The hydraulic regulator cannot be disassembled. If it breaks, you have to replace it and install a completely new set. The device includes the following parts:
- adjustment knob on the dashboard;
- main cylinder;
- two actuator cylinders located on the front optics;
- two pipelines connecting the cylinders;
- working non-freezing liquid in a closed circuit.
The cylinder system operates in a closed, sealed circuit filled with liquid under pressure. In the basic state, the hydraulic regulator system is under the highest pressure. The switch takes position I. When the handle is switched alternately to positions II, III and IV, a vacuum is created, according to the change in pressure, the rods of the working cylinders are retracted and the angle of inclination of the optics is changed, the headlight turns down. When the switch is returned to its original position, the pressure increases to the limit, the pistons protrude and turn the headlight upward.
The device system consists of several connections. The head cylinder rod is connected to a lever, which in turn is connected to the rod of the actuator cylinder located on the front optics. The function of the reference point is made by a lever that passes through the adjustment bolt. The hydraulic regulator uses a swing mechanism.
When the machine is fully loaded, the headlights must be lowered down to direct the light from the headlights onto the road surface. If the load is small, then the rear part of the body is raised and the headlights should be turned upward.
The movement of the support point up and down is carried out thanks to the adjusting bolt. The corrector turns the lampshade. When the bolt is in its last position, the reverse end of the lever may pop out of its own mounting. Understanding the mechanism of operation of the headlight control, you should take this feature into account and avoid a situation in which repair of the hydraulic corrector will be necessary.
Signs and prerequisites for hydraulic regulator failure
The hydraulic corrector is easy to diagnose. If you find that the headlights occupy the same position and always shine either up or down, and the control knob cannot change the direction of the light beam of the headlights, you need to inspect the device. It is likely that only the adjustment of one headlight does not work; in this case, you can try changing only the corrector in the direction where it does not work.
Before replacing the corrector, you must make sure that the connection between the rod and the lever is in good condition. It is necessary to check whether there is liquid in the lines and cylinders of the hydraulic regulator. To do this, you need to remove all the elements and measure the working stroke of the pistons, but it should be approximately 7 mm.
Often the hydraulic corrector stops working during cold weather, when, due to sharp temperature fluctuations, the seal made of poor rubber becomes unusable. In this case, the working fluid from the hydraulic regulator, when it occupies a certain position, penetrates the seal and hits the cylinder pistons.
The most common cause of regulator failure is leaked liquid. It gets on the pistons, and they sometimes jam, the angle of rotation of the headlights is not adjustable with the switch. The adjustment lever may break. Repair consists of replacing failed parts.
{Instructions} for replacing the hydraulic regulator on a Lada Samara
You can replace the hydraulic regulator system on a VAZ 2114 with your own hands, without the help of professionals. To carry out the procedure, you need to prepare a flat-blade screwdriver, a socket with an extension and the latest set of hydraulic corrector.
There are three types of correctors on the auto market:
- hydraulic, operating due to changes in pressure in a closed circuit;
- electronic, the electric drive function in them is performed by electric motors;
- automatic, self-regulating the direction of the headlights depending on the vehicle's closure.
The first option of devices has the lowest cost, the second is the most reliable and has higher efficiency. The best correctors are automatic, but they are also the most expensive. You can choose any device, because they all use the same circuit. They differ in composition and dimensions. When purchasing, you must take into account the information on the packaging. From the Lada Samara factory they are equipped with a hydraulic type regulator. But it can be replaced electronically, installed in the hydraulic space.
Dismantling and installation of the latest hydraulic regulator
To perform the replacement, it is necessary to remove the failed system. To do this, you need to perform the following sequence of actions:
- First, unscrew the mounting screws on the pipeline clamps, with which they are attached to the mounting brackets.
- Remove the switch from the dashboard by pulling it towards you.
- Next, unscrew the fastening nut, thanks to which the main cylinder is fixed to the device panel.
First adjustment method
The setup procedure follows the following principle:
- Drive the car onto the found horizontal surface that was chosen for setting up the lights.
- Stop the car directly in front of the wall.
- Using chalk, make marks on the wall that will correspond to the center point of the car and the centers of the lights.
- Mark the distance from the ground to each headlight.
- Mark the distance from the center axis of the car to each of the headlights.
- Draw a line five centimeters below.
Adjusting the headlights using the wall
- Next you need to drive away and stop at a distance of 7.5 m from the wall.
- Connect the points of the centers of the lanterns in the drawing with one straight line.
- Draw a pair of vertical lines through the same centers;
- Draw a line parallel to the ground through the center point of the machine.
- At this point, the drawing is considered complete - turn on the headlights close to you.
- The angle of inclination of the lanterns should coincide with the horizontal line, and the beginning where the border of the light will rise should be aligned with the intersection of the lines.
- Adjust the headlights by turning a pair of screws - you will find them on the rear panel in the engine compartment. The beam should be located slightly below the headlight point designation on the drawing.
Types and purpose of corrector
The corrector, using a drive, changes the headlight adjustment, raising or lowering the cut-off line.
It can be of several types:
- With automatic control;
- With manual, forced regulation.
Automatic ones use sensors to determine the position of the car body, the sagging of the front and rear suspension, and based on these data they adjust the headlight beam. In this case, no human assistance is required; all options are included in the corrector control unit by the manufacturer.
Manual correctors have several positions, and there is a switch between them in the cabin. Most often, on the threshold of the car on the driver’s side there is a table with recommended positions for different vehicle loads. It can also be adjusted while moving, for example, if you have poor lighting, raise the beam, or if oncoming cars indicate that you are blinding them, the beam must be lowered.
The corrector drive can also be of several types:
- electric corrector;
- hydrocorrector;
- mechanical corrector.
Changing positions with a mechanical corrector occurs using a cable; this is a fairly reliable solution, but over time the shirt can fray, and the cable can jam, so it has not been used for quite some time.
The hydraulic corrector is installed on the VAZ 2114 from the factory; it works on the principle of configuring the water pressure in the tubes. The liquid is frost-resistant, and the system is closed, but this solution is considered unreliable and often fails, and accuracy is also poor due to the effect of temperatures on the density of water.