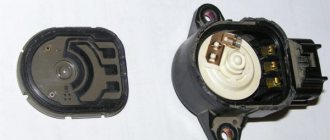
The block cover (11183-1108500) is fixed with bolts that are inserted into oval holes. The improvement is this. to loosen the 4 screws and turn the cover in the desired direction:
- Economy mode (counterclockwise). To drive smoothly, to accelerate, you should press the pedal a little more than before. Gasoline consumption is reduced;
- Active mode (clockwise). The car reacts even with slight pressure on the gas pedal. Gasoline consumption increases. The pedal becomes more sensitive and informative.
In other words, we get the same effect as after installing JETTER (Jetter or spur).
It has been noticed that the first minutes after such settings, the idle speed may be increased (about 1300 rpm). But after a minute, the ECU gradually adjusted and the speed dropped to the usual level. If this does not happen, turn on the ignition for a minute and then start the engine.
If necessary, you can easily return to the original position (mark it in advance).
Instructions for replacing the clutch cable on a VAZ 2114
Domestic motorists are accustomed to doing most of the technical and repair work on their cars themselves. If you are one of these drivers, then you will most likely be interested in learning how to replace the clutch cable of a VAZ 2114, what is needed for this and how to replace the cable with your own hands. In addition, we will show you a video that will help you with the replacement process if this is your first time.
VAZ 2114 car
We carry out the replacement ourselves
As a rule, replacing the clutch cable is required if its elements are worn out or damaged. To determine if a cable is broken, you just need to watch it while driving. If there are certain malfunctions, the clutch pedal will not disengage completely, slip, or even go to the floor. In such cases, as a rule, complete disassembly of the clutch and its replacement is required. How to determine a breakdown?
- The vehicle begins to slip if, when you sharply press the gas, the engine gains optimal speed, but the car hardly moves. The driver may feel that there is not enough power - this is especially noticeable when the vehicle is moving uphill.
- The clutch pedal does not disengage completely: you have to press it several times to return it to its normal position.
A new element against the background of the engine compartment 2114
In such cases, repair of the element is necessary. If you have a garage, tools and an assistant, then you can start replacing the component. If you are not confident in your abilities, then entrust this matter to specialists. Replacing the clutch involves preparing all the materials necessary for this, changing the drive cable, as well as adjusting it. Therefore, we will consider each of these processes step by step.
What will you need?
Before you begin repair work, you should prepare everything that may be needed in the process.
- Wrench or socket set to “17”.
- New cable.
- Lubricant like Litol.
- Thread loosening fluid, like WD-40;
- Ruler.
Step-by-step instruction
First, find the place where you will make the replacement. You may also need help. Of course, you can do without it, but an extra pair of hands won’t hurt.
- Having done this, open the hood and disconnect the battery terminals.
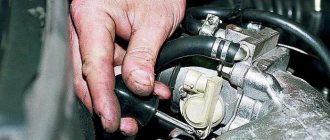
- Next, we find the clutch cable: we need to disconnect it. To do this, using wrenches set to “17”, disconnect the nuts securing the lower end of the cable to the attachment point. After this, the element can be pulled out of the bracket and removed from the clutch fork.
Unscrew the nuts securing the element under the hood
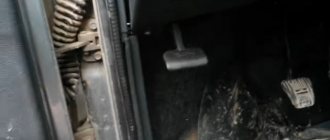
- The remaining steps will need to be performed in the salon. First, remove the carpet from the driver's seat and remove the carpet in the pedal area.
- Once you do this, you will see where the clutch cable attaches to the pedal. You need to disconnect it. It is put on with the eye of one end on the hook.
Eyelet of one end of the element - When all elements are disconnected from the cable, it needs to be pulled out. To do this, push it away from you towards the engine compartment. If the cable is pushed very hard, then it is most likely soured and needs to be worked out by pouring a little motor fluid into the sheath. Now it just needs to be developed by moving it back and forth. Here you may need the help of a friend - when you develop the cable from the inside, he should pull it towards himself from the engine compartment.
- When the old cable is removed, a new one can be installed in its place. Before installation, you need to remove the bushing on which the cable is held from the pedal. It should be examined carefully. If you think that the bushing has almost reached the end of its service life, then it is better to replace it, and it is better to lubricate the fastening on the pedal and on the cable.
Installing the element at the mounting location in the engine compartment of the VAZ 2114
At this point, the process of replacing the cable is completed, but the work cannot be considered completed, since now the clutch must be adjusted and tightened. The car must be parked on a level surface. Get behind the wheel and start the engine. After this, engage the gear and try to start driving while releasing the clutch. This needs to be done smoothly: you need to determine the position of the pedal at the moment the vehicle begins to move.- If you realize that your VAZ 2114 starts to move only at the end of the pedal stroke, then you will need to adjust it. To do this, open the hood again and find two “17” nuts that hold the cable bracket. It won’t be difficult to find these nuts, since you have already unscrewed them before. With their help, the full travel of the pedal is adjusted. In the event that you are trying to reduce the full pedal travel, you need to slightly unscrew the screw that is located inside the bracket. Accordingly, the outer screw will need to be tightened slightly.
Adjusting the inner and outer nuts of the cable after installing it using wrenches to “17” - If the full stroke of the pedal needs to be increased, then the inner screw of the bracket must be tightened and the outer one must be loosened. While unscrewing the nut, you may have noticed that its threads are covered with rust. Then take WD-40 and lubricate it before screwing it in. If you don’t have WD-40 on hand, you can lubricate the threads with engine or brake fluid.
- Finally, when the clutch cable has already been adjusted, you need to check its operation. If everything is done correctly, the clutch pedal travel should be from 125 to 135 mm. This is where a ruler comes in handy. 125 - 135 mm is the distance that should be from the pedal to the floor of your VAZ 2114.
If after all these steps your vehicle continues to slip, then it most likely needs a complete replacement of the clutch, and not just the cable.
At this point, the work of replacing this element can be considered complete. If you have any questions, please check out the video provided.
What happens if you don't adjust the clutch in time?
A clutch that is not adjusted in time will quickly fail, so it will soon have to be repaired or completely replaced. With increased pedal travel, the clutch is not completely disengaged; its disk is constantly pressed against the engine flywheel. With a small stroke, the clutch is not able to fully engage the driven disc, which leads to slipping and lack of torque.
Driving a car with an unadjusted or faulty clutch is dangerous and can lead to an accident!
Lack of adjustment is the reason for rapid clutch failure
Quick replacement of throttle cable VAZ 2114
The replacement process is not difficult if you act carefully and carefully. To briefly describe the process of replacing the cable, you just need to unscrew 2 nuts under the hood (in the place where the cable is attached), and then slowly pull it out.
In order to install a new cable, you do not need to have any expensive tools. It is enough to stretch a new cable and tighten the same nuts that were unscrewed. The only thing that can cause difficulty is adjusting the gas pedal, but this will simply require spending more time than unscrewing the nut.
Detailed instructions on how to remove the cable:
- First you need to remove the cable end from the gas pedal. After this, the tip must be pushed into the engine compartment of the car through the front shield.
- After this, you need to open the hood and find the damper sector. When this is done, you need to disconnect the bracket from it using pliers.
- Now it’s the turn to press the sector with your hand and disengage the cable. This way the cable will be disconnected from the sector.
- All that remains is to move the protective cover and secure the nut from turning. Then you need to unscrew the nut. When it is unscrewed, you can pull the cable. This way it will be removed from the car.
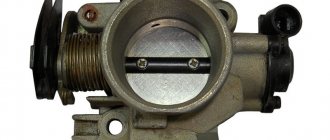
Checking and adjusting the throttle valve control cable
As a rule, during the operation of a car with an automatic transmission, various failures and malfunctions may occur. In this case, most often the driver may notice the appearance of jerks and jolts when changing gears, a car with an automatic transmission begins to consume more fuel, etc.
In this case, there may be many reasons, but among them the automatic transmission cable should be singled out. In this article we will talk about when and why the so-called automatic transmission tuning is needed, as well as how to check and adjust the automatic transmission cable.
Feedback on the E-Gas modification
Car enthusiasts who have already completed the adjustment note that if you move the pedal assembly cover clockwise, the car becomes a little more lively. If you press the pedal as before and the car starts to move, you have to get used to it and not press the gas so hard. When you press the pedal to the floor, you can't feel the difference.
Those who adjusted the E-gas for a quieter ride noticed that driving on the highway became more comfortable. Now, to maintain speed, you need to press the gas pedal a little harder, which allows your leg to not be as tense as before.
Other motorists do not believe in the positive effect, saying that it is all self-hypnosis. The operation of the electronic gas pedal is based on changing the resistance difference. And even if you move the cover, when the engine starts, the ECU will still consider it to be zero and adjust the throttle from this point. And if you increase the sector stroke, the E-gas error “signal outside the permissible limits!” will appear.
Have you encountered such modification of E-gas? What feedback can you leave about such adjustments? Is there a positive effect or is it all at the level of self-hypnosis? Let us remind you that if necessary, you can check the E-gas yourself. By the way, an alternative to modifying the electronic gas pedal is chip tuning.
How does an electronic gas pedal work, how are its advantages and disadvantages manifested, what malfunctions are most common, and how to deal with them? All these questions are very relevant, because today many car manufacturers have replaced the traditional cable drive with a more modern electronic pedal.
Disadvantages of the electronic pedal
- A slight “thought” at first when pressing the accelerator;
- The “E-pedal” does not make it possible to carry out deep tuning, since for this it is necessary to convert to a “cable” system, and this is an additional expenditure of about 20-25 thousand rubles plus a bunch of sensors and cables. Not everyone will agree to such a hassle;
- Exclusively on the first (raw) versions with “e-gas” the pedals stuck, the engine speed fluctuated and random periodic self-pressing occurred;
- Most likely the second point is to blame, which does not allow you to upgrade the car.
But what to do if an avid driver wants to drive recklessly?! Our craftsmen found the optimal solution without removing the “e-gas” - this is re-flashing the sensors and adjusting the turbochargers.
Design and principle of operation of “e-gas”
By default, an electronic pedal consists of: an electronic damper, the pedal itself, and a chip sensor on the pedal itself. The operating scheme is as follows: when you press the accelerator, the electronic sensor amplifies the signal and transmits it to the electronic control unit (ECU), which indicates to the damper the degree of opening or closing.
But sometimes these transitions can't always keep up with the software. In this regard, sensors often produce “correlation violation” errors. There are two ways to cure the problem of “dampness” in the system:
A complete replacement of the chip board with a re-flashed (unlocked) one with the ability to set modes “for yourself” and regulate emissions into the atmosphere yourself. As a rule, in such situations, drivers return to Euro-2 standards
and increase engine power by 15-20% plus;
The electronic gas pedal on the VAZ 2114 is replaced with a similar new one, but the chip remains the same - not hacked, which means it will not break again for the first time.
E-Gas (electronic gas pedal) is an electronic gas pedal that replaced the cable-operated throttle valve. Email The gas pedal controls the throttle electronically rather than physically. AvtoVAZ began producing models with E-Gas at the beginning of 2011, the reason was the environmental standards Euro-4 and Euro-5, which must be observed.
To understand how to change the clutch cable on a VAZ 2114, you need to remember the following algorithm:
- Open the hood.
- Remove the negative terminal from the battery.
- Find the cable under the hood.
- Using a 17 key, unscrew the fastenings of the element.
- Remove the part from the clutch fork and bracket.
- Move into the car interior.
- Remove the driver's foot mat and lift the carpet.
- Remove the cable eye from the pedal mount. The locking bracket, which allows you to release the element, sometimes causes difficulties for some VAZ 2114 owners.
- Pull the element out from under the hood into the interior. It is not advisable to remove it from the engine compartment, as there is a risk of damage to the wiring and other parts of the machine.
- Disassemble the housing and remove the cable.
- Place the new part in the housing and assemble.
- Perform the previously described steps in reverse order.
- Adjust the cable tension. It is necessary to ensure free movement of the pedal. But it should not be pressed too tightly or too lightly.
You can replace the part yourself. It is recommended to work in a garage, especially in the cold season. It is not necessary to contact a car service to check and replace the element. This may only be necessary as a last resort if the cause of unusual clutch behavior cannot be found. Perhaps it was not the cable that failed, but other parts of the mechanism that broke.
Diagram of a car clutch
Most car enthusiasts and owners of the VAZ-2114 are accustomed to doing most of the repair and restoration operations on their car with their own hands. Replacing the clutch cable is no exception. Of course, not everyone is able to do this on their own, because they do not know where to start and carry out the process.
Tool
So, what tools will you need to perform this action: a new cable, WD-40, a 17mm wrench and Litol-24.
Algorithm of actions on the VAZ-2114
In principle, when everything is put together, you can proceed directly to the repair process:
- We remove the negative terminal from the battery to disconnect the power to the car.
- We find the cable and begin the dismantling process.
- Using a 17mm wrench, unscrew the fastening nuts.
We remove the clutch cable from the seat from the fork
We completely dismantle the cable
Clutch cable adjustment process
Cable selection
The old clutch cable is worn out and needs to be replaced.
While researching the spare parts market while searching for a clutch cable for a VAZ-2114, it turned out that there is an original part, as well as several analogues that are no different in quality, and in some cases even better.
Original article
2109-1602210-10 – original catalog number of the clutch cable manufactured by AvtoVAZ. It is installed quite easily and simply, and also does not require modifications or improvements. The cost of the product is 1200 rubles.
Analogs
In addition to the original part, you can find analogues that are recommended for installation on the VAZ-2114. So, what non-original parts can be found on the spare parts market:
Automatic transmission diagnostic procedures
It is recommended to troubleshoot an automatic transmission in the following sequence:
Checking the throttle valve control cable
An important detail in automatic transmission control is the throttle valve control cable. It connects the automatic transmission control mechanism with the engine throttle sector or the fuel injection pump control lever. The cable consists of a metal base placed in a plastic sheath, rigidly fixed on both sides. During long-term use, the cable sheath dries, shortens and comes out of the attachment points.
A misaligned cable may cause gear shifting at higher or lower speeds. Shifting gears at high speeds leads to premature wear of gearbox parts and may cause increased fuel consumption. Some automatic transmission malfunctions can be eliminated by adjusting the throttle valve control cable.
Replacing the throttle cable:
- First, use a screwdriver to move the tip of the cable from the interior so that it comes out from the pin of the pedal lever, and remove it.
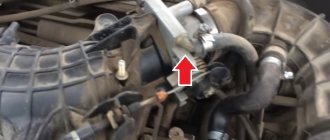
Further under the hood, next to the throttle valve, there is a drive sector on which the cable is clamped. Turn this sector all the way and unfasten the drive cable itself from it.
The next step is to remove the protective cap at the end of the cord (1). Hold the nut securing the cable sheath (3) so that it does not turn, and unscrew the nut (2). Next, remove the cable from the bracket slot.
We pull the cable in the direction of the engine compartment, it will come out of the hole that goes into the passenger compartment.
This completes the dismantling. In order to install a new cable, you need to perform the same steps in reverse order.
After installing a new accelerator cable, it needs to be adjusted. Let us consider further the order of execution point by point.
Articles
- Cable for 8-valve engines – 6001546868 or 182013208R;
- Cable for K4M engine – 6001548721.
Substitutes and analogues
8 valves:
- Asam-Sa 30371
- Automotor France ATC 6868
- FRANCECAR FCR210151
- ABS K37240
- LECOY 4768
- SEIM 122185
- KAGER 19-3928
- REMKAFLEX 47.3010
- SPIDAN 440742
- TRISCAN 8140 25329
- SPJ 911111
16 valves:
- Asam-Sa 32067
- Automotor France ASC 8721
- BRECKNER BK19017
What are the differences
Renault articles contain data on the cable length (last 3 digits). As you can see, 868 and 721 are two different numbers. Cables for different engines also have different tips.
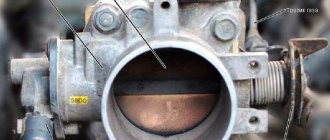
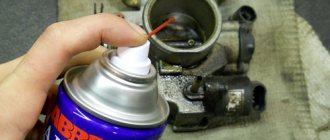
Lubricating the throttle cable will take you no more than 15 minutes. To lubricate the cable, you need to spill it with oil; even used motor oil will do. The cable is shed in such a way that it is completely covered with a layer of oil and runs in a protective braid without interference or jamming. To lubricate the throttle cable, you need to pour oil from the syringe where the arrow points in the figure below.
Oil for lubricating the cable is poured with a syringe so that it penetrates inside the protective braid of the throttle cable and lubricates it. Ideally, you need to pour until it seeps into the cabin, where the gas cable is connected to the accelerator pedal. This may seem like a tedious task, because the oil may flow slowly if it is viscous. However, it's worth it. The process of lubrication of the throttle cable can be speeded up by disconnecting the throttle cable from the throttle valve and positioning it as you see fit for faster penetration of oil into the protective braid of the throttle cable.
Problematic cables
In total, problems can arise with two types of cables:
- stove tap cables;
- damper adjustment cables.
It is these elements that VAZ-2114 car owners have to deal with when the heater stops functioning effectively. It is recommended to first check other elements of the system for serviceability and operability, so as not to carry out unnecessary disassembly, assembly and adjustment work in vain.
Adjustment
Hot antifreeze for the heating system on the VAZ-2114 model is supplied mechanically, for which appropriate cables are used. Over time, they become dirty and stretched out. The moment of weakening of the fastening element is also taken into account. Because of this, the stove begins to function incorrectly. When the cable is loose or stretched, moving the heater tap slider on the panel does not make it possible to fully open or close it.
The first thing you can do in such a situation is to try to tighten the crane cable. For adjustment you need:
- remove the driver's side panel skin;
- a little higher under the steering wheel you will see a pair of cables;
- you need the one to the left;
- find the crane cable itself (it is fixed to it), which is located in the gas pedal area under the panel;
- tighten the element so that when the damper is fully open, it opens fully;
- in some cases, it is enough to shorten the cable literally by 5 mm, making an additional turn;
- take into account the current state of tension. If the element is very loose, you will have to tighten it more or change it altogether.
Important! Do not start working on a hot engine immediately after entering the garage. And it is also recommended to first remove the ground from the battery, since you will be working in the wiring area.
The damper cable is adjusted in approximately the same way:
- The side panel cover is removed from the front passenger's side near his left leg.
- There you will find a lever for controlling the temperature of the heating system, to which a pair of cables are connected. Yours is the one on the right.
- The element is pulled so that the damper is in the maximum temperature mode of the stove. Secure the damper next to the cable. It must remain in the specified position at all times.
- After carrying out this work, the excess cable can be cut off. Just leave about 20mm of length, depending on the current condition.
- Check to see if warm air is now effectively flowing out of all ducts and that the temperature changes as the controls are adjusted.
Important! In some cases, adjustment only gives a temporary effect. If the wear is severe, such operations may not produce results, so the only way out of the situation will be a full replacement.
Replacement
You can change the elements yourself, but it is recommended to allocate several hours of your time for this in advance.
- Remove the leather from the center dashboard. It is better to push the panel itself inside to make it more convenient to work.
- Press down on the latch tongues to disconnect the drive cable from the heater control panel. This will free one end.
- Next, the latch is pressed in. To do this, use a screwdriver to release the other end of the damper cable from the stove.
- The cable is removed from the holder on the heating system. The heater radiator damper drive cable is also dismantled.
- Connect and secure the damper drive cable using the adjusting device on your VAZ-2114 stove.
- Using the cable, turn the flap to blow the windshield. In this case, it should be in a completely open position.
- Next, the handle is mounted on the control panel. You need to select the position - heated windshield.
- In this position, the new cable is mounted to the panel and fixed.
- A new heater damper drive cable is mounted in the holders.
- Connect and secure the radiator damper drive cable, then turn it (the cable) until it stops, moving in a clockwise direction.
- The knob on the panel is turned to the off position.
- Now you need to connect the cable to the control panel and secure the connection properly.
Important! After the measures taken, be sure to check how correctly the stove is working and whether everything was done in accordance with the instructions. If the heater is not working properly, double-check that it was replaced correctly. If the problem does not go away, you will have to look for the cause in other nodes.
The stove on VAZ-2114 cars is considered quite capricious. But this mainly applies to conditions under which the heater has to operate under maximum loads. VAZ-2114 car owners living in regions with fairly warm winters rarely complain about the stove. They have to use it less often, and therefore it breaks down less often.
Are you satisfied with the quality of the VAZ-2114 heater and what do you see as the main shortcomings in it? Be sure to write to us, leave comments and share your observations regarding the repair, maintenance and operation of your own car.
Symptoms when adjustment is necessary
Adjusting the automatic transmission cable will be necessary in the following cases:
- excessive weakening;
- thoughtfulness when changing gears from third to fourth speed;
- jerks and kicks. Checking for wear of clutches, oil quality and its level in the machine showed a standard result;
- sudden starts from a standstill.
Adjustment is necessary if, while eliminating problems with relaxation of the device, on the contrary, symptoms of a tightened cable arise. This is also harmful to the vehicle's automatic transmission.
Attention! For those who like driving with sudden starts, a tight cable tension is allowed. The main thing here is not to overdo it.
And the symptoms themselves can appear, for example, only when changing gears. Therefore, the car owner can ignore the shocks and jerks for a long time. This happens to those who have cars with a French-made Al4 gearbox. Or in Russia this device is called DP0.
Typical problems and repairs of automatic transmission f4a42
Initially, the manufacturer tells car owners that the first generation has an untreated childhood illness in the form of rarely appearing kicks or hesitation when switching. The driver does not pay attention to these symptoms, the cause of which gradually leads to automatic transmission failure.
Other boxes are more advanced and do not have such serious features.
How to change the clutch cable on a VAZ-2114 photo and video
It is possible to replace the clutch cable on a VAZ-2114 at home and you don’t have to go to a car service center, where they will charge a considerable amount of money for repair operations. So, many motorists, as practice shows, carried out the replacement with their own hands. This article will tell you how to perform this procedure, and will also tell you about some of the nuances and subtleties.
Video about replacing the clutch cable on a VAZ car
The video will tell you how to replace the clutch cable, and also tell you about some of the subtleties and nuances of the process.
Replacement process
Diagram of a car clutch
Most car enthusiasts and owners of the VAZ-2114 are accustomed to doing most of the repair and restoration operations on their car with their own hands. Replacing the clutch cable is no exception. Of course, not everyone is able to do this on their own, because they do not know where to start and carry out the process.
Algorithm of actions on the VAZ-2114
In principle, when everything is put together, you can proceed directly to the repair process:
- We remove the negative terminal from the battery to disconnect the power to the car.
- We find the cable and begin the dismantling process.
- Using a 17mm wrench, unscrew the fastening nuts.
Cable mounting bolts under the hood
Using 17mm wrenches, unscrew the clutch cable fixing nuts
We remove the cable from the bracket and clutch fork.
We remove the clutch cable from the seat from the fork
Clutch pedal bracket under the hood
Disconnect the eyelet securing the cable to the pedal
The cable is pulled out from the engine compartment, so it needs to be pushed through from the passenger compartment. You can, of course, pull under the hood and pull it out, but this is dangerous because you can hit wiring or other elements.
We completely dismantle the cable
Clutch cable adjustment process
Cable selection
The old clutch cable is worn out and needs to be replaced.
While researching the spare parts market while searching for a clutch cable for a VAZ-2114, it turned out that there is an original part, as well as several analogues that are no different in quality, and in some cases even better.
Original article
2109-1602210-10 – original catalog number of the clutch cable manufactured by AvtoVAZ. It is installed quite easily and simply, and also does not require modifications or improvements. The cost of the product is 1200 rubles.
Checking the solenoid block
Automatic transmission tuning includes checking the solenoid unit. Due to incorrect operation of the electric valves on the control plate, the machine can not only be pushed or kicked, but also go into emergency mode.
To carry out the procedure for checking the serviceability of the electrical valves of the hydraulic plate, you must take the following steps:
- Drive onto the overpass.
- Drain the operating oil and tighten the bolts on the pan. Then remove it.
- Disconnect the filter device.
- Remove the hydraulic unit.
- Disconnect the contacts of each solenoid valve.
- Now you will need to call them.
- To determine whether the solenoid is working or not, you need to know the resistance rate. It can be found in the instruction manual. For example, for EV1 modifications at a temperature of 20 plus Celsius, the resistance is 65 Ohms.
And also at a service station, experienced mechanics can connect a computer and use it to check the faulty solenoid. After checking, you need to remove the faulty one and install a new one.
When checking solenoids, you must remember that they are different. Here are some types:
- by functional value: TCC and EPC. The first is responsible for blocking the fluid coupling, the second is responsible for distributing oil through the channels;
- The Shift solenoid is responsible for downshifting and upshifting;
- linear - the simplest and easiest to replace solenoid valves;
- VFS is complex to control, but simple in design, like linear ones. Its service life is noticeably limited.
The solenoid valve is replaced as follows:
- Unscrew the fastening of the faulty solenoid from the valve body removed from the automatic transmission.
- Install the correct one.
- Connect it to the connectors.
- Assemble and install the hydraulic plate into the machine.
After each assembly and disassembly of the box, experts advise adapting the box. This is done in order to set up the machine for smooth operation and unquestioning obedience to the driver.