How much does a tow bar cost on Vesta, installation price
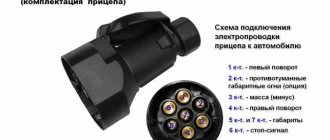
The price of a towbar for Vesta (sedan and any other car model) depends on the type of device, configuration and manufacturer. Drivers more often buy trailer hitches from Bosal. One of the reasons for its popularity is the price.
Bosal models cost from 3,000 to 4,000 rubles. They are supplied without electrical wiring. The matching block must be purchased separately. You will have to pay 1,500 rubles for it. Electrical prices are average.
Russian trailer hitches cost the same. Wires are not included. Models are sold for different car modifications. The towbar for the Vesta SV will be different from the hitch for the sedan.
Traction devices from the Slovak Galia cost from 8 thousand rubles. The upper threshold is 12.5 thousand rubles. This model is completely galvanized and equipped with the necessary wires. The trailer hitch can be connected to the vehicle's electrical module via a retractable socket with a rotating mechanism behind the bumper.
The price of towbars for Vesta with a matching unit from the Polish manufacturer Auto-Hak starts from 10,500 rubles. The most expensive model costs 25 thousand.
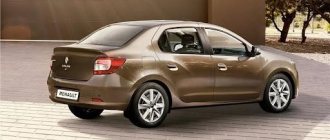
Original catalog devices supplied by an official dealer cost 6800 and 7000 for the sedan and SW Cross, respectively. Articles: 99999218007282 and 99999218107282.
Installing equipment at a service station will cost the driver 3 thousand rubles. The price is average. The values depend on the complexity of installation and the “appetites” of the service owners.
Tow bar for Vesta: which one to choose, installation and connection features
Good day to all! Today I propose to discuss with me the tow bar for Vesta. This is a fairly popular domestic car, the birthplace of which was the city of Tolyatti. Now Vesta is objectively one of the best Russian cars, so the high demand for the model is quite obvious. Sales statistics provided by Krasnodar, Perm, Moscow, Volgograd and a number of other Russian cities clearly confirm that Vesta is on trend.
Despite the noticeably improved characteristics and capabilities, the car retained the main advantages of all domestic cars. I'm talking about low prices, a fairly simple design and the ability to perform a number of repairs and maintenance work with your own hands.
One of such works is the installation of a towing device, that is, a tow bar. Before understanding the nuances of installation and talking about electrical connections, I suggest doing a little research on the issue of choosing a suitable trailer hitch. It doesn’t matter whether you have a sedan or an SV Cross station wagon from AvtoVAZ. Vesta has a decent selection of towbars, so everyone will find the best option for themselves.
DIY installation and connection
It is also possible to independently install a tow bar on a Vesta sedan, station wagon or crossover. Before starting work, you need to wash the car. For convenience, you will have to drive the car onto the overpass.
What you need
Regardless of the car model, the device is attached directly to the side members. To work, the driver will need:
- towbar;
- Control block;
- a set of keys.
No additional elements are needed.
How to install and connect a tow bar on a Vesta (sedan)
You can install a tow bar on a Vesta (sedan) car in 30-60 minutes. The sequence of actions is as follows:
- We drive the car onto the overpass, turn off the engine, and place small blocks under the wheels.
- Remove the ground terminal from the battery.
- We remove the rear bumper (a video of the work on removing this structural element can be found on the Internet).
- Unscrew the mounting bolts from the rear bumper beam and remove it. Re-installation is not provided. To do this, you need to install the 10th head on the knob.
- At the side members, we clean the holes for fixing the tow bar from the PShM layer.
- We place the support brackets in the cavity of the side members, fix them with bolts, but do not tighten them.
- We place the beam on the brackets and tighten it with the fasteners supplied. You will need a 17mm socket.
- Tighten the fastening bolts. To work you will have to use an extension cord.
- We mount the hook and socket box (wrench and wrench 19).
- We install the control unit. It is better to connect it through the rear lights. It is necessary to connect the wires of the brake light, turn signals and dimensions.
The final stage of work is installing the bumper and connecting the battery.
Design options
At the moment, the selection of towbars for SV Cross is small. They are conventionally divided into two groups:
- removable – can be removed if not needed, which will not affect the appearance of the car;
- non-removable – they are rigidly mounted to the body and remain on it permanently.
Related link:
Sensors for Lada Vesta.
Since this car model is quite new, there are still few manufacturers of this part, since companies have not yet managed to implement a full-fledged production of components and parts for Vesta.
You can purchase the original device from official AVTOVAZ dealers. There, the cost of a towbar is approximately 7-7.5 thousand rubles . In addition to the original, it offers its own analogue - a removable tow bar, the price of which is about 3-3.5 thousand rubles . Among the major manufacturers, the Russian company AvtoS began producing designs for Vesta SW. The model has already gone into production, but the price needs to be clarified with the distributors. There are also several foreign companies that have already partially launched the production of components for this car.
The following structural models can be installed on Vesta:
- A flange-type device is considered the best option for Vesta, but only if there is a special seat for uniform traction force and load distribution.
- Models with rigid fixation cost less and are easy to install and functional. But they have an unaesthetic appearance, and fastening occurs using bolts or welding.
- Removable hitch ball devices have a removable top and are virtually invisible. The model is stable and reliable, but costs much more than other analogues.
- You can also find American-type towbars on the market, but they are rarely chosen. This is due to installation difficulties, the dimensions of the ball are slightly different, there is a difference in the seat, and the socket does not match.
Many experts recommend installing removable models. Even though they are the most expensive, they can always be removed so as not to spoil the appearance of the car. But most drivers are not particularly concerned about the presence of a constantly peeking towbar.
Can I install a towbar on my car?
The main question here is whether installing a towbar is a change to the design?
First of all, it should be said that any complex mechanism, including a car, is accompanied by operational documentation, in which we are interested in two main documents:
- Manual.
- Catalog of parts and assembly units.
A towbar may be provided by design
If these documents mention a towing device, then you are in luck.
It is quite normal for the towbar itself to be drawn in the catalog, and its part number is indicated next to the picture, but it was not installed on the car from the factory - its installation is not provided for with this particular package. Then you just need to contact an official dealer or supplier of spare parts, and using the part number they will send you a towbar, which will fit like a native one in a place prepared in advance for it.
In this case, the towbar is a component of the vehicle, supplied to the assembly plant or as a spare part. Its installation according to the technical regulations does not affect the safety of the car and does not constitute changes to the design (clause 20 of the Technical Regulations).
The situation is similar if the instruction manual describes in detail, step by step and with a diagram, how you can mount a towbar on your car.
You will also be interested in:
- How to register an LPG with the traffic police? Registration instructions, rules and documents
- New rules for making changes to the design of a car and PPRF No. 413
- How to file a complaint and restore the registration of a car if it was terminated by the State Traffic Safety Inspectorate?
But even if it is not provided, in some cases it is not necessary to register it separately
All other work on installing the towbar is a modification to the design.
Any new device introduced inside or outside a vehicle is likely to impact its safety. A reduction in security is unacceptable. Therefore, it is necessary to provide documentary evidence that the new elements of the car will not affect its safe operation. You may already have the required document on hand.
Your task is to understand its importance and save it, or even better, make a copy and take it with you to satisfy the mental activity of traffic police inspectors
And then, according to paragraph 77 of the TR, there is no need to register the changes made with the traffic police.
This is a certificate included with the towbar indicating that the towbar has been tested for safe use with your vehicle type and model. Naturally, the certificate is accompanied by a diagram and a list of works on how to properly mount the tow bar on a car.
The easiest way is to contact the official dealer of the trailer manufacturer.
During the consultation before purchasing a trailer, you will be told not only which trailer can be used with your car, but also whether it is possible to install a tow bar, which will not subsequently need to be registered with the traffic police MREO.
Even if you buy a trailer secondhand, it is better to purchase a trailer with a certificate from the officials.
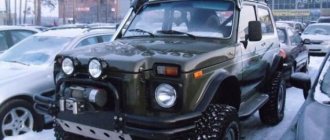
By the way, if an ancient Niva has a towbar installed, the documents for which have long been lost, you can also contact an official dealer to restore the documents. If you have any idea who made the tow hitch, you can contact the manufacturer.
How to check if everything is done correctly
For installation and connection of the structure, only technological holes are used. If they are not available, you can make them in the bottom yourself using special equipment. All elements are mounted and adjusted to the holes, everything is carefully checked, since minimal misalignment can lead to rapid wear of both the towbar itself and its wiring.
The fasteners must be tightened well to avoid possible displacement. Before using a coupling structure, it is tested to determine whether the coupling device can withstand the permissible load. Before installation, it is recommended that all holes and joints be treated with a grease-type lubricant; a plate-type compound for processing the coupling ball is best suited. Before installing the ball itself, it must be covered with a cap.
Towbar installation
Installation of the tow hitch is simple. Simply install a design adapted to the Lada Vesta model (using the example of the Bosal 1234-A model):
- Remove the decorative interior trim of the trunk;
- Remove the rear bumper housing;
- If necessary, disconnect the parking aid connector;
- Remove the special shockproof buffer located under the bumper;
- Remove the plastic plugs from the holes on the lower plane of the side members;
- Insert the guide pins of the trailer hitch into the holes inside the side members;
- Tighten the mounting bolts supplied.
If you decide to install a structure that is not adapted for the Lada Vesta, additional drilling or welding will be required:
- Remove the decorative trim from the inside of the trunk;
- Remove the rear bumper housing;
- Align the vehicle axis with the axis of longitudinal symmetry of the trailer hitch;
- Place the device on the bottom of the car's side members (under the bottom of the car), and use the fastening pads of the brackets to mark holes for drilling;
- Treat the holes with an anti-corrosion compound;
- Secure the trailer hitch frame with the bolts from the kit.
To avoid unplanned repairs, do not forget about periodic preventive maintenance measures for the trailer hitch (tightening bolted connections, treating the coupling ball with a special lubricant solution, applying a cap to the ball).
Connection
To connect, you can use the video instructions and follow the recommendations below.
- The BSF is connected to the car battery;
- The oil pressure sensor, starter, car fuel valve and the on-board computer of your car must be connected to the smart connect;
- They remove the loading panels, prepare a set of wiring, check the operation of the running lights and the trailer brake light;
- The smart connect is installed according to the diagram provided by the manufacturer. It will look approximately as shown in the image.
It’s up to you to install BSF yourself or entrust the installation to professionals. Advice from me personally. If you do not have experience or skills in working with car wiring, or simply do not have time to do it, contact a specialist. They can carry out the entire range of work, from selecting a tow bar and trailer, to selecting a suitable unit and connecting all these devices into a single circuit.
Thank you for attention! Be sure to subscribe, leave your comments and invite your friends to discuss this topic!
204,70
Lada Vesta LPG › Logbook › Tow bar BOSAL + Smart-Connect ARTWAY
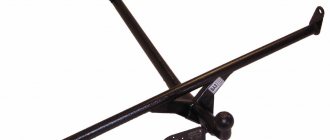
Ngày tốt lànhFinally, I got around to installing a towbar. I chose a towbar with a Bosal towbar without electrics (order number 1234A) and an Electrical Coordination Unit for the Smart-Connect Artway-Pro towbar (catalog number SC-PRO-100) Why?1. The Bosal 1234A trailer hitch has a more competent fastening compared to analogues. For example, the photo shows that it is attached instead of the rear amplifier - 4 bolts at the end of the side members, and one at the bottom.
Competitors (for example Leader) have 4 bolts on the bottom and that’s it.
2. Smart-Connect Artway-Pro SC-PRO-100. The choice is stupid because of the price. The parameters were also quite satisfactory: Tracking the connection of the tow hitch. Switching the fog light. Regulation of work with single-filament and diode lighting. Works in most cars with modern electronics. Automatically disables standard parking sensors when connecting a trailer. Sound indication if there is a malfunction in the trailer lamp circuit.
No more is needed. I paid 1,750 rubles for the happiness of owning a Chinese gadget.
Purely theoretically it was possible without it. The equipment is basic, there is no additional electrical unit. But I decided to install a smart one and relieve the standard wiring. During installation, the power, at my request, was taken directly from the battery. I installed it at the official Lada dealer in Kaluga - Aves paid 4,000 rubles for installation, the time was 3 hours.
And the question that worries many is whether installing a towbar is a change in the design - NO, subject to the conditions: It must be removable or conditionally removable. It must be designed for this vehicle. And it was installed by the service center. In short, his passport (aka installation instructions) went to the towbar - there we write down our car, VIN, and at the dealer we put a stamp that they put (now I carry this piece of paper with me along with the passport for the gas cylinder). Well, we make a note in the service book - that’s it. It's enough )
Installed a towbar from PT Group
Finished installing the tow bar. Initially, I wanted a removable one, so that nothing would protrude anywhere, and ideally the device would be multifunctional, so the choice fell on the “American square”, the price is of course one of the highest, but it’s worth it, it looks powerful, as well as being attached.
The installation is nothing complicated, remove the bumper, remove the amplifier, replace the standard hardware with those from the kit (longer and hopefully stronger). Make slits in the bumper. The cable to the socket was led through a plug in the body and led directly into the left niche, where it was connected to the connector. I cut off the standard place for the socket and put it under the bumper so that it would not interfere. I assembled everything in the reverse order without any problems.
The coordination unit took Smart Connect Artway with parking sensors disabled. I connected everything according to the diagram from the box, everything is twisted above the left arch to the chip. For some reason I couldn’t cope with the parking sensors, I connect it through the unit, it is silent, I put it back together - it works, I made 2 chips (mother), one from the car, the other from the coordination unit and a chip (male) from the speaker, I will switch depending on the driving with towbar. If anyone has encountered such a problem, tell me how to overcome it.
Today I’ll go test the socket and the towbar itself on the trailer. I like that you can take everything off and put it in the trunk, fortunately there is a lot of space there. I'm thinking about a small Hi Jack type rack and pinion jack.
At the same time, I painted the lower part of the bumper, since almost immediately after purchasing the car, I turned around on the lot and forgot about the stump that my favorite road workers left behind and tore off the paint. Everything was sanded and painted.
In time, slowly 5-7 hours, along the way I wiped everything down, cleaned it, I hope it won’t disappoint me)
Source
Required
Towbar
(original catalog numbers):
- Lada Vesta sedan (article 99999218007282), price about 6800 rubles;
- Lada Vesta SW/SW Cross (article 99999218107282), price about 7,000 rubles;
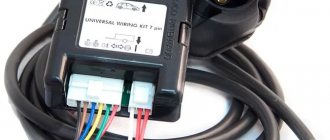
Control unit (coordination)
99999215007182 Smart Connect KA.SC.7.1, price about 2900 rubles.
The matching unit is an unloading device that ensures uninterrupted operation of the vehicle and trailer electronics. The equipment protects the vehicle wiring from overloads - as a result, the vehicle’s on-board diagnostic system does not detect the connection of additional devices to the vehicle’s electrical network, and operates in normal mode.
Where can I buy?
Connection
The connection is made through a special electrical module - a matching unit (smart connector).
Turn off the ignition, disconnect the earth wire terminal from the battery.
Connect the electrical module type Smart Connect KA.SC.7.1, supplied with the trailer hitch kit, in accordance with the instructions supplied with the module.
The matching block can be made independently based on conventional 4-pin relays:
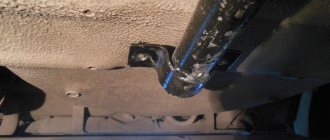
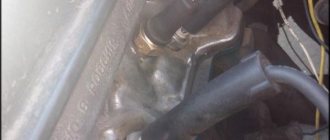
Almost all the necessary contacts for connection can be found in the rear light area (see Lada Vesta electrical diagrams), or use a multimeter). Additionally, you just have to run the wire from the battery through the fuse along the left side (photo author).
Towbar options for Lada Vesta
The trailer hitch for the vehicle is selected individually. The selection also depends on the car model. The towbar on the Vesta SV Cross differs from a similar device for the station wagon or sedan variation. There are 3 types of trailer element classifications.
According to the first, all models are divided into original and non-original. The first variations were certified by Lada. The second ones did not receive a certificate from the car manufacturer.
To install original trailer hitches, trimming the bumper for the ball is not required. Visually they look stronger and more reliable.
The disadvantage is the price. According to driver reviews, non-original trailer hitch models cost almost half as much as their certified counterparts.
Towbar for a car with a conditionally removable ball
According to another classification, coupling devices for Lada Vesta are divided into 4 types:
- flanged;
- with rigid fixation;
- with removable ball;
- American
Installation of a flange-type towbar takes place on ready-made mounting points. Thanks to this, the load is distributed optimally. Such models are more expensive, but many owners of Vesta Cross and other car modifications call them ideal.
Towbars with rigid fixation are cheaper than flanged ones. Another advantage of the models is functionality and ease of installation. However, such trailer hitches can ruin the appearance of the car. To install them, you have to use welding or coupling bolts.
Towbars with a removable ball are not inferior to others in terms of loading capacity. In this case, the driver can always remove the upper part of the coupling device, making it almost invisible.
The American type of trailer hitch is rarely used. Disadvantage 3:
- difficulty in installing electrics due to the non-compliance of sockets with European standards;
- problematic operation;
- differences in ball size.
This variation of the coupling device is also called “square”.
Most often, drivers buy flange-type towbars or with a removable top part.
Hitches are also distinguished by the type of coating used. The cheapest models are those treated with powder paint. But price is their only advantage.
Galvanized towbars are more expensive. However, this type of coating protects the iron from corrosion. Such models are best used in northern regions and large cities. In winter, the roads there are sprinkled with a reagent, which leads to rapid rusting of the steel and iron parts of the car. A trailer hitch coated with powder paint will rot within 5-6 seasons of use.
Functions and types of towbars
The functional purpose of various trailer hitches is one - towing a trailer, and the design features offer the following options:
- Conditionally removable design. The most favorable in terms of cost and functionality. Disadvantages – it will raise questions among traffic police officers, spoils the modern appearance of the car;
- Removable device - high degree of reliability and excellent functionality. Easily dismantled;
- American type trailer hitch made of 4 components. Low popularity due to its complex design and many installation nuances.
Lada Vesta › Logbook › connect the Lada Vesta tow bar socket
Without a matching unit it’s as easy as shelling pears, you just need to know the colors of the wires of the rear lights of the car to which you need to connect the corresponding wires from the towbar socket. And so in the car of my year and configuration (I assume the others have a similar color scheme, but not a fact)), Clear blue - dimensions Orange - turn signals Red - feet Didn't connect the rear PTF, didn't bother, they say purple. For ground there is a standard nut on the body on the left side of the lamp under the trunk trim. There is also a standard hole for entering wires from the tow bar and wiring, i.e. the most convenient place for connection. What pitfalls await with this installation option, i.e. without a matching block. Turn signals with incandescent lamps do not work, i.e. they will only work with LED lamps, but they do not shine well (the light is dim), and in clear sunny weather they are practically invisible. Vesta is equipped with the so-called Skanshina, which reacts to changes in resistance in the network of various electrical consumers. And if the resistance increases, for example, when additional consumers are connected, Skanshina blocks this channel, i.e., turns off the current supply so that the wires do not melt from heating under additional load. LED light bulbs, by their nature, have virtually no additional resistance in the network, it is minimal and Skanshina does not see them. It turns out that we either install LED bulbs in the standard trailer lights or a matching unit, no options. I also heard that in Vesta in the Lux configuration, installing a towbar electrics without a coordination unit is not an option at all. There is some kind of additional block burning there, which costs as much as ten thousand rubles. Now with the coordination block.
No question, the diagram is simple, anyone can figure it out. But where to connect the + power supply of the matching unit. Pull it to the battery, as in the diagram, through the entire car? I don’t have a free power plus, for example a 12 V socket, in the trunk. I haven't found a convenient answer yet. If you have any thoughts please write. Good luck to all.))
I’m not an electrician)), if something is wrong, forgive me and correct me, fellow professionals. And tell me, is there a free power + in the wiring in the trunk and what color is it?
Towbar (aka trailer hitch) on Lada Vesta SW
And again, good day, boys and girls, parents and everyone in general)
For everyone else - let's go)
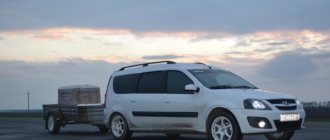
I had a need to transport cargo by car, the dimensions of which do not allow it to be placed in the trunk or on the roof. So you need a trailer. This means you need something to attach it to the car. Towbar.
Let's start with the choice of the towbar itself. Since I have a regular station wagon (not a Cross), everything becomes extremely simple. ANY towbar is suitable for Vesta. At least for a sedan, at least for a Cross. And don’t believe it when they say that station wagons have their own tow bar. I'll tell you why later)
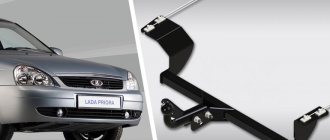
Since I am a frugal person, I looked towards budget options for towbars. No American squares, just a regular hook. Also, in order to save money, I paid attention to the tow bars that are labeled “for sedans”; they are dramatically cheaper. My choice fell on the budget VAZ-65 from AVTOS, I was already familiar with their products, there were no questions
Schematic representation of the structure
Having monitored online stores, I ordered it on Ozone) Unexpectedly, it turned out to be more than a thousand cheaper than in any other place, plus I had a lot of points there, in the end I got it for only 3 thousand, practically for nothing
Unfortunately, I didn’t take pictures upon receipt, but I’ll describe what’s included
1).
Upon receipt, I immediately drove it to the garage)
To install, remove the rear bumper. Nothing complicated, we unscrew all the screws that we see and don’t see around the perimeter, remove the rear lights, and unscrew the screws under them, and the bumper is free
I was a little shocked by the lack of replaceable guides for the bumper, God forbid you damage these metal ones...
We remove the bumper amplifier, and then the fun part comes.
Inside the side members we see plugs for the tow bar fastenings. Only these are plugs for fastening the tow bar for cross country vehicles. We are not interested in the distant plug; we do not touch it. But we remove the neighbors. And also, if you feel the side members from the inside, then under the layer of anti-corrosion you can find holes, closer to the edge of the side member, which are not visible from below (covered with anti-corrosion), this is the covered hole and the first one under the plug - these are the attachment points for the tow bar for the sedan, they tell us and are needed. We pierce the anti-corrosive material, put the mounting plates inside, and screw the base of the towbar
And then we calmly screw the bumper reinforcement on top
Don’t forget to run the wiring into the cabin from the outlet, screw on the hook, and put the bumper back on. There is no need to trim anything. The bumper fits as expected and doesn’t hit anything anywhere.
And then the electrician)
You can go 2 ways:
1) Buy a ready-made matching block 2) Make your own using relays or something more complicated
I don’t consider options without a block; the wiring of the car and the opportunity to not worry about which lamps are obviously more expensive in the trailer)
I chose the relay option. The usual 4 relays from a VAZ (low coil resistance), diodes, etc., I took the circuit from here, from the drive. Half an hour of work and it's ready. I put a double switch button on the power supply to the relays, it breaks both the plus and minus power, so after disconnecting nothing clicks.
To connect the wiring you need to create such chaos
Everything comes off surprisingly easily and doesn’t break.
In the wiring braid we find the wires we need (we look at the colors from the sockets in the flashlights) and make connections, I took the power from the trunk cigarette lighter in the same braid
We turn everything on, test it without a load (trailer), the relays click, everything works) We put it back together. I placed the button in the hatch above the left rear light; to turn it on you need to open it, but outwardly nothing catches your eye
If anyone has any questions, I will be happy to answer)
Source
How to avoid a traffic police fine for a towbar in 2022?
The car owner gives the inspector a permit document.
Fine for one-way traffic in 2018.
You can try to prove your innocence to the traffic police inspector: you should admit guilt and promise to correct your mistake as soon as possible. The fact is that for this type of offense, in addition to a fine, a liability measure such as a warning is established. Therefore, if no penalties have been applied to the car owner over the past six months, his chance of success increases significantly. The likelihood that a law enforcement official will fine the owner of a removable tow hitch is close to zero, since the element does not protrude beyond the bumper.
If a change is provided, it will be problematic to prove the correctness: this is not a design change, but the inspector will not be able to determine the manufacturer’s “intention” by eye. According to section 4 clause 77 of the Technical Regulations, the availability of original documentation from the manufacturer is a necessary condition for allowing the machine to be used. Such vehicles are not subject to inspection.
The car owner must have with him:
- vehicle passport with a note about the design change;
- trailer lashing certificate;
- payment document;
- act on installing a new device on a car.
DIY installation and connection
It is also possible to independently install a tow bar on a Vesta sedan, station wagon or crossover. Before starting work, you need to wash the car. For convenience, you will have to drive the car onto the overpass.
What you need
Regardless of the car model, the device is attached directly to the side members. To work, the driver will need:
- towbar;
- Control block;
- a set of keys.
No additional elements are needed.
How to install and connect a tow bar on a Vesta (sedan)
You can install a tow bar on a Vesta (sedan) car in 30-60 minutes. The sequence of actions is as follows:
- We drive the car onto the overpass, turn off the engine, and place small blocks under the wheels.
- Remove the ground terminal from the battery.
- We remove the rear bumper (a video of the work on removing this structural element can be found on the Internet).
- Unscrew the mounting bolts from the rear bumper beam and remove it. Re-installation is not provided. To do this, you need to install the 10th head on the knob.
- At the side members, we clean the holes for fixing the tow bar from the PShM layer.
- We place the support brackets in the cavity of the side members, fix them with bolts, but do not tighten them.
- We place the beam on the brackets and tighten it with the fasteners supplied. You will need a 17mm socket.
- Tighten the fastening bolts. To work you will have to use an extension cord.
- We mount the hook and socket box (wrench and wrench 19).
- We install the control unit. It is better to connect it through the rear lights. It is necessary to connect the wires of the brake light, turn signals and dimensions.
The final stage of work is installing the bumper and connecting the battery.
Installation
The design of LADA vehicles provides for the possibility of installing a trailer hitch without additional mechanical influences (drilling holes, welding) on the vehicle body.
For each LADA car model, several trailer hitch options are offered for installation, differing in design, but identical in the method of attachment to the car body.
The trailer hitch, regardless of the model and design of the device itself, is attached to the rear power elements (side members) of the car body.
Figure 2-1 shows two main versions of the trailer hitch installed on the LADA VESTA vehicle.
Figure 2-1 – Options and delivery set of LADA VESTA trailer hitch: 1 – left support bracket; 2, 7 – rod; 3 – right support bracket; 4, 9 – socket box; 5, 8 – hook; 6 – embedded strip; A – collapsible design of the trailer hitch; B – welded design of the trailer hitch
Remove the rear bumper.
Unscrew bolts 1, Figure 2-2, securing the rear bumper beam 2 brackets to the body, remove the beam assembly with brackets. Subsequent installation of the beam is not provided (replaceable head 10, knob).
Figure 2-2 – Rear bumper beam: 1 – rear bumper beam bracket mounting bolt; 2 – rear bumper beam
In the rear of the left 1, Figure 2-3, and right 3 rear side members, locate and clean two holes 2 from the faceplate layer (using a flat-head screwdriver).
Figure 2-3 – Location of mounting holes in the side members: 1 – rear left side member; 2 – mounting holes; 3 – rear right side member
Place the left 1, Figure 2-4, and right 5 support brackets into the cavity of the rear side members of the body. Fix the brackets through the holes in the side member without tightening them with the bolts and washers included in the delivery kit.
Install rod 2 on the brackets and secure with the bolts and washers supplied (replaceable head 17, knob).
Tighten the bolts securing the brackets to the body side members (replaceable head 17, extension, knob).
Figure 2-4 – Installation of a collapsible trailer hitch: 1 – left support bracket; 2 – rod; 3 – socket box; 4 – hook; 5 – right support bracket.
When installing a trailer hitch of a welded structure, insert rod 2, Figure 2-5, with brackets into the cavity of the body side members.
Insert the mounting strips 1 inside the brackets, and aligning the threaded holes of the mounting strips with the holes in the rod brackets and side members, fix the rod to the body using the bolts and washer supplied, without tightening.
Align the holes at the end of the rod brackets with the threaded holes for attaching the rear bumper beam to the body and secure the rod with the bolts and washer supplied (replacement head 10, extension, wrench).
Tighten the bolts securing the rod to the side members (replaceable head 17, knob).
Figure 2-5 – Installation of the trailer hitch of a welded structure: 1 – embedded strip; 2 – rod assembly with brackets; 3 – socket box; 4 – hook
Install hook 4 and socket 3 on the rod (spanner 19, replaceable head 19, knob).
Install and connect the electrical equipment of the trailer hitch (see below).
Install the rear bumper.
Note
: Before installing the rear bumper of a CROSS car, modify (trim) the rear bumper according to the attached template, Figure 2-6, to avoid contact and deformation of the bumper at the place where the towing hook is attached.
Figure 2-6 – Rear bumper modification diagram
Tightening torques for threaded connections:
- M6 – 9.8 Nm (0.98 kgf/m);
- M8 – 24.0 Nm (2.4 kgf/m);
- M10 – 47.0 Nm (4.7 kgf/m);
- M12 – 81.0 Nm (8.1 kgf/m).
Installing a tow bar
Installation of the structure is carried out as follows:
- The rear spar plugs are removed. Then the power frame is mounted.
- Open spaces serve as a place for attaching the traction structure.
- The bolts are carefully tightened.
- The bumper is mounted back.
- Install the towbar ball in a standard place, tighten the nuts.
The trailer hitch control unit is included with the traction device. Almost all wires are connected to the rear lights; you just need to run the wire to the battery through the fuse on the starboard side. This work is best left to a competent electrician.
Read more: New sample diagnostic card 2018
As you can see, the process is quite simple. But you can achieve a good result only if you have certain skills and confidence that you can handle it. Otherwise, it is better to contact specialists.
Connection
1.
The connection diagram for the trailer hitch control unit (universal module or smart connect) is included with the device:
2.
The matching block can be made independently based on conventional 4-pin relays:
Almost all the necessary contacts for connection can be found in the rear light area (see electrical diagrams of Lada Vesta and Lada XRAY, or use a multimeter). Additionally, you just have to run the wire from the battery through the fuse on the left side (author of the photo).
Let us remind you that we previously told you how you can make your own organizer in the trunk of a Lada Vesta and Lada XRAY.
Read more: Loan with residual payment - what's the catch?
Found an error? Select it and press Ctrl+Enter..
Similar materials
Top materials
News
Tuning
Lada.Online
Lada (“Lada”) is a brand of cars produced by AvtoVAZ JSC. Previously, it was used only for export cars, and for the domestic market, cars were produced under the Zhiguli brand. In 2004, the management of AvtoVAZ announced the transition to the Latin alphabet for the official spelling of the names of all cars produced by the plant: Lada - instead of "VAZ" and "Lada".
Lada.Online is the largest Russian-language automotive resource with a daily audience of thousands, which is dedicated primarily to cars of this brand, the domestic automotive industry and the automotive world in general.
This site is not the official LADA website.
2020 Lada.Online. Copying of material is permitted only with a link to the source.
Many car owners cannot imagine their car without a towbar and therefore want to quickly equip their recently acquired Lada Vesta with this device. The choice of this device is carried out individually for each specific car brand. There is a wide range of towbars for Vesta on the market, allowing you to choose the most suitable one in terms of type, quality and price. Installation of the unit can be done either in a car service center or with your own hands.
Purchasing towing equipment
The price of a Lada Vesta towbar varies depending on the type. Flange equipment is the cheapest (1800 rubles). However, it comes complete without electrics. A towing device with a removable hook costs about 3,500 rubles.
A towbar for a Lada Vesta with a coordination unit is purchased at the same price. Smart Connect (electrical coordination unit) controls the parking indicators, reversing lamp, fog light and the lighting of the trailer hitch itself. The innovation is increasingly being installed on modern models, increasing the level of comfort and safety of Lada Vesta drivers and passengers. You can buy a towbar of this type from a dealer organization or in an online store.
Installation nuances
To begin with, I advise you to look at photo and video materials that will help you learn all the features of installing a trailer hitch with your own hands on a car like the Lada Vesta.
Installing a towbar largely depends on what type of towbar you choose for your vehicle. In some cases, it is possible to get by with little loss if you take trailer hitch models adapted specifically for Vesta. There are quite a lot of these on the market, and numerous reviews from car owners are direct confirmation of this. Or buy universal designs, with which there are many more problems.
If this is a universal type tow bar, then matching them with the mounting points on Vesta will be problematic. There are some trailer hitches that require cutting out the bumper to install, after which the car looks downright ugly.
Again, I don’t see any point in spending a lot of money on expensive towbars when it comes to domestic cars. Therefore, take a closer look at the assortment of Baltex, the popular company Leader Plus, the same company Avtos or Bosal Autoflex (Russian production).
When planning to perform the installation yourself, you can divide the entire procedure into the following processes:
- purchasing and unpacking a brand new towing device;
- removing trim from the luggage compartment of a car;
- search for a mounting platform provided by the automaker represented by AvtoVAZ;
- alignment of the holes on the body with the fasteners of the towbar itself;
- if necessary, making additional holes (if the tow bar is not adapted for Vesta);
- installation of trailer hitch and tightening of connections;
- electrical connection.
As for me, the most important stage is the installation of the electrical part of the trailer hitch on Vesta. But again, if you have experience in such work, and you are well versed in the structure of the car, then this will not be a problem for you.
To begin with, the trailer hitch kit comes with detailed instructions that outline all the installation steps, including connecting the electrics using a socket and standard vehicle wiring. In some cases, depending on the type of towbar, a matching unit may be needed. What it is and why it is needed, you can easily learn from this material.
How to choose a device
When choosing a towbar for Vesta (station wagon or sedan), you should proceed from criteria such as the trailer's carrying capacity and the weight of the cargo that is supposed to be transported. For a passenger car with a small gasoline engine, a 3.5-ton trailer hitch would be a dubious choice. You simply won’t be able to tow such a trailer comfortably and will waste your money.
Which is more practical?
| Situations | Recommendations |
| If you plan to use the trailer hitch infrequently and are concerned about the appearance of your car. | It is possible to purchase a removable towbar, which can be quickly installed only if necessary. |
| If you plan to use the trailer hitch regularly. | Here it makes sense to consider non-removable trailer hitches, the acquisition of which is cheaper. |
Among other things, it is worth paying attention to the power supply socket of the trailer hitch; they come in 9- and 13-pin types. Accordingly, you need to choose a tow bar so that the socket fits the trailer plug, and you don’t have to redo it later or look for an adapter.
When choosing a trailer hitch of the desired type and size, you should give preference to certified products from leading European manufacturers: Baltex, Bosal, Thule and HAK. By purchasing a reliable imported towbar, you will avoid the need to regularly repair the towbar later. Of the domestic towbars at more reasonable prices, we can recommend the TSU. The cost of a trailer hitch for Vesta varies from 800 to several thousand rubles, depending on the type, functionality and manufacturer. An original tow bar for a particular car model can be purchased at official dealerships.
When inspecting the towbar on Vesta, you need to pay attention to the paint layer. The presence of defects on it should alert you. Moisture penetrating through scratches will cause corrosion.
Homemade towbars are an unsafe thing.
They did not pass the necessary tests for strength, compatibility, and welding quality. They can let you down at the most inopportune moment. The trailer hitch will come off along with the trailer, which may cause an accident. You should purchase trailer hitches only at specialized retail outlets. You must provide the seller with all the necessary information about your car, the weight of the loaded trailer, the load on the tow ball, etc.; specify the equipment (hitch ball, wiring); find out the details of device installation.
In addition to the trailer hitch itself, you may also need a block or coordination module designed to coordinate the actions of the on-board computer and the trailer hitch electrics. The price for a standard Lada Vesta tow bar coordination unit varies in the range of 2-3 thousand rubles.
Tow bar for Lada Vesta
In this article we will look at how to choose a towbar for a Lada Vesta, how to install it and use it safely on your car.
Many car enthusiasts cannot imagine their car without a towbar and therefore are eager to equip the purchased Lada Vesta with this device. Today we will learn what aspects should be taken into account when choosing, purchasing and installing the presented device.
To begin with, let us repeat that a tow bar is a special towing device that is installed on a car and allows you to safely tow semi-trailers and the trailers themselves. Installation of this item is carried out from the bottom of the car and for each individual model its own design is created, which optimizes the load on the car frame.
If we talk specifically about the Lada Vesta car, then this car will also be equipped with a towing device, which will be installed either at a service station, or the car owner will do it on his own. We strongly advise you to approach the selection and installation extremely responsibly, so that later no problems or force majeure situations arise with the transportation of trailers.
How to choose the right towbar for Lada Vesta?
First, let's look at all categories of towing devices:
- With rigid fixation - these are the models that are most suitable for the model we named. The fact is that the ratio of functionality and cost fully satisfies the capabilities of most car enthusiasts. Note that installation of this type is carried out using several bolts and welding;
- Flange type - a device that is mounted on a pre-prepared seat, which guarantees the most even distribution of the load on the car frame. If there is no prepared place, then installation will be impossible, so find out in advance the nuances of this issue when buying a car;
So, as you can see for yourself, there are 4 main types of this unit that can be used for installation. Let's now talk about the installation process itself.
Installing a towbar on a Lada Vesta
The process of installing a towbar will depend entirely on what type of towbar you decide to buy. In most cases, for installation you need to carefully remove the rear bumper, and you may have to make small cuts in the bumper, which will not look very beautiful and attractive.
If you draw up a small work plan, then installing a tow bar involves:
- complete or partial dismantling of the luggage compartment in the car;
- alignment of the holes in the Vesta body with those on the tow bar design;
- adjustment of all connections;
- installation and tightening of the fastener.
Installation tips
I would like to note that the entire installation process has certain nuances that you should be aware of. For example, all holes for connecting the towbar and the body must be treated with grease. This will completely eliminate the ingress of dust or dirt, which means it will extend the service life of both the vehicle and the trailer hitch itself.
Towbar prices for Lada Vesta
The cost of a towbar can vary, not only because of its type, but also because of the company that sells the device. In short, the price on the automotive spare parts market for this towing device varies from 1,500 to 3,000 rubles.
We wish you good luck in choosing this item, which will serve you well if you choose and install it correctly on your Lada Vesta.
Basic criteria for selecting a part
There are a couple of types of towbars for Lada Vesta:
The flange type device is optimal for Vesta. To install such a structure, it is necessary to take into account the availability of seats in the car. Only if they have the criterion, the load is applied evenly.
Towbars with rigid fixation have a lower price, are functional, and easy to attach. The main disadvantage of this type is the unaesthetic appearance acquired by the car during installation by welding or bolting.
The main advantage of devices with a coupling ball is the removable type of device. In the absence of operation, the upper part of the mount is removed, the trailer hitch becomes almost invisible. In terms of reliability and stability, this type is not inferior to others, but has a higher price. Due to its characteristics, most drivers prefer this model.
2180 drivers rarely choose American-style towbars. Compared to previous types, the American device has a number of disadvantages:
- complex installation on the car and operation;
- There may be differences in the installation of seats and the size of the ball;
- sockets may not comply with European standards.
The set of American-type coupling devices consists of four parts: a metal frame is attached under the rear bumper, a bracket is installed, which is secured with a clamp. This type has a coupling ball.
Law on towbars for passenger cars in 2022
Technical Regulations of the Customs Union 018/2011 “On the safety of wheeled vehicles” is a law that regulates the installation of a coupling unit on passenger vehicles. The need to legalize a trailer hitch depends on the technical characteristics of the vehicle.
If the documentation supplied with the car indicates that the traction device was installed on the vehicle at the factory, then additional registration of the element will not be required. In cases where the production did not provide for the presence of a trailer hitch, and the car owner installed a purchased or homemade hook, it is necessary to register the towbar on the passenger car with the traffic police.
From July 1, 2022, in accordance with the requirements of GOST 33670 “Single motor vehicles. Methods of examination and testing for conformity assessment”, before legalizing tuning in the traffic police, the car will need to be presented for inspection to an accredited organization for laboratory testing.
Previously, it was enough to send the expert photographs of the part of the vehicle to which changes were made. Based on the photographs, a conclusion was issued about whether the work was done well. At the client’s request, the expert could come to the parking lot himself and carry out an assessment. The rules have changed since July 1st. The owner of the car must bring the car for examination himself. However, after making changes, you cannot move on it: this is a violation of traffic rules. Therefore, to carry out the mandatory assessment, they resort to using a tow truck.
Installing a tow hitch on Vesta yourself
Installing a tow bar
The work depends on what type of device the owner of the Lada Vesta is going to buy. Before starting installation, be sure to lubricate all the holes and the coupling ball, which will be covered with a cap afterwards. The part will therefore not become contaminated. Installing the Lada Vesta towbar is quite simple:
- The first condition will be to dismantle the rear bumper, which will be useful for the convenience of further work and maintaining the integrity of the body.
- In some situations, it becomes necessary to drill the bottom of the trunk. Otherwise, they simply combine the technological holes of the body and the towbar to install the device.
- After checking the correct connections, all that remains is to tighten all the fasteners.
Is it possible to avoid a fine for a towbar?
Firstly, it is worth conducting a dialogue about the fact that Article 12.5 of the Code of Administrative Offenses of the Russian Federation provides for an alternative to warning. That is, first of all, it is necessary to say that everything will be corrected in the near future and ask to stop at the warning. It will be especially good to use this tactic if you have no relapses, that is, traffic violations over the past six months or a year. Secondly, you can use a removable towbar. In this case, it will be difficult to logically argue that such design changes affect the likelihood of an accident and its outcome. After all, in essence you have no protruding parts. Which negates the influence of such a semi-tow bar in the final results of an accident. Of course, a reasonable inspector should accept this point of view. Another case would be when the tow bar is installed from the factory or there are fastenings provided for it. We don’t know if there are such cars, that is, those that come straight from the factory with a towbar (tow hitch) and how to confirm that the towbar was installed at the factory. But if there are any, then essentially the towbar cannot be considered a change in the design of the vehicle. Since neither you nor anyone else interfered with the design. Everything was as is. Thirdly, which may be the most popular argument, you can take advantage of the loophole under Chapter V of the Technical Regulations..., section 4, paragraph 77
...that is, if, say, the towbar is certified in accordance with the requirements of the Technical Regulations of the Customs Union for the car on which it is installed, then it has thereby passed the assessment, which means you can drive with it. Well, there is no need to repeat about those provided by the manufacturer, since this is practically akin to what is provided by the design. This is naturally possible, as we have already talked about.
In general, if you have a towbar, then you must have a certificate for compliance with the Technical Regulations, and also that the models in which it was received are mentioned. It is this certificate that will become a kind of guarantee that you won’t be fined for the tow bar. To confirm this information, we will attach a letter from the traffic police.
Well, one thing can be said about homemade towbars: they remain “outside the law” here.
Where can I buy
You can view availability, cost and sign up for installation on the catalog page
If you live in Volgograd, you can contact us. We will help you with the choice and directly with the installation of a trailer hitch suitable for your Vesta or any other vehicle.
Thank you all for your attention and activity on our website!
Subscribe, leave comments, be sure to ask relevant questions and share your opinion with us!
(3 ratings, average: 4.67 out of 5)
Subscribe to updates and receive articles by email!
We guarantee: no spam, only new articles once a week!
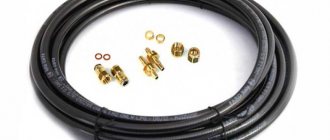
A towbar (tow hitch or trailer hitch) is designed to couple a vehicle to a trailer when towing and transporting large cargo. Installation of this accessory on modern LADA cars has a number of features. Let's take a closer look at what you need to install a towbar on your Lada Vesta and Lada XRAY yourself.