- Towbar manufacturers
- Types of trailer hitch for Renault Logan
- Criterias of choice
- What should be included
- Installation of a tow bar for Renault Logan
- Connecting an electrical outlet on a car from 2004 to 2014.
- Electrical connection for Renault Logan, manufactured from 2014 to present.
- About the need for registration
Renault Logan is one of the most popular cars in Russia and the CIS countries, which is why towbars for it are quite in demand. When purchasing a vehicle, you can order a towbar as an additional option, but many refuse out of a desire to save money. When the need arises to tow a trailer, you have to purchase and install the tow bar yourself. It is important to choose the model that is suitable for your vehicle and connect the power outlet correctly.
Types of towbars
Any type includes several large units
There are several main types of towbars that you can install on Renault Duster or Logan:
- removable. With its help you can improve the aesthetics of your own car. It is quite reliable and can be easily removed from the car, although its price is twice as high as the standard one. Installing it is not difficult at all thanks to a special frame with mounting holes;
- standard. Easily screwed or even welded to the vehicle body. More suitable for large cars than small cars;
- flanged, with 4 or 4 mounting holes. For its installation you will need a special platform.
conclusions
As you can see for yourself, installing a tow bar on a Renault Logan is not difficult, you just need to choose the right type of this design in the store that suits your car, fortunately there are many of them in stores and slowly follow our instructions and you will definitely succeed .
PS
Please note that towbars for Renault Logan cars from 2004-2012 and 2013-present have a different design and therefore a completely different price.
What will suit the car
When choosing a towbar that you want to buy and install on your car, you need to start from your goals. That is, what types of cargo and what mass are you going to transport using the machine and the trailer installed through the trailer hitch.
All available towbars can be divided into several types.
- Type A. Such towbars are used when transporting cargo in a trailer weighing up to 1.5 tons. The simplest designs, the price of which is minimal;
- Type B. Load capacity parameters are similar. In this case, the equipment additionally provides for the presence of a semi-automatic device on the nut;
- Type C. This is a semi-automatic design with an eccentric, which has a load capacity of up to 1.8 tons;
- Type G and F. They are characterized by a different number of mounting holes for connection to the body, have a forged iron structure and have a load capacity of 2 tons.
From the factory, the car can be equipped with a standard trailer hitch, which has decent characteristics and the advantages of factory assembly and fit. But if you were initially confused by how much the kit with a trailer hitch costs and you didn’t take it, then over time you’ll have to choose a towing device yourself.
If we consider manufacturers, then for Logan you can take excellent devices from the following companies:
- Leader-Plus;
- VFM Bosal;
- Thule (Brink);
- Imola;
- Leader;
- Trailer.
I will not give specific advice about this or that manufacturer. All of them are of quite high quality, they have excellent wiring, reliable sockets and other components.
It is better to focus on the type of trailer hitch design.
- Removable. The easiest to install and operate. The price is approximately 4-7 thousand rubles. This depends largely on the manufacturer;
- Electrically driven. Their design is usually reinforced and designed for installation on large machines. Although it will fit on Logan. But you can transport more than 2 tons. The purchase will cost at least 10 thousand rubles;
- Flanged. It has 4 or more mounting holes. During installation, you will need a special landing pad and a set of tools. They are rarely installed on passenger cars.
You can purchase any option that suits you in stores or online in St. Petersburg, Moscow, any other city in the country, and even from foreign sellers. Although I don’t see the point in bothering so much and ordering goods from abroad. Find the required trailer hitch article and place an order.
What I don’t recommend doing is buying a trailer hitch on the secondary market, that is, used. The same Internet platform Avito offers a number of much more interesting and rational solutions among new towbars.
Air suspension on a car: features, advantages and disadvantages
Photo and video materials will help you. I propose to consider step by step the features of self-installation of a towbar on a Logan.
- Read the towbar manufacturer's instructions, take the factory diagram and always keep it in front of your eyes so that you can monitor the correctness of the operations;
- Clear the trunk of anything unnecessary. You don't need a mess there. And to eliminate it all, you can choose an organizer. I have already written about them here;
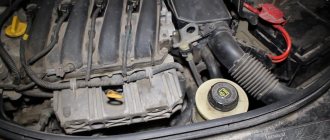
- Remove the hangers of your muffler from approximately the middle of the car, including the fasteners near the exhaust. Lubricant may be required to remove stuck elements;
- Disconnect the muffler. There is no need to remove it completely. Just leave it on the rear beam;
- There should be technological holes on the side members inside the trunk. Renault specifically provided for them. Pull out the plugs from there with a flat-head screwdriver;
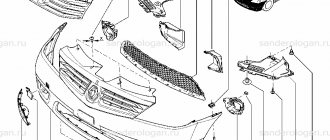
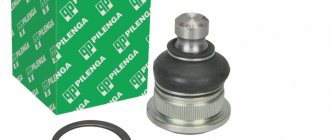
What is included in the trailer hitch kit
Since Duster is produced on the same platform as Logan, the procedure for installing the trailer hitch on both of these cars will be similar. The manufacturer has already taken steps to make the task of self-installation as easy as possible, and you don’t have to spend a lot of money by contacting official dealers, but you can purchase parts yourself from a car disassembly center at competitive prices!
The trailer hitch is accompanied by a description of the components and parts
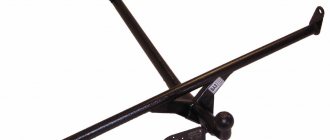
Structurally, the Duster towbar includes the following main elements:
- transverse beam;
- side plates;
- trailer hook and its ball head;
- electrical outlet;
- connecting wires;
- fastening elements (nuts and bolts).
This is interesting: Renault Kadjar 2022 - prices, start of sales in Russia
Preparatory procedures
We are considering installing a tow bar with our own hands on a Renault Logan car. First, the car enthusiast needs to decide on the choice of towing device. If you have welding skills, you can make the part yourself, having a welding machine and steel. There are many videos and photos on this topic on the Internet. These videos for Renault Logan describe in detail the process of welding a towbar from several components. The positive aspects of making a towbar with your own hands include:
- saving money, since this procedure will require a welding machine, steel fasteners and a pipe bender, the financial costs will be minimal;
- the quality of workmanship and the strength of materials are on the conscience of the owner of Renault Logan. With the proper level of skill and the presence of good steel, this is undoubtedly a plus, but otherwise it can result in dire consequences in the form of a traffic accident.
Tips for making and operating a tow bar
A towbar for Duster can be purchased in a store or made independently. It will be useful for the car owner to receive the following information regarding the features of the manufacture, operation or installation of this additional element:
When you tighten the bolts and fastenings of the towbar for a Renault Duster with 4WD, you need to simultaneously pull the towbar towards the rear. Do not neglect the rule of mandatory lubrication of screwed-in parts; to do this, use anti-friction greases tsiatim or litol. When making a towbar yourself, you can weld the ball around or in the center (in relation to the mount on which the towbar-ball will be held). Before installing a towbar, you should also consider the legality of the changes being made: it is important that it does not interfere with reading the rear license plate of the car.
Selecting a towbar for a Renault Duster for the purpose of subsequently attaching a trailer can be no less a difficult task than making it yourself according to the size and taste of the owner (driver) of the car. That is why none of the options is more preferable: evaluate the pros and cons of each method and get to work!
Electrical connection
Some car owners prefer to use the socket only when directly transporting the trailer. This is due to the fact that when driving over rough terrain or during “unsuccessful” parking, it is this element that suffers first. The socket can be connected to the vehicle's power supply and stored in the trunk.
Healthy! Before connecting the towbar socket, disconnect the vehicle battery. To do this, just remove the negative terminal.
To connect to the car network, you only need to connect a socket from the trailer hitch itself to one of the rear lights. Electrics are connected according to the following diagram.
These are the standard 7-pin connectors for passenger trailers, but there are also 13-pin models that are most often used for trailers. If the pinout is different, it’s better not to split hairs and buy an adapter.
Find out more about the new Logan
- Replacing the clutch cable on a Renault Logan: step-by-step instructions, necessary tools | New Logan
- Buy Renault Logan at a price of 160,000 rubles in Volgograd - more than 117 Renault Logan on Avto.ru
- Fog lamp bracket 6001549322 Renault. Wholesale and retail.
- Renault Logan or Sandero air conditioning does not work and does not turn on: reasons and repairs - New Logan
- Logan front suspension parts - New Logan
- What to do if a gun knocks out at a gas station - a step-by-step analysis of the problem in 2022
- Renault Logan 2007 - Wheel and tire sizes, PCD, wheel offset and other specifications - Wheel Size.RU
- Renault Logan brake lights do not light up - My Logan
Technique for installing a tow bar to the body
You need to make four bushings, such as in the drawing. The towbar from any project is assembled using M12 bolts and nuts. Well, they secure it with M10x90 screws. By the way, it is advisable to use lock nuts and washers.
Additional fasteners
It is important to follow one rule: all nuts are first tightened. When the towbar is assembled, you need to forcefully pull the beam back
And at this time, without releasing the beam, tighten the M10 nuts one by one.
Work on installing a tow bar on a car
Thanks to Logan's high ground clearance, you can do without a lift. The side members have four holes for mounting. But they are covered with mastic. Do the following:
- Open the trunk;
- There are two niches on the floor on the sides. On the inside of these niches you can feel the plugs;
- Each of the plugs is removed. Using an awl from the inside of the trunk, holes are pierced in the mastic.
To ensure that the muffler does not interfere with installation, you need to unfasten one of the rubber bands - the one that is closer to the bumper.
Muffler, plug, bracket installation
The result of all efforts is shown in the photo. Self-locking nuts (both M10 and M12) are used here. We wish you success.
Preparatory procedures
We are considering installing a tow bar with our own hands on a Renault Logan car. First, the car enthusiast needs to decide on the choice of towing device. If you have welding skills, you can make the part yourself, having a welding machine and steel.
There are many videos and photos on this topic on the Internet. These videos for Renault Logan describe in detail the process of welding a towbar from several components. The positive aspects of making a towbar with your own hands include:
- saving money, since this procedure will require a welding machine, steel fasteners and a pipe bender, the financial costs will be minimal;
- the quality of workmanship and the strength of materials are on the conscience of the owner of Renault Logan. With the proper level of skill and the presence of good steel, this is undoubtedly a plus, but otherwise it can result in dire consequences in the form of a traffic accident.
Meet the Logan family and their relatives
First of all, decide what kind of car you are dealing with. This is largely influenced by the choice of trailer hitch and connection. And the actual installation of a towbar with a trailer on a car will be different.
You may have:
- Renault Logan first generation;
- new generation of Logan 2nd generation from approximately 2012 to 2017;
- A variation of Logan with the MCV index, that is, a station wagon;
- Dacia Logan.
The differences between the old and new generations are more serious than between Renault Logan and Dacia Logan. In fact, these are two identical cars, only with different nameplates on the hood and trunk.
The 1st generation model began to be produced in 2004, and in 2008 there was a restyling. Already in 2012, the second generation was released. By 2013, the car reached Russia, and in 2014 it was already setting unique sales records.
Everything is clear here. If you have a car before 2012, then you are dealing with an old version. Everything released after 2012 is already classified as a new generation. The most significant distinguishing feature is that the new Logan has an on-board computer and an electronic control unit, and therefore, when installing a trailer hitch, you will definitely need to purchase an additional coordination unit.
Criterias of choice
The towbar is selected according to the following parameters:
- Maximum permissible trailer weight.
- Maximum vertical load on the hook.
- General design.
- Possibility of installing additional accessories, for example, frames for transporting bicycles.
Thus, before purchasing a trailer hitch, you need to select a trailer and roughly estimate the weight of the cargo you will transport.
In Russia and Western European countries, a ball with a diameter of 50 mm is considered standard. This norm is stated in the following documents:
- GOST 28248;
- DIN 74058;
- ISO 1103.
In the USA, different standards apply, so for a trailer manufactured there you need to look for an appropriate trailer hitch.
There are 2 types of electrical sockets:
- Russian standard - 7-pin;
- European and American - 7- or 13-pin.
It is recommended to choose the first option, even if you intend to use an imported trailer. It can be easily connected to a 13-pin socket using an adapter. But it will be difficult to connect a domestic trailer to a 7-pin electrical point, should such a need arise: there are also adapters, but some of the wires will have to be spliced directly.
The overall design must match the parameters of the vehicle. There are 3 varieties of Renault Logan:
- 1st generation – produced from 2004 to 2014;
- 2nd generation – produced after the specified period;
- Logan Stepway model (available from 2022).
Each of the listed versions has its own tow bar design. It is recommended to select products that meet the following conditions:
- the distance from the center of the ball to the road surface is 350-420 mm;
- from the center of the ball to the rear bumper - at least 65 mm.
Which tow bar should you choose?
Towbar from the trendsetter Thule
A towbar is considered a model product, which means that each model has its own product. Therefore, before you come to the store, you must know exactly what type of towbar is needed for your car.
There are many different types of towbars on the market and they are all divided into groups:
It clearly shows what each type of towbar looks like.
- Option A – designed for transporting cargo with a maximum weight of 1500 kg. (It is the simplest in design).
- Option B - has the same load capacity, but the design includes a semi-automatic device on a nut.
- Option C - the design is a semi-automatic eccentric, the load capacity is increased to 1800 kg.
- Options G and F – differ in the number of mounting holes to the body, have a forged iron structure and have a load capacity of 2000 kilograms of cargo.
For the Renault Logan car, the simplest type of design is used: option A, so before choosing a tow bar, pay special attention to this. >
>
Articles and common options for the new Renault Logan
8201555829 — cross member (new Renault Logan)
Code of the original cross member for the new Renault Logan
Towbar installation kit
8201555830 — towbar fastening kit.
82 01 555 830 - article number of the original towbar fastening kit
Original towbar mounting kit
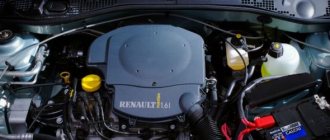
Brief information
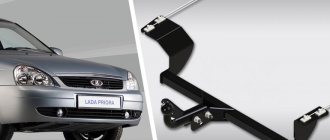
At the very beginning of the 2000s, most French cars were not characterized by low maintenance costs and more and more surprised their owners with their capriciousness in operation. Popular representatives of that time, Peugeot and Citroen, were much lower in maintenance costs compared to cars of the same class from Korea or Japan. But in 2004, the Renault company decided to make a real boom in the world of automotive manufacturing and released a truly people's car, the Renault Logan.
This car immediately appealed to both residents of Europe and Russia. It would seem that this car has everything to drive comfortably and economically, but sometimes you get the feeling that something is still missing. But what is missing is precisely the payload that this vehicle would use for its intended purpose, in the form of transporting additional units and trailers. And for this you need a towbar.
What you need for work
If you don’t have a welding machine or desire, the part can be purchased. How much does a new towbar cost? Its price varies depending on the area, but does not exceed the limits of 4 to 15 thousand rubles. The cost depends on the type of new tow bar.
Removable devices for transporting cargo weighing up to 1 ton will cost around 5-8 thousand rubles. Electrical products, differing in their manufacturability and increased load weight, will accordingly cost more (in the range from 10 to 15 thousand rubles).
The most popular manufacturer of parts for this model is. The products are deservedly in demand due to their good price-quality ratio.
Fortunately, specialized stores offer a wide selection of models for the Renault Logan car. Using the factory article number (for example: 9010), the owner of a Renault Logan will be able to choose a part that is suitable in its characteristics for this car (before purchasing, you still need to check the dimensions and places of fastening of the part to the body, which is why it is necessary to take measurements of the original fasteners before going to the store ). The advantages of a purchased part are obvious:
- the connection diagram was developed by the manufacturer taking into account the characteristics of the Renault Logan car for any type of towbar;
- at the manufacturer’s factory, the part undergoes repeated tests for strength and reliability, for which specialized services have a certificate of conformity;
- the owner does not need to personally develop wiring drawings for installing the tow bar.
Recommendations
Comments 15
I didn’t buy the car from scratch, but the previous owner said that there was no towbar! So I took care of the towbar back in the fall - I took www.mnogofarkopov.ru/94-logan! The load on the ball is 65 kg, the trailer is 900 kg without removing or cutting out the bumper! Installed it myself. It's simple, you didn't have to finish anything. I also connected the electricity myself. I had to tinker a little with the wires, but everything worked out. I connected it without a matching block, everything works. The documents (certificate and installation order) were prepared by kind people. The installation itself took 2-3 hours! The GAI guys have never found fault with the towbar yet, although there is no mark on the PTS
I’m also happy with my towbar, I’ve already run 1000 km with the trailer, and the mechanics and electrics are working properly
Good afternoon. Question about documents if you do the installation yourself. What documents are needed for the traffic police if you know
No documents are required, because if the installation of a towbar does not imply a change in the design of the vehicle (welding, drilling, etc.) and does not cover the license plate, then it can be installed independently without additional registration. Those. if the towbar is installed in standard places, then this is not a design change.
Preparing for installation
After purchasing a towbar, you need to understand everything that is included in the kit. And this kit is a kind of set of spare parts that invites the owner to assemble everything with his own hands and consists of the following parts:
- Metal construction.
The metal parts of the tow bar consist of a beam, a hook and side plates. - Fastening elements.
Depending on the model of the tow hitch, the complete set of fastening elements may differ. - Electrical part.
The electrical part usually includes instructions, a socket and a wiring harness.
To work you will need the following tools and equipment:
- Overpass or pit.
- Jack.
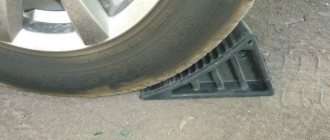
- Wheel chocks or bricks.
- Phillips and flathead screwdrivers.
- Socket and socket wrenches.
Step-by-step installation process
Before we begin work, we remove everything unnecessary from the trunk, especially its side parts. And in order to make it easier to get to the rear of the car, we lift each side of the rear wheel and fix it on bricks or wheel chocks. You can do the trick without lifting the rear, fortunately Logan’s ground clearance allows you to do this.
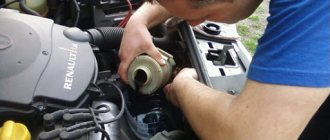
- First of all, while under the car, remove the muffler hangers.
First in the middle of the car, then at the muffler itself. In order for the hangers to come off their seats better, it is recommended to treat them with any lubricant. First of all, it is best to remove the fastenings from the body and then from the muffler itself. - We leave the disconnected muffler on the rear beam so that it does not interfere.
This way it will be difficult to damage and will not interfere. - The next step is to dismantle the rubber plugs located on the side members in the trunk on the inside of the “cheek”.
To do this, just pry them off with a flat-head screwdriver. These rubber plugs can be easily removed even with a little effort. - These plugs actually hide the factory technological holes.
After removal, make sure these holes are clean. - Next, you will have to find the holes in the side member, which the manufacturer hid under the protective tape; to do this, you need to press them out into the inside of the trunk using a Phillips screwdriver.
At first glance, such holes may not be found. their locations on both sides are marked with a marker. - Thus, a screwdriver easily breaks through such a film.
We perform a similar operation on the opposite side. This is how easily a screwdriver goes through the protective film. - After this, we assemble the tow bar strictly according to the instructions, but do not tighten the bolts to the limit.
First of all, the side plates are installed on both sides, followed by the beam. The progress of such work should be done strictly in order. - Next, we check everything for secure fixation and tighten all the bolts.
This is what the towbar looks like at the final stage of assembly. - The final step is to install the tow hook itself.
Please note that before installing the muffler hangers, they MUST be cleaned of traces of grease, since they must be installed “dry”
We clean the muffler mount from grease using a rag.
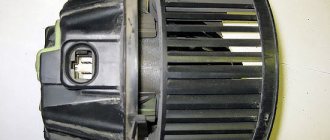
Installation of electrical equipment
Connecting the electrics to the towbar is necessary first of all in order to connect the trailer to it. The socket is installed in its regular place using a pair of bolts and fixed on a hook. In order to connect the electrical circuit from the socket to the car's network, you only need to run it from the tow bar to one side of the rear lights. The electrical connection is best done by cutting the wires into the wiring cables directly from the headlights.
This is what the location of the signals on the Logan taillight circuit board looks like.
Please note that the power supply for the brake light, reverse light and dimensions (license plate illumination, also from the dimensions) can be taken from one element, but in order to power the turn signal, the wires will have to be routed each to its own side. A more informative wiring location is indicated on the back of the rear light block
A more informative wiring location is indicated on the back of the rear light unit.
>
Connecting an electrical outlet on a car from 2004 to 2014.
The socket is connected to the vehicle's on-board network in parallel. To do this, do the following:
- Disconnect the terminals from the battery (safety precautions).
- Study the diagram provided by the manufacturer.
- Attach the socket to the bracket.
- Find a hole in the bottom of the trunk and cut out a plug from it.
- Pull the cable from the socket into the hole.
- Opens access to the harness block of the right rear light of the car.
- Turn on the side lights and, using the control of an auto electrician, find the wire feeding them, mark it in any convenient way.
- Similarly, determine the purpose of other wires and mark them.
- Cut off the insulation from sections of the car wires and, using detachable crimp sleeves, connect the corresponding wires from the socket to them (you need to follow the diagram).
- Provides access to the wiring harness of the left rear light of the vehicle.
- Connect the socket wire for the left turn signal to the corresponding wire for the left lamp.
- Check the correct installation: test the circuits with a multimeter for breaks and short circuits.
- Reconnect the terminals to the battery.
- Check the operation of the vehicle's lighting equipment.
- Block access to the rear light harnesses.
There are recommendations to connect wires using OB type piercing clamps (clips). Experienced craftsmen do not advise doing this: at the puncture site, the metal core quickly rots. There is also a risk of it breaking when installing the clip.
Installation of trailer hitch
If you decide to tackle the installation yourself, prepare for it mentally and physically. Plus, don’t forget about vehicle registration. I already talked about this HERE.
When everything is ready for installation work, we begin to create miracles in our garage.
- Remove anything unnecessary from the trunk of your Renault that might be in the way. You will also need to remove the spare tire and muffler. Place the car over a hole or lift the rear end with jacks. Prepare a set of tools, drawings with dimensions included with the trailer hitch, and remove the negative from the battery;
Now remove the factory plugs. You will find them on the right and left under the trim inside the trunk. They are simply pryed off with a screwdriver and removed; Fastening bolts are inserted into the freed hole. Look underneath the crossover and make sure they protrude from there. Inside the spar, do not forget to install bushings that will protect the bolts; Install side lugs (brackets, if anyone has forgotten) on the ends of the bolts, secure with washers and nuts, but just push them on without tightening. Then you can adjust it as needed;
- Now it’s the turn of the cross beam. It's quite easy to install;
- Align the holes on one side and on the side, attach it to the nut. The same thing is done on the other side;
- Adjust the position of your beam. Now you can tighten the bolts properly;
- The installation of the mechanical part is completed with a tow hook.
If you watch a visual video, it will be easier for you to carry out all these manipulations. Don't forget, this is still half the job. The main goal is to make the connection not only mechanical, but also electrical.
Electrical component
Before installing the towbar electrics, read the instruction manual for your Renault Duster. Here you will need to deal with the matching block. What it is and why it is needed, I already wrote HERE.
We proceed something like this:
- First, the negative terminal from the battery is disconnected;
- now we find the terminals in the rear lamp shades, which are responsible for their operation;
- we lay a cable with wiring from the outlet to our trunk;
- we separate the wires by color so that the trailer hitch wiring matches the color of the wiring on the car (this is where the operating manual and the factory instructions for the towbar come in handy);
- wires must be copper and stranded with a minimum cross-section of 1.5 mm2;
- the ends are clamped and insulated;
- the trailer hitch socket is mounted on the cross beam of the towbar using several screws;
- the wiring goes into the trunk and is neatly hidden there;
- the ends of the wiring are fixed in the terminal harnesses and connected in a standard hole.
As you can see for yourself, there is nothing particularly difficult with installing towbars on the Renault Duster crossover. And there shouldn’t be any problems with the choice. So go for it!
This is interesting: How to change stabilizer bushings on a Toyota Corolla - photos and videos
Renault Logan 1.4i Road Cruiser › Logbook › Bosal 1418-A towbar, installation
I decided to expand the functionality of my car with a trailer, because... The harvest from the dacha is scheduled to be removed soon.
Based on the characteristics and reviews, I chose the towbar from the trusted manufacturer Bosal, towbar model 1418-A for Logan phase 1 and 2 (with electrics included).
The process of installing a towbar on Logan is wonderfully described by Wulf-moto in the recording www.drive2.ru/l/1986693/ I will only note the main points.
1. It’s much more convenient to work together. I worked alone and had a lot of trouble. Especially when tightening the fasteners to the body side members. Doing this alone is EXTREMELY inconvenient (and generally only possible if you have long and tenacious arms).
2. It is highly advisable to secure the spacer bushings to the bolt entering the spar, for example, by placing pieces of wire insulation under them. Otherwise, one awkward movement, and the bushings will remain in the side members (most likely forever).
3. The cross beam is quite heavy in weight, especially when working alone - during installation I was helped by a stool, on which I placed the opposite end of the beam while I was screwing it on. DO NOT TIGHTEN the bolts until you have assembled the 2 mounts to the side members and the cross member. Once assembled, tighten alternately on each side.
4. On specialized forums, it is recommended to fill the towbar socket with lithol on the inside to prevent oxidation of the contacts and increase service life. I followed this advice. Moreover, I coated the contacts on the outside as well. If the measure does not justify itself, I will move the socket to the trunk and will only take it outside when transporting a trailer.
5. Complete wiring is connected to both lights. From the left is taken: turn signal, brake signals, fog lamp and ground. On the right is the turn signal, dimensions and license plate illumination. I ran the wires along the top of the cross beam, securing them with zip ties. On the left - I led it into the trunk through a rubber plug for the license plate light wire, on the right - by making a hole in the plug in the “pocket” of the trunk.
6. It seemed to me more convenient and faster to connect to the wiring of the lamps using a traditional good twist. With a sharp knife, I stripped 0.5 cm of insulation from the wires without cutting them. According to reviews, the clamping terminals-couplers included in the kit often break wire strands. They were sent to reserve.
7. It’s impossible to work alone without a ratchet. And in general, get a ratchet and make many men’s hobbies 100,500 times easier for yourself