Hospitality! The throttle body is a valve that opens and closes, thereby expelling a certain amount of air into the car engine, but most of the time people call the throttle body itself the throttle body, and this is not the case, so we want to make it clear that we will call this part the correct one, that is, the throttle assembly, and we will only mention the shock absorber in some cases when we talk about it, in general, read everything carefully and delve into it and you will understand what we are talking about.
Note! To replace this valve, you will need: A set of two screwdrivers (where the two screwdrivers will be different types), as well as an extension with a cap head (without this there is no point in even replacing it, so an extension is definitely necessary, but you can also use a crank instead), and you will also need a gasket that is located between the throttle body and the receiver (look for this gasket in a car store, tell the seller the engine of your car, and if he understands what it is, he will immediately select the right one for you if the gasket is nowhere to be found, then you can do without it, counting on the fact that your gasket is in good condition), besides, it will still need a wrench to remove the negative terminal from the battery!
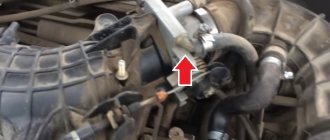
Where is the throttle valve and the shock absorber itself? The throttle valve block, which we will tell you how to replace it with a new one, is located in the same place on all VAZ cars; for clarity, we took a photo below, where the block itself is indicated by a blue arrow, and the throttle valve that is located in it is indicated by a red arrow arrow, over time the unit becomes dirty and dusty, then the throttle valve begins to fail, then it closes due to the gravity of the dust that is on it, so it opens, therefore, on relatively old cars, due to contamination of the throttle valve, there is a moment when the revolutions fluctuate, but this could also be due to its deformation and, in general, the revolutions from different types of sensors can fluctuate.
When should you change the throttle valve? It changes when deformed and even if the throttle valve inside can no longer be adjusted even with a cable (By the way, about how to adjust the throttle valve, read the article: “Adjusting the throttle valve on a VAZ”), in addition, we recommend that you try to clean the throttle remove dirt from the throttle body using carburetor cleaner, it is not that difficult and you do not need many tools (For more information on how to clean the throttle body, read the article: “Cleaning the throttle body on a car”).
General characteristics
If we consider the throttle assembly as a whole, it will consist of several parts:
- coolant outlet and supply pipes;
- ventilation system tube;
- a sensor that controls the position of the damper;
- RXX;
- the damper itself;
- condensation system pipe.
Knowing the throttle structure and what it looks like is necessary for cleaning. This unit is one of the most important components of the intake system. When the throttle operates correctly, a sufficient amount of air is sent to the engine, which is used to enrich the fuel mixture. The damper is controlled by an electronic gas pedal, which, when pressed, changes the opening angle.
This mechanism is located between the intake manifold and the air filter. Getting to it for preventive cleaning will not be difficult even for someone who has just become a car enthusiast.
To work, you will need to prepare tools and materials for cleaning.
Removing the throttle valve
To remove the mechanism, arm yourself with the screwdrivers that will be needed to release the mechanism from the clamps, a 13-point socket wrench and any detergent.
- Cleaning the described VAZ car assembly begins with removing the plastic cover covering the top of the power unit;
- Next, remove the pipe that provides forced ventilation. Look at the condition of the air tube, as there may be oil residues there, which indicates that the mechanism also needs cleaning;
- Next, remove the cap covering the expansion tank to relieve pressure in the engine cooling system, since the shock absorber is connected to the “antifreeze” pipes. To do this, you need to remove the pipes that heat the mechanism, after first removing the mounting clamps from them. The output system is closed with easily removable caps;
- And finally, we remove the hose that ventilates the fuel tank, disconnect the cable that connects the shock absorber to the accelerator pedal and remove the device itself. To do this, unscrew the two fastening nuts.
Depending on the degree of contamination, superficial or complete cleaning of the mechanism is required.
Signs of damper contamination
The car itself may tell you that it’s time to start cleaning the damper. To do this, you need to listen to the engine. A few main signs:
- when the e-gas pedal is released, the engine speed decreases jerkily;
- difficulty starting in winter;
- When starting, a strong smell of gasoline may be felt in the garage;
- at the beginning of operation, the engine stalls, since not all cylinders start at the same time;
- the car jerks during acceleration;
- it is impossible to brake with the engine and coast;
- when switching to low speeds, the car may stall;
- When driving at low speeds, shocks are felt.
The appearance of these symptoms is due to the fact that insufficient air enters the engine and the fuel mixture becomes poorly enriched. Due to the design features, combustion product residues accumulate on the damper - unprocessed fuel, soot, drops of oil. Dust and small particles of sand are added to them from the air supply system, which makes the mass very thick. The intervals between preventive cleanings are shortened by poor quality fuel and engine oil.
When the layer of dirt becomes thicker, the damper cannot move smoothly, and its opening angle becomes smaller. Because of this, the amount of air entering the cylinders is reduced and engine power is reduced.
Symptoms of a problem
You can find out if your 2114 throttle body needs cleaning for the following reasons:
- When you release the accelerator pedal, the transition from high-speed to low-speed mode is uneven (sometimes you can notice a drop of up to five hundred revolutions per minute).
- In the cold season, it is almost impossible to start the VAZ 2114 power unit; when starting the engine indoors, the smell of exhaust gases is not heard, it is replaced by the smell of gasoline.
The main reason for contamination of the throttle valve on a VAZ 2114 is the air-oil mixture, as well as fine dust entering through the air filter membrane. These materials, falling on the door material, cover it, reducing the mobility of the section changing mechanism. Over time, the idle control rod may become clogged, and the gap opening will narrow, which leads to poor air flow through the channel.
So let's get started. The throttle valve is cleaned after the VAZ car engine has cooled.
Step-by-step instruction
Before starting work, purchase a special cleaner for carburetors, and also prepare a set of screwdrivers and a 13mm wrench. If you want to get to the hidden places of the damper, then also take cotton swabs. When disassembling it often turns out that the reservoir o-ring and throttle body gasket are unusable, it is best to replace them at the same time as cleaning, so that later you do not have to waste time disassembling the assembly again. You need to purchase parts based on engine size and number of valves. The gaskets for 1.6 are slightly different than for a motor with other parameters.
- Lift the hood and remove the plastic cover from the engine. If you have not a mechanical, but an electronic damper, which was installed on cars of later years of production, then remove the terminals from the battery and disconnect the electronic damper control chip.
- Disconnect the rubber ventilation hose. This hose is held in place by a clamp, so you will need a screwdriver. If you see dirt in this part of the assembly, wipe the connections and components with a rag.
- To reduce the pressure in the cooling system, remove the liquid supply tubes from the throttle assembly. To do this you will need to loosen the clamps. To prevent dirt from getting into the cooling system, plugs are put on the tubes. There you can do with all the hoses.
- Lastly, remove the fuel tank ventilation hose.
- After this, it is enough to unscrew two bolts and disconnect the accelerator pedal cable to get to the damper.
Examine the part and decide how you will proceed next:
- carry out superficial cleaning without removing the entire assembly;
- completely remove all contaminants, replace the gasket and o-ring.
In the first option, you need to remove a layer of dirt using a rag or cotton pad from the surface of the damper.
In this case, do not use specific cleaning agents - wipe the throttle with gasoline or ordinary solvent. When cleaning, manually adjust the flap to remove dirt not only from the outside, but also from the inside. For complete cleaning, remove the throttle assembly. To do this, it is enough to remove two bolts with a 13mm wrench. In this case, complete cleaning is carried out with special means and consumables are replaced. After you finish work, be sure to blow out the assembly with a stream of compressed air. Thanks to this, you will get rid of excess moisture in the assembly. With complete cleaning, your manipulations take place in a non-confined space, which allows you to put the entire unit in order. This is exactly what is best to do if you are doing routine throttle maintenance. During the complete cleaning, be sure to pay attention to the idle speed sensor - it is best to remove dirt from it using WD40 and cotton swabs.
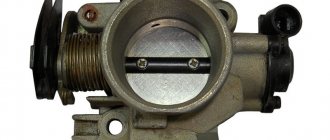
How to replace the throttle assembly on a VAZ 2113-VAZ 2115?
Discount: 1) At the beginning of the operation, loosen the screw (indicated by the red arrow) that holds the retaining clip and which in turn holds the end of the air intake hose (the end indicated by the blue arrow), then manually disconnect the end of the tube from the throttle body if it What interferes with all this is the crankcase exhaust pipe, which must be connected to the point indicated by the green arrow, then disconnect this pipe (as you can see in the photo, this pipe is already disconnected) it is disconnected in the same way as the air intake pipe, that is, a little the screw is loosened and then the pipe is disconnected, this way you will give yourself access to the throttle assembly itself and it will be much easier to unscrew the nuts securing it.
2) Then disconnect three or four pipes (on some cars there may be three, and on some even four, the fourth pipe will only be on cars equipped with an adsorber) from the three or four fittings that are on the throttle body, for clarity, in the photo below, the fittings are indicated by red arrows, and the hoses connected to them are indicated by blue, the hoses are disconnected from the fittings in the same way as the air intake hose, that is, the screws are unscrewed and then the hoses are disconnected, but there this is just a warning, before disconnecting the hoses it is necessary to cool and drain the liquid from the system cooling (For information on how to drain the coolant, read the article: “Replacing coolant in a VAZ”).
3) Now discard the negative terminal from the battery, to do this, loosen the nut holding the terminal and then disconnect it (for more details, see point 1, “here in this article”), once you have disconnected the terminal, disconnect the cable from the throttle sector, to this first lever with a screwdriver on the bracket so that it does not interfere with the removal of the cable (indicated by the red arrow), and then disconnect the cable that will pass inside the sector (the point where the cable (indicated by the blue arrow) from this sector will be attached to it at the end , unfortunately, is not visible in the photo, but the approximate location where the cable is connected is indicated by a green arrow.
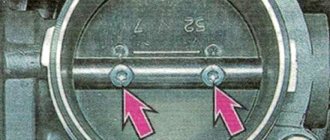
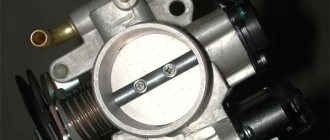
4) After all the operations performed, disconnect the two wire blocks that are attached to both sensors and the sensors, in turn, are located on the throttle body (see Photos 1 and 2) and after disconnecting the blocks, unscrew the two nuts that secure the throttle block to casing (see photo 3), and then dismantle the throttle body (see photo 4), behind the assembly, remove another gasket, which is located at the back and which must be replaced if it is damaged, but we recommend replacing it constantly when accelerating, remove the assembly from the car .
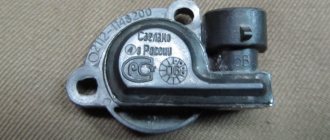
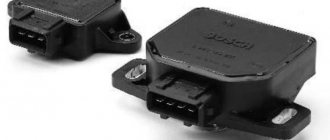
Note! By the way, when you remove the assembly from the car, there will be two sensors on it, one of which is the throttle position sensor, and the other is the idle speed sensor (both sensors are indicated by red arrows), you also remove them and move them to a new group, because that new groups of throttle valves are sold without sensors and without them the car will not work properly, they are removed very easily, for this reason you unscrew the two screws that secure them, and then they are removed from the assembly (the screws holding the sensors are indicated by blue arrows, by the way, the screws are sensors, the idle speed adjustments in the photo have already been swapped, so they are not visible), after removing the sensors you will find a foam ring under one of them, which in case of deformation and breakage should be replaced with a new one, if you have one good condition, then transfer it to a new throttle body and secure the sensor to it with self-tapping screws!
Installation: The new throttle body assembly is installed on the car in the reverse order of removal, but only when you do not install screws on the new one, and also on the old one, if you decide to install it, do not turn it (it's just that there are screws on any assembly that first of all, they fix the throttle valve and adjust it, secondly, they do not need to be turned under any circumstances if you do not understand what they are responsible for).
The throttle body gasket must isolate the heat of the engine assembly from the intake manifold and the air masses entering it.
The higher t0, the lower the air density. As a result, the amount of oxygen entering the power unit decreases.
Reducing the amount of air required for stable engine operation inevitably leads to excessive fuel consumption. The engine simply does not have enough oxygen.
Cleaning the throttle valve on a VAZ 2114 in two ways
Flushing the throttle valve is not a troublesome procedure. Especially if you have already had to remove the throttle and put it back. For those who are hearing about such a unit as a throttle for the first time, I’ll explain: on the fourteenth, as well as on the fifteen and ten, this damper is located in front of the intake manifold.
The main function is to regulate the amount of air that enters the manifold. It is clear that the fuel entering the cylinder burns only when mixed with air, therefore, the more of it, the more active the combustion is, the engine produces more power, and the car drives faster. Everything would be fine, but only if there is more air, then in proportion to it more gasoline will flow in and be burned. But this is not always required. And this same throttle controls the inlet for air flow, thereby controlling the power produced by the engine and the speed of the car.
The valve opens and closes at the moment when we press the shoe to the floor - the gas pedal - or release it (the throttle valve is connected to the gas through a cable).
As has already been said, you don’t need much experience in the process of how to clean the throttle valve; it is much more important to realize in time that it needs it. Experienced drivers and service specialists unanimously insist that every 60-70 thousand kilometers it is necessary to carry out preventive maintenance along with diagnosing the condition of the damper.
Removing/installing the gasket
It should be noted that removing the sticky throttle body gasket without damaging it can be quite difficult, so there is almost a 100% chance that you will have to buy a new one or make one yourself. However, if you do everything carefully and slowly, with straight hands, you may not have to replace it with a new one.
Carry out work in compliance with the rules and regulations of personal safety. Don't forget about fire safety rules. In fact, the use of fuels and lubricants, especially gasoline, is permitted.
When you decide to buy a factory gasket, go to a specialized store, as there are a lot of them now.
It is recommended to carry out dismantling and installation work with a partner. The extra head and arms haven't bothered anyone yet.
When is it needed?
Dust, oil, crankcase gas - all these are reasons why we have a dirty throttle valve. Slag settles on the walls of the entire assembly and prevents complete response to the pedal of the damper itself - it will no longer open and close efficiently. It will easily become clear to you that the time for cleaning has come, based on the following symptoms:
- The engine starts every other time
- Increased crankshaft speed
- RPM fluctuates at idle
- The car jerks if you drive at low speed
- The engine may start and immediately stall
Cleaning has never been superfluous, but along with this procedure, just in case, check the condition of the air flow, idle speed and throttle lift sensors.
Washing methods
On a VAZ 2114, cleaning the throttle valve can be done in two ways: surface and deep washing.
Surface washing method
This method is easy and does not require knowledge of how to disassemble the throttle valve on the fourteenth. But the effect from it is insignificant - we walked superficially with a rag over the body of the unit, wiped off the dust and that was it. But even in this case, you need to have a small arsenal: a cleaning agent - the good old WD-shka will come in handy (many people believe that this is the best product for cleaning the throttle body), but you can also take alcohol, gasoline, carburetor cleaner, a rag and a brush. The process is like this:
- Removed the corrugation from the damper
- Sprayed all the insides of the assembly with cleaning agent
- Went through with a brush
- Wipe it off with a cloth
- The main thing is not to forget that the reverse side of the unit also needs to be cleaned - open the flap
- Then we put everything back in place - and that’s it!
Surface method from the word “surface”, the internal parts of the unit with this method of cleaning remain dirty.
Deep washing method
The method requires a more thorough approach, a little experience in removing the damper and a richer arsenal for cleaning: a cloth with a WD head remains, plus a cross-head screwdriver, a throttle valve gasket (if the engine is 1.5 liters) and a receiver O-ring (if the engine is 1.5 liters). 1.6 l) - an inexpensive pleasure, on average 40 rubles, cotton swabs, a 13-socket wrench and 2 M13 bolts. The process is as follows:
Removing the throttle valve on a VAZ 2114
- We remove the throttle assembly: pull the corrugation off the filter, then disconnect the pipes with antifreeze (for this procedure you need the same M13 bolts to plug the pipes; many recommend draining the antifreeze, but this is a waste of time, just very quickly disconnect and plug the ends), Next, you need to remove the adsorber pipe.
- All the hardest part is over, we move on to disconnecting the fasteners of the assembly itself, then disconnect the gas pedal cable and remove our assembly.
- As soon as the assembly has been removed, we disassemble it: let's start with the IAC and TPS sensors.
- They need to be washed thoroughly.
- Then wash the damper on all sides, after washing, blow through all the holes so that everything is dry.
- We assemble the assembly in exactly the opposite order and put it in place.
What is the gasket made of, what materials can be used
New gaskets are usually made of paronite or fourth-generation fluoroplastic based on polytetrafluoroethylene.
When making it yourself, you can use paronite or heat-insulating cardboard as a working material; some even manage to cut it out of an ordinary shoe box. We definitely don't recommend doing this.
Once you have decided on the material, the algorithm is quite simple:
- apply material to the accelerator;
- outline the outline;
- drill holes in the right places;
- adjust everything to the desired size.
Note! The thermal conductivity coefficient of ordinary cardboard is only 0.15, and the thermal conductivity index is 0.44.
It is important that the thickness of the gasket affects the thermal conductivity. So don't overdo it. Use material with a thickness of 0.5-1.5 mm, no more.
Cleaning the idle speed sensor
It is very important to pay special attention to the condition of the idle speed sensor. Since it plays an important role in the throttle assembly, and if this sensor is faulty, then the engine will behave inappropriately, and you will sin on the throttle. But this is not even the worst thing - a malfunctioning sensor always means excessive voltage on the entire system of the car and its incorrect operation, which is dangerous, especially at a VAZ, where sometimes it is not possible to figure out what caused the problem.
Knowing how to clean the throttle valve, we clean the IAC sensor. The only thing is that if you have the fourteenth with a volume of 1.6, you will first need to unscrew the two nuts securing the throttle assembly to the receiver and move it away with a gap of a couple of centimeters, without removing it from the car. The process for cleaning the sensor is as follows:
- You need to remove the entire wiring system from the sensor.
- Dip a cotton swab into the WD solution and carefully clean all these contacts.
- Then use a cross-head to unscrew the sensor fasteners (if they are present, of course, if they are not, the IAC is sitting on the varnish and you cannot do without removing the entire assembly).
- The sensor can now be pulled out and inspected - if it is all oily and covered with a layer of dirt - the VAZ 2114 throttle valve has long been in need of deep washing, just like it.
- Take a WD-shku and spray it onto the needle of the cone with a spring, wipe off the corroded dirt with a cotton swab. Just like the entire assembly, you need to blow it out after washing and put it back in place dry.
- Now check the distance from the sensor cone needle to the body - it should be 23 mm!
That, in principle, is all that concerns the process and reasons why you should clean the throttle valve. It is important to understand the fact that if after deep cleaning of the damper and sensors. The higher fourteenth still behaves badly, twitches and stalls at idle, then the problem is not in the throttle or in the sensors (most likely). Perhaps the wiring is loose.
By the way, if you still decide to go to the service center to the craftsmen so that they wash and clean everything for you, the pleasure is relatively inexpensive, on average 500 rubles. Advice - the throttle is the only thing they should clean, without touching your brain about the topic of why they clean the throttle and how often it should be done. It’s no wonder that the more often a client visits the service, the better the business goes. They may say that flushing should be done once every 10-15 thousand km; this is too small a figure and not realistic in practice.
We recommend
- Reasons for engine overheating on a VAZ 2114
- How to properly remove various stains from a car body
- How to change a low beam bulb on a VAZ 2114 - all the subtleties and nuances of the procedure
- Phase sensor errors on VAZ 2114
Cleaning the throttle body
Superficial cleaning
This method does not require complete disassembly of the mechanism. All you need to do is wipe the shock absorber with a rag and remove the surface layer of dirt. We will arm ourselves with any detergents (alcohol, thinner, gasoline, wd-40), since the only difference in them is how much effort is required for cleaning. You will also need a brush and a rag.
It is necessary to remove the ripples of the air purification filter and spray the hole in the throttle valve with cleaner. Wipe the splashed surfaces with a rag. If it is poorly removed, use a brush. It is worth noting that the inner surface of the shock absorber is also dirty, so it must be cleaned even after opening. This is the entire plaque removal procedure. The device is installed in the reverse order of removal. However, such cleaning does not provide access to all surfaces of the mechanism, so in case of heavy contamination it is necessary to use a comprehensive cleaning method.
Complete cleaning
- To do this, in addition to the set of tools used in the previous method, we will use a flat-head Phillips screwdriver, an accelerator gasket (volume 1.5 liters) or a receiver O-ring (volume 1.6 liters), headphones, a socket of thirteen wrenches, two M13 bolts .
- After disconnecting the throttle valve, it is necessary to disconnect and clean the IAC and DPS sensors, wash the valve with detergent, and also blow out each of the holes with compressed air.
- To remove the idle air regulator (IAC), you need to disconnect the wire block, unscrew the screws securing the regulator itself, then remove it.
- The throttle position sensor can be removed by disconnecting the wiring harness connector and removing the screws that secure the sensor to the throttle body.
- After completing the throttle valve flushing process, it should be assembled and installed in the reverse order of disassembly.