The main reason for replacing the exhaust pipe (pants) on a VAZ 2109 car is burnout. This problem does not happen so often, but it can still appear, especially if the car has already covered 100,000 km. In order to replace the exhaust pipe on your own, you will need the following tool: a 13 deep socket, a 13 socket wrench or an open-end wrench.
First of all, you need to unscrew the four nuts that secure the pants to the exhaust manifold.
Now we remove the pants from the heels so that they move to the side. We unscrew the nuts securing the exhaust pipe to the body bracket, if, of course, there is one.
Now unscrew the nuts that connect the pants and the resonator.
If the clamp is unscrewed, at least on one side you can lift it up and the pipe is disconnected from the resonator, since nothing is holding them in anymore.
Now we find the optimal position and take out the pants through the bottom. There is an O-ring at the junction.
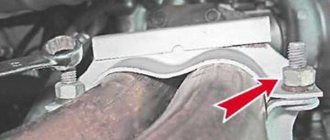
We also pay attention to the gasket at the junction of the exhaust manifold; if it is in poor condition, it should be replaced. The price of the exhaust pipe of a VAZ 2109 car ranges from 300 to 700 rubles (for carburetor models), and 900-1000 rubles (for injection models). Installation is carried out in reverse order.
Exhaust pipe laying for VAZ 2109 injector 8 valves
- To the beginning of the forum
- Forum Rules
- Old design
- FAQ
- Search
- Users
I'm looking at the nuts that need to be unscrewed.
Tell me what I need to buy in advance
wrap it overnight with a rag soaked in kerosene.
And then how to get to the garage? Will the sprinklers and locks be of any use if the pipe then warms up?
Is it recommended to apply graphite during reassembly?
By the way: what is this little ratchet? Can I give you a link so I know what to look for?
Take a gasket and new brass or copper-plated nuts
Can you tell me approximately how long?
The exhaust pipe gasket needs to be replaced, the following questions arise:
2. What else do you need to buy: 4 brass nuts, 4 M8x25 studs, anything else?
Information on icons and features
You can not
start topics You
cannot
reply to messages You
cannot
edit your messages You
cannot
delete your messages You
cannot
vote in polls You
can
attach files You
can
download files
Source
How to replace the exhaust pipe on VAZ 2108-VAZ 21099 cars?
Removal: 1) First disconnect the resonator from the exhaust pipe of the car. (see “Disconnecting the resonator from the exhaust pipe of the car”, point “3-4”)
2) Then, using a wrench, unscrew the two nuts securing the upper bracket.
3) Next, after unscrewing all the nuts, remove the upper bracket from the exhaust pipe of the car.
4) Next, move to the lower bracket, and then unscrew its two retaining bolts in the same way.
5) And then remove the lower bracket from the downpipe of the car.
Note! After removing the upper and lower brackets, check whether there is an oxygen sensor on the exhaust pipe. If there is one, then unscrew the nut that holds it to the exhaust pipe of the car! (How to unscrew the sensor retaining nut and then remove it from the car pipe, see the article: “Replacing the oxygen sensor”, point “3”)
6) Now bend back the locking plates of all four nuts securing the exhaust pipe.
7) And after bending the plates, unscrew all four nuts securing the pipe, using an extension with a cap head.
 And to complete the operation, remove the exhaust pipe from the car, together with the metal gasket.
Note! Replace the burnt or deformed metal gasket with a new one!
Installation: 1) First, install a metal gasket on the mating surface of the new receiving pipe, and then, together with the gasket, install the receiving pipe in its place by tightening all four nuts that secure it.
Note! It is recommended to replace the exhaust pipe mounting nuts with new ones!
2) Next, fasten the exhaust pipe and the resonator with a clamp. (see “Securing the exhaust pipe and resonator with a clamp”, point “4-5”)
Note! After connecting the exhaust pipe, install the oxygen sensor! (How to install the sensor, see “here” point “1”)
3) And at the end of the operation, install the upper, as well as the lower bracket for fastening the exhaust pipe, in its place, tightening all the bolts for securing them.
Source
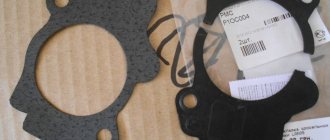
Which gaskets are best to use?
Quite often, a muffler exhaust pipe flange gasket is used for replacement, which is responsible for sealing the connection between the exhaust pipe of a car exhaust system and the exhaust manifold. This gasket is usually used on cars that have a receiving pipe mounted at two points (Volga third series, GAZ-21).
However, you can make your own pant liner. It is recommended to use the following materials:
Also, many motorists advise using automotive sealant that can withstand high temperatures. The technology for using it is quite simple: a thin layer (about one millimeter thick) is applied to the muffler in the seat, and then left to dry for twelve hours.
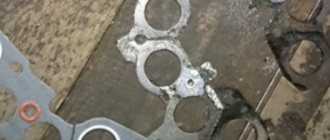
Most drivers prefer to use paronite to create a gasket. The creation process is as follows:
- First, a square-shaped piece of material is cut out, the old gasket is placed on it and placed on superglue.
- Then a marker is drawn along the entire contour. It is also necessary to circle all the holes located inside the product.
- The old gasket is removed, and then all the glue is removed.
- Next, the correct hole ratio is checked. If a discrepancy occurs, the product must be refined using a file.
There is an easier way:
- The surface on which the gasket will be present is cleaned and degreased;
- The gasket material is applied.
- Next, the product is hammered around the entire perimeter with a hammer.
- The gasket will gradually become visible, and the unnecessary part of the material will fall behind.
Ultimately, the finished gasket is modified using a round file and sandpaper, and then can be used for its intended purpose.
replacing the gasket between the manifold and pants VAZ 2109 part 2
Burnout of the gasket under the exhaust manifold is a rather unpleasant and common malfunction on the VAZ 2109.
A product that has become unusable will allow exhaust gases from a running engine to pass under the hood, and the characteristic chattering sound when the engine is under load also does not greatly contribute to a comfortable ride. Replacing the manifold gasket on a VAZ 2109 will help avoid such problems.
The collector gasket is made from a specially compressed asbestos mixture reinforced with steel thread; it can be purchased at any spare parts store. The price of the product, depending on the manufacturer, varies from 50 to 200 rubles. For a VAZ 2109, replacing the intake manifold gasket at a car service center will cost approximately 1,500 rubles and more, not counting the cost of the gasket itself.
Product delivery options
Note! Below are the shipping methods available specifically for this product. Payment options may vary depending on the shipping method. Detailed information can be found on the “Delivery and Payment” page.
Transport companies
Available payment methods:
- Using cards Sberbank, VTB, Post Bank, Tinkoff
- Yandex money
- QIWI
- ROBOKASSA
Delivery is possible to any locality where there is a representative office of the transport company. Delivery time is from 2 to 10 days. Sending large parcels is approximately 50% more profitable than by Russian Post.
Pickup from our warehouse
Available payment methods:
- Cash upon receipt
- Credit, installments
- Using cards Sberbank, VTB, Post Bank, Tinkoff
- Yandex money
- QIWI
- ROBOKASSA
Pickup times must coincide with store opening hours.
Source
How to change the gasket between the manifold and pants
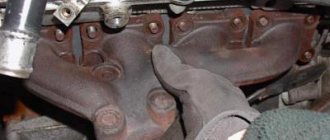
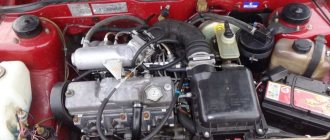
The most common reason why you have to replace pants on a VAZ 2109-2108 car is burnout. This doesn’t happen very often, but once every 100 thousand km this problem can arise. So, to replace the exhaust pipe, we need a minimum of keys, namely:
First of all, unscrew the four nuts securing the pants to the exhaust manifold of the VAZ 2109-2108. The location of this fastener is shown more clearly in the photo below:
Then you need to pull the pants off the heels, just so that they move a little to the side. It is also necessary to unscrew the nuts and bolts securing the exhaust pipe to the body bracket, if such a fastening is present. Personally, this was no longer the case on my old nine, apparently someone removed it so as not to experience unnecessary difficulties in the future.
Preliminary work
Replacing the VAZ 2109 intake manifold gasket with your own hands is not very difficult and does not require specific knowledge or expensive tools - the required set of keys is usually present in the trunk of every car enthusiast.
But before replacing, you should try to tighten the fastening of the intake unit - if the gasket is not burned out, it is the loose fastening that may cause exhaust gases to get under the hood. If tightening the fastening does not help, it means that the gasket is completely burned out and needs to be replaced. Replacing the VAZ 2109 manifold gasket will require preliminary work to dismantle the air filter, remove the carburetor and the manifold itself. All of the above work is carried out exclusively on a cold engine.
Removing the air filter with housing
On the injection engine of a VAZ 2109 car, to remove the air filter, it is enough to unscrew the four self-tapping screws securing the cover of the filter element housing - for this, use a 10mm wrench or a ratchet. There will be a filter element under the cover. If the cover is difficult to lift, you can disconnect the mass air flow sensor from the plug.
On a carbureted engine, there are three latches under the hood that can be easily opened. There is a screw in the middle of the metal cover, which can also be unscrewed by hand, after which the cover is removed. Under the cover there is a filter element that must be carefully removed. Subsequently, during reassembly, the filter element can be replaced - if the time has come or if the filter element is very dirty.
Removing the carburetor
After the air filter has been removed, you can begin to remove the carburetor. To remove the carburetor on a VAZ 2109, you will need the following tools:
- two screwdrivers - flat and Phillips;
- 13 open-end wrench;
- head at 8;
- ratchet.
Instructions for dismantling the carburetor will be as follows:
- The coolant supply hose to the carburetor starter is disconnected from the fitting by unscrewing the fastening clamps. The coolant itself is drained into a previously prepared container.
- The exhaust pipe coming from the exhaust manifold and from the cylinder block bracket is disconnected.
- Then the throttle cable bracket is disconnected. To do this, first remove one end of the spring from the throttle control rod, and then remove the entire spring, then loosen the nut on the bracket and remove the cable from its engagement.
- The EPHH screw sensor is disconnected from the power plug.
- Two hoses and a vacuum tube are disconnected from the carburetor heating unit.
- The crankcase ventilation hose is removed.
- Unscrew the 4 nuts securing the carburetor to the intake manifold.
- The carburetor is removed carefully and without jerking - by lifting it from the studs.
The work of removing the carburetor is completed. The presented photos and videos will help you clearly follow the process of removing the carburetor.
Removing the intake manifold
After the work of removing the air filter and dismantling the carburetor is completed, you can begin to remove the intake unit. To do this you will need the following set of tools:
- open-end wrench 13;
- head 13 - regular and deep;
- ratchet and crank;
- ratchet with 10mm head.
How to repair a “glushak” with your own hands
The muffler on the “fourteenth” and “fifteenth” is considered one of the most vulnerable points of the car. The fact is that due to exposure to high temperatures, the metal quickly burns out, that is, the tightness of the system is broken. Therefore, the part must be changed as soon as there is a suspicion that it is not working.
Reasons for failure
Most often, mufflers “burn out” - that is, due to hot exhaust, the metal inside the housing begins to thin out, which ultimately leads to the appearance of holes. However, this is not the only reason why the silencer may fail:
using a homemade device - handicraft products do not differ in quality and long service life;
mechanical shocks from uneven roads - dents and deformations of the pipe also lead to loss of tightness;
Rust and corrosion sooner or later affects even the highest quality original mufflers.
In general, all of the above factors influence service life to some extent. The car owner can easily identify all of the above faults - just drive the VAZ into the inspection hole and visually examine the muffler. In addition, when deformations, burnouts and corrosion reach their “peak”, the part will begin to make characteristic sounds when moving - gurgling, sharp pops, knocking.
Why is the muffler knocking?
This part on the VAZ 2114/2115 can make knocking noises only in two cases:
When moving, it touches the gas tank housing.
In any case, it is necessary to immediately take measures to eliminate this malfunction. Most often, the problem lies in severe wear of the rubber suspensions. It is enough to change them and the muffler will again return to its normal position under the bottom of the car.
How to replace the exhaust pipe on VAZ 2108-VAZ 21099 cars?
Removal: 1) First disconnect the resonator from the exhaust pipe of the car. (see “Disconnecting the resonator from the exhaust pipe of the car”, point “3-4”)
2) Then, using a wrench, unscrew the two nuts securing the upper bracket.
3) Next, after unscrewing all the nuts, remove the upper bracket from the exhaust pipe of the car.
4) Next, move to the lower bracket, and then unscrew its two retaining bolts in the same way.
5) And then remove the lower bracket from the downpipe of the car.
Note! After removing the upper and lower brackets, check whether there is an oxygen sensor on the exhaust pipe. If there is one, then unscrew the nut that holds it to the exhaust pipe of the car! (How to unscrew the sensor retaining nut and then remove it from the car pipe, see the article: “Replacing the oxygen sensor”, point “3”)
6) Now bend back the locking plates of all four nuts securing the exhaust pipe.
7) And after bending the plates, unscrew all four nuts securing the pipe, using an extension with a cap head.
And to complete the operation, remove the exhaust pipe from the car, together with the metal gasket.
Note! Replace the burnt or deformed metal gasket with a new one!
Installation: 1) First, install a metal gasket on the mating surface of the new receiving pipe, and then, together with the gasket, install the receiving pipe in its place by tightening all four nuts that secure it.
Note! It is recommended to replace the exhaust pipe mounting nuts with new ones!
2) Next, fasten the exhaust pipe and the resonator with a clamp. (see “Securing the exhaust pipe and resonator with a clamp”, point “4-5”)
Note! After connecting the exhaust pipe, install the oxygen sensor! (How to install the sensor, see “here” point “1”)
3) And at the end of the operation, install the upper, as well as the lower bracket for fastening the exhaust pipe, in its place, tightening all the bolts for securing them.
Installing a spider on a VAZ of the tenth family
| Tuning a car's exhaust system is a large chapter that includes a set of measures. If you approach this issue head-on, then such tuning significantly improves the characteristics of the car. One of the main points in such modifications is replacing the exhaust manifold with a Spider 4-2-1. |
To increase the power of your car, you should approach tuning the exhaust system wisely. They say that the standard VAZ exhaust manifold significantly delays the release of exhaust gases, as if “strangling” the engine. And the exhaust manifold (spider) allows the engine to breathe at full capacity. What is meant by these phrases, and whether there is any benefit from a spider, we have already discussed in the article about proper tuning of the exhaust system. If you decide to buy a spider, you can order it in online stores (section “Tuning”). It is worth noting that the tuning exhaust manifold can have two layouts: spiders 4-2-1 and spiders 4-1. Due to the specifics of Russian cars, the first scheme is most widespread. In addition, there are many models of spiders that differ not only in manufacturers (STINGER, MG-RACE, etc.), but also in modifications. For example, you can buy a spider without an oxygen sensor or with a sensor. In the first case, you will have to discard the sensor, but first you need to replace the standard ECU firmware.
| Often, after purchasing a spider, they also buy a direct-flow (sports) resonator and muffler, which are already adjusted in length. Thus, you make it easier to install the spider, eliminating welding and adjustment. It is also recommended to purchase an oxygen sensor extension and a graphite ring, which will greatly facilitate installation. |
DIY 4-2-1 spider installation
Let's look at a specific example of installing a spider on a VAZ 2110; a kit was purchased for this: We drive the car onto an overpass or a hole in the garage, and wait until the exhaust manifold cools down. Then we dismantle the standard elements of the exhaust system:
- removing the exhaust pipe (for 8kl, for 16kl);
- Removing the engine exhaust manifold (for 8kl, for 16kl).
By the way, you can save a lot of time if you remove the manifold with the exhaust pipe assembly. Often the fastening nuts stick, so it is recommended to use VD-40 before unscrewing them. Now we install a spider instead of the standard exhaust manifold. It should “sit” on the cylinder block studs without modifications. During the operation of the car, the spider becomes very hot, so make sure that it does not come into contact with pipes and wires. Next, we determine how much the spider repeats all the bends under the bottom of the ten. Here it may come into contact with the stabilizer, which can be corrected with a hammer. The next modification concerned the fastenings for the elastic bands (gingerbread cookies), they had to be overcooked, moving them by about 10cm. It was also necessary to shorten the flaring by the same 10cm. Even one person can install the spider with their own hands, but it is better to do the work with an assistant. The time spent is 4 hours. By the way, you can save on buying a muffler by making a forward flow yourself. xn--2111-43da1a8c.xn--p1ai
Device
In total, this system includes several elements. This:
- An exhaust manifold. This is the very first part through which gases pass after combustion. People call the collector a spider for its characteristic shape. This element is supplied to each of the four cylinders of the internal combustion engine. Then all these pipes are combined into two, and then into one single pipe. There are also sports manifolds with a 4-2-1 exhaust pattern. They are installed to increase power. As practice shows, gases move more freely along the path, but the driver still will not feel a significant increase in power.
- Reception pipe. It connects to the collector. There is a special probe inside this pipe. This is an oxygen sensor, or lambda probe. If we talk about the VAZ-2109 exhaust system (carburetor), there is no such sensor in the system. But on car injectors, a lambda probe is required. The slightest problems with it may be accompanied by a “Check Engine” lamp on the instrument panel. In fact, the exhaust pipe has the simplest device. There are no sound-reflecting partitions or special fillers. This is an ordinary hollow pipe in which a single sensor can be located.
- Catalyst. As in the previous case, this element is present only on injection versions. There is no catalyst on carburetor engines. What is this element needed for? Its main task is to reduce the concentration of harmful substances in exhaust gases. Passing through the catalyst honeycomb, harmful metals are converted into harmless oxides. Thanks to the use of this element, the machine began to comply with the environmental standard Euro-2 and higher. The catalyst is the most expensive element in the VAZ-2109 exhaust system (injector). Therefore, when it malfunctions, many install flame arresters or simply knock out the core and weld the walls, leaving the catalyst empty inside.
- Resonator. This element is present on both carburetor and injection versions. A resonator is installed behind the catalyst. What is his task? The resonator serves to absorb the main noise from the exhaust gases. Thanks to this element, the sound of gases becomes less. The resonator is designed simply. This is a metal case with a perforated pipe inside. Additionally, there may be a partition inside.
- Main muffler. The resonator can be called an auxiliary muffler, but the main sound energy is absorbed by the last muffler, located under the rear bumper. It enters the resonator and absorbs up to 90 percent of the sound. The structure of this element is somewhat more complicated. The basis here is also taken from perforated tubes, but there are several of them, as well as chambers. Usually these are three or four tubes and two chambers. Passing through this entire labyrinth, the gases lose their energy and exit without unnecessary sound.
Replacing the exhaust pipe of a VAZ 2114
You've probably heard such a slang and quite common word among car enthusiasts as VAZ 2114 pants. If you have no idea what it is, then everything is simple, it's just the exhaust pipe of the exhaust manifold.
The product is used to remove exhaust gases directly from the internal combustion engine. And it got its original name for the shape of the structure (one end of the pipe has a split and closer to the opposite edge smoothly flows into a single pipe) with the shape of the pants. This is how the popular name “clung” to the product.
How to determine whether a muffler is faulty
It is not difficult to understand that the muffler of a VAZ 2109 car is faulty:
- the volume of the engine increases sharply, the engine begins to growl;
- In this case, the engine power is reduced by two or even three times;
- the cabin smells of exhaust fumes;
- if the driver does nothing, the growl of the engine is replaced by a deafening roar, which can sometimes be accompanied by pops similar to pistol shots.
All this suggests that a hole has formed in the muffler housing. If you don't do anything about it, then problems are inevitable:
- If the muffler is faulty, carbon dioxide contained in the exhaust gases may end up in the vehicle interior. This gas is colorless and odorless, but causes severe headaches and dizziness. And if exposure to dioxide lasts for a long time, it can lead to the death of the driver;
- Driving with a faulty muffler cannot be called comfortable;
- Driving with a faulty muffler is expensive: there are rules to limit noisy driving. Violation of these rules may result in fines.
Symptoms of a problem
The main sign indicating possible problems with the gasket of the VAZ 2114 pants is a changed sound (bass) from the exhaust pipe when the engine is running. When an element wears out, you will immediately hear and identify disturbances in the operation of the exhaust system. This will increase the noise level and exhaust sound. However, it is worth understanding that such signs may indicate failure of other components of the exhaust system (for example, the resonator). To accurately determine the possible causes, conduct a thorough diagnosis.
Fault diagnosis
To determine operational problems, you should start the car engine. It is best to carry out the activities together, so that one person sits in the driver’s seat and, at the command of the second, increases the operating speed of the engine. The second person should be located in the inspection hole or under the overpass exactly under the bottom of the car. When the speed increases, you need to carefully inspect the entire exhaust system line, record the source of increased noise and possible leakage of exhaust gases. If you have decided to replace the problem unit, read below for instructions on how to change pants on a VAZ 2114.
Preparation stages
To replace the manifold or its gasket, in any case you will have to dismantle the VK. But before you get to the element you are looking for, you will first need to go through some preparatory steps. Namely, tighten the fasteners, and then remove the air filter and carburetor if the first stage does not help.
Stage of work
Your actions
Often, loose manifold fastenings caused the entry of contaminants, which disrupted the performance of the exhaust system. If the tightening did not give any result, then the gasket is definitely burned out or the collector itself is damaged, which is less likely
Removing the air filter
Removing the carburetor is carried out in the following sequence:
Dismantling the unit
Tuning
Those who want to change the exhaust sound to a sportier one can install a straight-through Stinger muffler. The exhaust system of the VAZ-2109 is also modified by installing a “Stinger” brand spider.
As a result, gases will freely leave the combustion chamber. But you need to understand that the exhaust sound will increase several times. Since there are no such labyrinths in a direct-flow muffler, all gases go directly into the atmosphere.
The car will sound sporty, but there is no need to talk about a significant increase in power. A more correct solution is to install such a muffler after upgrading the engine. You can start by installing a 16-valve head, then change the intake system, mount a turbine, and so on. There is no point in installing direct flow on a simple VAZ engine. The standard exhaust system already copes with the exhaust from a simple atmospheric engine. In the case of installing a turbine on a “nine”, such modification is simply necessary.
Required tool for replacement
Before you begin the process itself, you need to decide on the necessary tools. So, what will you need: a ratchet and sockets for 17, 19; screwdrivers with flat and Phillips tips; a set of keys and the gasket itself.
Now that everything is prepared, you can start working directly. In order for the manifold to be removed without any problems and rusted bolts not to create trouble, everything must be lubricated with WD-40 before performing the operation. It is advisable to do this several times. Before performing the operation, you need to think again, weigh everything and calculate your strength.
Causes of breakdowns of the VAZ2114 exhaust pipe
Since the unit is attached directly under the bottom of the car, and our Russian roads leave little to be desired, the most common occurrence is driving into a hole (even worse if it is hidden under a puddle) with subsequent damage to both the exhaust pipe itself and the place where it connects to the muffler. The second most common reason is the vulnerability of the gasket itself. The fact is that it is constantly exposed to a strong influence of hot exhaust gases, therefore, in an aggressive environment, the destruction of the product (burnout) accelerates. “Please note that if you have diagnosed wear or damage directly on the pipe itself, you should replace not only the unit that is damaged, but also the sealing gasket. This approach will ensure the best durability and wear resistance of the entire pipe section, and the old gasket will not become a bottleneck in the entire exhaust pipe.”
Source
Preparation stages
To replace the manifold or its gasket, in any case you will have to dismantle the VK. But before you get to the element you are looking for, you will first need to go through some preparatory steps. Namely, tighten the fasteners, and then remove the air filter and carburetor if the first stage does not help.
Stage of work
Your actions
Often, loose manifold fastenings caused the entry of contaminants, which disrupted the performance of the exhaust system. If the tightening did not give any result, then the gasket is definitely burned out or the collector itself is damaged, which is less likely
Removing the air filter
Removing the carburetor is carried out in the following sequence:
All dismantling work must be carried out only on a cold engine. To make it easy to unscrew all fasteners, you can pre-treat them with WD40, several hours or even a day before the repair begins.