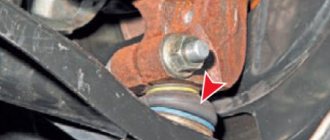
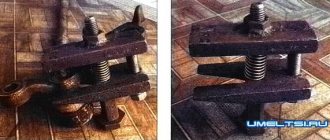
I found a topic on the forum on how to remove a ball joint without a puller, read it and forgot. The other day I had to remove the lever and decided to try it. But there was no hole, I remembered the theory but not verbatim, and the result was this. First, I describe the method posted on the forum. ——————————————————————————- You need a pit, not a lift (relevant for DIYers). 1. Remove the cotter pin nut. 2. Pour wd40 onto the nut. 3. Loosen the nut, but not completely, that is, so that it is screwed in at least 3 turns of thread. 4. Pour wd40 under the nut onto the finger. 5. Take a flat chisel, or any piece of metal 15mm thick. 6. We insert it between the lever and the steering knuckle so that it comes into contact with the ball joint boot. 7. Jack up the car. When jacking up the car, we see that the chisel begins to be tightly pinched between the fist and the lever. 8. When the wheel leaves the ground, we hear a strong click; this is the finger coming out of the fist. 9. If the wheel leaves the ground and the finger does not come out, use a small hammer to lightly hit the fist through a drift. All. forums.drom.ru/toyota-vitz-yaris … 66203.html
And how did I do without without a hole
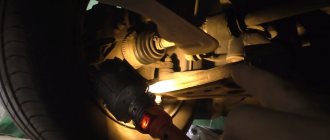
It is possible without a hole and with the wheel removed, as long as you have a hydraulic jack or any other. You need to jack up the lever itself in the ball area, then insert the same chisel between the ball and lever and lower the jack. The ball flies out for the sweet soul. If you don't have a hydraulic jack, you can probably use any other one. Since the ball flies out under the action of the shock absorber strut spring.
Quite often, car enthusiasts are interested in how to remove a ball joint without a puller. This need may arise for various reasons. Most often, the existing puller does not fit the given car model. Although the principle of mounting the support is the same, the overall design of the suspension may be different. Therefore, it turns out that the existing puller simply cannot get to the part. Also, many novice drivers do not have some equipment available. You should not go to a service station due to the lack of a puller; again, you can do without it. In addition, there should not be any negative aspects.
How to replace a ball joint on a Lada Kalina
To check the condition of the suspension ball joint, remove the wheel and measure the distance “A” between the lower arm 29 and the brake disc 9. If this distance changes by more than 0.8 mm when the suspension is rocked, replace the ball joint.
Replacing the ball joint of the suspension arm
| rice. 1 |
Apply the parking brake to the vehicle and place wheel chocks under the rear wheels. Loosen and tighten the wheel bolts only with the vehicle on the ground. The tightening torque of the bolts is 65–95 Nm (6.5–9.5 kgf m).
| rice. 2 |
1. Raise and place the front of the vehicle on supports. Remove the wheel.
2. Unscrew the ball joint nut using a 19mm wrench.
| rice. 3 |
3. Press the ball joint pin out of the lever using a puller.
| rice. 4 |
Puller for the ball joint of the suspension arm in Figure 4.
| rice. 5 |
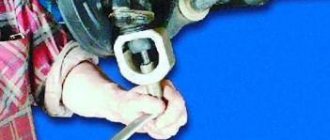
4. If there is no puller, do not unscrew the nut completely.
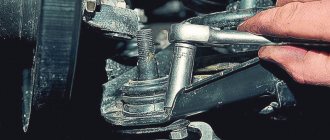
Press the lever with a pry bar and use a hammer to press the hinge pin out of the lever using a hammer along the axis of the lever. After this, finally unscrew the nut.
| rice. 6 |
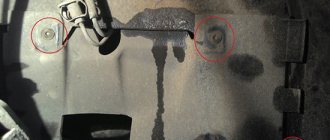
5. Unscrew the two bolts securing the ball joint to the steering knuckle using a 17mm wrench
| rice. 7 |
6. Press the lever down with a mounting tool and remove the ball joint
7. Before installation, lubricate the hinge and the internal cavity of the cover with grease.
| rice. 7 |
8. Install the ball joint in the reverse order of removal.
After lowering the car to the ground, rock it vigorously several times. Tighten with the appropriate torques: nut securing the ball joint to the lever - 80-96 Nm (8.0-9.6 kgf m), nut securing the ball joint to the steering knuckle - 50-63 Nm (5.0-6.3 kgf m). After driving 100 km, re-tighten these threaded connections to the required torques. When installing, do not damage the ball joint protective boot. Be sure to replace the damaged cover.
avtomechanic.ru
Diagnostics of the condition of ball joints
Choosing ball joints for a VAZ 2107
Diagnostics of ball joints is required if the following symptoms of malfunction appear:
- when driving, a knocking and grinding noise is clearly audible from the wheel side, which intensifies when driving over uneven road surfaces;
- the increase in speed is accompanied by the wheel rim swinging in different directions;
- turning the steering wheel is accompanied by creaking and grinding sounds;
- uneven tire wear;
- noticeable heaviness when turning the steering wheel;
- the handling of the VAZ 2107 has deteriorated;
- the car has become unstable, which is especially noticeable when overcoming uneven roads.
If the above symptoms are present, the condition of the ball joint must be checked. The easiest way to identify a faulty unit is by ear. To do this, turn off the engine of the VAZ 2107 and, standing with an assistant on both sides of the hood, rock the car. If the ball is worn out or damaged, a distinct sound will be heard from the wheel arch, which will make it easy to identify the fault.
You can more accurately check the condition of the support by the presence of play. To do this, you need to use the instructions below.
- Jack up the front wheel.
- Depress the brake pedal all the way and hold it there until the test is completed.
- Rock the wheel forcefully in a vertical plane. Movements should be made initially up and down, and then left and right. The presence of minimal play indicates that the ball needs to be replaced.
Detection of ball joint play
The latest VAZ 2107 models have special inspection holes. Through them it is easy to check the wear of the ball pin without the need to disassemble the unit.
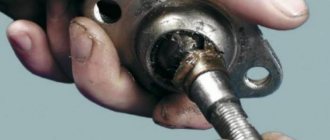
An indirect sign of ball failure is the rupture of the boot. The performance of the support directly depends on the quality and quantity of lubricant. If there is damage to the cuff, moisture and abrasive debris get underneath it. Therefore, if cracks, tears or other holes are found on the boot, it is recommended to replace the unit with a new one.
Damaged ball joint boot
Is it possible to restore the support?
This element has 2 types of faults. Most often you may encounter the depletion of lubricant in the housing. With this development of events, restoring the ball joint to working condition is easy. Using a special syringe, the amount of lubricant in the housing is updated. Experienced craftsmen prefer graphite lubricant, but you can use another type of it, preferably with similar values. I advise you to read the article - how to lubricate a ball lubricant.
If the performance of the ball was restored using the above method, it is worth considering that it will not be possible to extend it for a long time. In cases where there is a high degree of wear, adding lubricant will not change the situation. A replacement part will be required.
The condition of most domestic roads means that car suspensions cannot last for a long time, as a result of which regular and frequent replacement of its elements is required. As for the ball joint, removing it without a puller is not a big problem. This process requires a minimal set of auxiliary tools. At the same time, the absence of a professional tool will not have a negative impact on the parts of the mechanism.
How to remove a ball joint with your own hands without a puller?
3 mistakes that cause ball joints to quickly die
If you have a normal tool, free time and a desire to tinker with the car, then what is the point of going to a service station? The money you have to leave there can be spent on more enjoyable activities. Moreover, you can work if the ball joint has been giving signals for a long time that it is time to send it to rest - it is knocking in the pits. Very soon it will become difficult to turn the steering wheel, and then it will get worse; tires with uneven wear will have to be replaced.
How to remove a ball if there is no puller
There is no need to look for an overpass, inspection hole, or lift. It is enough to settle down on a small asphalt area. Prepare the tool:
- a couple of jacks;
- a pair of wheel chocks;
- a set of spanners and open-end wrenches;
- crowbar;
- hammer.
Sequencing
place the car on the platform; there should be stops under the rear wheels to prevent the car from rolling; Place even wooden blocks or bricks under the jack; loosen the nuts on the wheels; lift the body until the wheels slightly lift off the asphalt; completely unscrew the wheel nuts
Be careful, because the car is now standing only on relatively unstable jacks and may fall if too much force is used; remove the wheel and place it under the beam for complete safety; open your toolbox, take a suitable key and remove the caliper, to which the protective casing can be screwed with a small bolt; if replacing the pads is not planned, then move the caliper on the hose to the side and tie it to the frame; unscrew the tie rod mounting nut 3 turns; insert a crowbar so that one end of the lever rests on any metal part, and the lever itself is on the tip rod. With one hand, press the lever to press out the tie rod cone, and with the other hand, tap the knuckle in the hub with a hammer to release the tie rod; unscrew the fastening nut and move the rod to the side; unscrew the stabilizer link; Use a crowbar or jack to release the tension between the stabilizer and the strut and remove the ball strut; remove the shock absorber by unscrewing the upper nuts and the bolt at the bottom; loosen the upper support nut; insert the crowbar in the same way as when removing the steering rod, but very carefully so that the chassis boots are not damaged; tap the hub with a hammer at the point where the hinge is attached to the turning shoe; completely unscrew the ball joint nut; Unscrew all the upper arm mounting bolts; remove the ball joint and begin dismantling the lower one; loosen the fastening nut; remove the protective cover from the hub; remove the locking ring and the adjusting washer; Place a jack under the lower arm, lift it until it stops with the upper arm
At the same time, slightly turn the hub towards the bumper; continue to lift the hub, straining its connection with the ball; tapping on the hub, squeeze out the ball joint, unscrewing the nut completely; remove the ball and try not to lose the washer that was between the bearing and the grenade. Cover the hole with a clean rag; After unscrewing the mounting bolts, remove the ball from the lower arm.
Replacing a ball joint on a Lada Kalina
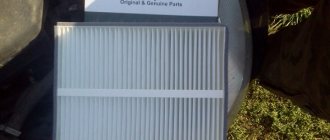
How to replace the cabin filter on a Kia Rio correctly?
The instructions for carrying out work on the first generation Lada Kalina and the “two” are no different. This does not depend on the modification, for example, sedan, station wagon or hatchback (cross). You can do everything yourself. To do this you will need the following set of tools:
- wrenches or socket heads 17 and 19;
- TORX E12 head;
- special puller for ball joints.
You may also need a torque wrench to ensure optimal tightening of nuts and bolts, a pry bar, and a hammer to knock out the pin. As for the TORX E12 key, it can become useful when working with a ball joint on Kalina 2, where this fastener is used for fastening to the steering knuckle, and not a 17 bolt, as on Kalina 1st generation.
Rules for removing the ball joint
Before starting work, you should raise the parking brake lever all the way and use the jack to hang the desired wheel. The further process is as follows.
- Using a socket or a 19 mm wrench, unscrew the fastening nut, thanks to which the ball end is mounted on the wishbone.
- Use a special puller to remove the conical pin from its seat in the body.
- Using a 17 wrench (on Kalina 2, a TORX wrench), unscrew the fastening bolts that secure the ball to the hub knuckle.
- Using a pry bar, lower the lever lower. This will give you access to remove the ball joint.
To make the task easier, you can pre-treat the bolts and nuts with VD 40 or any similar liquid. This is true in some cases, but usually there are no problems with unscrewing nuts and bolts. If there is no puller for ball joints, you can remove the pin in another way:
- loosen the nut and leave it on the tip;
- Use a mounting spatula to press the lever from top to bottom;
- Use a hammer to knock the pin out of the body, thereby pressing it out of the seat.
If desired, the ball can be visually inspected and tested for compliance. To do this, the assembly is clamped in a vice. And with movements in different directions, the axial and other play of the finger in the socket is checked. The play should not exceed 0.7 mm; if there are large deviations in this indicator, the unit should be replaced; the ball joint cannot be repaired. If it is in order, but the rubber boot is damaged, you can only get by by replacing it. To do this, the support is dismantled and the boot is removed from it; before installing the cover, it should be filled with a suitable lubricant and fixed to the support.
Installing a new ball
Lubrication in the case will also be required for the other support; without lubricants, the unit will not last long. Installation is carried out in the reverse order of removal. To do this, you can use one of two methods.
- Install the support on the steering knuckle, then fix the lever and secure the nut to the tip.
- Install the assembly on the lever and only then bring them to the steering knuckle, then secure the structure with bolts.
In the case of using the second method, it should be borne in mind that there are some inconveniences due to difficulties in bringing the lever to the fist, therefore, if possible, it is better to prefer the first method. It is recommended to use a torque wrench to properly tighten the mounting nuts and bolts. Having installed a new support, you can operate the car as before. However, after an approximate mileage of about 100 km, it is imperative to check the tightening of all bolts and nuts. Then you can drive without any additional actions.
In general, replacing a ball joint on a Kalina can be done with your own hands, even by beginners. Contacting a car service is possible to save time, especially since it is inexpensive: usually no more than 250 rubles per side, not counting the cost of the unit.
We recommend reading:
- Replacing the pump on a Kalina car
- Rear wheel bearing on Lada Kalina: we change it ourselves
- Oil pressure sensor Lada Kalina
- Do-it-yourself stove on Kalina: replacing the radiator and fan
- The cigarette lighter does not work on the Lada Kalina
- Purpose and procedure for replacing the central unit of body electronics Kalina 2
Removing the ball
So, you are convinced that the support has come to an end, and now you should change it. By the way, this is done not only in the event of a malfunction of this structural element. When repairing the hub, you will also have to remove the ball joint, otherwise it will not be possible to dismantle the steering knuckle. Before starting work, you need to treat the nut with penetrating lubricant. This will make disassembly much easier. We prepare the car. They put it on the handbrake and install wheel chocks. The car is jacked up and measures are taken to prevent it from falling. Remove the wheel.
To remove the ball without a puller, you will need a wrench, a pry bar and a hammer. This work is done in the following order:
- Loosen the nut securing the support pin. It should be unscrewed to the top edge of the finger. Some models have additional screws that secure the ball joint housing. If there are any, then you need to unscrew them;
- Having thus prepared the support, we proceed to remove it. To do this, we slip a pry bar under the lever and begin to push it slightly (up or down, depending on the location of the support). At the same time, we apply strong blows to the finger. That's what the nut was left for. Usually a few hits are enough.
You can use this method without fear for the remaining elements of the suspension. Even if vibrations occur, they are damped by silent blocks. This method is completely universal; it can be used on all car models with ball joints.
What is the danger of malfunctioning ball joints?
The most harmless consequence is a problem with worn tires. Management also becomes much more complicated. If you do not pay attention to the problem, then there is a considerable risk that the support will simply be torn out while moving. It's good if this happens when stopping or driving at low speed. In the event of such a breakdown while driving on the highway, you cannot avoid a serious accident.
Classic ball design
A standard ball joint design requires the following main components:
- metal case;
- pin with ball head;
- compression spring;
- corrugated rubberized boot.
A sufficient amount of lubricant was packed inside at the factory. High-quality lubricant was enough for a long run. At each maintenance, mechanics must check the safety of the boot and the quality/volume of the lubricant, and if necessary, use a lubricant to repress the required amount. In later models, some metal products were replaced with plastic analogues. Also, there are no springs inside anymore (they got rid of them as unnecessary). The spherical head of the finger is now rolled in a hemisphere of liners. In modern models, the latter are no longer made of plastic, but of more durable and durable nylon. Manufacturers began to produce two types of ball bearings, so there are maintenance-free and maintenance-free bearings. Most new machines have a second type of assembly. There is no possibility of disassembly and there is a built-in oiler for adding lubricant. Sometimes there are intermediate types that relate to non-separable design options, but have an oiler.
Diagnostics
How to remove a ball joint without a puller? This question is asked by people who are faced with replacing a ball joint. Especially in cases of unexpected breakdown. To prevent this from becoming an unpleasant surprise for you, you need to know how to correctly diagnose a breakdown. The first sign of a malfunction is a knocking sound in the suspension when driving over uneven roads. But here you need to take into account that in extreme cold the lubricant can freeze. In this case, knocking noises may be observed when starting to move.
Don't panic, this is completely normal. Also, with severe wear, the car may wander along the road, and increased tire wear is observed.
Do not forget that it is not only ball joints that can knock in the suspension. Therefore, be sure to carefully inspect the suspension. The easiest way to diagnose is to check the play. To do this, you need to jack up the car. After that, they try to shake the wheel; if there is play, the ball must be replaced. At the same time, we determine which support has failed. This is true for machines with two supports on each side. In some models, it is possible to measure the level of wear of the hinge through a hole in the lower part of the support.
Restoration of support
There are 2 malfunctions of this design element. Most often, the lubricant present in the housing is used up. In this case, you can easily restore the functionality of the ball joint. For this, a special syringe is used, with its help a new portion of lubricant is added to the body.
Graphite lubricant is best suited for this, but you can use another one with similar performance. But, do not forget that the service life of the restored part is somewhat shorter. If there is a lot of wear, then this method will not help. The part will have to be replaced.
Conclusion
. Domestic roads are not conducive to long suspension life. Therefore, the chassis has to be repaired quite often. Because of this, the question often arises of how to remove a ball joint without a puller. It's actually quite simple. This doesn't require a lot of effort. The tools used are a pry bar and a hammer. Removing the ball without a special tool does not negatively affect the suspension.
- Removing the ball joint without a puller - is this possible?
- What is a ball joint?
- How to remove a ball joint without a puller?
- The process of removing a ball joint without a puller
An important part of any car is the suspension. You need to constantly monitor its condition, since failure of even a small part will become a huge nuisance. One of these seemingly insignificant parts is the ball joint. It, like all machine parts, sometimes needs to be replaced, and in order to install a new mechanism, you need to remove the old one. Let's consider the issue of removing the ball joint using improvised means, that is, without using a special puller.
What is a ball joint?
The ball joint is a vehicle suspension element that provides a rigid and reliable fastening, while maintaining limited mobility of the arms relative to the wheel hub. When you are driving a car, the front wheels have two functions: to ensure that the car moves along the road, and also to provide the ability to maneuver - turning left and right. To maneuver and move correctly, the wheels must be positioned correctly relative to the road , that is, they must stand level, roll freely back and forth, be freely controlled by the steering wheel, and also be firmly attached to the axle. To meet these requirements, a suspension was developed in which ball joints play a very important role. They connect the suspension arms and the steering wheel hub.
replacing balls on a grant.
| Replacing the ball joint for a Lada Granta |
| Hi all. In this issue I showed how to replace a ball joint on a Lada Granta car. Principle… |
| Tags: |
| replacing a VAZ ball joint and how to determine wear |
| The Auto_Repair channel will help you troubleshoot your car with your own hands... |
| Tags: |
| Uncle Mitya is repairing his Grant (replacing ball joints and spark plugs) |
| I show in detail how to change ball joints and spark plugs. What tool is needed for this. Partner... |
| Tags: |
| Elimination of KNOCKING IN THE SUSPENSION. Replacement of the ball joint LADA GRANTA |
| The cause of the knocking turned out to be ball joints, after replacing them the knocking disappeared - the car began to drive like... |
| Tags: |
| Replacing a ball joint on a VAZ 2110 2112, Kalina, Granta, Priora, 2108 2109, 2114 2115 |
| Video instructions for replacing ball joints on VAZ 2110-2112, Kalina and Granta, Priora and other front-wheel drive... |
| Tags: |
| Replacement of ball joints, stabilizer struts, brace bracket for Lada Granta, Priora, Kalina |
| In this video you will learn how to replace ball joints, extension joints, arm joints... |
| Tags: |
| Replacing balls without a puller is very simple. |
| FOR A NEW CAMERA sber-42768310242 04148. |
| Tags: |
| Replace ball joint without puller |
| Replacing a ball joint without using a special puller, suitable for many cars with a similar design... |
| Tags: |
| Replacement of ball joint 2108-21099 |
| Replacing a ball joint is easy. Subscribe to the channel! |
| Tags: |
| replacing the joints of the “daisy” extension without removing, grant, viburnum, vaz 2108 – 2115 |
| The Auto_Repair channel will help you troubleshoot your car with your own hands... |
| Tags: |
| Lada Granta automatic transmission. Replacement of ball joints. |
| Cursing and insulting me - BAN! |
| Tags: |
| Diagnostics of a ball joint: an example of a working lever. |
| In one of the recent videos I showed a diagnostic tool for a ball joint (if anything:) Immediately... |
| Tags: |
| Checking the car suspension, do-it-yourself diagnostics |
| An excellent scanner for diagnostics of any AUTO Simple diagnostics of wheel bearings, steering… |
| Tags: |
| Replacement of daisies and silent blocks of VAZ 2110 |
| In this video we explain in detail how to inspect the suspension and identify faults that need repair... |
| Tags: |
| AUTOCOMMITTET: How to check the suspension yourself (vk.com/avtokomitet) |
| Replacing the stabilizer bar, ball joint, pressing in the silent block of the lever using the example of a Chevrolet Aveo T300. |
| Tags: |
| Eliminating knocks and squeaks in the chassis |
| CashBack service LETYSHOPS buy at a discount Thank the authors... |
| Tags: |
| Homemade (DIY) ball joint and steering rod remover |
| Hello, in this video I will show you how to make a beautiful, effective puller for steering wheel end pieces, made... |
| Tags: |
| MAKE YOURSELF SUCH A REMOVER |
| Don’t save money on your cars by installing spare parts of questionable quality on them from a similar company... |
| Tags: |
| Never install this on your car! Ball joint from HOFER |
| Replacement of DATSUN ball joints. ——————– ——————– ——————– ——————– ——— Community: ... |
| Tags: |
| Replacing DATSUN ball joints |
| rusty auto repair Replacing the ball joint takes about 30 minutes, but something went wrong…. |
| Tags: |
| Replacement of the ball joint of a vase!!! Super class!!! |
| In my opinion, a very good puller for balls and ov ends.... |
| Tags: |
| Replacement of ball joints on the rogue Grant. |
| We clean the socket from dirt and corrosion products and generously moisten it and the new silent bl... |
| Tags: |
| How to remove a ball or tip. Good puller. |
| Replacing the BALL JOINT FOR VAZ 2108, 2115, 2109, 2110, 2114, Kalina, Granta, Priora Bolt securing the ball joint... |
| Tags: |
| Replacing silent blocks “daisies” or extension joints on a VAZ 2115,2114,2113,2199,2109,2108 |
| The principle of replacing ball joints on a VAZ classic is explained and the method of replacing a ball joint on a VAZ 2109 is shown. Conta… |
| Tags: |
| REPLACEMENT OF BALL JOINT FOR VAZ 2108, 2115, 2109, 2110, 2114, Kalina, Granta, Priora” rel=”spf-prefetch |
| Description missing |
| Tags: |
| How to Replace VAZ Ball Joints - simple option” rel=”spf-prefetch |
Which manufacturer of hinges is recommended to be installed on Lanos?
It is recommended to install original spare parts from GM on Lanos. The ball joint has the GM serial number 94788122, and its cost is about 1 thousand rubles. The parts are made from alloyed high-carbon steel, which is why they have such a long service life.
You can also install non-original spare parts on Lanos. They are produced by the following manufacturers:
- Daewoo - have article numbers 96535089 and 94788122. The cost of the part is about 1000 rubles, and it is completely identical to original spare parts from GM.
- CTR - cost from 900 rubles.
- SWAG - cost of SHO from 700 rubles.
- CIDEM - the cost is from 800 rubles.
- Ball Joint - price about 800 rubles.
These parts are fully suitable for Lanos, Sens and Chance cars. However, it is recommended to use original spare parts, since in addition to their full compatibility, they have a long service life of over 100 thousand km.
The ball joint is a key suspension element that must always be in good working order. The part must be regularly checked for serviceability, and at the first signs of wear, it must be replaced immediately. How to replace the ball joint on Lanos, Sense and Chance is described in detail in the material.
Diagnostics
How to remove a ball joint without a puller? This question is asked by people who are faced with replacing a ball joint. Especially in cases of unexpected breakdown. To prevent this from becoming an unpleasant surprise for you, you need to know how to correctly diagnose a breakdown. The first sign of a malfunction is a knocking sound in the suspension when driving over uneven roads. But here you need to take into account that in extreme cold the lubricant can freeze. In this case, knocking noises may be observed when starting to move.
Don't panic, this is completely normal. Also, with severe wear, the car may wander along the road, and increased tire wear is observed.
Do not forget that it is not only ball joints that can knock in the suspension. Therefore, be sure to carefully inspect the suspension. The easiest way to diagnose is to check the play. To do this, you need to jack up the car. After that, they try to shake the wheel; if there is play, the ball must be replaced. At the same time, we determine which support has failed. This is true for machines with two supports on each side. In some models, it is possible to measure the level of wear of the hinge through a hole in the lower part of the support.
Signs and causes of malfunction
The service life of a ball joint ranges widely and ranges from 15 thousand km to 150 thousand km. It is difficult to predict when this element will fail. Most automobile manufacturers indicate the timing of replacement of ball joints in the vehicle's technical manual. In practice, the service life depends on driving style and the quality of the roads on which the car drives.
Signs of damage
There is noise coming from the suspension. If you hear noise from the suspension when overcoming speed bumps or when driving on a bumpy road at speeds up to 30 km/h, it means that there is not enough lubrication in the ball joints, or the pin is knocking due to wear. In winter, such knocking is common, since at low temperatures the lubricant takes longer to heat up than in the hot season. If the knocking does not stop a few minutes after you start driving, it means you need to check the ball joint.
The wheel wobbles. If during movement the wheel behaves unstably and “wobbles”, then there is play in the support. This phenomenon is dangerous because during maneuvers the wheel can turn out and the car can fall on its side. When this symptom appears, you need to replace the support as quickly as possible.
Uneven tire wear. A bad ball joint may be indicated by uneven tire wear on the front and rear axles. It is worth taking a close look at the tires of your car. If they are worn unevenly, diagnose the ball joints.
Also, a squeaking sound when turning the steering wheel may indicate a malfunction of the ball joints.
Causes of breakdowns
The main reason for ball joint failure is its mechanical damage. The following factors can speed up this process.
Stitching the finger. One of the reasons for support failure is pin grinding due to increased clearance. As a result, the element becomes loose and when driving on an uneven road, the finger may jump out of its socket.
Lack of lubrication. Another reason for ball joint failure may be partial or complete depletion of lubricant. Car owners are recommended to regularly carry out preventive maintenance and external inspection of the support and renew the lubricant layer.
Anther rupture. Anthers are made of rubber, which quickly wears out and becomes unusable at abnormal temperatures (heat, cold). If a crack has formed on the boot, it must be urgently replaced in order to prevent moisture and small particles from entering the ball joint.
Driving on uneven roads. If the car has to be driven frequently off-road, the wear of the ball joints accelerates. This problem is especially relevant for Russia. This should be taken into account by owners of foreign cars, many of which are not designed for off-road driving.
Choosing a Renault Logan ball joint
Service technicians advise installing original spare parts on the suspension. Causes:
- For parts manufactured at the company's factories, materials are used in accordance with the technologies developed by the designers.
- provides a guarantee for all spare parts purchased in company stores, dealers and service centers.
- The service life of original spare parts is significantly longer than that of analogues.
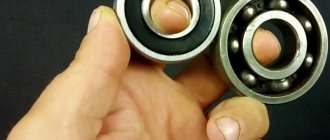
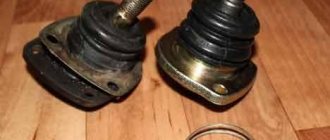
Important: since 2013, it has been using ball joints of a new type. Now they have fingers with a lateral rather than a circular groove
The “old” and “new” options can be seen in the photo.
Article numbers for different parts will also be different:
- “Old” sample - 401604793R;
- “New” – 401602523R – differs in the direction of the finger groove.
Number of recommended special tool sleeve-mandrel for installation: R10079.
Ball dimensions on Logan:
- cone size: 18 mm
- outer diameter: 38.3 mm.
If you choose an analogue, then the search must also be carried out based on the corresponding articles.
It is worth considering that ball joints using the Renault Logan repair technology should be changed along with the levers. Therefore, it is not always possible to purchase original spare parts. If you have problems finding it, it is recommended to remove the old part and look for a replacement with it.
There are two manufacturing companies that have proven themselves, both are based in Germany, but Lemforder also has production sites in Romania.
For part 401604793R you can find analogues:
- TRW JBJ721;
- Lemforder 29469 01 or 37809 01.
To replace 401602523R, similar products are produced:
- "Avtovaz" - for Lada Largus;
- "Hofer"
- "Cedar";
- "Belaz".
Analogues from China are also available, but their quality leaves much to be desired.
For what reasons does a ball joint fail?
Depending on the manufacturing quality of the part, its service life can vary from 20 to 150 thousand kilometers. The reasons for the failure of the SHO are the following factors:
- Natural wear and tear. The average service life of an original spare part is about 100,000 km. The reduction in service life is affected by temperature changes, driving patterns, as well as abrasive substances that fall on the surface of the rubber boot.
- Loads during movement. Frequent maneuvers and driving on uneven roads with numerous potholes also negatively affect the service life of the hinge.
- Depletion of lubricant - the longer the part has served, the higher the likelihood of a reduced amount of lubricant. To avoid the need to change it in the near future, it is recommended to regularly service it by adding lubricant.
Part failure accelerates with frequent exposure to temperature changes. In the cold, rubber hardens, and as the temperature increases, it becomes soft. Regular changes contribute to the formation of microcracks in the rubber boot, which cause moisture and contaminants to penetrate inside.
Procedure for replacing ball joints
Before performing work, you should put the car on the parking brake, jack it up and remove the wheel.
Dismantling the ball joint is carried out as follows:
- Using a 19mm wrench, unscrew the nut securing the support pin to the lever
- Using a puller, press the pin out of the lever.
- Using a 17 mm wrench or a TORX E12 socket, unscrew the two bolts securing the ball to the steering knuckle
- Using a pry bar, press the lever down and remove the ball joint.
The nut and bolts can be pre-treated with WD-40 or similar, but in most cases the fasteners can be removed without special preparation.
If you don’t have a ball joint remover on hand, you can proceed as follows:
- Partially unscrew the nut, leaving it on the finger;
- Use a pry bar to apply force to the lever from top to bottom;
- Press out the finger with confident hammer blows on the lever.
The ball joint can now be inspected and tested for proper performance. The support must be clamped in a vice and the finger must be checked by hand for play in the axial and radial directions. Normally, a play of up to 0.7 mm is allowed; if there is even slight movement of the finger, the entire support must be replaced. If there is no play, the support is suitable for further use.
Often, the ball joint is in normal condition, but its rubber protective cover (boot) is torn and deformed - in this case, you can install a new cover. To do this, the boot is dismantled, the hinge is cleaned of old grease, the new cover is filled to half the volume with grease, and installed on the support.
The boot of the new ball joint must also be filled with lubricant. By forgetting to do this, you dramatically reduce the life of the entire part.
The new ball joint is mounted in the reverse order. Moreover, there are two possible ways:
- First install the support on the steering knuckle, then move the lever and screw the nut onto the pin;
- First, install the support on the lever, then bring this entire structure to the steering knuckle and fasten the support with two bolts.
The second method is less convenient in that it is quite difficult to bring the support to the steering knuckle so that the mounting holes of both parts coincide, so it is better to resort to the first method.
During installation, it is recommended to use a torque wrench, the nuts securing the support to the steering knuckle are screwed with a force of 50-63 Nm, the nut on the pin is screwed with a force of 80-96 Nm.
A car with a new ball joint can be operated in normal mode; after about 100 km, it is recommended to check the fastening of the support and, if necessary, tighten the bolts and nut with the force specified above. The part does not require any further maintenance.
It's hard to find a child who doesn't like active play outside, and every child has dreamed of one thing since childhood - a bicycle. Choosing children's bicycles is a responsible task, the solution of which determines the joy and health of the child. Types, features and selection of a children's bicycle is the topic of this article.
The warm season, especially spring and summer, is the season for cycling, nature walks and family holidays. But the bike will be comfortable and bring pleasure only if it is chosen correctly. Read the article about the choice and features of buying a bicycle for adults (men and women).
Swedish Husqvarna tools are known all over the world and are a symbol of true quality and reliability. Among other things, chainsaws are also produced under this brand - read all about Husqvarna saws, their current model range, features and characteristics, as well as the issue of choice in this article.
Heaters and pre-heaters from the German company Eberspächer are world-famous devices that increase the comfort and safety of winter operation of equipment. Read the article about the products of this brand, their types and main characteristics, as well as the selection of heaters and preheaters.
Many adults do not like winter, considering it a cold, depressing time of year. However, children have a completely different opinion. For them, winter is an opportunity to roll around in the snow, ride the slides, i.e. have fun. And one of the best helpers for children in their non-boring pastime is, for example, all kinds of sleds. The range of children's sleds on the market is very extensive. Let's look at some types of them.
How to replace a ball joint on a VAZ 2108-VAZ 21099?
Note! At the beginning, if you raise the handbrake up and if you took shoes with you, then put them up to the rear wheels!
Removal: 1) First, use a jack to lift the side you need on which you will replace the ball joint, and then remove the wheel from the car. (For information on how to lift a car using a jack and remove a wheel, see the article “Replacing a wheel on a VAZ”)
2) Next, completely unscrew the lower nut that secures the ball joint to the lever.
3) Then install a special puller as shown in the figure, and then use a wrench to tighten the puller bolt until the ball joint pin comes out of the lever.
4) Then remove both bolts that secure the ball joint to the steering knuckle.
Note! Unfortunately, the second bolt is not visible in the photo, but its approximate location is also indicated by the arrow!
5) Next, using a crowbar, press the lower arm down, and then remove the ball joint from the machine.
Installation: 1) Before proceeding with the installation of a new ball joint, check the functionality of the old and new ball joint, because it may not be functional (This applies to the new support), or it may also be fully operational (This applies to the old one). support), for this:
1. Grasp the ball joint pin with your hand, and then swing it in different directions, thereby feeling the presence or absence of play.
Note! There should be practically no play in the finger, and if the ball joint is in working order, as a rule, you will not be able to move the finger from the force of your hand, so shake your finger and perhaps it will only have a small play of about 0.7 mm (This is normal), but if it turns out that the play exceeds 0.7 mm , then in this case replace the ball joint with a new one!
2. Another small nuance related to the ball joint, after removing the support, look at the rubber boot that is present on the support itself, if it is torn, then remove it from the support and then remove the top layer of dirty lubricant from that place on the support, and if possible, apply new grease and in this regard, you can simply buy a new rubber boot and put it on the old support and continue to use it.
Note! But if it turns out that dirt has gotten into the inside of the ball joint and thus cannot be removed, then replace the ball joint with a new one!
3. Then take into account one important detail: there should be a spacer sleeve on the support, namely on its pin, so if you have it removed, be sure to put it on, otherwise the support will not work properly.
4. Now take the rubber boot in your hands and put grease into it half its volume.
Note! Before you begin installing the rubber boot, it is recommended to apply sealant to the place on the support on which this cover will be installed!
2) Finally, install a new ball or a repaired old one, in the reverse order of removal.
Note! When you install the support, try not to damage its protective cover, and if you do, then immediately replace it with a new one. Once the ball is installed, tighten all the nuts tightly, but not all the way. After this, rock the car a couple of times and only after that tighten all the nuts! (The lower nut of the support must be tightened with a torque of 80-96 Nm "8.0-9.6 kgf-m", and the two bolts that secure the support to the lever must be tightened with a torque of -50-63 Nm "5.0-6.3 kgf-m" m")
Article number and cost of good analogues of original VAZ 2107 ball joints from third-party manufacturers
The quality of original balls differs from batch to batch. It is possible to purchase both good support and outright rubbish. Therefore, many car owners doubt which one is better to install. They often refuse to buy the original in favor of products from third-party manufacturers. The best analogues of native balls are presented in the tables below.
Table - Good analogues of ball 2101029040828
| Manufacturer | vendor code | Approximate cost, ruble |
| TRW | JBJ250 | 520-600 |
| Lemforder | 3731501 | 590-710 |
| Delphi | TC204 | 370-450 |
| Monroe | L0704 | 440-530 |
| CTR | CBFI4 | 510-630 |
Table - Recommended alternative support options 21010290419286
| Manufacturer | vendor code | Approximate cost, ruble |
| Moog | LABJ0392 | 360-420 |
| Profit | 23010098 | 260-300 |
| Denckermann | D110135 | 250-315 |
| Lemforder | 37320 | 330-425 |
| Delphi | TC203 | 395-450 |
Spherical bearing. The device, what it is needed for, repair. Just about the complex Ball joint. The device, what it is needed for, repair. Just something complicated
Diagnostics of steering ends and ball joints
AUTOCOMMITET: How to check the suspension yourself (https://vk.com/avtokomitet)
Diagnostics of supports: repair or replace?
No one can say exactly how long the ball joints on Logan last. The main signs of a faulty ball joint in a Renault Logan are knocking and creaking. If you hear unusual sounds when turning the steering wheel, you should check the suspension.
Knocking on uneven surfaces also indicates a breakdown. But if the suspension “rattles” on a bad road, then do not rush to buy a new ball joint. Be sure to check the stabilizer struts, which fail more often, but knock no less.
For a more accurate “diagnosis” it is necessary to check the absence of play in the ball joint. This is done on a lift or simply by removing the front wheel. Next, you need to place a pry bar between the steering knuckle and the chassis lever and try to unclench them.
With a properly functioning suspension, you won't be able to do this. If there is free movement, then the life of the part has been exhausted and replacement is required.
A sure sign of a quick repair is a torn protective boot on the ball joint. If dirt or water gets inside the housing, the part will not last more than 2–3 thousand kilometers.
The boot is not sold as a separate part.
Which ball joint to choose for Lada Priora
Today, a fairly large selection of balls is offered, from Chinese to conveyor and even reinforced ones. The choice is up to the buyer.
- BZAK BA08-2904192-01 from 250 rub. piece
- TRACK BJ70-107, 2108-2904192 from 300 RUR
- LADA IMAGE 2110-2904192-82 from 400 RUR
- AMT-Miass AM08-2904192 from 220 rub.
- BELMAG BM10-2904192-01 reinforced with fastening (conveyor) from 500 rub.
- VAZINTERSERVICE /OAT/ VIS08-2904185-10 sunset – from 350 rub.
- ASOMI, Tolyatti A110.2904.193 Comfort PRO from 500 rub.
The most expensive conveyor ball joints are from the BELMAG company; also in terms of price, the ball joints from ASOMI, which also produces front and rear struts, as well as support bearings, stand out.