I decided to tell everyone about a little-known method of testing the dashboard and identifying errors without an on-board computer. The method is primitive because They developed it at Auto VAZ, but still.
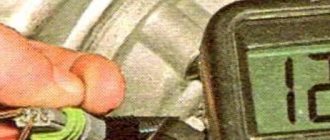
Instructions: Hold down the odometer button, turn the ignition key to the first position, release the button. The arrows start moving, press again, release, see the firmware version. And the third time they pressed, released, saw the error code (if there is one) on the video code: 8. To reset the error code, press and hold the button until the number 0 appears.
1 Microprocessor error 2 Fuel gauge sensor circuit error 4 High voltage 8 Low voltage 12 Indicator lamp diagnostic circuit faulty 13 No oxygen sensor/LAMDA probe signal 14 Coolant temperature sensor signal high 15 Coolant temperature sensor signal low 16 On-board voltage too high network 17 Low voltage on-board network 19 Incorrect crankshaft position sensor signal 21 High signal level of the throttle position sensor 22 Low level of the throttle position sensor signal 23 High level of the intake air temperature sensor signal 24 No signal from the vehicle speed sensor 25 Low level of the intake temperature sensor signal air flow 27 CO potentiometer signal high 28 CO potentiometer signal low 33 MAF sensor signal high 34 MAF sensor signal low 35 Idle speed deviation 41 Phase sensor signal incorrect 42 Electronic ignition control circuit malfunction 43 Signal incorrect knock sensor 44 Lean mixture 45 Rich mixture 49 Vacuum loss diagnostics 51 PROM error 52 RAM error 53 No CO potentiometer sensor signal 54 No octane corrector sensor signal 55 Leaning at high engine load 61 Oxygen sensor/LAMDA probe degradation
Errors persist until they are reset manually! Also mistakes add up! Those. If you have errors 8 and 14, the display will show error 22
Owning a domestically produced car of yesteryear necessarily implies carrying out independent repairs of the car’s components and assemblies. In the case of the VAZ 2114, it is quite easy to carry out repairs yourself, because The design of the machine and all its main “sores” have long been known. For young and inexperienced car enthusiasts, there are a lot of sources with detailed explanations and instructions for repairing all components of the 2114 model. Also, the injection versions of the model provide self-diagnosis of the VAZ 2114, which displays error codes present in the car. In this article we will analyze all types of errors that a car detects, and also describe the process of self-diagnosis.
Self-diagnosis of the VAZ 2114 model does not require serious knowledge in the field of electronics and mechanics, because To start it, you just need to take a couple of steps:
- Hold down the odometer button (on the dashboard under the speedometer scale);
- Without releasing the pressed button, turn the key in the ignition switch to the first position;
- Next, you will see that the self-diagnosis of the arrows on the dashboard has started. At this time, press the odometer button two more times (after the first press, the firmware version will be displayed).
- After displaying the firmware and pressing the key again, an error code will be displayed. To instantly reset it, just hold down the button for a while.
Important! It is worth clarifying that this method of automatic diagnostics is only possible on VDO dashboards. In other cases, errors are detected using special programs and scanners.
Error codes are displayed on the display, where the vehicle's daily mileage is usually located. To decipher the codes, you should familiarize yourself with the entire list of problems that are detected through checking using this method.
Despite all the primitiveness of this method of identifying problems in the operation of a machine, self-diagnosis allows you to determine the main reasons for the lightning of the “check”, and also displays errors in the on-board network. An extensive list of self-diagnosis errors for the VAZ 2114 includes the ability to display error codes in the operation of electrical systems, crankshaft sensor, air flow, during the formation of the air-fuel mixture, etc.
| Error code | Decoding |
| 1 | problems with the central processor |
| 2 | problems in the gasoline level sensor circuit |
| 4 | high voltage |
| 8 | low voltage |
| 12 | warning light circuit |
| 13 | no connection with the oxygen sensor (lambda probe) |
| 14 | high signal from the antifreeze temperature sensor |
| 15 | low signal from the antifreeze temperature sensor |
| 16 | overvoltage in the on-board network |
| 17 | low voltage in BS |
| 19 | incorrect crankshaft sensor readings |
| 21/22 | high/low TPS signal |
| 23 | incoming air sensor signal is too high (code 25 – low value) |
| 24 | there is no signal from the vehicle speed sensor; |
| 27/28 | high/low potentiometer signal |
| 33/34 | high/low signal from mass air flow sensor |
| 35 | incorrect idle speed |
| 41 | incorrect signal from the phase sensor |
| 42 | problem in the ignition system circuit |
| 43 | malfunction of the knock sensor |
| 44 | poor air-fuel mixture |
| 45 | enriched air-fuel mixture |
| 49 | – defects in the vacuum system |
| 51 | programmable read only memory error |
| 52 | RAM error |
| 53 | no signal from potentiometer |
| 54 | no signal from octane corrector |
| 55 | lean mixture under engine load |
| 61 | problems with the lambda probe (degradation) |
Note that self-diagnosis errors on the VAZ 2114 can be cumulative when displayed. For example, high voltage in the BS (4) and a problem with the control lamp (12) will be displayed on the panel as 16. After all the faults have been eliminated, notes about the problems are stored in the computer memory, so upon completion of the repair procedures you need to reset everything to 0. This is done long holding the odometer button. Summing up error codes is the main reason why it will not be possible to identify a problem with 100% confidence on a VAZ 2114. As for eliminating all the reasons that cause the listed combinations of errors, you can always contact service specialists. There are many nuances in this self-diagnosis method, so you should not base your guesses about breakdowns on the basis of the troubleshooting performed. If self-diagnosis on the VAZ 2114 is not possible due to the dashboard of another company (not VDO), then you can purchase a special OBD scanner to connect it to a laptop or mobile phone.
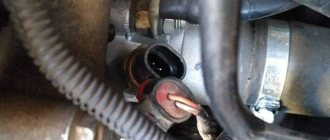
Further, if you have the software and the appropriate version of the ECU, you will have access to all possible indications and malfunctions of the machine being diagnosed. It is clear that this method is more expensive, but it allows you to see a broader picture. The location of the plug for the OBD scanner is shown in the photo below.
Car self-diagnosis
The self-diagnosis procedure is performed as follows:
- When the ignition is turned off, the odometer daily mileage reset button is pressed.
- Then the key is installed in the switch and turned. It is rotated to the first position to activate the ignition system.
- After turning the key, the mileage reset button is released. The arrows on the speedometer, tachometer, fuel and engine temperature gauge will begin to move from the minimum value to the maximum.
- The daily mileage reset button is pressed again. An inscription with the board firmware version will be displayed on the instrument cluster.
- The button is pressed again. After this, VAZ 2114 error codes will begin to be displayed on the dashboard screen.
Deciphering the VAZ 2114 self-diagnosis error codes will help you identify vehicle malfunctions and understand what actions need to be taken.
The channel “Your Own Mechanic” talked about carrying out a self-diagnosis procedure on a VAZ 2114 car.
Resetting the "Check Engine" error
- The ignition is activated, but the car engine does not start.
- The engine compartment of the car opens. Use a wrench to loosen the bolt that secures the terminal clamp to the negative terminal of the battery.
- Then you need to wait about a minute, then the battery terminal must be connected back.
- The engine compartment of the car is closed and the ignition is turned off.
- Then the power unit of the machine is started.
If the Check indicator continues to light, then you need to wait a while, it should disappear on its own. If the Check Engine light does not disappear from the dashboard, we can conclude that troubleshooting has not been performed.
User Ravil Shayakhmetov showed the procedure for independently removing the Check error from the dashboard of a VAZ car.
How can I reset errors myself?
To delete the data remaining in the memory of the control unit, a repeated self-diagnosis of all systems is performed. Once error codes are displayed, the information is recorded. Pressing the daily mileage reset button again will delete the fault data from the ECU memory.
The Glaz Szalg channel spoke in detail about resetting errors in VAZ cars.
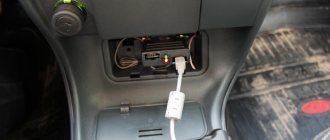
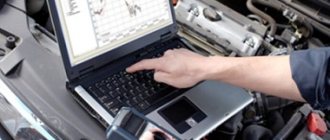
Instructions for performing diagnostics via a laptop with your own hands
For diagnostics you will need a laptop and a diagnostic adapter. The laptop can be of any power, it does not matter for diagnosis. The adapter is universal and suitable for all VAZ models (the author of the video is KV Avtoservis).
There may be a mismatch between the diagnostic pads. In this case, you can buy an adapter. A diagnostic program is supplied with the adapter, but the software can be downloaded from the Internet on specialized sites. They have the same set of functions, but may differ in unique features.
When connecting a laptop, the ignition must be turned off.
One end of the adapter is inserted into the DR, and the other directly into the USB port of the laptop. After connecting the adapter, turn on the ignition. At the next stage, we launch the program and begin diagnostic work. When the program starts, the computer connects to the electronic control unit.
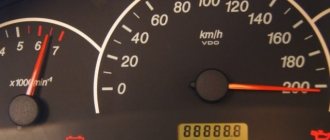
The interface will depend on the downloaded program. These can be lists with indicators or graphs with values. Based on these readings, we can draw the first conclusions about the operation of the engine and the main systems of the car.
Diagnostic Tool Interface
When a list of detected errors is displayed, their decryption can be found in the test file, which is usually attached to the program. It deciphers all the errors that may appear during malfunctions.
Having deciphered the codes of detected errors, you should begin to eliminate them. First of all, it is worth checking the sensors, since the correctness of the readings and operation of the ECU depends on their serviceability. A sensor malfunction may cause the error to appear. For more accurate diagnostics, additional checks of machine components may be necessary. After fixing all the problems, be sure to run a test to make sure everything is working without errors.
Don't forget that all data is stored in the microcontroller's memory. Therefore, before a new check, they need to be reset.
To do this, turn off the ignition and turn off the diagnostic equipment. To reset data from the microcontroller, simply disconnect the negative terminal on the battery. Then the process is repeated: the laptop is connected and diagnostics are repeated. The process is repeated until all errors are eliminated.
What are the errors that indicate a faulty phase sensor?
There are two error codes that indicate a faulty phase sensor:
- 0340;
- 0343.
Symptoms of problems will be as follows:
- the car moves jerkily, and the driving speed noticeably decreases;
- the power of the power unit decreases, in some cases the car cannot pick up speed above 60 km/h;
- the engine stalls when the gear is in neutral, for example, at traffic lights;
- the dynamics of the power unit decreases, shocks during acceleration, pops in the exhaust system;
- The ignition spark may completely disappear, as a result of which the car engine will not start.
Error code 0340
Error code 0340 indicates a faulty phase controller. The camshaft sensor needs to be checked for functionality. Sometimes error 0340 is associated with problems with the crankshaft position controller. The malfunction may be caused by the fact that the timing belt (gas distribution mechanism) has slipped by one tooth.
Error code 0343
The channel “In Sandro’s Garage” talked about troubleshooting a problem related to the operation of the camshaft sensor.
On-board computer codes and their meaning
Now let's talk about common error codes that can be identified by diagnosing the on-board computer of your VAZ 2114. It should be borne in mind that we are talking about electronics, which can also sometimes work incorrectly. But, as practice shows, in the vast majority of cases, error codes on the on-board computer correspond to real problems on the car.
BC connection diagram
It takes an incredibly long time to study each error. Therefore, in this table we have collected the most common ones that VAZ 2114 owners encounter regularly.
| Codes | Description of the problem |
| 0102, 0103 | Incorrect signal level of the mass air flow sensor. |
| 0112, 0113 | Incorrect signal from the intake air temperature sensor. It needs to be replaced |
| 0115 – 0118 | Incorrect coolant temperature sensor signal. It needs to be replaced |
| 0122, 0123 | Interference or incorrect signal from the throttle position sensor. It is recommended to replace the sensor |
| 0130, 0131 | Oxygen sensor not working |
| 0135 – 0138 | The oxygen sensor heating device does not work. Replacement required |
| 0030 | Failures in operation or a break in the control circuit of the oxygen sensor heater to the converter were detected. |
| 0201 – 0204 | An open circuit was detected in the injector control circuit. |
| 0300 | Random or persistent misfire detected. The car may not start immediately |
| 0301 – 0304 | Misfire detected in engine cylinders |
| 0325 | There was a malfunction in the detonation device circuit |
| 0327, 0328 | The knock sensor has failed. It needs to be replaced |
| 0335, 0336 | A malfunction of the crankshaft position sensor has been detected. The device needs to be replaced |
| 0342, 0343 | The phase sensor has failed. Device needs replacement |
| 0422 | The neutralizer is faulty |
| 0443 – 0445 | The canister purge valve does not work. Device replacement required |
| 0480 | The cooling fan is not working. Device replacement required |
| 0500, 0501 , 0503, 0504 | The speed sensor has failed. The device needs to be replaced |
| 0505 – 0507 | The idle air control malfunctions, which affects the number of revolutions (lower or higher). Detection of such an error indicates the need to replace the regulator. |
| 0560, 0562, 0563 | There are failures in the supply of mains voltage. A more thorough diagnosis is needed that will identify the exact areas in the circuit that need to be replaced. |
| 0607 | The detonation channel does not work |
| 1115 | Oxygen sensor heating circuit is intermittent |
| 1135 | An open circuit was noticed in the heating circuit of the oxygen sensor; a short circuit may have occurred. The sensor must be replaced |
| 1171, 1172 | Potentiometer gas level is not correct |
| 1500 | An open circuit was detected in the control circuit of the fuel pump device |
| 1509 | The electrical control circuit for the idle control element is overloaded. |
| 1513, 1514 | The on-board computer detected an open circuit in the idle speed device. |
| 1541 | There is an open circuit in the fuel pump relay control circuit |
| 1570 | Traction control system has an open circuit |
| 1600 | Traction control data is not sent to the on-board computer |
| 1602 | It is one of the most common codes when diagnosing fault codes. Indicates a loss of on-board power supply voltage on the electronic control unit |
| 1606, 1616, 1617 | A breakdown of the uneven road surface detection sensor has been detected. |
| 1612 | Electronic control unit reset fault detected |
| 1620 | Problems with the persistent storage device |
| 1621 | Failure of the random access memory device. |
| 1689 | If this combination of numbers appears during diagnostics, the on-board computer may show incorrect error codes. |
| 0337, 0338 | Errors in the functioning of the crankshaft position control element or an open circuit. |
| 0481 | The second fan of the cooling system has broken. The device requires replacement |
| 0615 – 0617 | Open or short circuit detected in starter relay circuit |
| 1141 | The heating device for the first oxygen sensor after the neutralizer has failed |
| 230 | The fuel pump relay is faulty and cannot be repaired. The device needs to be replaced soon |
| 263, 266, 269, 272 | These codes indicate a breakdown of the driver of the first, second, third or fourth injectors - the elements need to be replaced. |
| 640 | This combination indicates an open circuit in the CheckEngine lamp circuit. |
Diagnostics using special equipment
If you resort to a verification method using special equipment, you will need a computer on which diagnostic software is pre-installed.
The necessary software (programs) is downloaded from the Internet:
To connect to the diagnostic output, you will need a wire with an adapter. One end of the cable is connected to the header, and the other to the USB input on the computer or laptop.
For diagnostics, perform the following steps:
- A detailed inspection of the car is carried out. The car owner checks the availability of consumables. This can be brake fluid, engine and transmission oil, and antifreeze.
- The diagnostic output is searched for and a computer is connected to it. The ignition system in the car is first activated by turning the key in the lock to the appropriate position. The engine should not start. If there is a special scanner, then instead of a computer, this equipment is connected to the diagnostic connector.
- Then the diagnostic software is launched. Depending on the developer, the utility interface may differ. In many programs, when launched, graphs or technical parameters of the car with numbers appear.
- The car begins checking for errors; to do this, press the corresponding button in the program. At the end of testing, the utility displays error codes.
How to check engine errors and erase the error in the computer memory
To carry out engine diagnostics and read error codes, as well as to reset them, many drivers prefer to go to a service station where there is a scanner. Service station specialists, at the owner’s request, can issue a printout that will display the error codes recorded in the memory of the control unit.
In such a situation, you can buy a scanner for personal use, but its cost and the need to study the features of the software make this method impractical, especially when it comes to diagnosing only one car. Let us add that the scanner is used in parallel with a laptop or personal computer, which creates additional inconvenience.
All kinds of third-party BCs (on-board computers) also rightly belong to similar ones in terms of ease of use, cost and feasibility of purchase. The solution is capable of reading and deciphering error codes and displaying additional information about the parameters and operating modes of the internal combustion engine. At the same time, the BCs require proper connection and separate installation in the cabin.
Taking into account the above, the most popular among car enthusiasts is the so-called OBD2-BT or wi-fi adapter. The device allows you to read and decrypt error codes, and also has a number of useful additional functions. For full operation, you will need the adapter itself, as well as a smartphone or tablet PC with Android, iOS or Winphone on board. Let's take a look at this diagnostic device and look at the principle of its operation in more detail.
Among the main advantages of such adapters is that the device is a small, compact “box” that is inserted into the diagnostic socket of your car. This means that the need to connect, lay wires, place the device itself in the cabin, use a PC and perform other additional actions is completely absent.
Error code: Contacts
The adapter in the connector remains almost invisible and connects to a tablet or smartphone “over the air” thanks to bluetooth/wi-fi technology. This is especially convenient when the engine error lights up periodically. In other words, you can drive with the adapter in the connector as long as you like, and at the moment the check light comes on, immediately read the fault code.
As for the software, it may be supplied with the adapter. The necessary programs are also available in the Play Market for Android and similar solutions for devices on other operating systems. The software must be installed on a smartphone/tablet. Note that among the various available solutions, the Torque program is very popular (a free version of this application is available in the Market for Android).
https://www.youtube.com/watch?v=9TooqMkKxhE
Using the solution looks like this:
- The adapter is inserted into the vehicle's diagnostic connector;
- A smartphone/tablet with installed software is installed in the holder;
- Next, the car starts;
- Bluetooth is turned on on your smartphone or tablet;
- A program (for example, Torque) is launched on the phone/tablet;
Now you need to wait for the adapter and device to synchronize with the program, after which the parameters of the operating power unit are displayed. To determine why the check is on, you need to go to the appropriate subsection on your mobile device.
Car self-diagnosis
The self-diagnosis procedure is performed as follows:
- When the ignition is turned off, the odometer daily mileage reset button is pressed.
- Then the key is installed in the switch and turned. It is rotated to the first position to activate the ignition system.
- After turning the key, the mileage reset button is released. The arrows on the speedometer, tachometer, fuel and engine temperature gauge will begin to move from the minimum value to the maximum.
- The daily mileage reset button is pressed again. An inscription with the board firmware version will be displayed on the instrument cluster.
- The button is pressed again. After this, VAZ 2114 error codes will begin to be displayed on the dashboard screen.
Deciphering the VAZ 2114 self-diagnosis error codes will help you identify vehicle malfunctions and understand what actions need to be taken.
The channel “Your Own Mechanic” talked about carrying out a self-diagnosis procedure on a VAZ 2114 car.
Resetting the "Check Engine" error
- The ignition is activated, but the car engine does not start.
- The engine compartment of the car opens. Use a wrench to loosen the bolt that secures the terminal clamp to the negative terminal of the battery.
- Then you need to wait about a minute, then the battery terminal must be connected back.
- The engine compartment of the car is closed and the ignition is turned off.
- Then the power unit of the machine is started.
If the Check indicator continues to light, then you need to wait a while, it should disappear on its own. If the Check Engine light does not disappear from the dashboard, we can conclude that troubleshooting has not been performed.
User Ravil Shayakhmetov showed the procedure for independently removing the Check error from the dashboard of a VAZ car.
How can I reset errors myself?
To delete the data remaining in the memory of the control unit, a repeated self-diagnosis of all systems is performed. Once error codes are displayed, the information is recorded. Pressing the daily mileage reset button again will delete the fault data from the ECU memory.
The Glaz Szalg channel spoke in detail about resetting errors in VAZ cars.
What are the errors that indicate a faulty phase sensor?
There are two error codes that indicate a faulty phase sensor:
- 0340;
- 0343.
Symptoms of problems will be as follows:
- the car moves jerkily, and the driving speed noticeably decreases;
- the power of the power unit decreases, in some cases the car cannot pick up speed above 60 km/h;
- the engine stalls when the gear is in neutral, for example, at traffic lights;
- the dynamics of the power unit decreases, shocks during acceleration, pops in the exhaust system;
- The ignition spark may completely disappear, as a result of which the car engine will not start.
Error code 0340
Error code 0340 indicates a faulty phase controller. The camshaft sensor needs to be checked for functionality. Sometimes error 0340 is associated with problems with the crankshaft position controller. The malfunction may be caused by the fact that the timing belt (gas distribution mechanism) has slipped by one tooth.
Error code 0343
The channel “In Sandro’s Garage” talked about troubleshooting a problem related to the operation of the camshaft sensor.
Diagnostics using special equipment
If you resort to a verification method using special equipment, you will need a computer on which diagnostic software is pre-installed.
The necessary software (programs) is downloaded from the Internet:
To connect to the diagnostic output, you will need a wire with an adapter. One end of the cable is connected to the header, and the other to the USB input on the computer or laptop.
For diagnostics, perform the following steps:
- A detailed inspection of the car is carried out. The car owner checks the availability of consumables. This can be brake fluid, engine and transmission oil, and antifreeze.
- The diagnostic output is searched for and a computer is connected to it. The ignition system in the car is first activated by turning the key in the lock to the appropriate position. The engine should not start. If there is a special scanner, then instead of a computer, this equipment is connected to the diagnostic connector.
- Then the diagnostic software is launched. Depending on the developer, the utility interface may differ. In many programs, when launched, graphs or technical parameters of the car with numbers appear.
- The car begins checking for errors; to do this, press the corresponding button in the program. At the end of testing, the utility displays error codes.
TYPES OF CONTROL UNITS VAZ 2114
The fourteenth is a car whose production lasted for 12 years. Throughout the entire production cycle, Avto-VAZ engineers were constantly improving the main characteristics of the VAZ 2114. The changes also affected the brains of the car. The VAZ 2114 can be equipped with 8 generations of electronic units from different manufacturers.
Let's figure out how to find out which ECU is on the VAZ 2114. To do this, you need to look at the device itself - the numbers of the model number are printed on its body, rewrite these numbers and compare them with the markings given in the tables of this article.
GM-09 AND JAN-4
The first generation of brains of the fourteenth were represented by blocks GM-09 and January-4. Such devices were installed from the very beginning of production of the VAZ 2114 to 2003.
The first units had a wide range of models; the VAZ 2114 electronic controller could be distinguished by the presence of a knock sensor operating on the resonant principle and compliance with the EURO-2 standard.
Today the cost of such a device ranges from 5 to 5.5 thousand rubles.
List of ECU models GM-09 and January-4 (in the figure-table):
List of ECU models GM-09 and January-4
JANUARY 5.1.Х, ITELMA 5.1, BOSCH M1.5.4
The next generation of brains is represented by January 5.1.x devices. (a similar device was also installed on the VAZ 2113 and VAZ 2115).
On VAZ 2114 produced after 2013, 3 variants of the January 5.1.x block can be installed, the difference between which lies in the method of gasoline injection: there are devices with phased, simultaneous and pair-parallel injection.
It is worth noting that this January model line is completely identical to the Itelma 5.1 and Bosch M1.5.4 devices.
List of models January 5.1.x and Itelma 5.1 (in the figure-table):
List of models January 5.1.x and Itelma 5
List of Bosch M1.5.4 models (pictured table):
List of Bosch M1.5 models
The most common model on the VAZ 2114 produced in 2003-2007 is January 5.1.1, which can now be bought for 7-8 thousand rubles; export cars were most often equipped with Bosch 2111 1411020, which costs similar money.
JANUARY 7.2 AND BOSCH M7.9.7
Which modification of January 7.2 is installed on the fourteenth depends on the displacement of the power unit. Bosch controllers were installed, as a rule, only on export car models that were required to comply with the Euro-3 environmental standard.
For 8-valve VAZ 2114 with a volume of 1.5 liters. The following controllers were installed (in the figure-table):
List of controllers for VAZ 2114 8 valves 1
On a VAZ 2114 with an engine capacity of 1.6 liters (in the fig. table):
List of controllers for VAZ 2114 8 valves 1.6 liters
The cost of a new January 7.2 varies between 7-8 thousand, a used one is about half as much, the same ECU 2111 1411020 81 can be purchased for 3-3.5 thousand rubles..
JANUARY 7.3
This controller is the latest modification of domestically produced control units installed on the VAZ 2114. It is this that is equipped with all 8-valve cars with a 1.6-liter engine produced after 2007.
This ECU was produced by Itelma and Avtel factories; depending on the modification, it could meet the environmental standard Euro-3 or Euro-4.
Compliance of the VAZ 2114 ECU with environmental standards
The new Itelma 11183 1411020 02 standard EURO-3 now costs about 8 thousand rubles.
Video
The Garage channel, using the VAZ 2115 as an example, showed the procedure for checking a car using a computer; in the case of the 2114 model, this operation is performed identically.
After self-diagnosis of errors and elimination of their causes on a carburetor or injection engine, a malfunction message may remain on the standard panel. If the problem has been deleted, this means that the code combination remains in memory. We'll look at the description of the faults below, and now we'll tell you how to remove the code from memory. To remove it after testing the device, when VAZ 2114 errors appear, the codes themselves must be written down. After this, the daily mileage reset button is pressed again, this will clear the fault from the control unit’s memory.
Resetting the "Check Engine" error
The "Check Engine" indicator indicates a problem with the engine.
How to reset the fault code:
- First, turn on the ignition; you do not need to start the car engine.
- Then open the hood. Use a wrench to loosen the bolt on the negative terminal of the battery.
- Wait about one minute, after which the battery terminal must be replaced.
- Close the hood and turn off the ignition.
- After that, turn it on again and start the car engine. If the check remains, it should go out on its own after some time. If the instructions given did not work and the solution did not help, then you need to look for the cause of the problem and fix it.
Autolider42.ru: online auto parts store | Topic author: Nikolay
People, tell me what could be the reason, the VAZ 2114 engine speed increases from 1500 to 1800 and when you press the gas pedal it stalls, as if it is choking. When you press the pedal to the floor, it starts to move. And it took a long time to start up.
VALERA (Rupesa) idle speed sensor change
Alexander (Charlize) Symptoms of excess air.
no (Vajrini) Try the air flow sensor first
How to make an ignition switch on a VAZ 2106
How to open the trunk of a Mercedes w220 without a battery
How Webasto works on Range Rover Vogue
How to reset an engine error on a VAZ 2114: comments
Sorry to interrupt you.
You are not right. Let's discuss this. Write to me in PM.
Diagnostics using special equipment
1. Diagnostic connector
2. Connecting a wire with an adapter to the diagnostic socket
3. Connecting the wire to the computer
4. Launching software for testing
The diagnostic process using special equipment consists of checking the car using a laptop. To connect to the diagnostic connector you will need a cable with an adapter. Using this cable, we connect the computer to the connector via USB output. For testing you will also need software; the power of the computer used is not important. There are many versions of different testing programs on the Internet.
Diagnostics is performed as follows: